
Building a FARM Stack Application — Part 2 — Creating an API
Welcome to this tutorial series about building a FARM stack application. By the end of this tutorial you will learn all the necessary steps to develop, test an deploy a FARM stack application.

On this part 2 of this tutorial series we will work on our API and start creating all the CRUD actions necessary to Create, Read, Update and Delete records from our MongoDB.
Check out part 1 at:
What are CRUD actions ?
CRUD stands for Create, Read, Update and Delete. This pattern gives us all the necessary actions to manage a particular record in a database, in our case on MongoDB.
For our API this translate to POST, GET, PUT, DELETE methods, respectively. We will created this methods on our API and interact with MongoDB to change the database records (database records for MongoDB means documents), but for now we will maintain a list in memory instead of MongoDB.
Setup GitHub for our API project
In the previous part 1 of this tutorial series we wrote a simple code for our API and React application just to show the basics of project setup and of running the development servers.
Now we will start working on our final code base, so we should add our code to a source control version system, in this case GitHub. This allows us to “save” our code in increments and return to a previous version if some code is not working as expected.
We start by creating a GitHub account (in case you don’t already have one) on https://github.com/.
After the account is created and verified, navigate to https://github.com/new to create a new repository. We create the repository for our API:
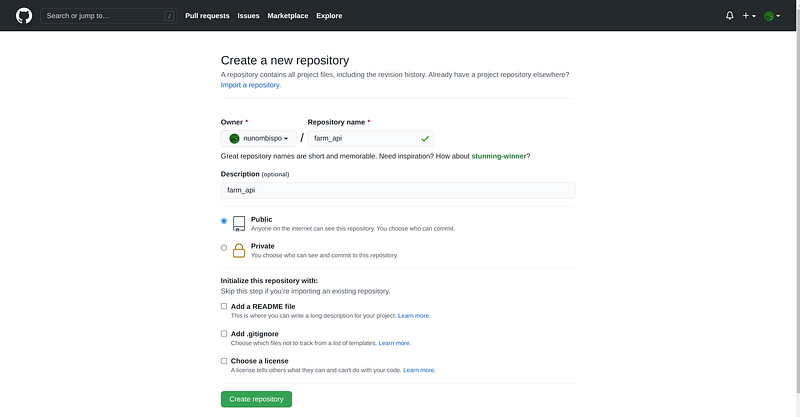
Type in a ‘Repository name’ and a optional ‘Description’ and click ‘Create repository’. Don’t worry about the other settings for now.
You should now see a screen confirming your created repository:
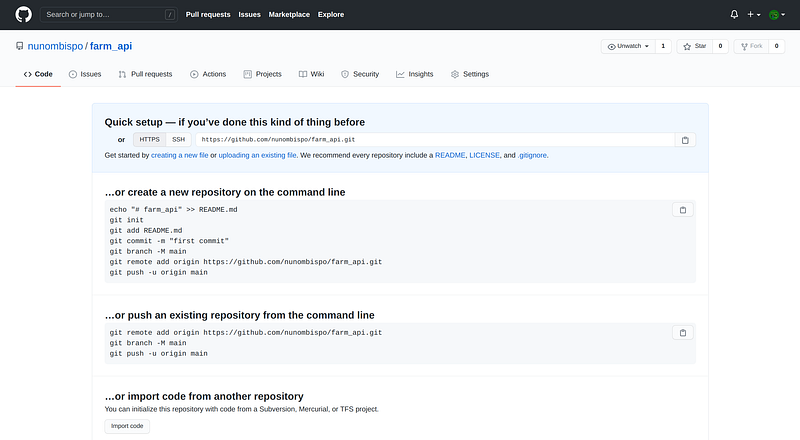
You can copy the the highlighted link, we will need it later.
Since August 13, 2021, GitHub as removed username and password authentication when accessing the repositories, so we need to create an access token.
For that we go to Settings->Developer settings->Personal access tokens and click on Generate a new token:
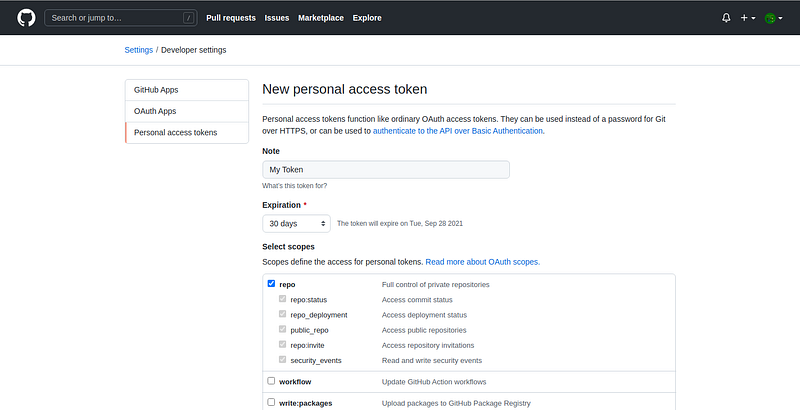
Fill in a name for the token and click on Generate new token button at the end of the page. This will generate a token for accessing the repositories.
Make sure to copy the generated token since it will not be shown again.
With the repository and access token now created, we navigate to our project folder and execute the following commands to create our local git repository and push the changes to the remote repository:
## Install Git
$ sudo apt install git## Navigate to project folder ##
$ cd ~/project/api## Initialize the local repository ##
$ git init
Initialized empty Git repository in nd /home/nunobispo/project/api/.git/## Create README file ##
$ echo "# farm_api" >> README.md## Create gitignore file to ignore temp project files ##
$ echo "/__pycache__" >> .gitignore
$ echo "/venv" >> .gitignore
$ echo ".idea/" >> .gitignore## Add files to the local repository ## $ git add .
## Before our first commit we need to set our name and email address
$ git config --global user.email "[email protected]"
$ git config --global user.name "Your Name"
## Do the first commit ##
$ git commit -m "Our First Commit"## Adding the branch ## $ git branch -M main
## Adding the remote repository ##
$ git remote add origin [https://token@your_repository_link]
## Pushing to the remote repository ##
$ git push -u origin main
Enumerating objects: 6, done.
Counting objects: 100% (6/6), done.
Delta compression using up to 4 threads
Compressing objects: 100% (4/4), done.
Writing objects: 100% (6/6), 723 bytes | 723.00 KiB/s, done.
Total 6 (delta 0), reused 0 (delta 0)
To [repository_url]
* [new branch] main -> main
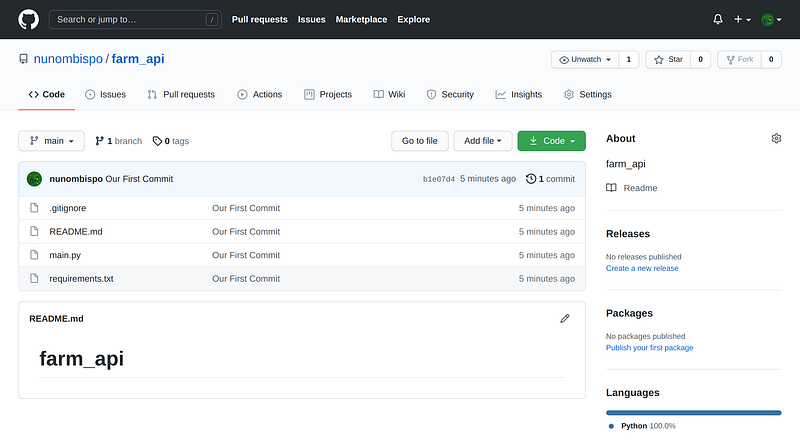
Branch 'main' set up to track remote branch 'main' from 'origin'.We can now refresh our repository page on GitHub and we should be able to see our pushed files:
Creating the API project folders
Before we start implementing our API and now that we have source code version control, let’s also organize our folders so that we can find our files faster and there are easier to understand and maintain.
## Navigate to our api project folder ##
$ cd ~/project/api/## Let's create a folder for our configurations
$ mkdir config## Let's create our (blank)__init__ file to handle the configurations
$ touch config/__init__.py## Now we created the folder for our api ##
$ mkdir api## Let's create our 2 files, for the models and for the routes ##
$ touch api/models.py
$ touch api/routers.pyOur project directory should now have a tree like this:
├── api
│ ├── models.py
│ └── routers.py
├── config
│ └── __init__.py
├── main.py
├── README.md
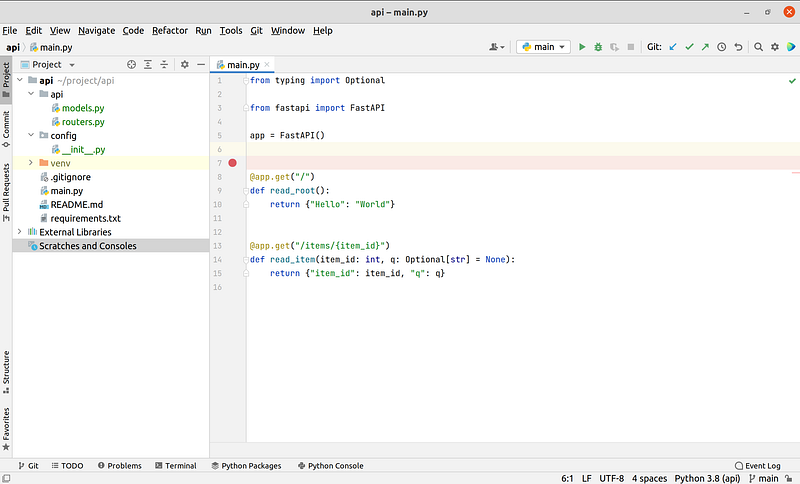
├── requirements.txtAnd checking on PyCharm IDE:
Implementing the API — Config Class
Now the have all the files that we need in the correct folder structure it’s time to start implementing our API.
The API will manage a simple list of tasks that the user can add, edit, remove and of course create new ones.
In this part 2 of the tutorial, the tasks will be stored in a list in memory, but on part 3 we will integrate with MongoDB for persistence.
We start with the config file, since this is where all the settings we need will be defined.
The settings structure is created with the use of 3 different classes:
- CommonSettings
- ServerSettings
- Settings (the main settings class)
This kind of structure helps to keep different settings for different parts of the application in it’s on classes. Each classes contains the necessary variables and values.
At the end of the file we create a settings variable (instance from the main Settings class) that we will use to reference the settings in all other files
Implementing the API — API Classes
Our API will store information about tasks for our task list application in React.
The API class is actually composed of two files, a models and a routers files.
The models file contains the model definitions for our tasks and the routers file contains the logic for the CRUD actions.
We will also change our main file later so that it uses the new router.
Let’s start with our models file:
We define our models using pydantic, which allows us to have really easy validation for data types and require/optional fields (it’s also the default data validation framework used by FastAPI).
The models definition are really simple, we define a model (TaskModel) for create a new task, and a model (TaskUpdateModel) for updating the task, since we don’t want to change the id on an update.
Let’s take a closer look to the id field on the TaskModel.
MongoDB uses _id, but in Python, underscores at the start of attributes have special meaning.
If you have an attribute on your model that starts with an underscore, pydantic will assume that it is a private variable, meaning you will not be able to assign it a value!
To get around this, we name the field id but give it an alias of _id.
We also need to set allow_population_by_field_name to True in the model's Config class.
We will not have the MongoDB integration in this part of the tutorial, but we already have our models prepared for that integration.
Now that we have our models defined we can create our routers file. This file contains the implementation for the all the CRUD actions, meaning this is the file that defines our API functionality.
Let’s examine our routers file in more detail.
We define our router (line 19) inside a function (get_api_router) so we can easily add it to our API definition in the main file later on.
After that we define our CRUD actions with the different HTTP methods:
- Line 22, a root GET that will return metadata about our API;
- Line 34, a tasks GET that will return a list of tasks;
- Line 39, a task POST to create a new task;
- Line 49, a task GET to get a task from an id;
- Line 59, a task PUT to update a task;
- Line 73, a task DELETE to delete a task from id;
On line 84 our return our router variable from the function.
Each method implementation is quite simple at the moment, simple creating, updating or deleting a task instance from the tasks list. Later on we will integrate with MongoDB persistence.
Implementing the API — main file
The last file we need to change is our main file where we actually define and create our API definition.
Let’s examine our main file in more detail:
- Line 8, we create our FastAPI app;
- Line 11, we include our API router into the FastAPI app;
- Line 14, we define a standard Python main function to run our API by setting up uvicorn.
We can now run our API from the Pycham terminal with:
$ python main.py
INFO:     Uvicorn running on http://localhost:8000 (Press CTRL+C to quit)
INFO:     Started reloader process [25128] using watchgod
INFO:     Started server process [25131]
INFO:     Waiting for application startup.
INFO:     Application startup complete.
Testing the API
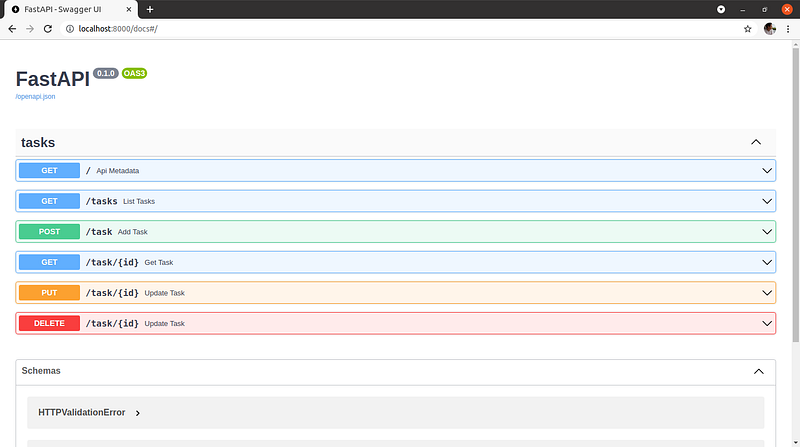
We can test out our API using the FastAPI docs by navigating to the link: http://localhost:8000/docs
You can see the following page showing all our defined API endpoints:
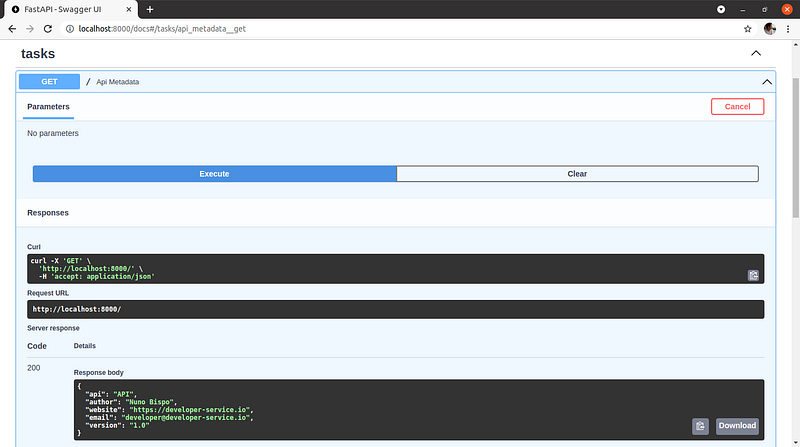
Let’s call our root endpoint (/) which will return our API metadata. We can do that by expanding the endpoint, then click ‘Try it out’ and finally clicking ‘Execute’. The response should look this:
Our API is working and returning the expected responses. Let’s now check our task API endpoints, starting by listing tasks. Expanding and try out our (/tasks) endpoint:
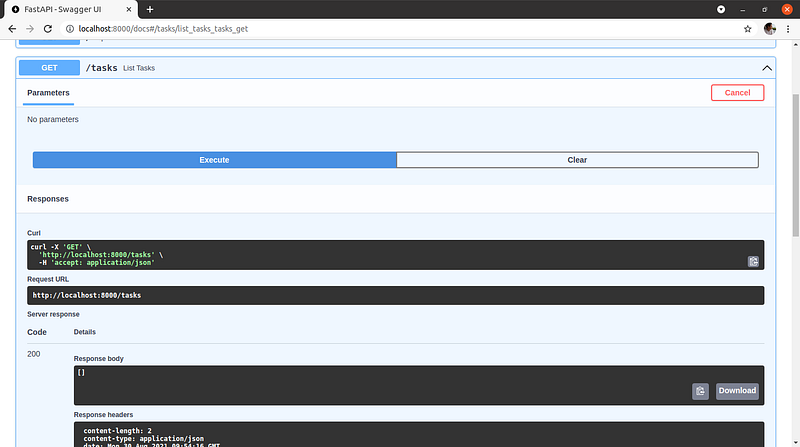
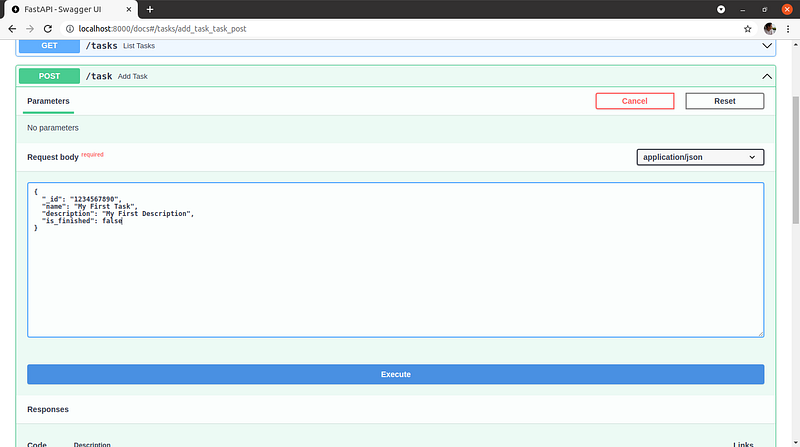
As you can see, it returns an empty list because we haven’t added any task, so let’s do that next by trying out a POST (/task) and filling in the task data:
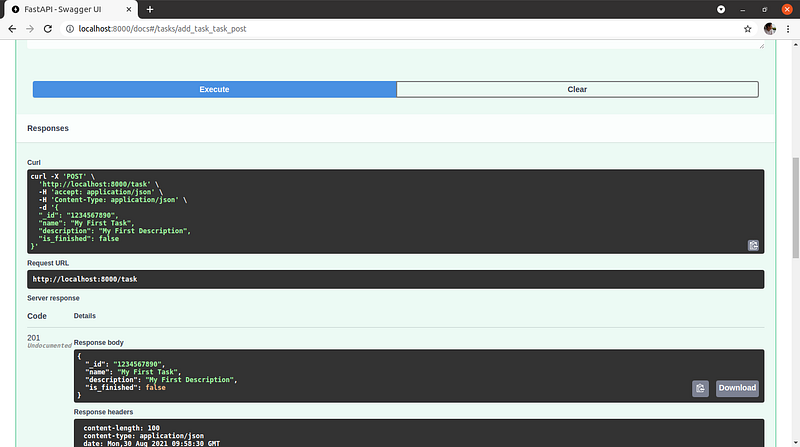
Which returns a 201 status code meaning it was created successfully:
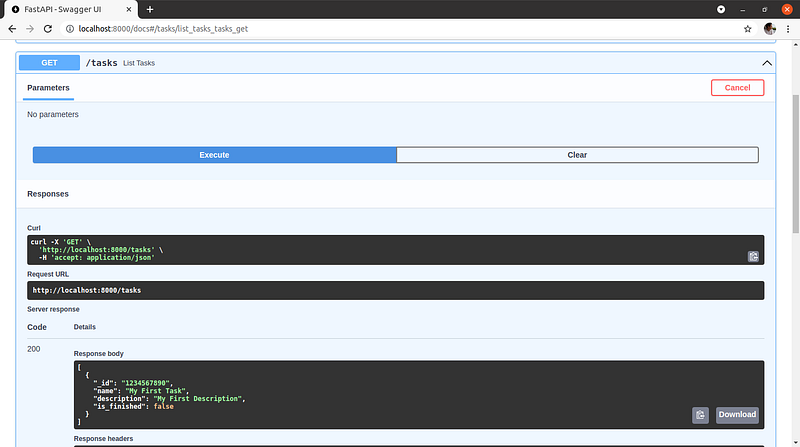
Checking again our task list endpoint (/tasks), we now see our newly added task:
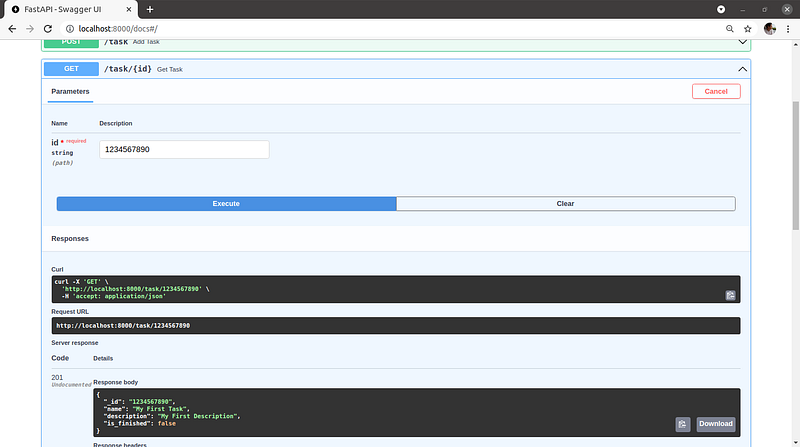
We can also get our task directly by it’s id with the endpoint (/task):
So far we have checked and tested several of our endpoints, we can add a task, list all tasks and get a task.
From the CRUD operations we have left to check the Update and Delete, so let’s test those endpoints, starting with Update.
For updating a record we need to pass a model just like for adding a task, but for the update we pass a slightly different model that we have defined in our models (TaskUpdateModel) which doesn’t contain the id that will in turn be passed in the call to the endpoint:
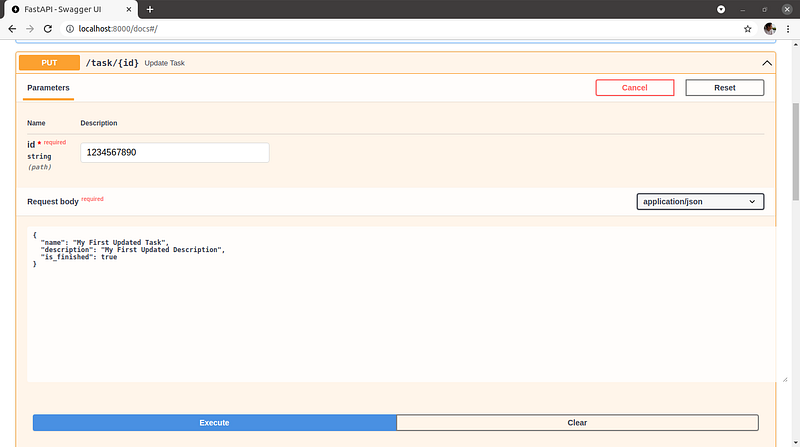
Just like the POST endpoint to create a new task, the PUT endpoint returns also a 201 status code when it updates a record successfully.
Finally the last endpoint to check is a DELETE method:

The endpoint returns a 204 status code indicating that there is no data since we just deleted that record.
Congratulations, you have just created a fully functional API with CRUD methods. And tested all endpoints to confirm that they are working correctly.
Conclusion
On this part 2 of this tutorial series we created our API CRUD methods and API configuration.
We also added our API project to GitHub for version control.
On part 3 of this tutorial series we will connect our API data to MongoDB, by creating a database in MongoDB Atlas and updating our API to read and write from that database:
Follow me on Twitter: https://twitter.com/DevAsService
Check out my website at: https://developer-service.io/
If you enjoyed reading this article and found it usefull, you can support me by signing up for a Medium membership (if you are not a member). It will only cost you $5 a month — this will give you access to all stories on Medium! (and I will receive a small commission)
Besides that, if you want to stay updated when I post a new story, you can signup for my free newsletter!


