
Build a Web App with ASP.NET Core and MongoDB
In this post, I will show how to build a web application using ASP.NET Core MVC and MongoDB. If you are not familiar with MongoDB, you may want to read my Introduction to MongoDB post first.
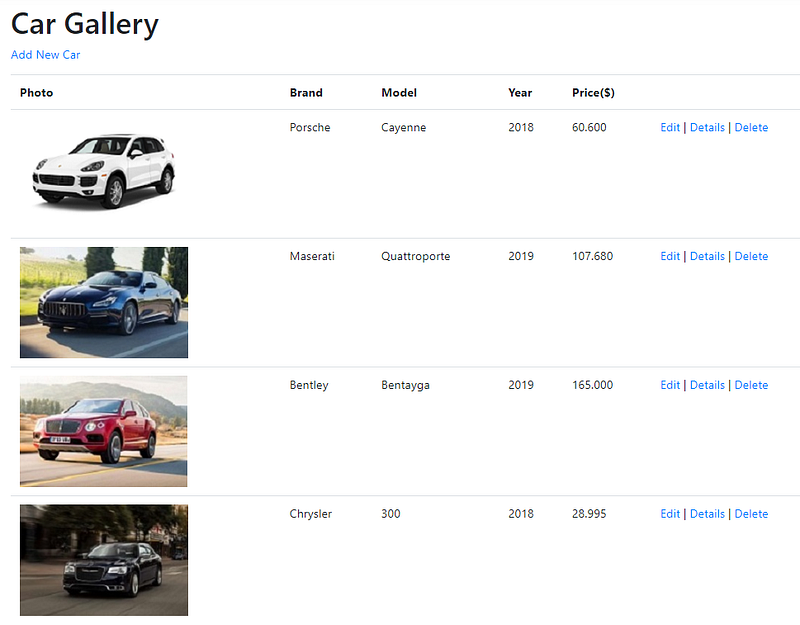
Our application will manage a database of cars in a car gallery and its main page will look like below at the end.
I will use the following tools for application development:
The sections of this post will be as follows:
- MongoDB Installation and Configuration
- Creating the ASP.NET Core MVC Project
- Adding a Model
- Adding a CRUD Services Class
- Adding a Controller
- Index Method and View
- Create Method and View
- Edit Method and View
- Details Method and View
- Delete Method and View
MongoDB Installation and Configuration
I explained these instructions in detail in the Installation and Configuration section of the post that I mentioned above.
I am using Windows 10 so I will give the instructions for Windows.
1. Go to this site and download MongoDB for your OS version.
MongoDB is installed at C:\Program Files\MongoDB by default. In the C:\Program Files\MongoDB\Server\{version_number}\bin folder there are two executables: mongod and mongo.
2. Go to Control Panel -> System -> Advanced System Settings -> Environment Variables and edit Path variable and add C:\Program Files\MongoDB\Server\{version_number}\bin to that. This change enables MongoDB access from anywhere on your machine.
3. MongoDB’s default directory for data storage is /data/db. Create these directories in your C drive.
4. Open a command prompt and run the following command.
mongod
5. Open a new command prompt and run the below command:
mongo
We will run all our mongo shell methods in this command shell.
6. Run the following command:
use CarGalleryDbThis command creates the database if it does not exist. If it exists, its connection is opened for transactions.
7. Create a Cars collection using the following command:
db.createCollection('Cars')Now, our database and collection are ready. We will perform CRUD operations on the Cars collection in the next sections.
Creating the ASP.NET Core MVC Project
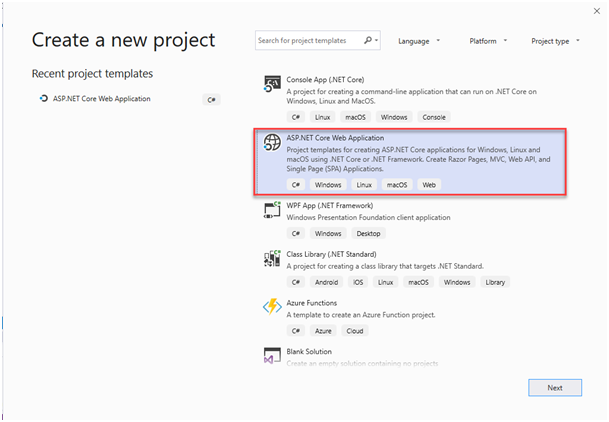
Open File -> New -> Project..
Select ASP.NET Core Web Application and click Next.
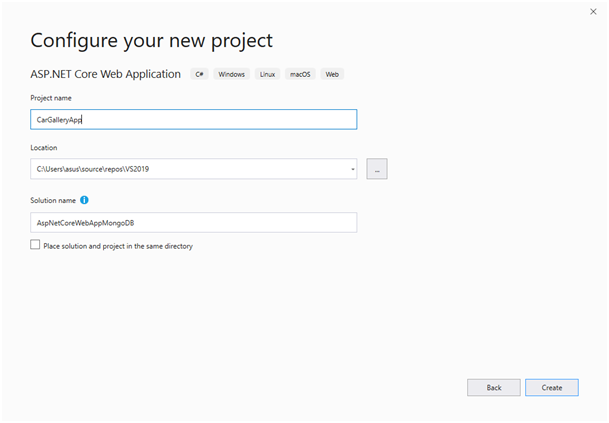
In the next window, name the project and solution and click Create.
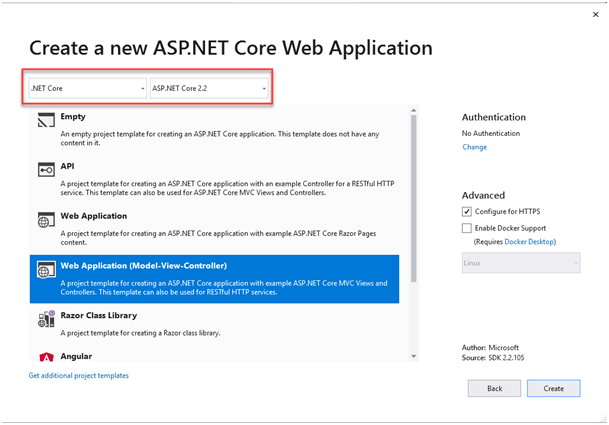
In the next window, select .Net Core and ASP.Net Core 2.2 as shown in the red box and select Web Application (Model-View-Controller) as project template and then click Create.
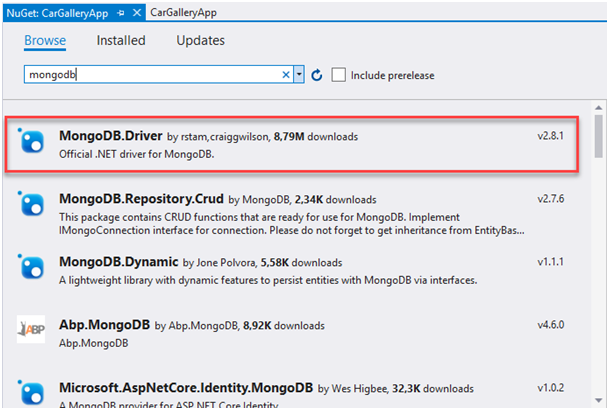
Now, we will add the MongoDB driver to our project.
Right-click on the project and select Manage Nuget Packages…
In the Browse tab, search for mongodb and install the MongoDB.Driver:
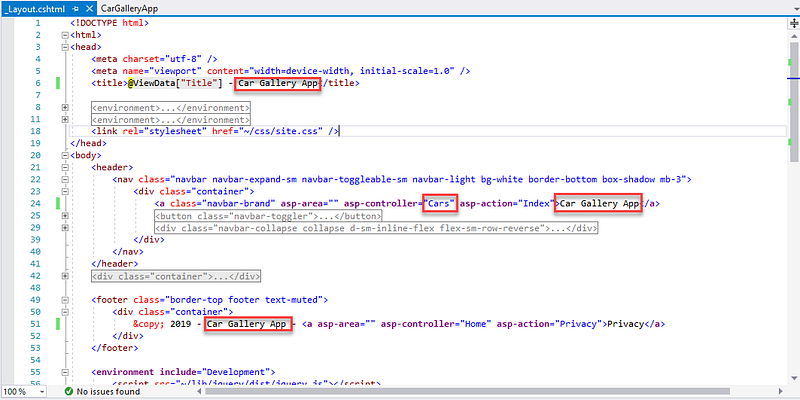
In the Views/Shared/_Layout.cshtml file, make the following changes in the title, menu link and the footer.
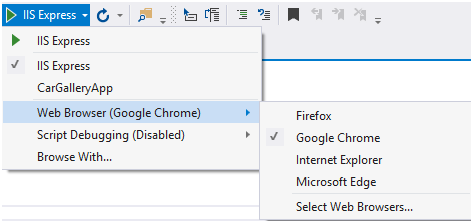
Now, let’s run our project (Ctrl + F5) and see if everything is OK.
You can change the browser that you want to run the site from below:
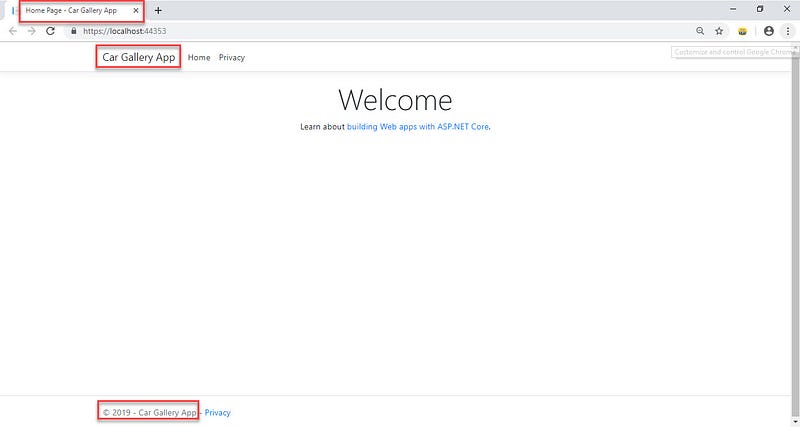
After running, we get the Welcome page as below:
Adding a Model
Now, we will implement our data model class (Model part of the MVC app).
Right-click the Models folder and select Add->Class.
Give the name Car.cs to the class and click Add.
Then add the following properties to the class:
In the preceding class, the Id property:
- is required for mapping the Common Language Runtime (CLR) object to the MongoDB collection.
- is annotated with
[BsonId]to designate this property as the document’s primary key. - is annotated with
[BsonRepresentation(BsonType.ObjectId)]to allow passing the parameter as type string instead ofObjectId. Mongo handles the conversion from string toObjectId.
Other properties in the class are annotated with the [BsonElement] attribute. The attribute’s value represents the property name in the MongoDB collection.
[YearRange] attribute is a custom attribute that allows only a valid range for the Year property. If you want to use this attribute, add CustomAttributes folder in the project as a new folder and add the following class there:
You can change the range as you want.
Adding a CRUD Services Class
In this section, we will add the CarService class which uses the MongoDB.Driver members to perform CRUD operations against the database.
First, add a Services directory to the project root.
Then, add a CarService class to this directory with the following code:
Next, add the MongoDB connection string to appsettings.json:
"ConnectionStrings": {
    "CarGalleryDb": "mongodb://localhost:27017"
  }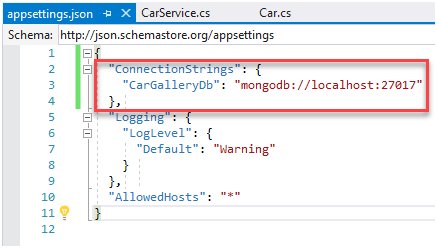
The CarGalleryDb property is accessed in the CarService class constructor.
Now, let’s examine the CarService class:
The CarService class uses the following MongoDB.Driver members to perform CRUD operations against the database:
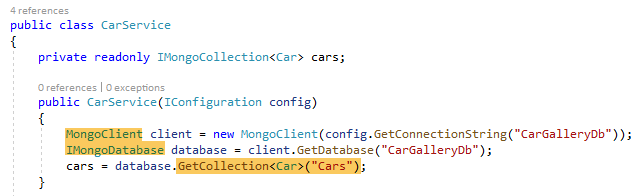
MongoClient : Reads the server instance for performing database operations. The constructor of this class is provided the MongoDB connection string.
IMongoDatabase : Represents the Mongo database for performing operations. Generic GetCollection<T>(collection) method on the interface is used to gain access to data in a specific collection. CRUD operations can be performed against the collection after this method is called. In the GetCollection<T>(collection) method call:
collectionrepresents the collection name in the database.Trepresents the CLR object type stored in the collection.
GetCollection<T>(collection) returns a MongoCollection object representing the collection. The following methods are invoked on the collection:
Find<T>: Returns all documents in the collection matching the provided search criteria.InsertOne: Inserts the provided object as a new document in the collection.ReplaceOne: Replaces the single document matching the provided search criteria with the provided object.DeleteOne: Deletes a single document matching the provided search criteria.

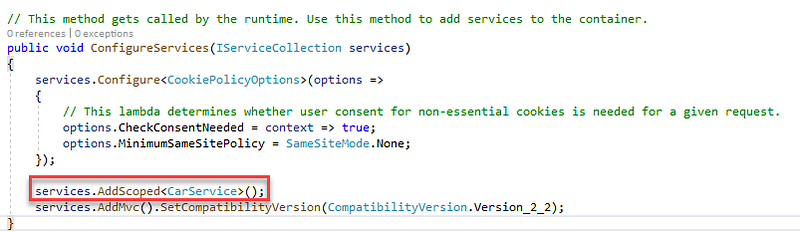
Registering the CarService with the Dependency Injection System
ASP.NET Core is built with Dependency Injection (DI). Services are registered with DI during application startup. Components that require these services are provided with these services via constructor parameters.
Now, we will register the CarService class with the Dependency Injection system.
Add the following code shown in the red box to the ConfigureServices method of Startup.cs:
Now, let’s build the solution to check if everything is OK.
Adding a Controller
In this section, we will implement our controller (Controller part of the MVC app).
Right-click on the Controllers folder and select Add Controller…
In the Add Scaffold dialog, select MVC Controller with read/write actions :
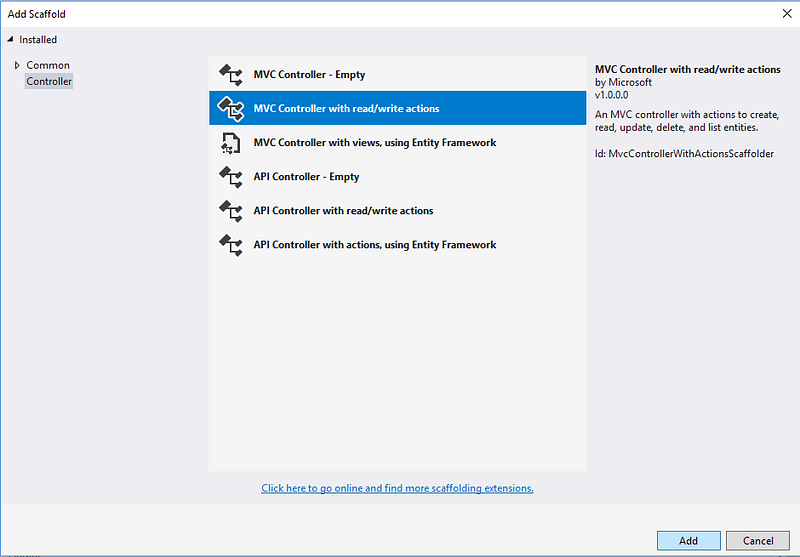
Give CarsController as the name and then click Add.
Add the following highlighted code to the CarsController.cs:
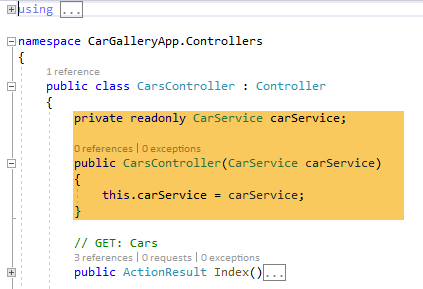
In the next sections, we will implement controller methods and the views associated with them.
Index Method and View
Change the Index method in CarsController.cs as follows:
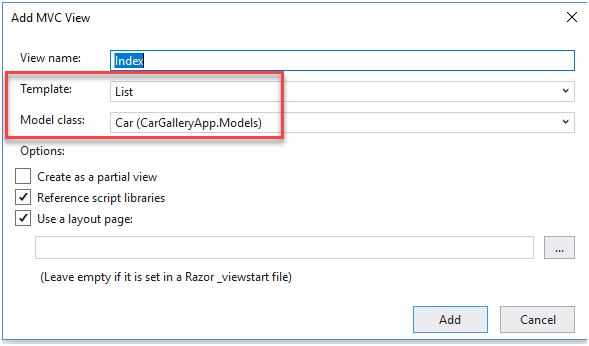
Then, right-click on the Index method and select Add View…
Select the template and model class as shown below and click Add.
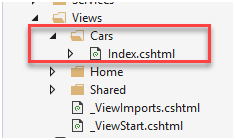
Cars folder and Index.cshtml are created in the Views folder after this operation:
Open the Index.cshml and make the following changes:
- Remove the Id fields
- Change the title Index to Car Gallery
- Change Create New to Add New Car
- Move the ImageUrl field to the up and change it to:
@if (item.ImageUrl != null){ <img src="@Url.Content(item.ImageUrl)" alt="Image" />}
- Update the action links at the bottom as below:
<td> @Html.ActionLink(“Edit”, “Edit”, new { id=item.Id }) | @Html.ActionLink(“Details”, “Details”, new { id=item.Id }) | @Html.ActionLink(“Delete”, “Delete”, new { id=item.Id })</td>Index.cshtml should be as follows at the end:
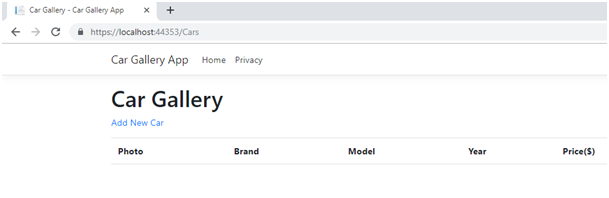
Run the application and click Car Gallery App in the Home page. You should get the following result:
Create Method and View
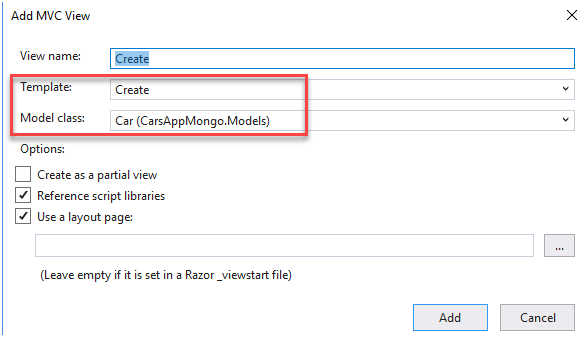
Right-click on the Create method in the CarsController and select Add View…
Then, select the template and model class as shown below in the red box and click Add.
Go to the Create.cshtml and remove the form group related to Id field:
<div class="form-group"> <label asp-for="Id" class="control-label"></label> <input asp-for="Id" class="form-control" /> <span asp-validation-for="Id" class="text-danger"></span></div>Change the Create POST method in the CarsController.cs with the following code:
Now, we can create our first record.
Run the application, click Car Gallery App and click Add New Car.
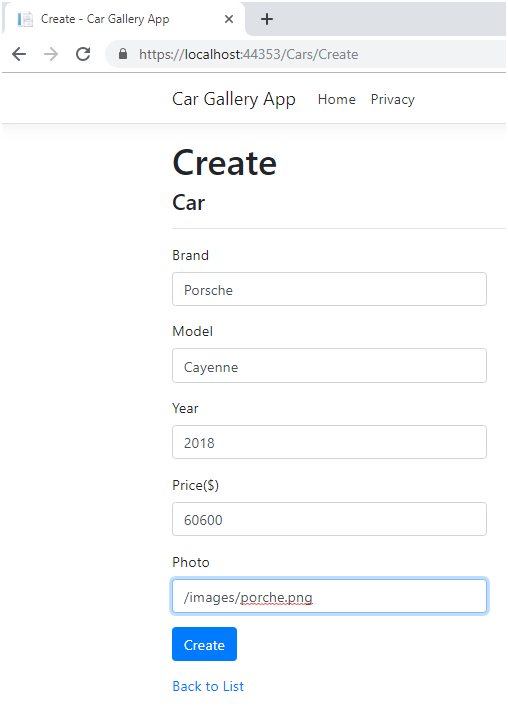
(You need to create images folder in the wwwroot folder of the project and add the pictures there)
After clicking Create, our first record is shown in the Index view as below:
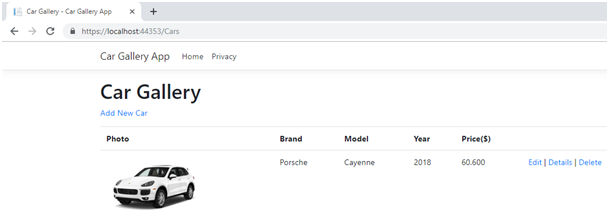
When we click Create button, Create POST method in CarsController runs.
We can check the record from the database by the following command:
db.Cars.find().pretty()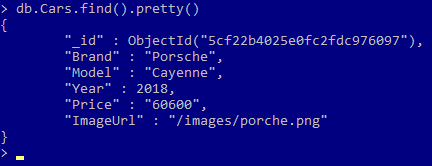
Edit Method and View
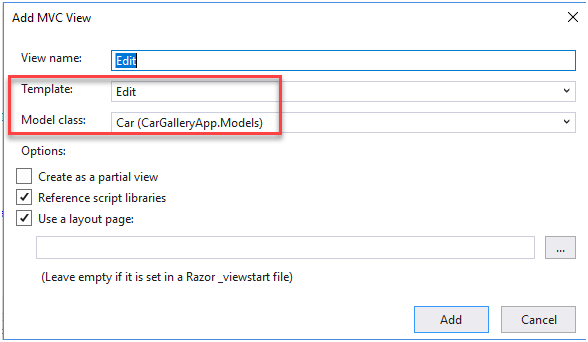
Right-click on the Edit method in the CarsController.cs and select Add View…
Go to Edit.cshtml and remove the form group related to Id field:
<div class=”form-group”> <label asp-for=”Id” class=”control-label”></label> <input asp-for=”Id” class=”form-control” /> <span asp-validation-for=”Id” class=”text-danger”></span></div>In the CarController.cs, change Edit GET and POST methods as below:
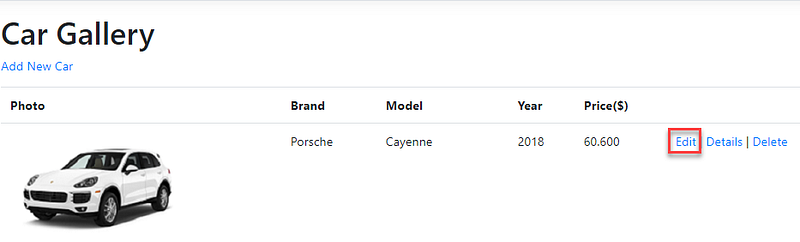
EDIT GET method is invoked when we select Edit link in the Index view:
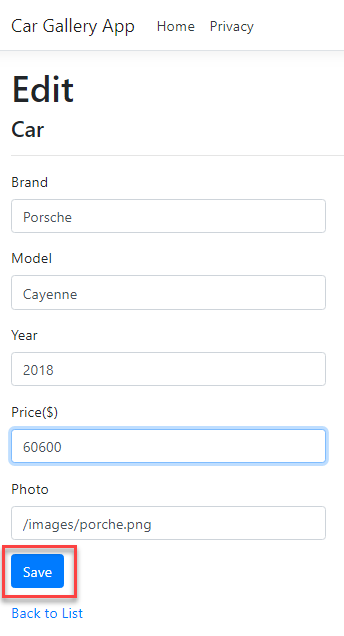
EDIT POST method is invoked when we click Save button in the following window:
Details Method and View
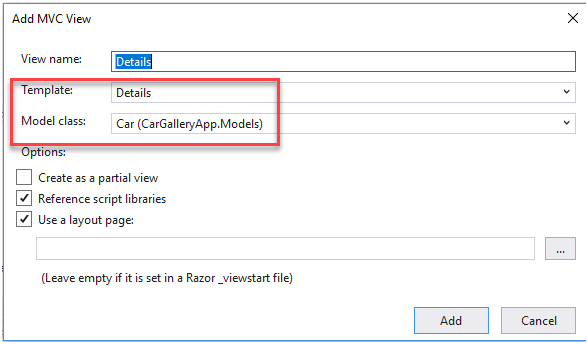
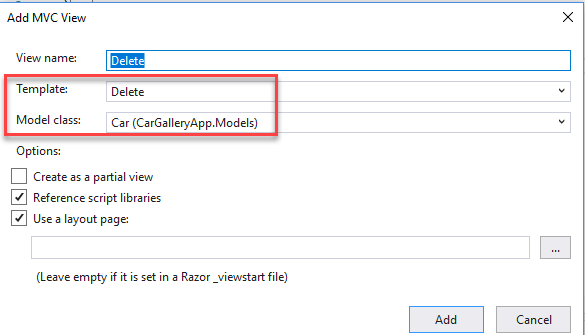
Right-click on the Details method in the CarsController.cs and select Add View…
Change Details.cshtml with the following code (similar changes that we did in other views):
Change the Details method in the CarController.cs with the following code:
This is the same code as the Edit GET method.
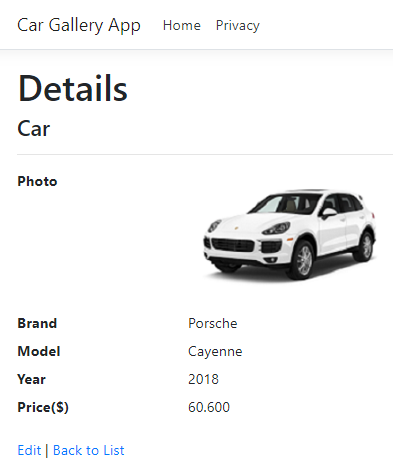
When you run the application and click the Details link, you should see the output as below:
Delete Method and View
Right-click on the Delete method in the CarsController.cs and select Add View…
Change Delete.cshtml with the following code (similar changes that we did in the other views):
Change Delete GET and POST methods in the CarController.cs as below:
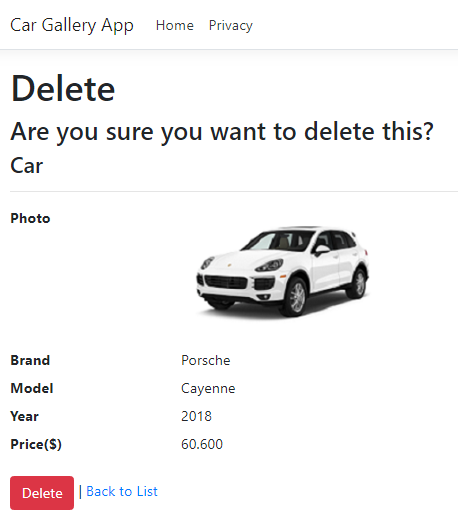
You should see the following output when you click Delete link:
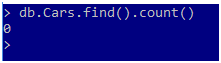
After deleting this record Index view will be empty and there will be no records in the Cars collection in the database:
Now that we have implemented all our methods and views for CRUD operations, we can insert other cars to our gallery and get a nice view like below :)
You can access the project from this Github repository.
I hope you found this post easy to follow and helpful. Please let me know if you have any questions and/or comments in the responses below.
If you are interested in .NET Core and want to find out more, you can check this .NET Core publication. The posts in the publication are as below:
- Introduction to .NET Core
- ASP.NET Core MVC Web Application (Project Structure)
- Build a Web App with ASP.NET Core MVC and EF Core
- How To Build a RESTful API with ASP.NET Core
If you want, you can follow this publication and be informed when a new post arrives.
And if you liked this post, please clap your hands 👏👏👏
Bye until to the next post!
Keep coding :)
References


