
AWS Workshops DIY — EKS Workshop — 3. Deploying the Web Store Application Microservices Internally
Chapter 3 — Architecture review and deployment of the application services/components inside the EKS cluster!
This workshop is already starting to move rapidly with one set of hands-on code in the last chapter. It only gets better and more exciting from here on!
This workshop is already starting to move rapidly with only one set of hands-on code in the last chapter. It only gets better and more exciting from here on!
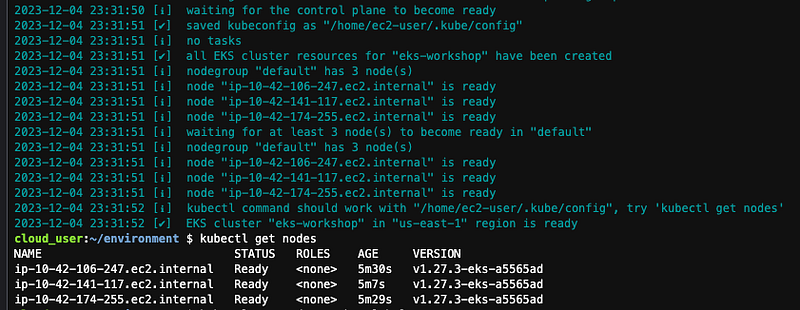
I simply copied/pasted the first two steps of Chapter 2, AWS Workshops DIY — EKS Workshop — 2. Let’s Cluster with ‘eksctl’, on CloudShell and Cloud9 terminals respectively and the cluster was ready, as shown in the screenshot below, in about 15 to 20 minutes, the average expected time to build an EKS cluster.
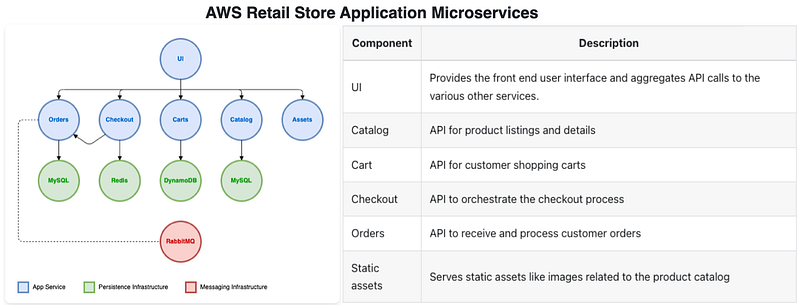
Having the Kubernetes cluster ready and running with the power of EKS, we can finish deploying the full microservices architecture-based AWS-sponsored Retail Store Application in the cluster. It’s always good to keep a well-defined application handy to fast-track Kubernetes learning, both basic and advanced concepts.
As the title of this chapter suggests, the full deployment takes place in two installs, first by deploying the microservices backend components internally inside the cluster, as done in this chapter, and then, in the next chapter, by hooking up the remaining Kubernetes, EKS, and AWS constructs/components (e.g. Service, Ingress, LoadBalancer, etc.) to make the application accessible externally from the Internet anywhere.
Reviewing the Application Microservices Architecture
The workshop provides two links to explain the application architecture following the microservices-based architecture. A quick reading and understanding of the services/components will help appreciate the backend, frontend, and their integration details when you have a chance to play around with the product interface at the end of the next chapter.
- Application services/components and dependencies
- Microservices on Kubernetes implementation quick guide
Examining the Component Manifests and Codes
Three places are of interest and worthy of deeper-level examination in this section.
- AWS Retail (Web) Store Application GitHub — This is the official source code repository of the application where you can review the architecture in greater detail as well as check out the codebase at leisure, for understanding and future ideas/improvements.
- Amazon Elastic Container Registry (ECR) Repositories and Dockerfiles — This is helpful for all container curious and knowhow minds. Containers used in the Kubernetes deployment use the ECR repo as the image source. Dockerfiles show the inner details of the images.
- YAML manifests and modules of the sample application — After executing the
prepare-environment introduction/getting-startedcommand below, you’ll have an opportunity to review the YAML manifests of deployments, services, and other Kubernetes components on the Cloud9 IDE or the terminal under~/environment/eks-workshop/base-applicationfolder. This page explains everything visually and is easy to follow.
NOTE: This AWS Workshop has a special way of deploying code in the Kubernetes cluster for each specific module environment and also similarly resetting the environment completely to start over fresh. Commands like
prepare-environment introduction/getting-startedused below and there's one for each module are used to accomplish these goals. A highly thoughtful design/contribution by the AWS Workshop team, kudos!
Deploying the Microservices
It is time to issue the prepare-environment command and proceed with the application deployment by installing all the microservices. This EKS Workshop makes use of Kustomize, the Kubernetes native configuration management tool. Post preparation, you can see the manifest YAML files for each component inside the eks-workshop repository installed in the Cloud9 environment. All the components are installed in one single command as shown below and then we just wait for all the Kubernetes objects to reach ready status. It’s that easy, to deploy complex applications in Kubernetes.
# Ref: https://www.eksworkshop.com/docs/introduction/getting-started/

# Pre-Req: Create Amazon EKS Cluster following Chapter-2
# https://readmedium.com/aws-workshops-diy-eks-workshop-2-lets-cluster-with-eksctl-e129a4a3be9b

# Prepare the Cloud9 environment and EKS cluster for this module
prepare-environment introduction/getting-started

# First, inspect the current namespaces in the EKS cluster
# Expect to see default and system namespaces, none application specific
kubectl get namespace

# Double check application specific namespaces, there should be none
# Kubernetes label trick helps to filter out default and system namespaces
kubectl get namespaces -l app.kubernetes.io/created-by=eks-workshop

# This application uses Kustomize to manage Kubernetes deployments
# The Kustomization manifest lists all the microservices components
# Review all the components by looking inside the YAML file. Expect to see:
# - catalog, carts, checkout, assets, orders, ui, other, rabbitmq -
cat ~/environment/eks-workshop/base-application/kustomization.yaml

# Deploy all the components in one go
kubectl apply -k ~/environment/eks-workshop/base-application

# Check the deployment pods of the 'catalog' component
# The status of pods will go through the following states:
# - ContainerCreating
# - CrashLoopBackOff
# - Running
# Reason being, the catalog Pod shows CrashLoopBackOff while catalog-mysql
# is getting ready to provide service. Kubernetes keep restarting meanwhile
kubectl get pod -n catalog

# 'kubectl wait' helps to monitor Ready state before issuing other commands
kubectl wait --for=condition=Ready --timeout=180s pods \
  -l app.kubernetes.io/created-by=eks-workshop -A

# Recheck namespaces for application components
# There should be one for each
kubectl get namespaces -l app.kubernetes.io/created-by=eks-workshop

# Check to confirm that the Deployments are created successfully
kubectl get deployment -l app.kubernetes.io/created-by=eks-workshop -A

# It's that easy.
# The application is now fully deployed internally inside the cluster
# No wonder we all love Kubernetes, it works predictably 100% all the time!
Testing Microservices Deployments and Cleanup
Deployment of all the application microservices/components completed. Let’s wrap up with testing and the usual cleanup steps.
Since this chapter deploys all the backend components/services of the application internally only (ClusterIP Service type as shown in the service manifest files restricts all access internally), there’s still no way to access the UI externally from a browser. But all the components are accessible within the cluster (see exec command below) and that’ll be the focus of testing below.
Once confirmed everything is up and running successfully, the workshop provides a delete-environment script to reset the environment after which we’re free to delete the cluster and the Cloud9 IDE stack.
# Test Application Deployments and Cleanup

# Let's dig deep and take some actions on one of the components: catalog
# Feel free to check other components as well in the similar manner.

# Once pods are up and running, we can check their logs
# TIP: '-f' option helps to tail the log. Ctrl-C to quit.
kubectl logs -n catalog -f deployment/catalog

# At this points, all pods should be in running state
# For catalog, we only deployed 1 replica
kubectl get pod -n catalog

# Use Kubernetes scale command to horizontally scale out the number of pods
# Fire both commands together
kubectl scale -n catalog --replicas 3 deployment/catalog
kubectl wait --for=condition=Ready pods --all -n catalog --timeout=180s

# Rollout status check is another way to monitor replica scaling process
kubectl rollout status deployment/catalog -n catalog

# Confirm scaling
kubectl get pod -n catalog

# The manifests also create a Service the application and MySQL Pods
# Services are used by other components inside the cluster to connect
kubectl get svc -n catalog


# All the Services are internal to the cluster
# Meaning they cannot be accessed from the Internet or even the VPC
# Access is allowed only within the cluster itself.
# This is verified by seeing the service manifest where
# the service type is ClusterIP (the default type)
cat ~/environment/eks-workshop/base-application/catalog/service.yaml

# To connect internally
# 'kubectl exec' is used to connect internally to access an existing Pod
# The command below invokes the catalog API
# It pulls a JSON payload with product information
kubectl -n catalog exec -it \
  deployment/catalog -- curl catalog.catalog.svc/catalogue | jq .

# Congratulations, you've just deployed all the microservices
# to Kubernetes with EKS!

# CLEANING UP
# First use delete-environment to remove the sample application
# and also remove any leftover lab infrastructure
delete-environment

# Delete cluster using eksctl in the Cloud9 terminal
eksctl delete cluster $EKS_CLUSTER_NAME --wait

# Delete the cloudformaiton stack from the CloudShell terminal
aws cloudformation delete-stack --stack-name eks-workshop-ide

# All done for this chapter!
Homework and Next Steps
We’ve successfully finished the deployment of all the microservices backend components internally, accessible within the cluster only, of the Retail Store Application. In the following chapter, we’ll build the necessary bridges for the external world to access the web store and interact with it.
That wraps up this chapter except for the homework, the bonus Kustomize (optional) chapter, a free learning resource covering one of the two most popular and heavily used Kubernetes application configuration and management tools, Helm being the other one.
See you soon in the next chapter, Chapter 4!
If you benefited from reading the post, please 👏 a few times before parting, and help others by sharing it; I highly appreciate that!
Please follow to stay in touch, track, and be the first to get notified of all future writings on AWS Cloud, Containers, Kubernetes, and Machine Learning. Also, check all my stories on The AWS Way publication.


