
OWH Film 2: Analog Film Look Fujifilm Recipe
Get a decent analaog look to your JPGs without painting yourself into a corner with OWH Film 2.

A year ago I published a Fujifilm recipe I called OWH Film, which I still use to this day. But since then I’ve experimented a lot, learned a lot and in the end I wanted to refine that recipe. I’ve started shooting different subjects and also shot a lot more raw recently, as well as reviewing a lot of old prints. This has made me realise a few things about the way Fujifilm cameras process files. This then is the culmination of everything I’ve learned about Fujifilm and from studying analog photography.
Digital vs film reds and yellows
One thing that struck me is how much more versatile daylight film stock is in varying conditions than digital daylight white balance. When shooting daylight film at night for instance you can still get acceptable results. Although the lighting temperature is obviously warm it just looks moody, whereas on digital it just looks yellow. I boiled this down to analog film being more sensitive to reds than yellow, whereas digital sensors will typically strive for an accurate result in all conditions.
I tested my hypothesis by adding in a pronounced red cast and sure enough, it worked! What I realised in the process is that I don’t particularly like the way Fujifilm processes yellows in general and by shifting them more towards red I get something that looks much better to my eye in all conditions.
Fujifilm greens vs Kodak greens
I don’t know how accurate this statement is, but anecdotally it seems that when talking about analog film, Fujifilm is know for producing vibrant greens to a level that Kodak never did. Kodak greens are typically darkened, less saturated and cooler, whereas Fujilfilm greens are bright and everpresent. Makes me wonder whether this is an intentional differentiator for Fujifilm, given how prominent the color green is in all their branding.
It just so happens that besides in landscape photography, the color green is more often a distraction. Even though we often appreciate some foliage in environmental portraiture for instance, the fact is that often there’s simply too much of it. Makes sense then that Kodak would be perfectly happy to let green take a backseat to other colors. By shifting the white balance towards red, we are also downplaying the greens.

Color separation
I feel like I’m harping on this point every time, but I don’t like the way so many Fujifilm recipes prioritise just one aspect of a film stock’s color rendition to the detriment of all other colors. More often than not this results in a color wash that affects everything and produces nothing more than an expired film look at best. I geek out on trying to achieve a film look while still retaining proper color separation.
With my first film look recipe I must admit that I kind of fell into the same trap, thinking that analog film just has to look warm so I shifted everything towards red and yellow. Compare the two versions of the street portrait below. OWH Film on the left OWH Film 2 on the right.

The fact of the matter is that this image was shot in overcast conditions. A daylight balanced film stock would have produced a cooler image like the one on the right. Here’s a philosophical question: If an analog film makes a cooler looking image in overcast conditions, isn’t that actually more accurate to the way you remember a scene than digital auto white balance doing its best to perfectly balance the whites?
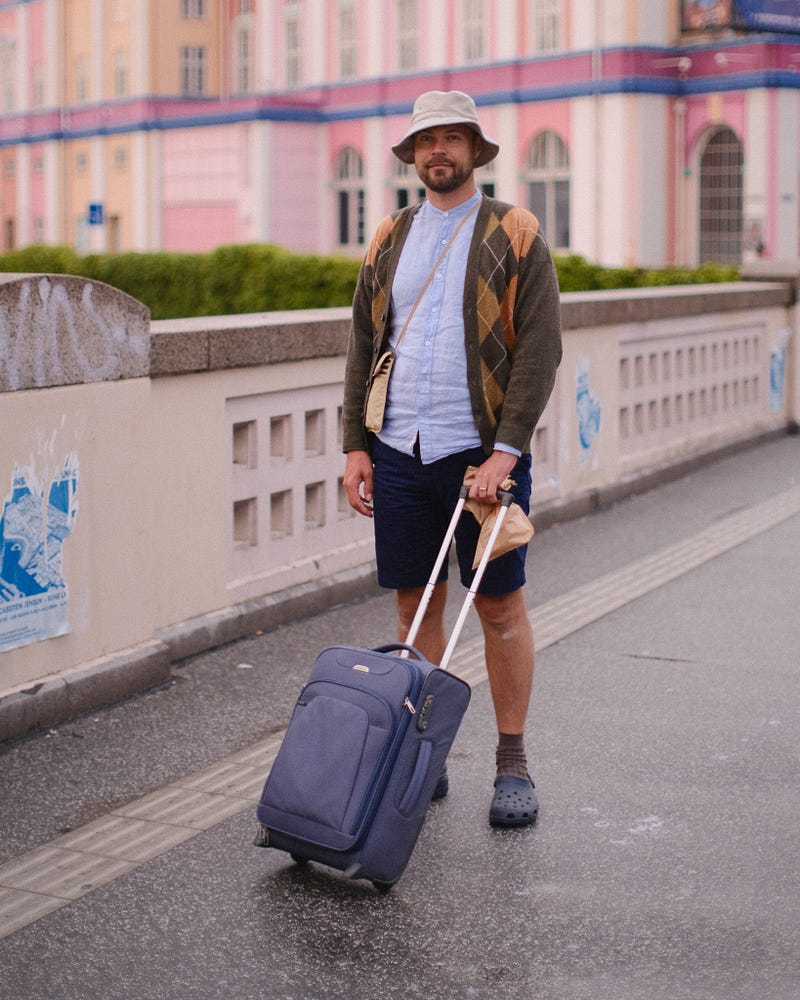
The picture below is another example. It’s shot at dusk using daylight white balance. It clearly shows what time of day it is and that’s part of the story of the image.
The point that I’m trying to make is one best summed up by quoting Norway’s most famous painter Edward Much who said “I don’t paint what I see, I paint what I saw”. One intrepretation of that is that your recollection of a scene will often include a “wrong” white balance. It’s an artistic choice to leave that in. For that reason I suggest you use this recipe with one of three white balance settings, but with the same WB offset:
- Daylight: For most situations, sometimes even at night
- Incandescent: For indoor natural lighting after dark
- Shade: For bright sunny days where you want the warmth of the sun to come through (even though this will most often produce an image that is too yellow).
Contrast
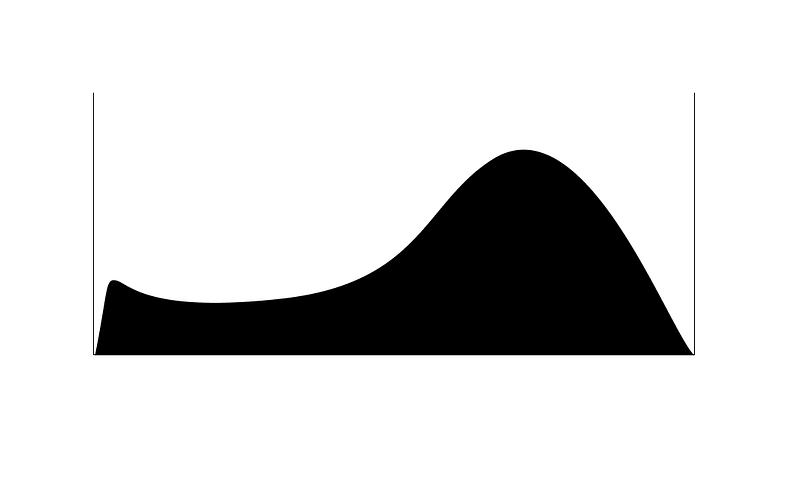
One thing that most film look recipes get right however is the contrast curve needed to make digital look like film. This is worthwhile keeping in mind for raw editing as well by the way: Analog film doesn’t like underexposure but retains highlights, so it is typically exposed for the shadows to retain detail there. This produces a histogram roughly like the one below.
For digital to look like film you are going to have to sacrifice some shadow detail by crushing the shadows then. Here’s where Fujifilm’s Dynamic Range setting really helps. Let’s go all the way and use DR400 so we can overexpose properly, as well as add in some shadow contrast to crush those darker parts. My preferred film simulation Astia also has a built-in contrast curve that is pretty similar to start, we are only helping it a little further along here.
DR400 does tend to clamp the highlights a little too dark though, so we are adding some highlight shift in the contrast curve to counteract that.
Microcontrast and sharpness
Fujifilm’s Clarity setting is a bit of a b*ch because of how it slows the processing down, but it’s also just right for this kind of thing. It adds a certain pop to the images that I think is really worth it here.
The sharpness setting is going to have to depend on the lens you use. Some of these sample images are shot with the 7Artisans 35mm f/0.95 which is very soft and vintage-looking already, so -2 will do. Whenever I shoot with something like the XF 23mm f/1.4 LM WR (which is ridiculously sharp), you might even need to use -4.
Saturation
If I’m honest I always find this a little hard to nail down. Analog film can be all over the place here, very much depending on the lighting conditions. But one thing I have noticed is that because of the contrast curve, film can often be perceived to be more saturated than it really is and sometimes film will over-saturate things to unnatural levels. Let’s lean into that and ditch the whole desaturated trend of late shall we? Because who doesn’t like photos that pop?
The recipe:
Please tag your images #owh_film2 so I can see what others do with this recipe!
Film Simulation: Astia Grain: Weak Small Dynamic Range: 400 White balance: Daylight, Incandescent or Shade WB offset: R: 4, B 0 Color chrome effect: Weak Color chrome FX blue: Weak Highlights: +1.5 Shadows: +0.5 Color: +3 Sharpness: -2 Noise Reduction: -3 Clarity: +3 Exposure compensation: Typically +2/3 — +1 Color Profile: Adobe RGB Lens Modulation Optimizer: Off ISO: 640–3200
As usual, you’ll find more examples of this recipe in use on my instagram.
Happy shooting!


