
An Easy-to-Follow Beginner’s Guide to Writing on Medium
10 tips and tricks to help you master the basics

When I started writing on Medium as a beginner at the end of July, I didn’t use subtitles, caption my images, or even properly format my first few articles. All the important stuff was unknown to me.
I realized this when someone actually told me to cite my images. I started my hunting — reading the Medium guidelines, taking a look at YouTube videos, joining an email list of top writers, and reading some articles about it.
So in this article, I’m going to tell you everything I’ve learned so far about formatting, publications, the important tags to use, and where to post — every little thing I’ve learned so far. I know someone needs it like I was in need of it.
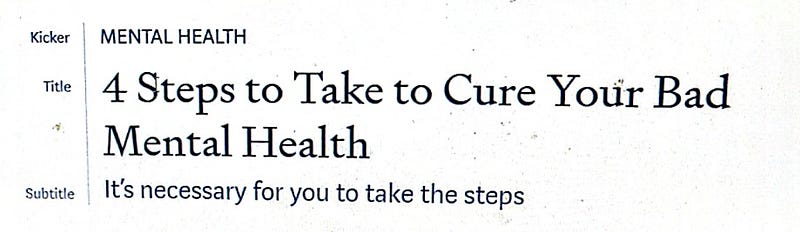
1. Title, Subtitle, and Kicker
The title and subtitle are essential for every article you write. The title gives the very first impression of your article. So spend a little time making it the best so people feel tempted to read your article.
Title: The title is the very first thing you write. So select the text, and click on the large T. For properly formatting the title, I use titlecaseconverter.com or capitializemytitle.com.
Subtitle: The subtitle usually comes after the title. So select the text, and click on the small T.
Kicker: The kicker is used above the title. I don’t use it much, but sometimes it’s a good way to start an article. For the kicker, just select the text and click on the small T.
2. Separator
The separator is a very good tool to use when formatting your article. By using the separator, your article looks better organized. So when you switch from one topic to the next in your article, use the separator.
On Windows, click ctrl+enter, and on iOS, click ⌘+enter. You can even click on the plus sign that appears whenever you start writing a new line. So click on the plus, go to the end, and select the last icon saying Add a new part. This also works as a separator.
Start using the separator. It’s a symbol loved by editors and curators.

3. Use Grammarly
Grammarly is effective, and it let’s us correct our mistakes.
When I started writing, I never used Grammarly until an editor told me to use it. Grammarly will improve your writing in many ways. There are lots of suggestions that’ll help you with grammar, spelling and usage, wordiness, punctuation, and even plagiarism.
There is a free version of Grammarly available. This is the free Chrome version. Grammarly will elevate your piece of writing and will make your article error-free and easy to read.
4. Back Up All of Your Medium articles
You should have a backup of all your articles. There’s a chance that some day your data might get lost. So always preserve your data, and keep it safe. Medium provides a whole backup of your articles.
Steps for backing up Medium articles
- Open your Medium account. Click on your profile icon, and go to the Settings menu.
- On your Settings page — click on the Account option → Download your Information → Download Zip.
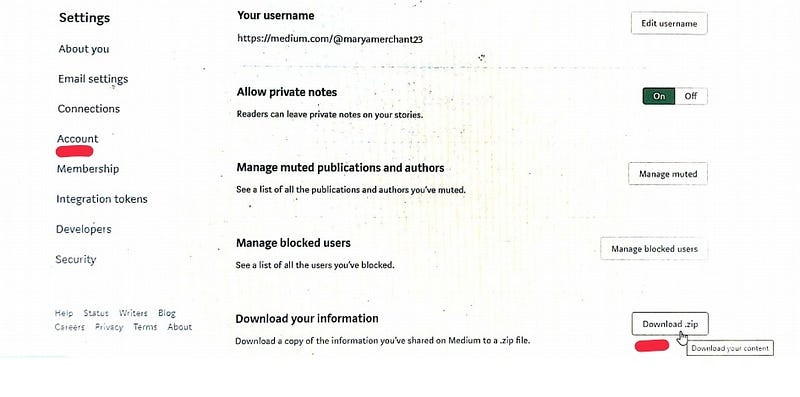
3. When you will click Download Zip, it’ll take you to a page where you’ll see an Export button — click on it.
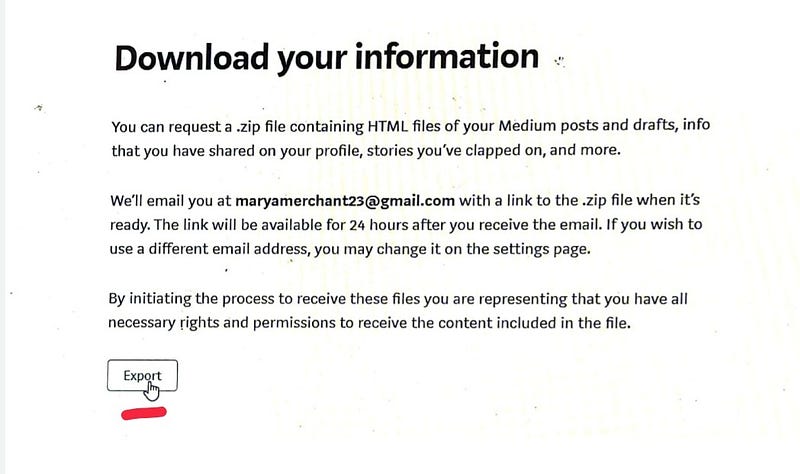
4. After you click on the Export button, Medium will archive all of your Medium data into a .zip file, and they’ll send you an email.
5. You’ll get an email saying to download your data. Click on Download my archive. You’ll get 24 hours to download your archive to your local system.
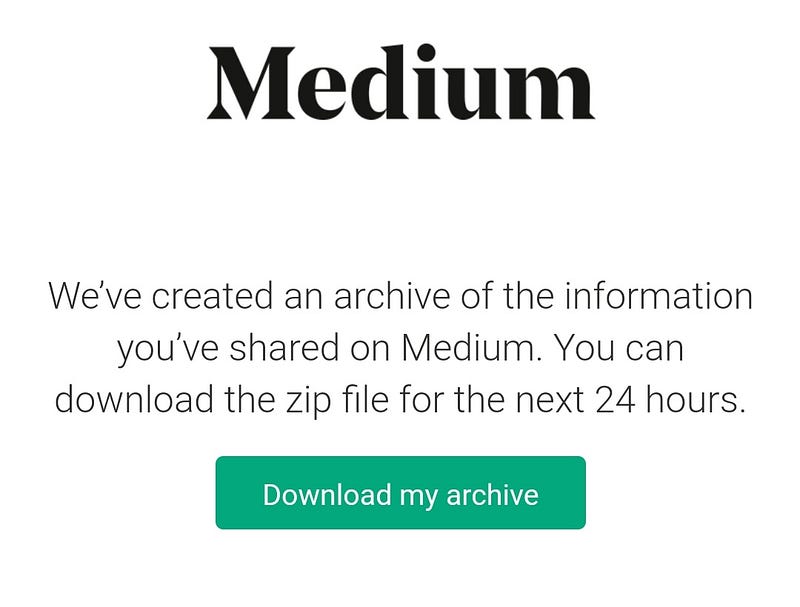
6. Once downloaded, you can see the medium-export.zip file in your download menu. Unzip it and retrieve your data.
7. Now you have the offline copy of all your Medium data, which includes your published story, comments, unpublished drafts, and everything you’ve posted on Medium.
5. Tags to Use
We all have the power to use five tags in our own way. As I started researching, I created a list of some of the popular tags. All these tags have thousands and thousands of articles in a specific niche.
Use these tags more often so one day you may become a top writer in a specific category.
6. Publications to Pitch
Medium is all about publications. To get more traffic on your article, you need to start pitching your article in specific publications.
You can use Smedian to send requests to Medium publications. This is the easiest route to get into different Medium publications.
All you have to do is click on the Request to Contribute button on the specific publication you’re interested in. They’ll accept you as a writer within a few days.
The other way is just to surf around your profile. There’s a publication option — go there and see the topmost Medium publications. Start pitching them, and read their guidelines to become a writer for them.
I wrote an article about getting into 11 relevant publications, which consist of both big and small pubs. The below article will help you to become a writer in different publications.
Start pitching and enjoy the roller coaster ride of welcoming yourself to new audiences.
7. Dismiss Your Private Note When …
Private notes can be seen by you if you’ve sent a note to someone. It’ll also be visible to the author of the post to whom you’ve sent it and, if the post in a publication, then the editor of the publication can also see your private note.
So you, the author, and editor of the publication can see your private note.
You need to dismiss the private note when you’re sending your pitch to the second publication when the first publication has rejected you.
It means if you’ve sent the article to Mind Cafe and if they rejected, then when you send the same article to another publication, just dismiss that rejected note because the editor can see that negative mark on your article. And that negative feedback doesn’t resonate in a good way.
I’ve made this mistake before — I got to know about it by reading some other articles. So make sure to dismiss your negative note when you’re pitching to another publication.
8. Use of Images
You need to use good images that are of a high resolution. Make sure to cite the images — even cite it when you’re the owner of it. You can even write an alternative text for the image if you want.
You can even create an image as a hyperlink. Click on image, and then click ctrl+K on Windows and ⌘+K on iOS to paste your link.
There are several sites to use free stock photos:
9. Promote Your Medium Stories
As we need traffic, we all need to promote our articles on different social media sites to get us more attraction.
The following ways will create an engagement on your post:
- Google Trends: Search for a specific word that people search a lot for on Google, and write articles about it. This is all about SEO.
- Social media: Connect your Twitter and Facebook from Medium, and post your article daily over there. You can also post on Linkedin, Reddit, or Instagram.
- ManyStories: You can post your articles on ManyStories. Just create an account over there, and start posting your stories. You’ll be on the wait list in the beginning, but you’ll be invited within 1-2 weeks to post over there.
- Highlight, comment, and clap: Engage with people on Medium, and start interacting with them. Clap, comment, and highlight people's articles — as you feel good when you get notified about someone commenting and highlighting. So do the same with people and make meaningful connections with people.
10. Medium Shortcuts
- Keyboard shortcuts: For different hints on Windows, click
ctrl+?. On iOS, click⌘+?. - Word count: To know the total word count of your article on Windows, click
ctrl+A. On iOS, click⌘+A. - Tag people: To mention people type
@and then the name of a person. The person will get notified when you mention them. It’s the best way to interact with them. - Code blocks: Just type three back ticks into the editor to create a code block.
Programmers needs this code block to write their code.Conclusion
I hope this article will help some beginners, like me. Just keep learning and sharing at every step, and thrive together.


