
Advanced ETL Techniques for Beginners
On a scale from 1 to 10 how good are your data ingestion skills?

Data ingestion is a crucial step in data engineering. Data engineers load huge amounts of data into various database systems for further transformation and processing. While dealing with relatively small amounts of data on staging we are in luck not running out of memory, working on production data pipelines with terabytes (or even petabytes) of records often turns into a real challenge. Existing ETL solutions offer automated data loading into a data warehouse we need and often have row-based pricing models. In this story, I would like to discuss how to create a bespoke data-loading solution for our pipelines to enable efficient data loading. We will take a better look into common data ingestion design patterns and typical ways to organise the process. We will reverse-engineer some of the most popular ETL solutions to see how data can be ingested without outages and losses efficiently. I will provide data-loading examples using Python libraries and tools available in the market for free to summarise my findings.
On a scale from 1 to 10 how good are your data loading skills? -
That would be one of my favourite questions during data engineering interviews. I keep looking for talents who know how to build bespoke ETL systems.
Indeed, being able to create a robust data loading system that can process data efficiently, doesn’t fail, doesn’t consume too much memory, can handle various data formats and scales well — this is what marks an experienced data engineer in my opinion. With the abundance of tools available in the market for ETL tasks, we are in luck and don’t really need this. Until the company decides to build this in-house. There might be various reasons for that and one of the obvious ones is security and regulations. Dealing with sensitive data is always challenging and often data must not leave certain regions and/or geographical locations. Another good reason to develop ETL expertise internally is that it saves tons of money in the long run. Having an all-hands software engineer who is experienced with data platform design and knows many ETL tools and frameworks is always great. Companies are hunting for those talents. I previously wrote about it in one of my previous stories [1].
I am currently at the beginning of the project where I am lucky (probably too lucky) to design and build the complete data platform from scratch. It has a data warehouse solution as the main data storage and data processing unit but also relies on a data lake to ensure fail-safe mechanisms, disaster recovery, compliance and security. So I was thinking that after fifteen years in data, I might be able to build something really flexible and efficient. I started to design something that is both cost-effective and flexible enough to easily switch between various data processing tools. Something that offers transparent data modelling with unit tests for views, tables and pipelines. While I kept dreaming about this perfect solution where data flows into pristine clean and production-ready datasets I came up with a solution that can offer this freedom and at the same time comply with high-end security standards. Indeed, I would like to be able to keep all my raw datasets in the data lake untouched and preserved for any potential upcoming data requests I might face in future.

I have already designed my new data warehouse (DWH) in a way I described in this article:
Most likely, I will need to use not just a data warehouse solution in the future. Data warehouses are ideal for data governance and granular access controls and offer ML capabilities these days but I would want to process data in the data lake in the first place. Indeed, when it comes to efficient data processing Apache Spark tools seem to be unbitable. Their cost-effectiveness is simply uncomparable in my opinion [2].
This is why data ingestion pipelines have a special place in my plan to build an efficient data platform. Having designed them correctly would ensure easy connectivity with any other tools I might want to use in the future.
Just imagine that we can load our extremely large datasets from the data lake into any system we have and do it with ease.
This is why I decided to use the data lake as a proxy polygon to stage all data files. I can easily connect any solution that works with data lakes, i.e. AWS Athena, Apache Spark, Starburst Galaxy or Databricks. Using cloud storage object versioning and HIVE partitioning layout seemed like a good foundation [3].
So now I’m in the process of building data warehouse solution using Snowflake. It is a great tools and I understand why it is so popular among non-technical users. The most successful IPO was a few years ago $70 billion at the price of $250 per share.
Data analysts love Snowflake
Loading data is simple in it. It is as simple as SQL statement to create a pipe. Yes, Snowflake has simplified everything for users and will indeed take care of data loading and data formats. Consider this Snowpipe example below. It will start loading files from S3 as soon as they land there.
create or replace pipe test.source.mypipe
auto_ingest=true
as copy into test.source.mytable
from @test.source.mystage
-- file_format = your_file_format;
file_format = (type = 'JSON')
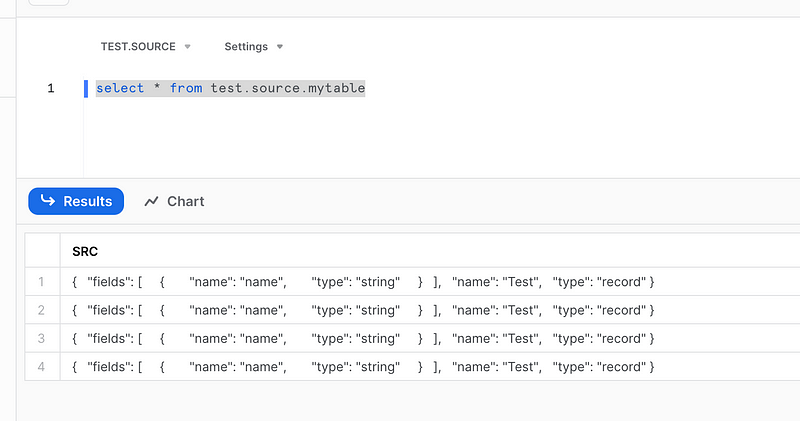
;This will continuously load files with JSON contents created in cloud storage, i.e.
'{"type": "record", "name": "Test", "fields": [{"name": "name", "type": "string"}]}'If we need to change data format this can be easily done with SQL as well.
CREATE OR REPLACE FILE FORMAT json_format
  TYPE = 'JSON'
  STRIP_OUTER_ARRAY = TRUE;
We can even test it from our command line. Let’s create a few files and then copy them into S3. Run this in your command line:
echo -n '{"type": "record", "name": "Test", "fields": [{"name": "name", "type": "string"}]}'\
> ./test.json

aws s3 cp ./test.json s3://data.youraccount.aws/test/test2.json
aws s3 cp ./test.json s3://data.youraccount.aws/test/test3.json
aws s3 cp ./test.json s3://data.youraccount.aws/test/test4.json
We will something like this on our table straight away:
Indeed, it is simple and works well in this simple example but how does it really work?
How data loading works
There are four ways of data loading into any data warehouse:
- File uploads — if one record fails — all file upload fails.
- Micro-batch data processing — split and load in chunks.
- Data streaming — per row data ingestion
- Loading from external tables — i.e. loading files from datalakes. Often the slowest method.
File object uploads
Let’s imagine we have a file staged in the cloud storage, we tell the microservice to read it, perform some ETL, i.e. strip outer array brackets, and then load all records into the DWH table.
Consider this example below of data loading into Google BigQuery [4].
from google.cloud import bigquery
...
client = bigquery.Client(credentials=credentials, project=credentials.project_id)
...

def _load_table_from_csv(table_schema, table_name, dataset_id):
    '''Loads data into BigQuery table from a CSV file.
    ! source file must be comma delimited CSV:
    transaction_id,user_id,total_cost,dt
    1,1,10.99,2023-04-15
    blob = """transaction_id,user_id,total_cost,dt\n1,1,10.99,2023-04-15"""
    '''

    blob = """transaction_id,user_id,total_cost,dt
    1,1,10.99,2023-04-15
    2,2, 4.99,2023-04-12
    4,1, 4.99,2023-04-12
    5,1, 5.99,2023-04-14
    6,1,15.99,2023-04-14
    7,1,55.99,2023-04-14"""

    data_file = io.BytesIO(blob.encode())

    print(blob)
    print(data_file)

    table_id = client.dataset(dataset_id).table(table_name)
    job_config = bigquery.LoadJobConfig()
    schema = create_schema_from_yaml(table_schema)
    job_config.schema = schema

    job_config.source_format = bigquery.SourceFormat.CSV,
    job_config.write_disposition = 'WRITE_APPEND',
    job_config.field_delimiter =","
    job_config.null_marker ="null",
    job_config.skip_leading_rows = 1

    load_job = client.load_table_from_file(
        data_file,
        table_id,
        job_config=job_config,
        )

    load_job.result()
print("Job finished.")In Snowflake it works in a similar way. We just don’t need to write Python code for that.
So the first and the most simple way to load data in Snowflake is to use the COPY INTO command. It simplifies mocking data on staging and loading data from my laptop.
copy into test.source.mytable
  from @test.source.mystage
  file_format = (type = 'JSON')
;

-- check the copy history
SELECT * FROM TABLE (INFORMATION_SCHEMA.COPY_HISTORY(
   table_name  =>  'test.source.mytable',
   START_TIME =>DATEADD(HOUR,-2,CURRENT_TIMESTAMP())))
;
All we need to do is to create a stage in our cloud storage. This can be done using SQL too:
create database test;
use database test;
create schema source;
create table test.source.mytable (SRC VARIANT);
CREATE or replace STAGE mystage
  URL = 's3://data.youraccount.aws/test/'
  STORAGE_INTEGRATION = s3_int -- your AWS S3 integration for Snowflake
  file_format = (type = 'JSON');
That’s great but what if our dataset is huge and our memory resources are limited?
In this case we would want to load data in chunks. For instance in BigQuery it can be done using Python SDK. Consider the example below. It explains how to yield data row by row and perform ETL and/or load it. We can use re.finditer which acts like a generator and will read our data file in chunks so we’ll be able to run the required ETL not consuming too much memory.
import io
import re
def etl(item):
    print(f'Transforming item: {item}')
    return item.replace("John", '****')

# Helper function to split our text file into chunks
# using separator
def splitStr(string, sep="\s+"):
    if sep=='':
        return (c for c in string)
    else:
        return (_.group(1) for _ in re.finditer(f'(?:^|{sep})((?:(?!{sep}).)*)', string))

# Text file loaded as a blob
blob = """transaction_id,user_id,total_cost,dt
1,John,10.99,2023-04-15
2,Mary, 4.99,2023-04-12
"""

# data = blob.split("\n") # We wouldn't want to do this on large datasets
# as it would require to load big data file as a whole in the first place
# consuming lots of memory

# We would want to use our generator helper function
# and process data in chunks
data = splitStr(blob, sep='\n')
data_str = u"\n".join(etl(item) for item in data)

print('New file contents:')
print(data_str)
data_file = io.BytesIO(data_str.encode())

print(data_file)
Output:
python example.py ✔ 48 19:52:06 dataform_env
Transforming item: transaction_id,user_id,total_cost,dt
Transforming item: 1,John,10.99,2023-04-15
Transforming item: 2,Mary, 4.99,2023-04-12
Transforming item:
New file contents:
transaction_id,user_id,total_cost,dt
1,****,10.99,2023-04-15
2,Mary, 4.99,2023-04-12
<_io.BytesIO object at 0x103672980>You can find more examples here [5]:
Snowpipe
Snowflake’s Snowpipe [6] does a similar thing. It will read our stage files and will process them in chunks to ensure successful data ingestion. So this is the second way and this one is more suitable for micro-batch data ingestion patterns. Snowpipe will use Snowflake resources (serverless computing). They can scale and resize easily and we are being charged per second of compute usage. We can monitor our pipe usage with SQL in Snowflake:
SELECT TO_DATE(start_time) AS date,
  pipe_name,
  SUM(credits_used) AS credits_used
FROM snowflake.account_usage.pipe_usage_history
WHERE start_time >= DATEADD(month,-1,CURRENT_TIMESTAMP())
GROUP BY 1,2
ORDER BY 3 DESC;
-- or
select SYSTEM$PIPE_STATUS('test.source.mypipe')
;
{
    "executionState": "RUNNING",
    "pendingFileCount": 0,
    "lastIngestedTimestamp": "2023-12-21T17:47:25.957Z",
    "lastIngestedFilePath": "test3.json",
    "notificationChannelName": "arn:aws:sqs:eu-west-1:1239090:sf-snowpipe-34567-dcfvbn",
    "numOutstandingMessagesOnChannel": 3,
    "lastReceivedMessageTimestamp": "2023-12-21T17:47:25.672Z",
    "lastForwardedMessageTimestamp": "2023-12-21T17:47:26.834Z",
    "lastPulledFromChannelTimestamp": "2023-12-21T17:55:35.651Z",
    "lastForwardedFilePath": "data.myaccount.aws/test/test3.json"
}
Snowflake Snowpipe will try to optimize allocated resources to split staged files and process them in chunks.
Consider this example below. I will use Snowflake SDK to load data into Snowflake the same way as the Snowpipe service would do it.
import os
from cryptography.hazmat.backends import default_backend
from cryptography.hazmat.primitives.asymmetric import rsa
from cryptography.hazmat.primitives.asymmetric import dsa
from cryptography.hazmat.primitives import serialization

import snowflake.snowpark as snowpark
from snowflake.snowpark.session import Session
from snowflake.snowpark.exceptions import SnowparkJoinException


def lambda_handler(event, context):
  try:
    processed=5
    with open("./key.p8", "rb") as key:
      p_key= serialization.load_pem_private_key(
          key.read(),
          password=os.environ['PRIVATE_KEY_PASSPHRASE'].encode(),
          backend=default_backend()
      )

    pkb = p_key.private_bytes(
        encoding=serialization.Encoding.DER,
        format=serialization.PrivateFormat.PKCS8,
        encryption_algorithm=serialization.NoEncryption())

    connection_parameters = {
      "user":'USER',
      # password='****',
      "private_key":pkb,
      "account":'account_name',
      "session_parameters": {
          'QUERY_TAG': 'Testing',
      },
      "warehouse":"wh_name",
      "database":"db_name",
      "schema":"schema_name"
    }
    new_session = Session.builder.configs(connection_parameters).create()

    # Get schema from existing table:
    df1=new_session.table("test.source.my_table")
    df1_schema=new_session.table("test.source.my_table").schema
    # StructType([StructField('SRC', VariantType(), nullable=True)])
    print(df1_schema)
    df_reader = new_session.read.schema(df1_schema)
    # Reading from S3:
    df1 = df_reader.csv("@s3_ts_stage/test/test3.json")
    print(f'Count: {df1.count()} :: Appending....')
    # Loading new records:
    df1.write.mode("append").save_as_table("test.source.my_table")
    print(f'Count: {df1.count()} :: Loaded. Getting data to validate...')
    df1=new_session.table("test.source.my_table")
    print(f'Count: {df1.count()}')

    new_session.close()

  except SnowparkJoinException as e:
    print(e.message)
  except Exception as e:
      print(e)
  message = 'Successfully processed {} API endpoints.'.format(processed)
  return {
      'statusCode': 200,
      'body': { 'lambdaResult': message }
  }
The output demonstrates that the data has been processed in chunks:
% python-lambda-local -e env.json -f lambda_handler -t 10 app.py event.json
# [root - INFO - 2024-01-25 16:46:03,078] Event: {'key': 'foo', 'value': 'bar'}
# ...
# [snowflake.connector.cursor - INFO - 2024-01-25 16:46:04,657] query: [SELECT  *  FROM (test.source.my_table)]
# [snowflake.connector.cursor - INFO - 2024-01-25 16:46:04,790] Number of results in first chunk: 0
# df1_schema
# StructType([StructField('SRC', VariantType(), nullable=True)])
# [snowflake.connector.cursor - INFO - 2024-01-25 16:46:04,792] query: [SELECT $1 AS "SRC" FROM  VALUES (NULL :: STRING)]
# [snowflake.connector.cursor - INFO - 2024-01-25 16:46:04,849] query execution done
# [snowflake.connector.cursor - INFO - 2024-01-25 16:46:04,849] Number of results in first chunk: 0
# [snowflake.connector.cursor - INFO - 2024-01-25 16:46:04,867] query: [SELECT count(1) AS "COUNT(LITERAL())" FROM ( SELECT to_variant(parse_json("SRC")...]
# [snowflake.connector.cursor - INFO - 2024-01-25 16:46:05,383] query execution done
# [snowflake.connector.cursor - INFO - 2024-01-25 16:46:05,384] Number of results in first chunk: 1
# Count: 1 :: Appending....
# [snowflake.connector.cursor - INFO - 2024-01-25 16:46:05,385] query: [SELECT to_variant(parse_json("SRC")) AS "SRC" FROM ( SELECT NULL :: STRING(16777...]
# [snowflake.connector.cursor - INFO - 2024-01-25 16:46:05,442] query execution done
# [snowflake.connector.cursor - INFO - 2024-01-25 16:46:05,448] Number of results in first chunk: 0
# [snowflake.connector.cursor - INFO - 2024-01-25 16:46:05,448] query: [show tables like 'my_table' in schema test.source_...]
# [snowflake.connector.cursor - INFO - 2024-01-25 16:46:05,560] query execution done
# [snowflake.connector.cursor - INFO - 2024-01-25 16:46:05,648] Number of results in first chunk: 1
# [snowflake.connector.cursor - INFO - 2024-01-25 16:46:05,648] query: [INSERT  INTO test.source.my_table  SELECT to_v...]
# [snowflake.connector.cursor - INFO - 2024-01-25 16:46:06,238] query execution done
# [snowflake.connector.cursor - INFO - 2024-01-25 16:46:06,240] query: [SELECT count(1) AS "COUNT(LITERAL())" FROM ( SELECT to_variant(parse_json("SRC")...]
# [snowflake.connector.cursor - INFO - 2024-01-25 16:46:06,330] query execution done
# [snowflake.connector.cursor - INFO - 2024-01-25 16:46:06,330] Number of results in first chunk: 1
# Count: 1 :: Loaded. Getting data to validate...
# [snowflake.connector.cursor - INFO - 2024-01-25 16:46:06,331] query: [SELECT count(1) AS "COUNT(LITERAL())" FROM ( SELECT  *  FROM test...]
# [snowflake.connector.cursor - INFO - 2024-01-25 16:46:06,717] query execution done
# [snowflake.connector.cursor - INFO - 2024-01-25 16:46:06,718] Number of results in first chunk: 1
# Count: 17
# [snowflake.snowpark.session - INFO - 2024-01-25 16:46:06,719] Closing session: 300381458764
...
# [snowflake.connector.cursor - INFO - 2024-01-25 16:46:06,826] query execution done
# [snowflake.connector.cursor - INFO - 2024-01-25 16:46:06,827] Number of results in first chunk: 1
In this example above I created an AWS Lambda function that can be run locally. So we can see that it reads data from the cloud storage and loads in chunks. I previously wrote about it in this tutorial before:
Even though Snowpipe clearly tries to process data in chunks it is not guaranteed that it will be processed. Snowflake doesn’t recommend large data files and kindly provides a guide to prepare the data [6]. Snowflake recommends having files of size 10–100Mb staged in cloud storage. Another thing to consider is that the Snowflake session will automatically expire after 24 hours. So if you are loading a super large file and splitting it in chunks then you would probably want to consider a distributed data processing solution instead.
Data streaming
In a similar way we loaded data as a set of rows we can try loading it row by rows. This data ingestion pattern is called streaming [7].
Modern applications now require stream processing as a prerequisite. Applications can respond instantly to new data events thanks to stream processing. Typically a `publisher` or source produces data and events, which are then sent to a stream processing application where data is being processed and then sent to a `subscriber`. Common use cases are real-time fraud detection, the internet of Things, real-time personalisation and retargeting and payment processing systems.
This model aims to process data points with better concurrency when numerous events occur simultaneously. Using streaming platforms, i.e. Amazon Kinesis, Apache Kafka, Hadoop, etc., aims to deal with concurrent data processing.
In this example below we can create a simple application that would load (insert) data row by row into BigQuery:
from google.cloud import bigquery

# Construct a BigQuery client object.
client = bigquery.Client()

# TODO(developer): Set table_id to the ID of table to append to.
# table_id = "your-project.your_dataset.your_table"

rows_to_insert = [
    {"event_name": "purchase", "ts": 123213322},
    {"event_name": "checkout", "ts": 293231231},
]

errors = client.insert_rows_json(table_id, rows_to_insert)  # Make an API request.
if errors == []:
    print("New rows have been added.")
else:
    print("Encountered errors while inserting rows: {}".format(errors))
The benefits of loading data this way are real-time processing, lower latencies and error handling, i.e. if one record fails to comply with the schema other records won’t be blocked.
In a similar way, Snowpipe Streaming API can load data into Snowflake tables with lower latencies based on the custom Java application code wrapper for the Snowflake Ingest SDK. An alternative way would be to load data using Kafka Topics. With Snowflake Kafka connector we can connect to topics in Apache Kafka server and take advantage of lower latencies and lower costs too. In the example below I set up a Kafka server using Redpanda. Then I connect a Snowflake Kafka connector and start loading data into my table row by row. It took me about 15 minutes to do it.

We can use this bash script to create a connector:
KAFKA_TOPIC=KAFKA_STREAMING_TEST
SNOWFLAKE_ACCOUNT=my-snowflake-account_test
SNOWFLAKE_USER=MY_USER
PRIVATE_KEY=''
REDPANDA_BROKERS=127.0.0.1:19092
URL="https://my-snowflake-account_test.snowflakecomputing.com"
NAME="KAFKA_STREAMING_TEST_SRC"

curl -i -X PUT -H "Content-Type:application/json" \
    "http://localhost:8083/connectors/KAFKA_STREAMING_TEST_SRC/config" \
    -d '{
        "connector.class":"com.snowflake.kafka.connector.SnowflakeSinkConnector",
        "errors.log.enable":"true",
        "snowflake.database.name":"MY_DB_TEST",
        "snowflake.private.key":"'Doesnt work with encrypted keys, Remove all delimiters and BEGIN END='",
        "snowflake.schema.name":"MY_SCHEMA_TEST",
        "snowflake.role.name":"ACCOUNTADMIN",
        "snowflake.url.name":"'https://my-snowflake-account_test.snowflakecomputing.com'",
        "snowflake.user.name":"MY_USER",
        "snowflake.enable.schematization": "FALSE",
        "snowflake.ingestion.method": "SNOWPIPE_STREAMING",
        "topics":"KAFKA_STREAMING_TEST",
        "name":"KAFKA_STREAMING_TEST_SRC",
        "value.converter":"org.apache.kafka.connect.json.JsonConverter",
        "value.converter.schemas.enable":"false",
        "buffer.count.records":"10",
        "buffer.flush.time":"10",
        "buffer.size.bytes":"250000000",
        "snowflake.topic2table.map":"KAFKA_STREAMING_TEST:KAFKA_STREAMING_TEST_SRC"
    }'
Output:
HTTP/1.1 201 Created
Date: Fri, 26 Jan 2024 18:31:17 GMT
Location: http://localhost:8083/connectors/KAFKA_STREAMING_TEST_SRC
Content-Type: application/json
Content-Length: 2479
Server: Jetty(9.4.53.v20231009)

{"name":"KAFKA_STREAMING_TEST_SRC"
,"config":{"connector.class":"com.snowflake.kafka.connector.SnowflakeSinkConnector"
,"errors.log.enable":"true"
,"snowflake.database.name":"MY_DB_TEST"
...
","snowflake.topic2table.map":"KAFKA_STREAMING_TEST:KAFKA_STREAMING_TEST_SRC"},"tasks":[],"type":"sink"}%
}
Now we can start publishing. I used a Python script to emulate this process [8].
export KAFKA_TOPIC=KAFKA_STREAMING_TEST
python ./data_generator.py 18 | python ./publish_data.py
As a result 18 records were sent to Snowflake:

Conclusion
Data ingestion is actually quite simple. INSERT command is a great example. In this story, I tried to raise a discussion about typical ingestion patterns — staging files, loading data in chunks, micro-batch data processing and streaming. Each one has its own pros and cons and often depends on business requirements. Streaming inserts can provide lower latencies and enable real-time analytics. Batch data load operations are typically more cost-effective and are easier to monitor. Whatever type of data we are dealing with it is better to create a queue of those files and records and process them efficiently not running out of allocated resources. There is a variety of message queues to consider available in the market — Kafka, RabbitMQ, Kinesis, Pub/Sub or Snowpipe Streaming. Which one to choose depends on your stack and programming skills. A good data ingestion manager would queue all data records or files to process and deal with tables where we need to load them. It will also apply required ETL data transformations, i.e. unzipping, JSON parsing and outer array manipulations. I previously wrote about it in one of my stories which I think might be a good example:
I hope you find this article useful. Please let me know what you think about data ingestion techniques.
Recommended read
[1] https://readmedium.com/how-to-become-a-data-engineer-c0319cb226c2
[2] https://towardsdatascience.com/data-platform-architecture-types-f255ac6e0b7
[3] https://pub.towardsai.net/when-your-stack-is-a-lake-house-6bcb17f9bff6
[4] https://towardsdatascience.com/how-to-become-a-data-engineer-c0319cb226c2
[5] https://towardsdatascience.com/python-for-data-engineers-f3d5db59b6dd
[6] https://docs.snowflake.com/en/user-guide/data-load-considerations-prepare
[7] https://towardsdatascience.com/streaming-in-data-engineering-2bb2b9b3b603
[8] https://quickstarts.snowflake.com/guide/tour_of_ingest/index.html#2
[9] https://docs.snowflake.com/en/user-guide/data-load-snowpipe-intro
[10] https://docs.snowflake.com/en/user-guide/data-pipelines-examples
[12] https://docs.snowflake.com/en/developer-guide/python-connector/sqlalchemy


