
Accessing Google APIs From Your Server-Side Web Application Using OAuth 2.0
In this article, I will guide you through practical example of how to connect to Google APIs from your server-side web application. You will be able to retrieve your user’s Google contacts or calendar events to use them in your application for example, or access their Google drive. This is practical application of the concepts discussed in the introduction to OAuth 2.0.
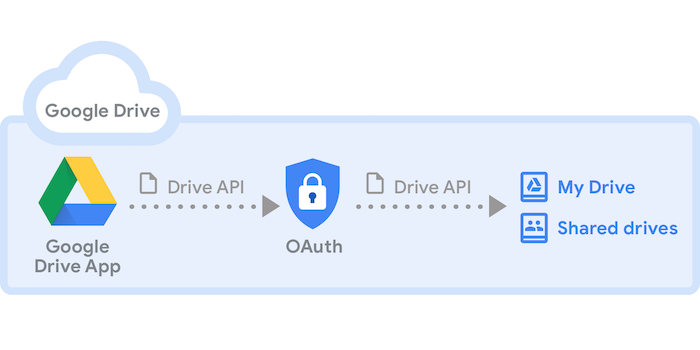
In the introduction to the OAuth protocol, we have seen the basic steps of an OAuth protocol. Now, it is time to see a practical example of a server-side web application that connects to the Google OAuth 2.0 servers to gain authorization to access private resources from Google Drive. I have chosen Google because the documentation is complete, and readers can refer to it in case they want to deep dive into more details.
In this article, we will see an example of a server-side web application. As we have seen, this type of applications uses the Authorization Code method which is more secure than other Authorization Grant methods. For client-side applications like React applications for example, this method is totally insecure because the network traffic between the application and the Google server is visible to the user. Therefore, Secret keys cannot be included in the web requests.
For any application connecting to Google APIs, there are two main prerequisites that need to be satisfied:
- Enabling APIs for your project: Open the API Library in the Google API console, and select the API you want to enable. All Google services are listed here, you can choose either Maps, Machine Learning services or Workspace services like Google Drive.
- Creating Authorization Credentials: these credentials are used to identify the application to Google’s OAuth 2.0 server. Go to the Credentials page, and select the web application type. If your app is server-side, you will download a client_secret.json file from the API console that you need to store in a safe location. If your app is client-side (Javascript app), you will need to register authorized Javascript origins. The origins identify the domains from which your application can send requests to the OAuth 2.0 server. This way, other apps won’t be able to access Google APIs using your credentials.
Server-Side Application
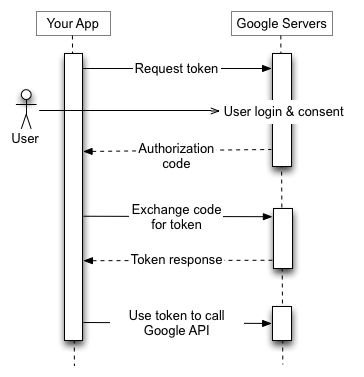
For server-side applications, we will use the Authorization Grant using Authorization Code method, as we have discussed extensively in this introduction to OAuth 2.0. The points below quickly summarize the 5 steps:
- Your application identifies the permissions it needs.
- Your application redirects the user to Google along with the list of requested permissions.
- The user decides whether to grant the permissions to your application.
- Your application finds out what the user decided.
- If the user granted the requested permissions, your application retrieves tokens needed to make API requests on the user’s behalf.
Before we start implementing the above, I need to point out that all steps can be done either by using a Google client library or by calling the Google APIs directly. In the first solution you create and configure an object that defines the request parameters. In the second solution, you call the Google OAuth 2.0 endpoint directly by generating yourself the URL and setting the parameters on this URL. For simplicity, we will adopt the first solution.
To be able to run the python codes in this example, you will need to install the Google APIs Client library and authorization libraries:
pip install --upgrade google-api-python-client
pip install --upgrade google-auth google-auth-oauthlib google-auth-httplib2
pip install --upgrade flask
pip install --upgrade requests
Step 1 : Set Authorization Parameters
The code constructs a Flow object, which identifies your application using information from the client_secret.json file that you downloaded after creating authorization credentials. That object also identifies the scopes that your application is requesting permission to access and the URL to your application's auth endpoint, which will handle the response from Google's OAuth 2.0 server. Here, in scopes we ask to access Google Drive’s endpoint in readonly . The redirect_uri indicates to where the API server redirect the user after the user completes the login and consent. It should be somewhere in your application where you can receive the Authorization code.
Finally, the code sets the optional access_type and include_granted_scopes parameters.
This code does not trigger any call to the OAuth server, it just configures this parameters and build the authorization_url .
Step 2: Redirect to Google’s OAuth 2.0 server
This step happens when the application first requires authorization to access a certain private resource from Google Drive. In this case, we want the application to send an authorization request to the authorization_url built in step 1.
This will redirect the app to start the authorization protocol.
Step 3: Google prompts user for consent
The user will authenticate to his Google account and give his consent to the application to use his Google drive for read-only or read-write permissions. After completion, the Google API will redirect the flow to the uri specified above in redirect_uri . Google will manage this.
Step 4: Handle the OAuth 2.0 server response
If the user approves the access request, then the response contains an authorization code. If the user does not approve the request, the response contains an error message. The authorization code or error message that is returned to the web server appears on the query string, as shown below:
An error response:
https://example.com/oauth2callback?error=access_deniedAn authorization code response:
https://example.com/oauth2callback?code=4/P7q7W91a-oMsCeLvIaQm6bTrgtp7Step 5: Exchange authorization code for access tokens
This code should reside under a function that gets called by the redirect_uri specified above. It should be waiting for a response to be received from the Google OAuth 2.0 server.
The lines 2–6 reconstruct the flow that was previously constructed in Step 1. This is very important because we want to verify that the request we’re receiving from Google is in line with what we have sent. So this part of the code must be present twice, a first time when we send an authorization request to the Google OAuth 2.0 server and again when handling the response received.
The lines 8–9 fetch the token from the response. So this will send a request with the Authorization code, receive the token and store it in the credentials parameter in the flow object.
The lines 11–18 store the authorization parameters in the flask session to be reused later on.
At every time the app wants to access a private resource on Google drive, the app will check if the flask session contains a token . If it does, the app will use it directly to access the resource, else, it will launch the entire process previously discussed.
In the next article, we will see an example of a client-side application calling Google’s OAuth 2.0 servers. Stay tuned!
Get notified of interesting content by email! Subscribe to my newsletter.
Resources:
- Understand the Basics of OAuth 2.0 by Simon Saliba
- Google’s developer guide for OAuth 2.0 and web server applications
- Digital Ocean Tutorial by Mitchell Anicas
- OAuth official website
- Google’s developer guide for OAuth 2.0


