
Modern Authorization: Understand the Basics of OAuth 2.0
In this article, I will guide you through the OAuth 2.0 authorization protocol which is currently in use in the majority of web applications on the web. We will dive in the details of the Authorization Granting methods for Server Web Applications or Client-Side Applications like Javascript apps or mobile apps.

Authorization has existed since the beginning of the software industry. Applications quickly realized the importance of checking if a user has the right to execute certain tasks. It is present both online and offline. On machines for example, operating systems give some users better privileges than others. This ensures the safety of data and the good functioning of our IT systems. On the other hand, Online Authorization ensures than your ex is unable to read your private chats, or that your child can’t purchase online using your credit card number.
The most basic authorization method is the use of credentials like username and password. But as soon as the web became more complex, this method was no longer viable. In the recent years, the number of services on the web increased exponentially, and these services needed to communicate together. For example, a third-party design web application wants to store files in your Google drive, or a Content Marketing application requires a list of your Google contacts. Giving your Google credentials to these third party apps can cause big security problems. A new protocol called OAuth was developed to allow authorization between different services on behalf of users while minimizing security vulnerabilities and improving the user experience.
Note on Authentication vs Authorization:
The words ‘Authentication’ and ‘Authorization’ are sometimes used incorrectly. Authentication is simply revealing your identity to the controlling entity, whereas Authorization is asking the permission to perform a certain task. Usually, for a user to receive authorization to view or modify resources, he should be authenticated first. Although they come together, they should not be mistaken for one another.
Roles in the OAuth protocol
In any authorization protocol, there are several entities that come into play including at least the authentication server and the client. In OAuth, there are 4 entities involved:
- The Resource Owner: The resource owner is the user who authorizes an application to access their account. The application’s access to the user’s account is limited to the “scope” of the authorization granted (e.g. read or write access).
- The Client: The client is the application that wants to access the user’s account. Before it may do so, it must be authorized by the user, and the authorization must be validated by the API.
- The Resource Server: The resource server hosts the protected user accounts and data to be retrieved by the client.
- The Authorization Server: The authorization server verifies the identity of the user then issues access tokens to the client.
From an application developer’s point of view, a service’s API fulfills both the resource and authorization server roles.
Let’s take the example of a third-party application or 3P-app which needs to read some file from Alice’s Google drive. The resource owner is Alice who owns the file, the client is the 3P-app, the authorization server is Google’s OAuth server which is going to verify Alice’s identity and the Resource Server is Google Drive’s server.
Abstract Protocol Flow
The protocol is the way these different roles interact together to reach the final goal, which is giving the client secure access to the user’s private resources.
The abstract protocol consists of 6 simple steps:
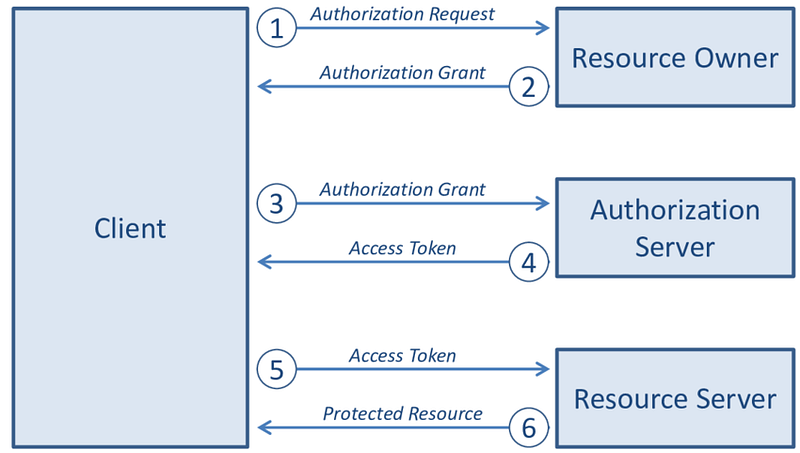
1- The client requests from the user authorization to access a private resource stored in the resource server of a certain web service
2- The user agrees to the authorization request
3- The client sends this agreement to the authorization server to signal that the resource owner trusts the client
4- The authorization server agrees (or not) to give the client access to the desired resource by sending back (or not) an access token that is recognized by the resource server
5- The client asks the resource server for the desired resource using the access token
6- The resource server responds with the protected resource
It is worthy to note two important aspects of this protocol:
- The authorization grant can have different forms as we will see in the next paragraph since the client can be a server application, a Javascript application or a mobile application. What is secure for one is totally unsecure for the other.
- The authorization key or token is different from the access token. The authorization and resource servers don’t speak the same language in the majority of cases.
Authorization Grant
In the abstract protocol above, the first four steps cover obtaining an authorization grant and an access token. The authorization grant type depends on the method used by the application to request authorization, and the grant types supported by the API. OAuth 2 defines four grant types, each of which is useful in different cases:
- Authorization Code: used with server-side Applications
- Implicit: used with Mobile Apps or Web Applications (applications that run on the user’s device)
- Resource Owner Password Credentials: used with trusted Applications, such as those owned by the service itself, not used between different services
- Client Credentials: used with Applications API access
The first two methods are by far the most used due to the security they offer. To understand how they work, let’s have a more detailed look.
Grant Type: Authorization Code
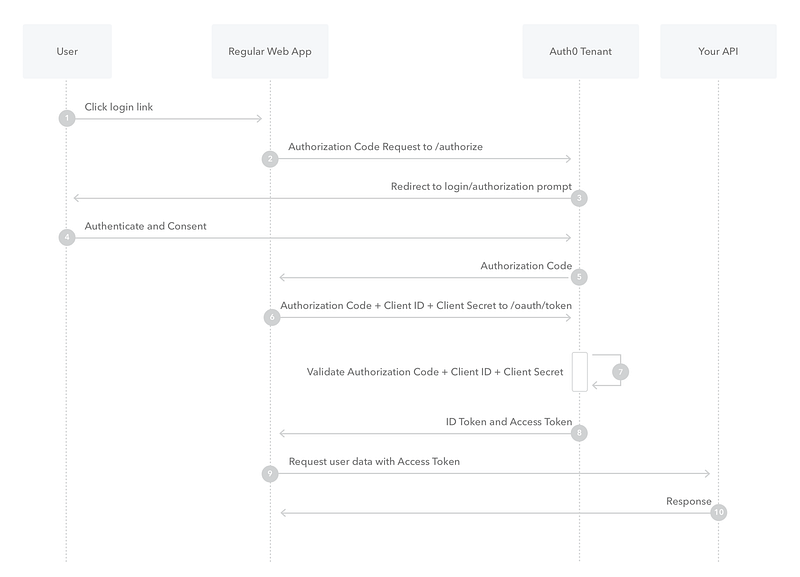
The user logs in to the 3P-app and wants to access a private resource. The 3P-app sends an authorization request to the authorization server. The auth server contacts directly the user to authenticate and give his consent to let the 3P-app access the desired resource. If the consent is granted, the Auth server then sends an authorization code to the 3P-app. The 3P-app then uses this code with its own Client Secret to request a token from the Auth server. After validation, the Auth server sends the access token to the 3P-app that will therefore be able to retrieve the resource using this access token.
The Client Secret is similar to a private key that the 3P-app already own and that the Auth server uses to identify this 3P-app amongst others. This Secret is generated by the Auth server to the developers of the 3P-app who hard-code it in the 3P-app source. This key makes the Authorization Code method the most secure one.
It is very important to note that the traffic between the Web app and the Auth server is completely hidden from the user because we’re considering here server-side applications. Developers should never use Authorization Grant using Authorization Code in client-side application like React or Angular apps, or mobile apps because the traffic between the 3P-app and the Auth server is available to the user. Meaning that anyone can get hold of the Client Secret when listening to the network traffic. For these type of applications, the Implicit method is used.
Grant Type: Implicit

The Implicit Authorization Grant is easier because it contains fewer exchanges between the 3P-app and the Auth server. The downside is, as you have probably guessed, less security because the Auth server will never verify that it is truly the 3P-app that got the access token. This method relies heavily on redirects.
The 3P-app sends a request to the Auth server to receive the access token. The Auth server redirects the user to a prompt where he gives his consent. The Auth server then redirects to the 3P-app with the access token.
This might cause security issues since at step 2, the redirect uri can be tampered to a malicious website. In this case, the user will give an untrusted service access to his private resources. The Auth server does not verify the redirect uri at any point in the process, unlike the previous method where the server validated the Client Secret.
At this point, you understand the basic mechanics of the most common authorization protocol. In the next article, I will guide you through using OAuth to call Google APIs both from a server-side app as well as from a client-side Javascript app.
Get notified of interesting content by email! Subscribe to my newsletter.
Resources:


