
A FastAPI for your Local LLM — part 1
Take Control of Your Local LLM with a Personal API: A Step-by-Step Guide to setup your own API for the LLM running on your PC as a service for your local network
As natural language processing (NLP) continues to gain popularity, the demand for pre-trained language models has increased. Hugging Face provides a wide range of pre-trained models, including the Language Model (LLM) with an inference API which allows users to generate text based on an input prompt without installing or downloading very heavy model weights files on your computer.
But what if you want to install in your personal network an AI? And how can you turn the text generation into a service for everyone in your network?
I mean, even without turning your projects into commercial use, maybe you want your personal business or organization to be able to make use of the AI powers.
I tried for weeks testing tutorials and Youtube videos to find a way to create my own fastAPI service using a LLM installed locally: and I failed. So after several trials and error I found a way to do it!
I decided to create a full Step to Step guide.
In Part 1 we will explore how to use FastAPI to host a local instance of the Hugging Face LLM. In part 2, that will be released very soon, we will see how to run it from a Streamlit app and from many apps in the same Local Area Network.
What is FastAPI?
FastAPI is a modern, fast (high-performance), web framework for building APIs with Python 3.7+ based on standard Python type hints. It is designed to be easy to use and to provide high performance, with automatic validation of request and response data, automatic generation of OpenAPI and JSON Schema documentation, and support for asynchronous code.
FastAPI it’s primarily designed for creating APIs, it can also be used to build interactive applications that provide a user interface to interact with machine learning models.
FastAPI is built upon two major Python libraries — Starlette (for web handling) and Pydantic (for data handling and validation).
Our roadmap
Here is an overview of the steps involved in building an interactive application using FastAPI:
Create a Virtual Environment and Install the dependencies
Download the LLM weights (MBZUAI/LaMini-Flan-T5–77M)
Explore FastAPI basic setup and run the server
Create an endpoint with a LLM inference
Build the FastAPI endpoints to Integrate your LLM
Test the inferences with different applications
Create a Virtual Environment and Install the dependencies
As a good practice let’s create a virtual environment to handle our project as a sandbox. All the dependencies will be installed only in the venv.
Create a new folder called YourFastAPI and go into the directory
➜  mkdir YourFastAPI
➜  cd YourFastAPI
Inside the YourFastAPI folder create the virtual environment and activate it
python3.10 -m venv venv  #create the virtual environment
source venv/bin/activate  #activate the venv
Now it is time to install the libraries required:
- The torch (torchvision and torchaudio too) library, langchain, transformers, sentence transformers and accelerate are responsible for running the LLM and interact with it;
- fastapi[all], asyncio and sse-starlette are responsible for the creation of the API;
- and finally Streamlit will be used to create a webapp with a beautiful interface, in the next article.
pip install torch==1.11.0 torchvision==0.12.0 torchaudio==0.11.0
pip install "fastapi[all]"
pip install transformers==4.30.2
pip install langchain==0.0.231
pip install sentence_transformers==2.2.2
pip install accelerate==0.20.3
pip install asyncio==3.4.3
pip install sse-starlette==1.6.1
pip install streamlit==1.24.0
Download the LLM weights (MBZUAI/LaMini-Flan-T5–77M)
I explained in my previous article about the LaMini series of models: they are tiny and very performing, and they can run on normal consumer CPU only.
For these reasons we are going to use the lightest good performing model based on Flan T5: MBZUAI/LaMini-Flan-T5–77M only 300 Mb. On my MacBook (Intel) I can run at the same time 3 different inferences!
There are many smart ways to download the model weights, but in old school style let’s click on the download icon next to EVERY file from the Hugging Face model card page for LaMini-Flan-T5–77M. Save them in a new sub-folder called model.

Your new folder should have the following files:
.gitattributes
.gitignore
README.md
config.json
generation_config.json
modelname.txt
pytorch_model.bin
special_tokens_map.json
tokenizer.json
tokenizer_config.json
training_args.bin
Create a file in the main folder called main.py and put the import instructions as follow:
# API import Section
from fastapi import FastAPI, Request
import asyncio
# LLM section import
import torch
from transformers import AutoTokenizer, AutoModelForSeq2SeqLM
# IMPORTS FOR TEXT GENERATION PIPELINE CHAIN
from langchain.llms import HuggingFacePipeline
from langchain import PromptTemplate, LLMChain
import copy
Go to the terminal, with the venv activated and run python main.py If you don’t see any errors means that everything is set!
Explore FastAPI basic setup and run the server
Our first step is to test if the API server works. So we will create a basic endpoint, basically our point to communicate with the server sending a request and getting a response.
Inside main.py add the following lines to instantiate a FastAPI object:
app = FastAPI(
    title="Inference API for Lamini-77M",
    description="A simple API that use MBZUAI/LaMini-Flan-T5-77M as a chatbot",
    version="1.0",
)
As you can see we are including some arguments, that are absolutely optional: a title, a description and a version.
Now, similarly to the instructions used in Flask applications, we create a call with the decorator @app.get() including the endpoint address, in our test it will be ‘/’, the root address.
@app.get('/')
async def hello():
    return {"hello" : "Medium enthusiast"}
And that is all! Really, this is already an API giving a reply when called at the root address.
Let’s test it. Save the main.py file that should look like this
# API import Section
from fastapi import FastAPI, Request
import asyncio
# LLM section import
import torch
from transformers import AutoTokenizer, AutoModelForSeq2SeqLM
# IMPORTS FOR TEXT GENERATION PIPELINE CHAIN
from langchain.llms import HuggingFacePipeline
from langchain import PromptTemplate, LLMChain
import copy

app = FastAPI(
    title="Inference API for Lamini-77M",
    description="A simple API that use MBZUAI/LaMini-Flan-T5-77M as a chatbot",
    version="1.0",
)
@app.get('/')
async def hello():
    return {"hello" : "Medium enthusiast"}
Go to the terminal window and with the venv activated run:
uvicorn main:app --reloadIf everything works fine you should get the following messages:
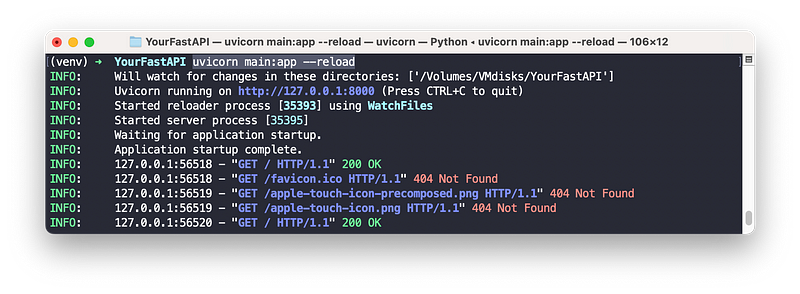
This is the server side: to see the API in action we can open in a browser the mentioned address http://127.0.0.1:8000
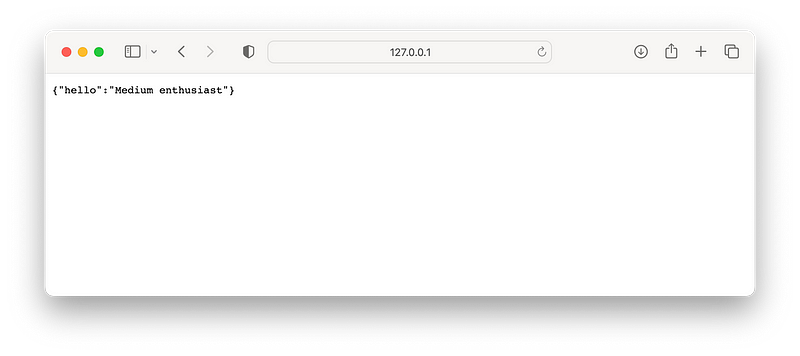
As expected a json object is given.
All the details of the API server endpoints are interactive. FastAPI provides an Automatic Interactive API documentation page that works when the server is active. Go in the browser to the address http://127.0.0.1:8000/docs
Our API documentation page displays its name, description, version, and a list of routes you can interact with. For now we have only one route. Let’s create a new one that include a fixed inference request to our model.
Create an endpoint with a LLM inference
How can we use FastAPI with our downloaded model? This is exactly what we do in this section. After loading with pytorch the weights and tokenizer, we initialize a pipeline with langchain and prepare a chain to be used for the inferences
Keep the imports and add the code before the @app.get(‘/’)…
### INITIALIZING LAMINI MODEL
checkpoint = "./model/"
tokenizer = AutoTokenizer.from_pretrained(checkpoint)
base_model = AutoModelForSeq2SeqLM.from_pretrained(checkpoint,
                                                    device_map='auto',
                                                    torch_dtype=torch.float32)

### INITIALIZING PIPELINE WITH LANGCHAIN
llm = HuggingFacePipeline.from_model_id(model_id=checkpoint,
                                        task = 'text2text-generation',
                                        model_kwargs={"temperature":0.45,"min_length":30, "max_length":350, "repetition_penalty": 5.0})
template = """{text}"""
prompt = PromptTemplate(template=template, input_variables=["text"])
chat = LLMChain(prompt=prompt, llm=llm)
If you have ever followed some of my articles you shouldn’t find this too hard: we are defining the checkpoint for the model, basically the folder where the weights and the tokenizer are. Then we initialize them with the from_pretrained() method.
Since I want to give some flexibility I decided to use the langchain library so that we will have a prompt template, that for now it is simply including our prompts.
Note that I kept
device_map='auto',torch_dtype=torch.float32This is required since we are going to use only CPU inference
To link everything together let’s add:
template = """{text}"""
prompt = PromptTemplate(template=template, input_variables=["text"])
chat = LLMChain(prompt=prompt, llm=llm)
Now every time we call chat.run(yourprompt) the chain will execute and provide you with the result.
We can add now a new endpoint that will reply with the Model text generation chain to a fixed question.
@app.get('/model')
async def model():
res = chat.run("Who is Ada Lovelace?")
result = copy.deepcopy(res)
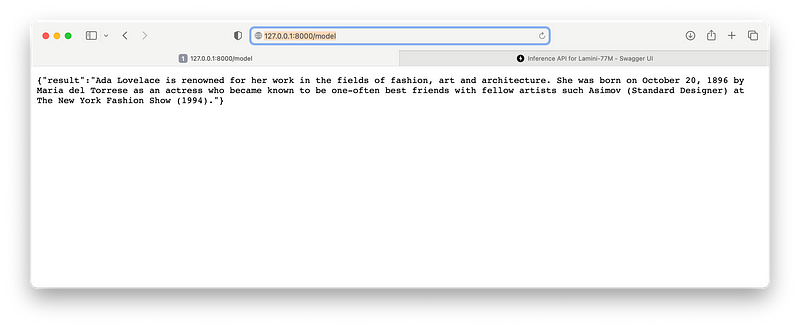
return {"result" : result}Our new endpoint will be at http://127.0.0.1:8000/model and will give us the LaMini reply to the prompt “Who is Ada Lovelace”.
I am putting here the file main.py but don’t worry you can find al the code into the Github repository.
# API import Section
from fastapi import FastAPI, Request
# LLM section import
import torch
from transformers import AutoTokenizer, AutoModelForSeq2SeqLM
# IMPORTS FOR TEXT GENERATION PIPELINE CHAIN
from langchain.llms import HuggingFacePipeline
from langchain import PromptTemplate, LLMChain
import copy

app = FastAPI(
    title="Inference API for Lamini-77M",
    description="A simple API that use MBZUAI/LaMini-Flan-T5-77M as a chatbot",
    version="1.0",
)

### INITIALIZING LAMINI MODEL
checkpoint = "./model/"
tokenizer = AutoTokenizer.from_pretrained(checkpoint)
base_model = AutoModelForSeq2SeqLM.from_pretrained(checkpoint,
                                                    device_map='auto',
                                                    torch_dtype=torch.float32)
### INITIALIZING PIPELINE WITH LANGCHAIN
llm = HuggingFacePipeline.from_model_id(model_id=checkpoint,
                                        task = 'text2text-generation',
                                        model_kwargs={"temperature":0.45,"min_length":30, "max_length":350, "repetition_penalty": 5.0})
template = """{text}"""
prompt = PromptTemplate(template=template, input_variables=["text"])
chat = LLMChain(prompt=prompt, llm=llm)
@app.get('/')
async def hello():
    return {"hello" : "Medium enthusiast"}

@app.get('/model')
async def model():
    res = chat.run("Who is Ada Lovelace?")
    result = copy.deepcopy(res)
    return {"result" : result}
Save the file, go to the terminal window and with the venv activated run:
uvicorn main:app --reloadIf it was still running you just need to refresh the browser page. Now to test the new inference go to the address http://127.0.0.1:8000/model:
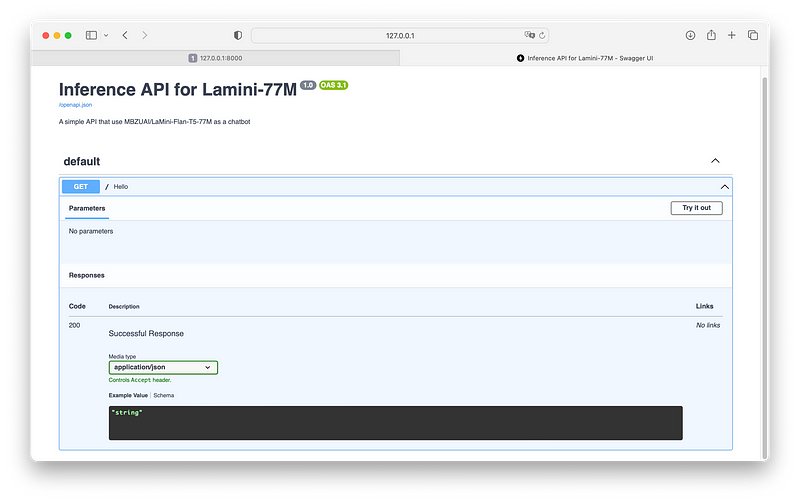
The automatic Doc page will give us some more details. Go in the browser to the address http://127.0.0.1:8000/docs to have a look at them
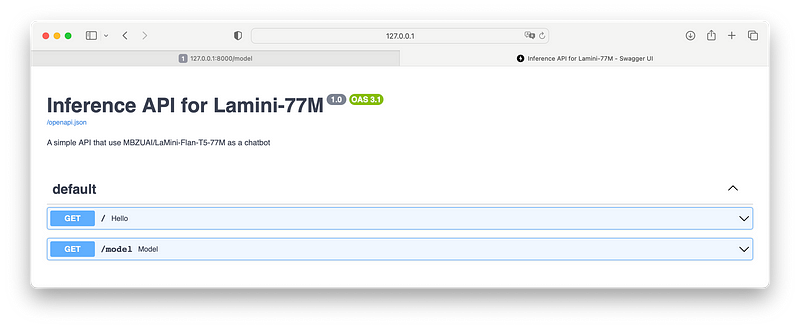
As you can see first of all there are 2 endpoints, and this is good. If we expand the GET method for /model we have something new…

First of all we do not have any Parameters: this means that we cannot interact with the API (in fact we are giving a fixed input “Who is Ada Lovelace“…). On the right you see a button “Try it out“ but will not work because of no Parameters available.
In the next session we will enable this feature to be able to interact without the model fully.
Build the FastAPI endpoints to Integrate your LLM
It is time to make the API interactive for us. We create a new endpoint for that, always as an async function (to make sure that is not executed only one time in the top-down execution order of the python script).
After the last endpoint add the following instructions:
@app.get('/lamini')
async def lamini(question : str):
    res = chat.run(question)
    result = copy.deepcopy(res)
    return result
Our entry point (endpoint) is ‘/lamini‘. Now we need to give a Parameter to it that is the string variable question:
async def lamini(question : str):Now we can run the chain storing the result into the res variable
res = chat.run(question)To keep the function free for another request we immediately use copy.deepcopy that, as stated in official documentation…
Assignment statements in Python do not copy objects, they create bindings between a target and an object. For collections that are mutable or contain mutable items, a copy is sometimes needed so one can change one copy without changing the other. This module provides generic shallow and deep copy operations…
Finally we return the result.
Save the file, go to the terminal window and with the venv activated run:
uvicorn main:app --reloadIf it was still running you just need to refresh the browser page. Now to test the new inference go to the address http://127.0.0.1:8000/lamini:

we are getting and error message! Don’t panic! it is normal, because we are not really sending any content to the FastASPI.
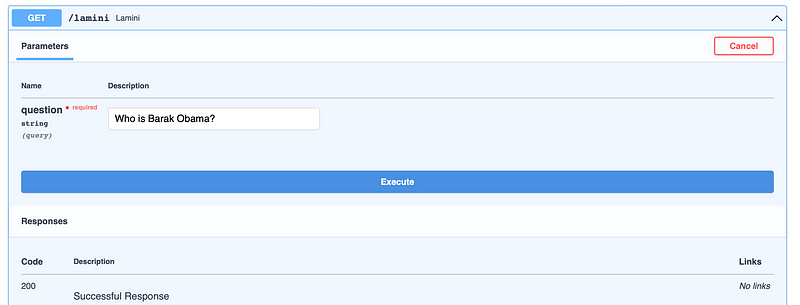
Go in the browser to the address http://127.0.0.1:8000/docs and expand the GET method for the /lamini endpoint. Now we can see that there is a parameter called question. We can click on Try it out and input a question to send to the API.
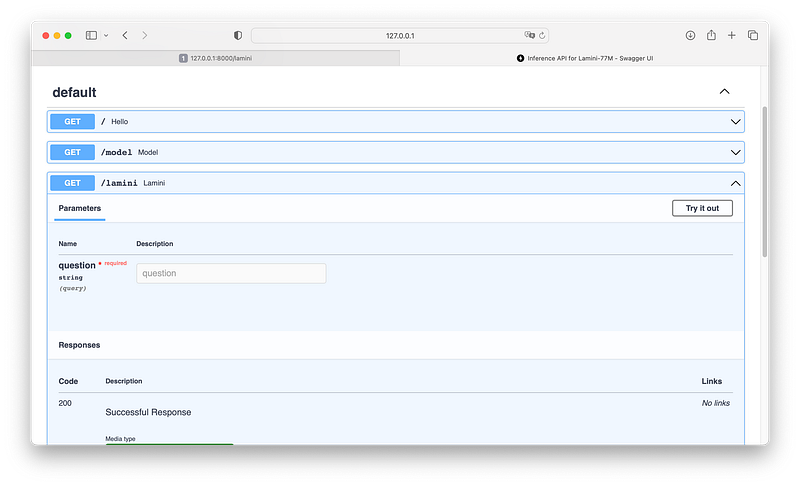
Let’s try with “Who is Barak Obama?“ and click on Execute
Clicking on execute will run the LLM chain under the hood. A brand new set of sections will appear, including our reply, a curl instruction and a request URL
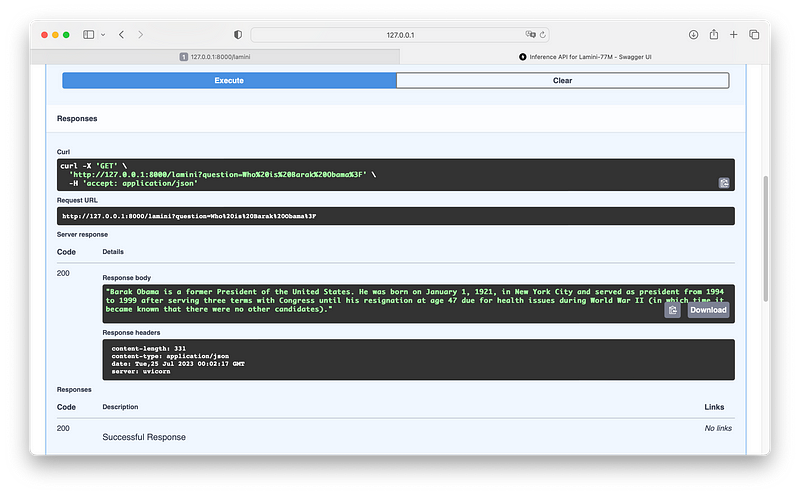
Here the sections. The Server Response with the response body:
"Barak Obama is a former President of the United States.
He was born on January 1, 1921, in New York City and served
as president from 1994 to 1999 after serving three terms
with Congress until his resignation at age 47 due for
health issues during World War II (in which time it
became known that there were no other candidates)."
The curl instruction
curl -X 'GET' \
  'http://127.0.0.1:8000/lamini?question=Who%20is%20Barak%20Obama%3F' \
  -H 'accept: application/json'
and the Request URL
http://127.0.0.1:8000/lamini?question=Who%20is%20Barak%20Obama%3FDo you want to know why I pasted the above curl and Request URL here? In the next session you will understand 😏
Test the inferences with different applications
With my surprise you can use a browser to get your response from the LLM FastAPI. So in this section we explore together 2 common methods.
URL Request
The Request URL is amazing: we can open our browser and simply input our question to the LLM writing it in the address bar after ?question=
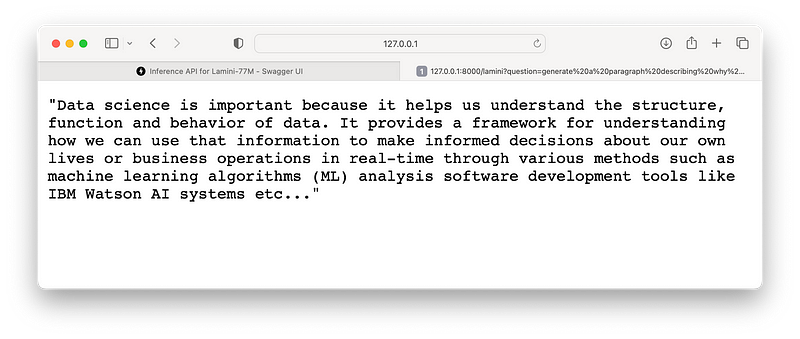
http://127.0.0.1:8000/lamini?question=Who%20is%20Barak%20Obama%3FSo if you open a new browser tab with the following address:
http://127.0.0.1:8000/lamini?question=generate a paragraph describing why data science is importantWe are sending the question “generate a paragraph describing why data science is important“
I got this response
HINT: If you are good at HTML/CSS and JavaScript you can build your web interface handling a simple URL request
Curl command
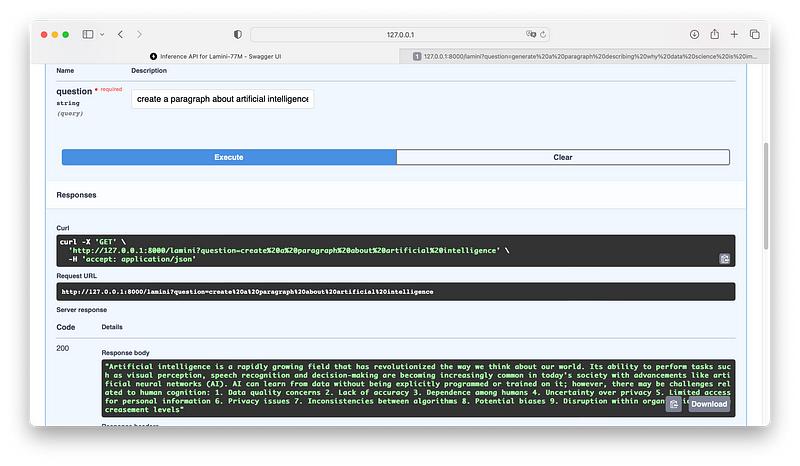
The second option is to run the request to the FastAPI directly from the terminal with a curl command. For example I tried in the docs page of the API to execute the question “create a paragraph about artificial intelligence“: the Response section has also a curl command…
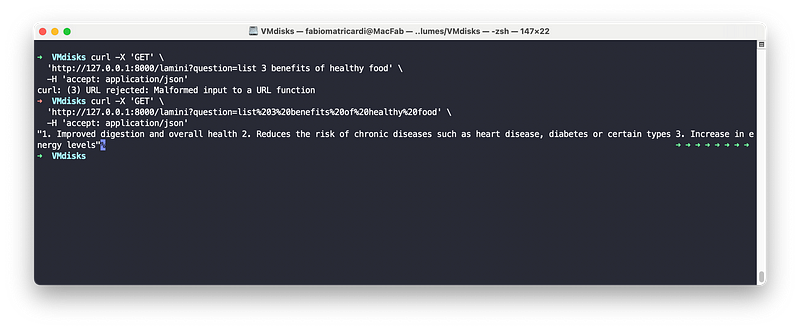
So let’s try to modify a little bit (list 3 benefits of healthy food) and run the command in the terminal window
curl -X 'GET' \
  'http://127.0.0.1:8000/lamini?question=list%203%20benefits%20of%20healthy%20food' \
  -H 'accept: application/json'
If you try to write the string like we did on the URL Request you will get an error since the string is not safe encoded. For the purpose of the test you can go on this page and encode the string: after that you can paste it into the terminal
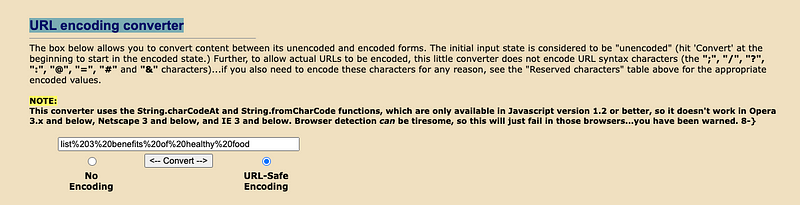
Here the example with no encoding and with safe url encoding
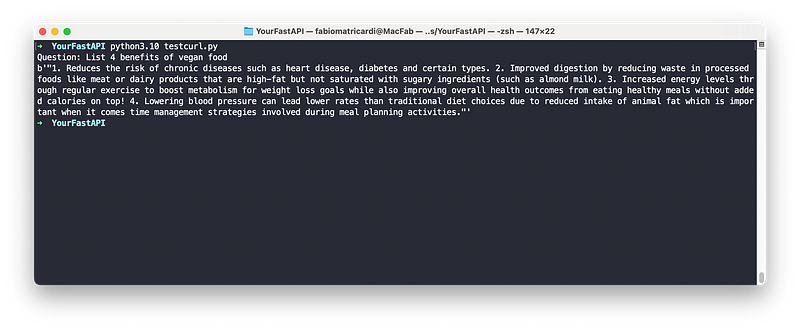
Just for fun we can run a new python script that we call testcurl.py.
NOTE: this is not a pythonic way to do things, but I wanted to give you the idea of how the cURL request works with the API, using python.
The testcurl.py will accept the question as an input, encode the url and run a subprocess to call the curl command. The result is a binary object
import  subprocess
import urllib.parse
import shlex
query = input("Question: ")
#Safe Encode url string
encodedquery =  urllib.parse.quote(query)
#Join the curl command textx
command = f"curl -X 'GET' 'http://127.0.0.1:8000/lamini?question={encodedquery}' -H 'accept: application/json'"

args = shlex.split(command)
process = subprocess.Popen(args, shell=False, stdout=subprocess.PIPE, stderr=subprocess.PIPE)
stdout, stderr = process.communicate()
print(stdout)
Save it and run in the terminal window `python3.10 testcurl.py`
Conclusions and way forward
In my next article we will use the template from my previous project to create a Streamlit Chat app that runs over the FastAPI we created. And you will be able to call it over your Local Network!
You can find the code and resources in my GitHub repo
Part 2 is OUT. If you want to continue our journey have a look at it!
If this story provided value and you wish to show a little support, you could:
- Clap 50 times for this story (this really, really helps me out)
- Sign up for a Medium membership using my link — ($5/month to read unlimited Medium stories)
- Follow me on Medium
- Read my latest articles https://medium.com/@fabio.matricardi
Here the previous projects for running a chatbot like Local LLM
References and inspirations
https://readmedium.com/building-and-deploying-a-fastapi-app-with-hugging-face-9210e9b4a713
https://github.com/mafda/ml_with_fastapi_and_streamlit/tree/main
https://www.freecodecamp.org/news/how-to-deploy-an-nlp-model-with-fastapi/


