A complete guide to a scalable app in Flutter — Part 6— Adding Flavors and setting up CI/CD for automatic testing and distribution to the app stores
Welcome back, fellow developers! I’m thrilled to have you join me on this continued exploration of building a scalable Flutter application. Your support and engagement through the earlier parts have been incredible and motivated me to keep writing.
In our previous installments, we’ve delved into the intricacies of Flutter’s architecture, dynamic theming with Material 3, and complex navigation using go_router. Today, we’re embarking on a new chapter — introducing flavors and automating development workflows.
What’s in Store for Part 6?
In this article, we’re extending our scope to address a crucial aspect of app development — environment-specific configurations. We’ll introduce two distinct flavors to our project: a DEV flavor for development and a PROD flavor for production. Beyond that, we’ll use GitHub workflows to set up our CI/CD pipelines.
Our workflows will focus on automating tests and managing Android and iOS signing with Fastlane, to then automating distribution to the app stores’ test channels. The goal is to streamline your development process, making it efficient, robust, and ready for the complexities of real-world app deployment.

Crafting Flavors in Flutter:
As we delve into the realm of creating flavors in Flutter, it’s essential to note that while flavors are fully supported on Android and iOS, there’s a little hiccup on macOS due to a bug. Fear not, though, as this guide will focus primarily on Android and iOS until the macOS bug-fix lands on the stable channel.
Flavoring Essentials
The process of creating different flavors in Flutter involves a systematic approach:
- Create
FlavorConfigin Dart: Develop aFlavorConfigusing the singleton pattern. This configuration serves as the cornerstone for providing the app with flavor-specific variables and properties. It’s the hub where flavor-specific properties and secrets are loaded. - EntryPoint Tweaks: Tailor separate entry points for each flavor. In our case, we’ll create
main_dev.dartandmain_prod.dartentry points to cater to the DEV and PROD flavors, respectively. - Platform-Specific Configuration: Add configurations specific to the Android and iOS platforms. Each platform might have its nuances to correctly create flavors.
- Update the launch configurations: we will update the launch.json files to automatically launch/debug the different flavors.
FlavorConfig
Let’s start with crafting the FlavorConfig using a singleton pattern. To keep things clean and optimized, we’ll leverage the dart-define pattern for initializing secrets. This pattern circumvents the need for the build runner, aligning with our commitment to optimizing build times. As a demonstration, we’ll include a baseUrl and two secret API keys in our FlavorConfig.
Here’s a sneak peek into what the secrets files and the FlavorConfig might look like:
/// dev_secrets.json
{
    "SECRET_API_KEY_1": "super_secret_dev_api",
    "SECRET_API_KEY_2": "even_more_secret_dev_api"
}
/// prod_secrets.json
{
"SECRET_API_KEY_1": "super_secret_prod_api",
"SECRET_API_KEY_2": "even_more_secret_prod_api"
}/// flavor_config.dart
enum Flavor { prod, dev }
class FlavorConfig {
static FlavorConfig? _;
static FlavorConfig get instance =>
_ ?? (_ = FlavorConfig.initDevEnvironment());
final Flavor _flavor;
final String _appName;
final AppColor _initialColor;
final String _baseUrl;
late final String _apiKey1;
late final String _apiKey2;
/// These are the public getters to use in our app
static bool get isDev => instance._flavor == Flavor.dev;
static Flavor get flavor => instance._flavor;
static String get appName => instance._appName;
static AppColor get initialColor => instance._initialColor;
static String get baseUrl => instance._baseUrl;
static String get apiKey1 => instance._apiKey1;
static String get apiKey2 => instance._apiKey2;
/// Initializer for the dev environment
factory FlavorConfig.initDevEnvironment() {
return _ = FlavorConfig._flavorConfig(
flavor: Flavor.dev,
appName: '[DEV] GBAccetta Feed',
initialColor: AppColor.deepPurple,
baseUrl: 'https://devbaseurl.com',
);
}
/// Initializer for the prod environment
factory FlavorConfig.initProdEnvironment() {
return _ = FlavorConfig._flavorConfig(
flavor: Flavor.prod,
appName: 'GBAccetta Feed',
initialColor: AppColor.green,
baseUrl: 'https://prodbaseurl.com',
);
}
/// Generic private constructor to be used by our initializer
FlavorConfig._flavorConfig({
required String appName,
required AppColor initialColor,
required Flavor flavor,
required String baseUrl,
}) : _baseUrl = baseUrl,
_initialColor = initialColor,
_appName = appName,
_flavor = flavor {
/// These are our app secrets from [flavor_secrets.json] file
_apiKey1 = const String.fromEnvironment('SECRET_API_KEY_1');
_apiKey2 = const String.fromEnvironment('SECRET_API_KEY_2');
}
}To make sure that our secrets are not committed to GitHub remember to update the .gitignore file with the following line:
# Environments secrets
*_secrets.json
Update the main.dart file
Now, let’s turn our attention to main.dart and introduce two flavor-specific variants: main_dev.dart and main_prod.dart. While our current sample projects might exhibit minimal disparities between the two, it’s crucial to acknowledge that as projects expand, the distinctions between flavors often become more pronounced. A common scenario involves additional log interceptors tailored for the development environment, serving as valuable aids in crafting and refining new features. The beauty of flavoring lies in its adaptability as projects evolve.
/// main_dev.dart
....
void main() async {
  // Here is where we initialize the DEV environment
  FlavorConfig.initDevEnvironment();
  WidgetsFlutterBinding.ensureInitialized();
  await serviceLocatorInitialization();
  await getIt<SharedPrefsService>().configure();
  runApp(const GBAccettaApp());
}
....
/// main_prod.dart
....
void main() async {
// Here is where we initialize the PROD environment
FlavorConfig.initProdEnvironment();
WidgetsFlutterBinding.ensureInitialized();
await serviceLocatorInitialization();
await getIt<SharedPrefsService>().configure();
runApp(const GBAccettaApp());
}
....Create Flavors on Android
On Android this is pretty straightforward:
- In the build.gradle file of the android/app module, inside the android block we need to declare the two
productFlavorsand a the commonflavorDimensions.In this example we customized the app_name used in the manifest activitylabeland we added anapplicationIdSuffixand aversionNameSuffixto thedevflavor.
android {
    .............
    flavorDimensions "flavor-type"
    productFlavors {
        prod {
            dimension "flavor-type"
            resValue "string", "app_name", "GBAccetta Feed"
        }
        dev {
            dimension "flavor-type"
            resValue "string", "app_name", "[DEV] GBAccetta Feed"
            applicationIdSuffix ".dev"
            versionNameSuffix ".dev"
        }
    }
    ..........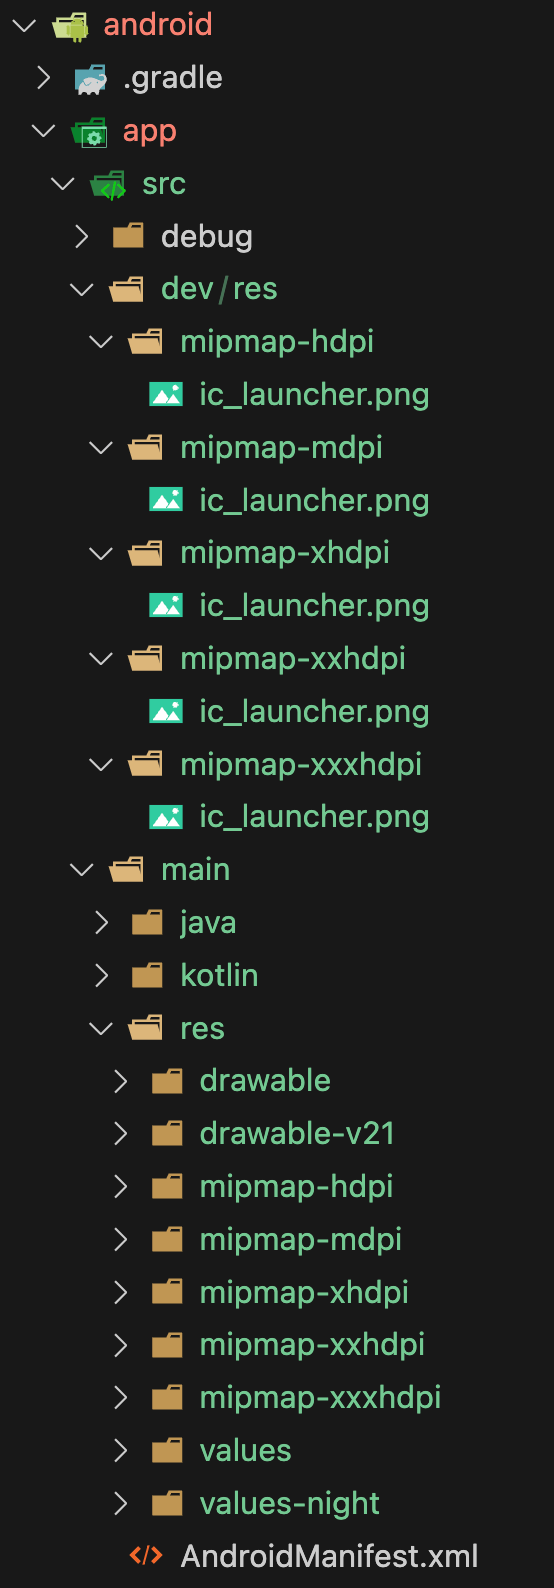
}- Any resource, such as the app icon that we want to change depending on the flavor can be customized by simply creating a file with the same name in a dev directory that reflects the main structure folder. In this example, we only override the
ic_launchericon:
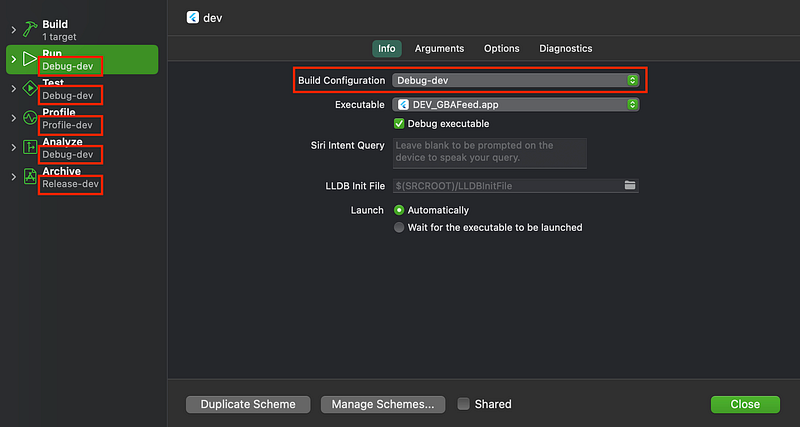
Create configurations and schemes on iOS
For iOS creating flavors is a little bit more tricky and require opening the Runner workspace with Xcode. We will need to do 3 steps:
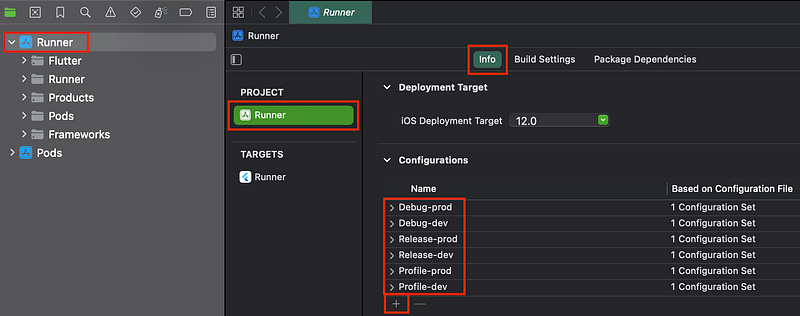
- In the Info tab of the Runner Project, we renamed the existing
Debug,Release,andProfileconfigurations toDebug-prod,Release-prod,andProfile-prod,and then by using the+button we duplicated each one of them asDebug-dev,Release-dev,andProfile-dev
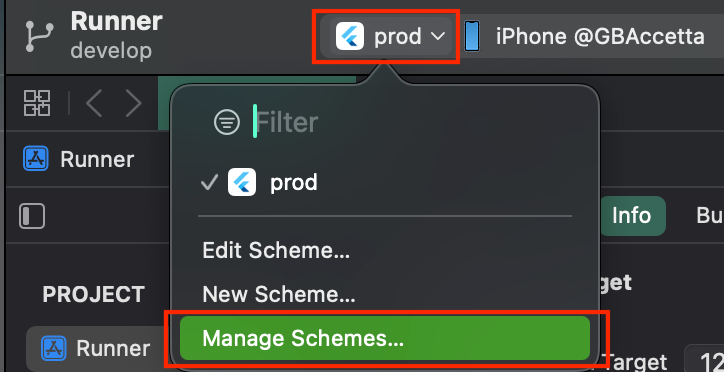
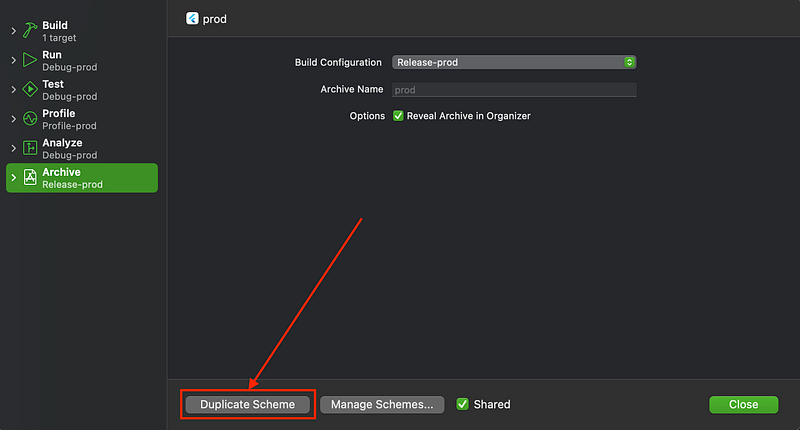
- in the schemes management screen, we renamed the
Runnerscheme asProdand then duplicated it into aDevscheme. After duplicating it, we entered the edit scheme page of the new Dev scheme and changed the configurations associated with each running mode (3rd screenshot):
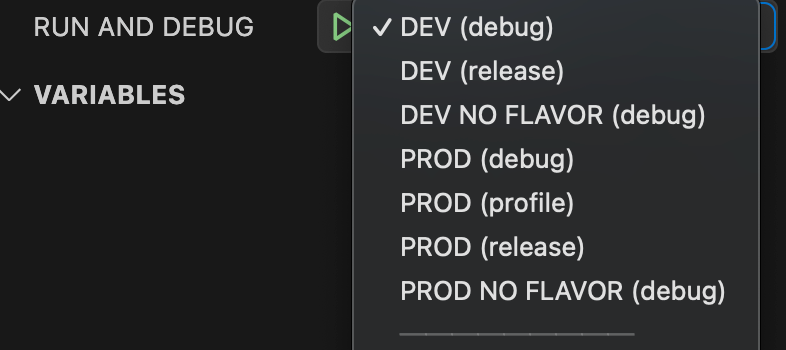
Update the launch configurations
Once a flavor is established, the flutter command needed to launch that flavor takes on a form similar to this: flutter run -release -flavor prod -t main_prod.dart. Furthermore, the integration of the dart-define command is imperative to fetch secrets from the JSON file we created earlier: flutter run -release -flavor prod -t main_prod.dart -dart-define-from-file ./prod_secrets.json.
Additionally, we must configure the launch settings to facilitate the launch of a Flutter app without flavors. This becomes necessary for scenarios where we intend to run the app on macOS, Windows, or the web, given that flavors are currently unsupported on these environments. Consequently, the launch.json file assumes a structure resembling the following:
/// launch.json
{
    "version": "0.2.0",
    "configurations": [
        {
            "name": "DEV (debug)",
            "program": "lib/main_dev.dart",
            "request": "launch",
            "type": "dart",
            "flutterMode": "debug",
            "args": [
                "--flavor",
                "dev",
                "--dart-define-from-file",
                "./dev_secrets.json"
            ]
        },
................
        {
            "name": "PROD (release)",
            "program": "lib/main_prod.dart",
            "request": "launch",
            "type": "dart",
            "flutterMode": "release",
            "args": [
                "--flavor",
                "prod",
                "--dart-define-from-file",
                "./prod_secrets.json"
            ]
        },
        {
            "name": "PROD NO FLAVOR (debug)",
            "program": "lib/main_prod.dart",
            "request": "launch",
            "type": "dart",
            "flutterMode": "debug",
            "args": [
                "--dart-define-from-file",
                "./dev_secrets.json"
            ]
        },
    ]
}
And this is all the configurations added in our sample project:
CI: automating tests and coverage report
Our next step involves crafting the initial GitHub workflow file to automate the manual execution of unit tests and eventually share the coverage report as a comment on the GitHub Pull Request. For this step I took some inspiration from this excellent article by Olivier Revial.
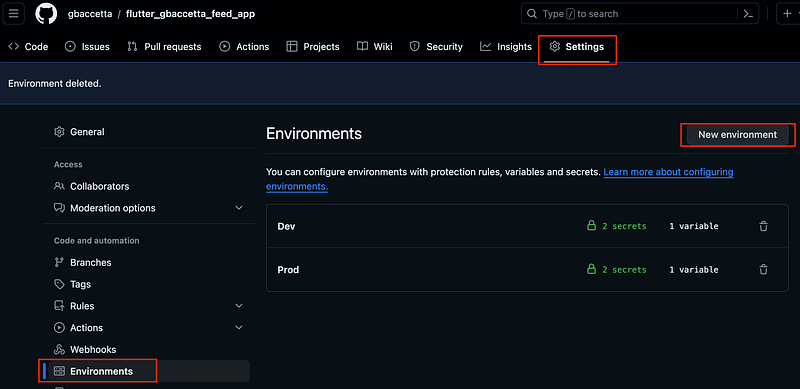
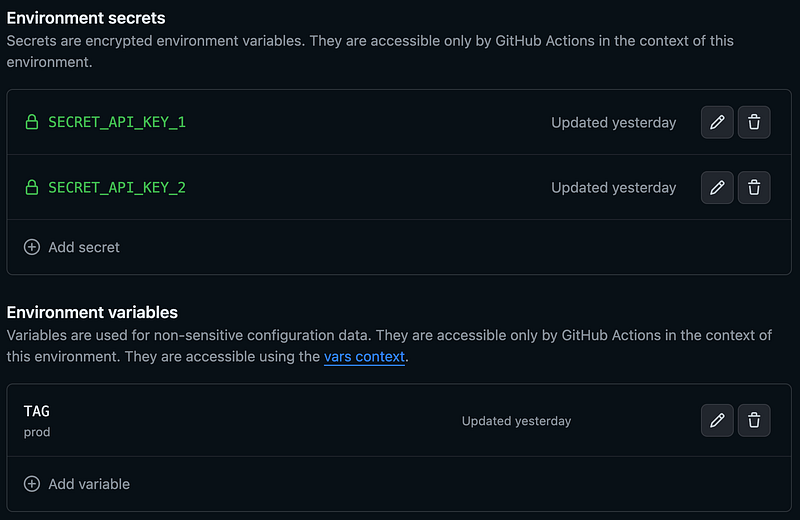
Ideally, we want these workflows to function seamlessly in both the Dev and Prod environments. To achieve this, a few configurations are necessary within the GitHub repository. Specifically, we must establish the two environments, incorporate variables, and introduce our two secrets.
The TAG variable plays a pivotal role in streamlining the environment targeting within our workflows. For instance, to invoke main_dev.dart, we utilize main_{{ vars.TAG }}.dart to dynamically generate the suffix based on the environment. As for the two secrets, they come into play when reconstructing the JSON file referenced earlier.
In this article, we will create two workflow files. We will be creating a tests_and_coverage.yml and a deploy_to_appstore.yml to automate distribution to the stores.
tests_and_coverage.yml
This Workflow will be written to run automatically on every Pull Request to the main branch and configured as a reusable workflow that will be called by the deploy_to_appstore workflow. As we did in previous articles, the best way to understand it is to read directly the code and comment on important points:
One important thing to notice is that we will run by default this job on the Prod environment, unless another environment is specified in the input when this job is run by another job:
environment:
      name: ${{ inputs.environment || 'Prod' }}
name: 📊 Tests And Coverage
# Allow to post comments back on the pull-requests
permissions: write-all
# This concurrency group will stop the workflow if a new commit is pushed on the same
# branch before the previous job finished. This can help saving precious github minutes
concurrency:
group: ${{ github.workflow }}-${{ github.head_ref }}
cancel-in-progress: true
on:
# make this reusable by other workflows
workflow_call:
inputs:
environment:
default: 'Prod'
type: string
# Triggered automatically on all pull requests to main
pull_request:
branches:
- main
types: [opened, reopened, synchronize, ready_for_review]
paths-ignore:
- '**.md' # do not trigger job if only docs were updated
jobs:
run-tests-with-coverage:
# do not run job if the pull request is a draft
if: github.event.pull_request.draft == false
environment:
name: ${{ inputs.environment || 'Prod' }}
runs-on: ubuntu-latest
timeout-minutes: 10
steps:
- name: ⬇️ Checkout code
uses: actions/checkout@v3
- name: ⚙️ Install Flutter
uses: subosito/flutter-action@v2
with:
channel: 'stable'
cache: true # This will allow to benefits from the cache mechanism
- name: 👁️ Check Flutter version
run: flutter --version
- name: ⚙️ Install LCOV
run: |
sudo apt-get update
sudo apt-get -y install lcov
# usually secrets are not needed for tests but we want here to demonstrate how to create a
# an environment secret fil to be used with the dart-define command in our jobs.
# we will use jsdaniell/create-json action to create the file from the github secrets.
- name: 🔐 Create ${{ vars.TAG }}_secrets.json file
id: secrets
uses: jsdaniell/[email protected]
with:
name: "${{ vars.TAG }}_secrets.json"
# The content of the json we want to create
json: |
'{
"SECRET_API_KEY_1":"${{ secrets.SECRET_API_KEY_1 }}",
"SECRET_API_KEY_2":"${{ secrets.SECRET_API_KEY_2 }}"
}'
dir: './'
- name: ▶️ Run tests with generate coverage report
run: |
flutter pub get;
flutter test --coverage --dart-define-from-file ./${{ vars.TAG }}_secrets.json;
# This action will do something only when triggered from a PR
- name: 📄 Report code coverage
uses: romeovs/[email protected]
with:
lcov-file: coverage/lcov.info
github-token: ${{ secrets.GITHUB_TOKEN }}
title: 'Coverage Report in ${{ vars.TAG }} environment'CD: Automate distribution to Google Play and App Store
Moving on to our second workflow file, deploy_to_appstore.yml, this workflow is triggered by two events. Whenever a new tag, starting with ‘v’, is created, we aim to automatically deploy a fresh version to the internal test track on Google Play and TestFlight on the Apple App Store. Additionally, we want the flexibility to manually initiate this job directly from the GitHub interface.
To facilitate distribution to these stores, we’ll leverage Fastlane to streamline the code signing and upload procedures. Specifically, we’ll utilize supply for Android and gym for iOS. While I won't delve into an exhaustive explanation of Fastlane, assuming some familiarity with the tool, we'll concentrate on the integration within our workflow.
To establish secure connections with Google Play and the App Store, the addition of new secrets to our environment is essential. We’ll create these secrets: GOOGLE_PLAY_SVA_KEY for Play Store access (refer to this guide for generating a Google service account), and APPLE_KEY_ID, APPLE_ISSUER_ID, and APPLE_KEY_CONTENT for App Store access (use this guide for generating them). Furthermore we will also need the upload key certificate for the Google Play Console. This will require 4 additional secrets to manage the Play Store upload key: ANDROID_UPLOAD_KEYSTORE, ANDROID_UPLOAD_KEYSTORE_PASSWORD, ANDROID_UPLOAD_KEY_ALIAS, ANDROID_UPLOAD_KEY_PASSWORD .
Our workflow encompasses three key steps:
- Determine the Next Build Number: Check the last published build number to ascertain the next one to be used.
- Run Tests and Coverage: Execute tests and assess coverage using the established workflow.
- Build and Deploy Android and iOS Apps: Initiate the build and deployment processes for both Android and iOS applications.
For a more detailed understanding, let’s delve directly into the code:
name: 📲 Deploy to App Stores

on:
  # We want to trigger an upload to the apple and play store when
  # creating a new tag starting with the v suffix
  push:
    tags:
      - "v*"
  # We will also add a manual dispatch trigger
  workflow_dispatch:
    inputs:
      environment:
        description: 'Target environment'
        required: true
        default: 'Prod'
        type: choice
        options:
          - Dev
          - Prod
      platform:
        description: 'Target app store (Google, Apple or both)'
        required: true
        default: 'both'
        type: choice
        options:
          - Apple App Store
          - Google Play Store
          - both

jobs:
  determine-next-build-number:
    environment:
      # default to prod environment
      name: ${{ inputs.environment || 'Prod' }}
    runs-on: ubuntu-latest
    timeout-minutes: 5
    steps:
      - name: ⚙️ Setup Ruby
        uses: ruby/setup-ruby@v1
        with:
          ruby-version: '2.7'
      - name: ⚙️ Install fastlane
        run: gem install fastlane -NV
      - name: 👉 Get next Internal track version code
        run: |
          cd android;
          echo ${{secrets.GOOGLE_PLAY_SVA_KEY}} | base64 -d > sa.json
          fastlane next_internal_track_version_code_${{ vars.TAG }};
          cd ..;
      - name: 👉 Get next TestFlight build number
        env:
          APPLE_KEY_ID: '${{ secrets.APPLE_KEY_ID }}'
          APPLE_ISSUER_ID: '${{ secrets.APPLE_ISSUER_ID }}'
          APPLE_KEY_CONTENT: '${{ secrets.APPLE_KEY_CONTENT }}'
        run: |
          cd ios;
          fastlane next_testflight_build_number_${{ vars.TAG }};
          cd ..;
      - name: 👉 Get max between the build_number and version_code
        run: |
          echo "build_number=$(( $ios_build_number  > $android_version_code ? $ios_build_number : $android_version_code ))" >> $GITHUB_ENV;
    outputs:
      build_number: ${{ env.build_number }}

  test-and-coverage:
    needs: determine-next-build-number
    name: 📊 Test And Coverage
    uses: ./.github/workflows/tests_and_coverage.yml
    secrets: inherit
    with:
      environment: ${{ inputs.environment || 'Prod' }}

  deploy-android-internal-test-app:
    # check if platform was included in the inputs
    if: inputs.platform == 'Google Play Store' || inputs.platform == 'both'
    needs: test-and-coverage
    runs-on: ubuntu-latest
    timeout-minutes: 30
    steps:
      - name: ⬇️ Checkout code
        uses: actions/checkout@v3
      - name: ⚙️ Setup Java
        uses: actions/setup-java@v3
        with:
          distribution: 'zulu'
          java-version: "12.x"
          cache: 'gradle'
        id: java
      - name: ⚙️ Install Flutter
        uses: subosito/flutter-action@v2
        with:
          channel: 'stable'
          cache: true # This will allow to benefits from the cache mechanism
      - name: 👁️ Check Flutter version
        run: flutter --version
      - name: 🔐 Add android signing credentials
        run: |
          cd android;
          base64 -d <<< ${{ secrets.ANDROID_UPLOAD_KEYSTORE }} > keystore.jks;
          echo storeFile=../keystore.jks > key.properties;
          echo storePassword=${{ secrets.ANDROID_UPLOAD_KEYSTORE_PASSWORD }} >> key.properties;
          echo keyAlias=${{ secrets.ANDROID_UPLOAD_KEY_ALIAS }} >> key.properties;
          echo keyPassword=${{ secrets.ANDROID_UPLOAD_KEY_PASSWORD }} >> key.properties;
          cd ..;
      - name: 🔐 Create [env]_secrets.json file
        id: create-json
        uses: jsdaniell/[email protected]
        with:
          name: "${{ vars.TAG }}_secrets.json"
          json: |
            '{
              "SECRET_API_KEY_1":"${{ secrets.SECRET_API_KEY_1 }}",
              "SECRET_API_KEY_2":"${{ secrets.SECRET_API_KEY_2 }}"
            }'
          dir: './'
      - name: 📱 Build android app bundle
        run: |
          flutter build appbundle
            --release
            --obfuscate
            --split-debug-info=android/build/symbols/symbols_${{ needs.determine-next-build-number.outputs.build_number }}
            --flavor ${{ vars.TAG }} -t lib/main_${{ vars.TAG }}.dart
            --build-number=${{ needs.determine-next-build-number.outputs.build_number }}
            --dart-define-from-file ./${{ vars.TAG }}_secrets.json;
      - name: Save symbols artifact
        uses: actions/upload-artifact@v3
        with:
          name: symbols_${{ needs.determine-next-build-number.outputs.build_number }}
          path: android/build/symbols/symbols_${{ needs.determine-next-build-number.outputs.build_number }}/*
          retention-days: 90
      - name: ⚙️ Setup Ruby
        uses: ruby/setup-ruby@v1
        with:
          ruby-version: '2.7'
      - name: ⚙️ Install fastlane
        run: gem install fastlane -NV
      - name: 📲 Deploy android app to Play Console Internal Track
        run: |
          cd android;
          echo ${{secrets.GOOGLE_PLAY_SVA_KEY}} | base64 -d > sa.json
          fastlane distribute_play_store_${{ vars.TAG }};
          cd ..;

  deploy-ios-test-flight-app:
    # check if platform was included in the inputs
    if: inputs.platform == 'Apple App Store' || inputs.platform == 'both'
    needs: test-and-coverage
    runs-on: macos-latest
    timeout-minutes: 60
    steps:
      - name: ⬇️ Checkout code
        uses: actions/checkout@v3
      - name: ⚙️ Install Flutter
        uses: subosito/flutter-action@v2
        with:
          channel: 'stable'
          cache: true # This will allow to benefits from the cache mechanism
      - name: 👁️ Check Flutter version
        run: flutter --version
      - name: ⚙️ Setup Ruby
        uses: ruby/setup-ruby@v1
        with:
          ruby-version: '2.7'
      - name: ⚙️ Install fastlane
        run: gem install fastlane -NV
      - name: 🔐 Create [env]_secrets.json file
        id: create-json
        uses: jsdaniell/[email protected]
        with:
          name: "${{ vars.TAG }}_secrets.json"
          json: |
            '{
              "SECRET_API_KEY_1":"${{ secrets.SECRET_API_KEY_1 }}",
              "SECRET_API_KEY_2":"${{ secrets.SECRET_API_KEY_2 }}"
            }'
          dir: './'
      - name: 📱 Build ios TestFlight app
        env:
          MATCH_REPO: ${{ secrets.MATCH_REPO }}
          MATCH_PASSWORD: ${{ secrets.MATCH_PASS }}
        run: |
          flutter build ios
            --release
            --obfuscate
            --split-debug-info=ios/build/symbols/symbols_${{ needs.determine-next-build-number.outputs.build_number }}
            --flavor ${{ vars.TAG }} -t lib/main_${{ vars.TAG }}.dart
            --no-codesign
            --build-number=${{ needs.determine-next-build-number.outputs.build_number }}
            --dart-define-from-file ./${{ vars.TAG }}_secrets.json;
          cd ios;
          fastlane build_test_flight_${{ vars.TAG }} build_number:${{ needs.determine-next-build-number.outputs.build_number }};
          cd ..;
      - name: ⬇️ Save symbols artifact
        uses: actions/upload-artifact@v3
        with:
          name: symbols_${{ needs.determine-next-build-number.outputs.build_number }}
          path: ios/build/symbols/symbols_${{ needs.determine-next-build-number.outputs.build_number }}/*
          retention-days: 90
      - name: 📲 Deploy TestFlight app to App Store Connect
        env:
          APPLE_KEY_ID: '${{ secrets.APPLE_KEY_ID }}'
          APPLE_ISSUER_ID: '${{ secrets.APPLE_ISSUER_ID }}'
          APPLE_KEY_CONTENT: '${{ secrets.APPLE_KEY_CONTENT }}'
        run: |
          cd ios;
          fastlane distribute_test_flight_${{ vars.TAG }}
          cd ..;
That’s a lot!!!
As you can see there are multiple fastlane lanes that are used here:
fastlane next_testflight_build_number_${{ vars.TAG }};fastlane next_internal_track_version_code_${{ vars.TAG }};fastlane build_test_flight_${{ vars.TAG }} build_number: [BUILD_#]fastlane distribute_play_store_${{ vars.TAG }};fastlane distribute_test_flight_${{ vars.TAG }}
If you are interested in their implementation, I’ll let you check out the code on the FastFile files on GitHub, where you can find the whole project from part 6 in the root directory and other parts in the dedicated subdirectory.
Yahoo! We can now release to the app stores !!
We Are ready
We have now covered all the essential topic I wanted to discuss in this guide. Once I have some time as proposed I will write few bonus parts to complete the course (internationalization, fastlane, app event management etc…)
I would greatly appreciate your thoughts and feedback on this first article. Please feel free to share any suggestions or ideas for improvement in the comments section below. It’s important to remember that there is no universally perfect approach to application architecture, and the one I have presented here is based on my personal experiences and has proven to be highly effective and scalable across various use cases over the years.
Support
If you found this guide helpful and insightful, your appreciation would mean a lot! Clapping is a great way to show your support. If you enjoyed and benefited from the content, consider giving it up to 50 claps. Your feedback helps in recognizing and acknowledging the effort and time put into creating this guide. Your recognition inspires continuous improvement and motivates for more comprehensive and valuable content creation.


