
Tortoise-TTS Fully Explained | Part 2 | Autoregressive Model (GPT-2)
In this series, I will take you on a deep dive into the architecture of the Tortoise-TTS model and explain in detail how the Tortoise-TTS model works. This will not only be done theoretically, but will also be accompanied by code.
If you like videos more, feel free to check out my YouTube video to this article:
Table of Contents
- Part 1 — The Overall Architecture
- Part 2 — The Autoregressive Model
- Part 3 — The CLVP Model
- Part 4 — The Diffusion Model
- Part 5 — The Vocoder Model
Enough of the theoretical background, let’s go through the code to generate speech with the Tortoise-TTS architecture. To do this, we first need to install the necessary libraries to run the Tortoise model:
git clone https://github.com/neonbjb/tortoise-tts.git > /dev/null 2>&1
cd tortoise-tts
pip3 install -r requirements.txt > /dev/null 2>&1
python3 setup.py install > /dev/null 2>&1
When running the Tortoise-TTS architecture and the models it consists of, I highly recommend you to use a GPU. Personally, I will use an NVIDIA RTX 6000 Ada GPU, which NVIDIA kindly provided me to support my YouTube and Medium channels. The RTX 6000 Ada, which is a high-end GPU, has the following specs:
- 568 Tensor Cores
- 960 GB/s Memory Bandwidth
- 48GB VRAM
Step 0: Download Model Weights and Initialize All models
Once all the required libraries are installed, we first need to download the model weights and initialize the autoregressive, CVLP, diffusion and vocoder model. In this step, we will also import all the modules and functions used in this article. In addition, we define the temporary_cuda method, which makes it possible to temporarily load a model into the VRAM and unload it into the RAM after execution. Since the Tortoise architecture consists of four different models, this prevents out-of-memory errors on the GPU:
# Imports used through the rest of the article.
import torch
import torchaudio
import torch.nn as nn
import torch.nn.functional as F

import gc
import IPython

from tortoise.api import TextToSpeech, fix_autoregressive_output
from tortoise.utils.audio import load_audio, load_voice, load_voices, denormalize_tacotron_mel
from tortoise.utils.diffusion import SpacedDiffusion, space_timesteps, get_named_beta_schedule
from contextlib import contextmanager

# This will download all the models used by Tortoise from the Hugging Face hub.
tts = TextToSpeech(kv_cache=True)

# This allows to temporarily load a model to VRAM and
# offload the model to RAM after execution
@contextmanager
def temporary_cuda(model):
    # load model to VRAM (GPU)
    m = model.to("cuda")
    yield m
    # offload model again to RAM (CPU)
    m = model.cpu()
Step 1: Define Text and Voice for Which Speech Is to Be Generated
Now it is time to define the text and the voice for which the speech is to be generated. For the audio samples, you need to make sure that they have a sample rate of 22.05 kHz to achieve the best speech synthesis results. Since we are using the sample files from the voices folder in the Tortoise repository, we do not need to pre-process them. However, I have already described the conversion in another article.
text = "Learning how AI models work and using them is fun!"

# Pick one of the voices from the voices folder
voice = 'tom'

# load voice samples (wav files) as tensor (elements in voice_samples have
# variable length since the wav samples have different length)
voice_samples, _ = load_voice(voice)
Step 2: Calculate Latent Vector Characterising the Voice in the Given samples
To be able to generate speech that sounds similar to the speech of a few given samples, we need to extract the features of the speaker’s voice and pass them to corresponding models. To do this, we use a latent vector (also called embedding) that efficiently encodes the features of the speaker’s voice in a low-dimensional vector. Within the Tortoise TTS architecture, this latent vector is passed as conditioning to the autoregressive and diffusion models as input. Conditioning means that the generation process of both the autoregressive and the diffusion model is guided by the information within the latent vector. Specifically, we will use the get_conditioning_latents method to calculate the latent vectors for both models. The calculation of the latent vectors can be summarized as follows:
- Clipping audio sample to 6 seconds length by either padding the sample with 0 values (if shorter than 6s) or randomly shortening the sample (if longer than 6s)
- Converting the 6s audio samples to Mel spectrograms
- Compute speaker embeddings (expressive vectors that encode aspects of the provided clips like voice, intonation, and acoustic) using learned encoder
- Calculate the mean of all speaker embeddings to get the final speaker embedding
################################################################################
# get_conditioning_latents method:
# input: list of audio samples (each as tensor) of a particular voice
# processing of gpt_conditioning:
# 1. clip audio sample to 6s (132300 using a 22.05KhZ sample rate) length by
# -  either padding the sample with 0s
# -  or randomly shortening the sample
# 2. convert 6s audio sample to mel spectrogram
# 3. compute speaker embedding (expressive vectors that encode aspects of the
# -  provided clips like voice, intonation, and acoustic) using learned encoder
# 4. calculate mean of all speaker embeddings to get final speaker embedding
# --------
# processing of diffusion_conditioning:
# similar approach to gpt_conditioning
# --------
# output: gpt_conditioning, diffusion_conditioning
################################################################################
gpt_conditioning, diffusion_conditioning = tts.get_conditioning_latents(voice_samples)
Autoregressive Model
Input: Text, Speaker Conditioning
Output: N x Mel token sequences
Step 3: Tokenize Text and Transform Tokens to Text Embeddings
The first model in the Tortoise architecture is the autoregressive model. The autoregressive model is a GPT-2 model that has been modified to support multimodal inputs. As with large language models (LLMs) such as ChatGPT or Llama 2, the text inputs for the autoregressive model are first converted into tokens that efficiently represent the input text. To enable the autoregressive model to determine when the input text begins and ends, a sentence start token (BOS) is prefixed and a sentence end token (EOS) is appended. Finally, the tokens are converted into semantically richer embeddings. These embeddings capture semantic relationships and similarities between words based on their context and meaning. The embeddings are learned during training, and there is a direct mapping between tokens and corresponding embeddings. Finally, element-wise position information is added to the text embeddings. Since all tokens in a sequence are treated the same in a Transformers architecture, a change in the order of the input tokens (permutation) would lead to the same output (invariance). To avoid this, positional embeddings are added to represent the position of the token in the sequence.
# Mapping input text to tokens that efficiently represent the input text
text_tokens = torch.IntTensor(tts.tokenizer.encode(text)).unsqueeze(0)
# A beginning of sentence token (BOS) is prepended and an end of sentence
# token (EOS) is appended, indicating when the input text begins and ends.
text_inputs = torch.cat((torch.IntTensor([[tts.autoregressive.start_text_token]]),
                        text_tokens,
                        torch.IntTensor([[tts.autoregressive.stop_text_token]])),
                        dim=1).to(tts.device)

with temporary_cuda(tts.autoregressive) as autoregressive:
  # Element-wise add positional information to the embedded input text
  text_emb = autoregressive.text_embedding(text_inputs) + autoregressive.text_pos_embedding(text_inputs)
Step 4: Combine Speaker Conditioning and Text Embeddings as input
This step is quite simple: we simply concatenate the speaker conditioning and the text embeddings as an input sequence for the autoregressive model. Based on this input sequence (also called context), the autoregressive model generates Mel tokens. A model that is not used during inference but was used to train the Tortoise model is the VQ-VAE model (Vector Quantized-Variational AutoEncoder). The VQ-VAE takes a Mel spectrogram as input and compresses it into a discrete (or quantized) code/token. Here, the Mel tokens compress a Mel spectrogram by a factor of 4. Given an input text and speaker conditioning, the autoregressive model aims to generate the corresponding Mel tokens that are known during training thanks to the VQ-VAE model. This also means that the Tortoise model cannot be fine-tuned without having access to the VQ-VAE model that was used to train the Tortoise model.
# add a dimensionality to match the shape of the text embedding
gpt_conditioning = gpt_conditioning.unsqueeze(1)
# concatenate the speaker conditioning and text embeddings
input_embedding = torch.cat([gpt_conditioning, text_emb], dim=1)
Step 5: Create “Fake inputs”
Understanding the following step took me some time and was not very obvious to me. Since LLMs usually expect tokens as input, the popular Hugging Face generate method also expects tokens as input. Since tokens are discrete, they are usually defined as values of type int or long. However, our input_embedding contains float values. The Tortoise model therefore consists of a customized GPT-2 implementation that is able to process the input_embedding with floating point numbers internally. However, to still use the generate method, we need to pass a tensor with long values that has the same size as our input_embedding. In the Tortoise library, this input is called fake_inputs. To tell the autoregressive model to start generating mel tokens, we append the start_mel_token to the end of the fake_inputs as well. Internally, this is handled as if we were appending the start_mel_token to our input_embedding. You may be wondering why we did not append the start_mel_token to the text_inputs in step 3. Since the text inputs and the mel inputs have different learned embeddings, converting the start_mel_token using the text embedding table would lead to misleading results.
# While our input_embedding consists of float values, the autoregressive
# model returns a sequence of discrete tokens (int or long type) and expects
# an input of discrete tokens. We therefore create a tensor of the same size
# as our input_embedding containing long values.
fake_inputs = torch.full((input_embedding.shape[0], input_embedding.shape[1] + 1), fill_value=1, dtype=torch.long, device=text_emb.device)

# the start_mel_token is assigned to the last value of the input sequence to
# indicate to the LLM (GPT) that it should subsequently generate mel tokens.
fake_inputs[:, -1] = 8192 # 8192 = start_mel_token

# the trunc_index allows to separate the input sequence from the generated
# tokens later on
trunc_index = fake_inputs.shape[1]
Step 6: Generate Mel Token Sequences
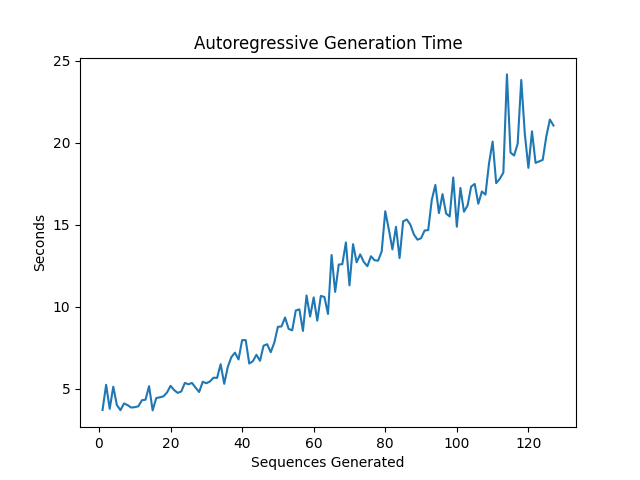
Now that we have prepared all the inputs, it is time to generate the Mel token sequences. By specifying the number of return sequences, we can determine how many Mel token sequences should be generated. Theoretically, the more sequences we generate, the more likely we are to generate a sequence that perfectly matches our input text and speaker conditioning. However, generating more Mel sequences also takes more time, so there is a trade-off between speech quality and generation time. The following graph shows that the generation time increases linearly with the number of Mel token sequences generated:
In the following you will find the code for generating the Mel token sequences:
# restricts the Mel code sequence length
# each unit is 1/20 of a second -> 250*0.05 = 12.5 seconds
mel_seq_dim = 250mel_seq_dim = 250

# number of Mel code sequences to be generated
num_return_sequences = 16

with torch.no_grad(), temporary_cuda(inference_model) as autoregressive:
  # generate mel code sequences given the input text and voice samples
  inference_model.store_mel_emb(input_embedding)
  # https://huggingface.co/docs/transformers/v4.29.1/en/main_classes/text_generation#transformers.GenerationMixin.generate
  gpt_output = inference_model.generate(fake_inputs, # input
                                        bos_token_id=tts.autoregressive.start_mel_token,
                                        pad_token_id=tts.autoregressive.stop_mel_token,
                                        eos_token_id=tts.autoregressive.stop_mel_token, # determines end of generation process
                                        max_new_tokens=mel_seq_dim, # maximum number of generated tokens (Mel codes)
                                        num_return_sequences=num_return_sequences,
                                        do_sample=True,
                                        top_p=.8,
                                        temperature=.8,
                                        repetition_penalty=2.0
                                        )
  generated_mel_codes = gpt_output[:, trunc_index:]
  # in case the GPT model generates sequences with less
  # than 250 Mel codes, the sequence will be padded
  padding_needed = mel_seq_dim - generated_mel_codes.shape[1]
  generated_mel_codes = F.pad(generated_mel_codes, (0, padding_needed), value=autoregressive.stop_mel_token)
Final Thoughts
I hope you enjoyed this article. I will publish more articles about how to use AI models and how they work in the future. Follow me if that sounds interesting to you. :-)
Isn’t collaboration great? I’m always happy to answer questions or discuss ideas proposed in my articles. So don’t hesitate to reach out to me! 🙌 Also, make sure to subscribe or follow to not miss out on new articles.
YouTube: https://bit.ly/3LqA1Os
LinkedIn: http://bit.ly/3i5Sc1g


