6 Best Practices & Pro Tips when using Angular CLI

Disclaimer: Article is focused on Angular CLI version LESS THAN 6.0.0 which was released in April 2018, everything is pretty much still valid, the only thing that changed are default flags of prod build, please have a look at official Angular CLI
ng builddocumentation.
Follow Release Butler, a twitter bot I created to help you stay up to date with releases of Angular CLI, Angular & many popular frontend libraries…
Developing Angular apps with Angular CLI is a very pleasurable experience! Angular team provided us with amazing CLI which supports most of the things which are needed for any serious project out of the box.
Standardized project structure with full testing capabilities (both unit and e2e testing), code scaffolding, production grade build with support for using environment specific configuration. That’s a dream come true and lots of saved hours on every new projects. Thank you Angular team! 💖
While Angular CLI works great from the get go, there are some potential configuration improvements and best practices we can utilize to make our projects even better!
What are we going to learn
- Best practices for architecture with Core, Shared and lazy-loaded Feature modules
- Using aliases for app and environments folders to support cleaner imports
- Why and how to use Sass and Angular Material
- How to setup good production build
- How to wave PhantomJS goodbye and use Headless Chrome instead (testing)
- How to release our project with automatically generated changelog and correct version bump
1. A bit of architecture
OK, so we generated our new fresh project using Angular CLI but what now? Should we just keep generating our services and components into some random folders. How do we structure our project?
A good guideline to follow is to split our application into at least three different modules — Core, Shared and Feature (we will probably need more than one feature module though😉).
CoreModule
All services which have to have one and only one instance per application (singleton services) should be implemented here. Typical example can be authentication service or user service. Let’s look at an example of CoreModule implementation.
SharedModule
All the “dumb” components and pipes should be implemented here. These components don’t import and inject services from core or other features in their constructors. They should receive all data though attributes in the template of the component using them. This all sums up to the fact that SharedModule doesn’t have any dependency to the rest of our application.
It is also the perfect place to import and re-export Angular Material components.
How to prepare project structure using Angular CLI
We can generate Core and Shared modules right after the creation of our new project. That way, we will be prepared for generation of additional components and services right from the start.
Run ng generate module core. Then create index.ts file in the core folder and re-export the CoreModule itself. We will be re-exporting additional public services which should be available in the whole application during further development.
That being done, we can do the same for shared module.
FeatureModule
We are going to create multiple feature modules for every independent feature of our application. Feature modules should only import services from CoreModule. If feature module A needs to import service from feature module B consider moving that service into core.
In some cases there is a need for services which are shared only by some features and it wouldn’t make much sense to move them into core. In that case we can create special shared feature modules as described later in this post.
Rule of thumb is to try to create features which don’t depend on any other features just on services provided by CoreModule and components provided by SharedModule.
This will keep our code clean, easy to maintain and extend with new features. It also reduces effort needed for refactoring. If followed properly, we will be confident that changes to one feature can’t affect or break the rest of our application.
LazyLoading
We should lazy load our feature modules whenever possible. Theoretically only one feature module should be loaded synchronously during the app startup to show initial content. Every other feature module should be loaded lazily after user triggered navigation.
2. Aliases for app and environments
Aliasing our app and environments folders will enable us to implement clean imports which will be consistent throughout our application.
Consider hypothetical, but usual situation. We are working on a component which is located three folders deep in a feature A and we want to import service from the core which is located two folders deep. This would lead to import statement looking something like import { SomeService } from '../../../core/subpackage1/subpackage2/some.service'.
Definitely not the cleanest import ever…
And what is even worse, any time we want to change location of any of those two files our import statement will break. Compare that to much shorter import { SomeService } from "@app/core". Looks better, doesn’t it?
To be able to use aliases we have to add baseUrl and paths properties to our tsconfig.json file like this…
We are also adding @env alias to be able to easily access environment variables from anywhere in our application using same
import { environment } from "@env/environment"statement. It will work for all specified environments because it will automatically resolve correct environment file based on--envflag passed tong buildcommand.
With our paths in place we can now import environment and services like this…
You may have noticed that we’re importing entities (like SomeSingletonService in the example above) directly from the @app/core instead of @app/core/some-package/some-singleton.service. This is possible thanks to re-exporting every public entity in main index.ts file. We create one index.ts file per package (folder) and they look something like this…
In most apps components and services of particular feature module will usually only have to have access to services from the CoreModule and components from SharedModule. Sometimes this might not be enough to solve particular business case and we will also need some kind of “shared feature module” which is providing functionality for a limited subset of other feature modules.
In this case we will end up with something like import { SomeService } from '@app/shared-feature'; So similarly to core, shared-feature is also accessed using @app alias.

3. Using Sass
Sass is a styles preprocessor which brings support for fancy things like variables (even though css will get variables soon too), functions, mixins… You name it…
Sass is also required to effectively use official Angular Material Components library with it’s extensive theming capabilities. It is safe to assume that using Sass it’s the default choice for most projects.
To use Sass we have to generate our project using Angular CLI ng new command with --style scss flag. This sets up most of the necessary configuration. One thing which is not added by default is stylePreprocessorOptions with includePaths and we can set it up ourselves with mandatory root "./" and optional "./themes" values.
This helps our editor to find imported symbols and enhances developer experience with code completion of Angular Material variables and utility functions.
When theming Angular Material apps it’s a good practice to extract theme definitions into separate
themesfolder, one theme per file.
Follow me on Twitter to get notified about the newest blog posts and interesting frontend stuff
4. The “PROD” build
Project generated by Angular CLI comes only with a very simple ng build script out of the box. To generate production grade artifacts we have to do a bit of customization ourselves.
We add "build:prod": "ng build --target production --build-optimizer --vendor-chunk" to our package.json scripts.
Target Production
This one is an umbrella flag which enables code minification and lot of useful build flags by default. It is equivalent to using following…
--environment prod—useenvironment.prod.tsfile for environment variables--aot— enable Ahead-of-Time compilation. This will become a default setting in future versions of Angular CLI but for now we have to enable this manually--output-hashing all— hash contents of the generated files and append hash to the file name to facilitate browser cache busting (any change to file content will result in different hash and hence browser is forced to load a new version of the file)--extract-css true— extract all the css into separate style-sheet file--sourcemaps false— disable generation of source maps--named-chunks false— disable using human readable names for chunk and use numbers instead
Other useful flags
--build-optimizer— new feature which results in smaller bundles but much longer build times so use with caution! (also should be enabled by default in the future)--vendor-chunk— extract all vendor (library) code into separate chunk
Also check official docs for other available configuration flags which might be useful in your individual project.
5. Phantom JS is dead! Long live Headless Chrome!
PhantomJS is a very well known headless browser which was defacto THE SOLUTION for running frontend tests on CI servers and many dev machines.
While being kinda OK, it’s support for modern ECMAScript features was lagging. More so, it’s non-standard behavior caused headache on many occasions when tests were passing locally without problem but they still broke the CI environment.
Luckily, we don’t have to deal with it anymore!

As the official documentation says…
Headless Chrome is shipping in Chrome 59. It’s a way to run the Chrome browser in a headless environment. Essentially, running Chrome without chrome! It brings all modern web platform features provided by Chromium and the Blink rendering engine to the command line.
Great! So how can we use it in our Angular CLI project?
We add --browser ChromeHeadless flag to our test command so we end up with "test": "ng test --browser ChromeHeadless --single-run" and "watch": "ng test --browser ChromeHeadless" in our package.json scripts. Pretty simple, ha!
6. Use standardized commit messages & automatic changelog generator
It’s always great to have a quick overview of what are the new features and bug fixes of the project we‘re interested in.
Let’s provide our users with the same convenience!
Writing changelog manually would be extremely tedious error prone task so it is the best to automate that process instead. There are many available tools which can do the job but let’s focus on standard-version.
This tool automatically generates and updates CHANGELOG.md file with all the commits following Conventional Commits specification and correctly determines new version of our project.
Conventional commit defines mandatory type, optional (scope): followed by the commit message. It is also possible to add optional body and footer, both separated by a blank line. Let’s see how does that look in practice by checking an example of full commit message of ngx-model library.
fix(dependency): multiple versions of rxjs in single project (TS90010)BREAKING CHANGE: rxjs is now peerDependency instead of dependencycloses #1Standard version will correctly bump MAJOR version of the project because of the presence of BREAKING CHANGE keyword in the commit body.
The generated CHANGELOG.md will then look something like this….
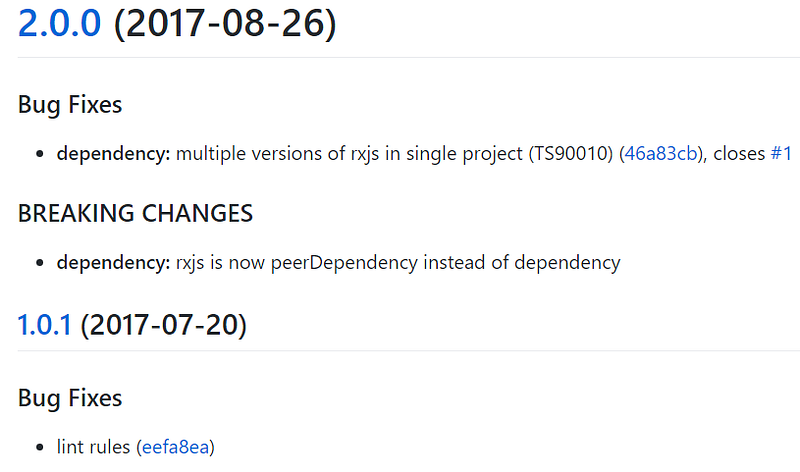
Looks sweet! So how can we use this in our project?
We start by installing npm install -D standard-version to save it in our devDependencies and add "release": "standard-version" to our package.json scripts.
We can also add git push and npm publish to automate the whole process. In this case we will end up with "release": "standard-version && git push — follow-tags origin master && npm publish".
Note that we used
&&to chain our commands which is platform dependent and works only on Unix based systems (so also on Windows with Cygwin, Gitbash, or new Win10 subsystem for Linux).

Do you find the information in this article useful?
We are providing tailored expert support for developing of your Angular applications. Explore our wide range offers on angularexperts.ch
BONUS: Use resource root (Intellij IDEA, Webstorm only)
Intellij IDEA will not always find all the paths by default which will result in many red error markings and crippled code completion support. Fortunately, the solution is very simple. Just select the src folder and mark it as a Sources Root.

Great! You made it to the end!
I hope you found some of these tips and best practices useful! Please support this article with your 👏 👏 👏 to spread these tips to a wider audience!
Starting an Angular project? Check out Angular NgRx Material Starter!

Also, feel free to check some other interesting Angular posts…
And never forget, future is bright