
Writing a Network Layer in Swift: Protocol-Oriented Approach
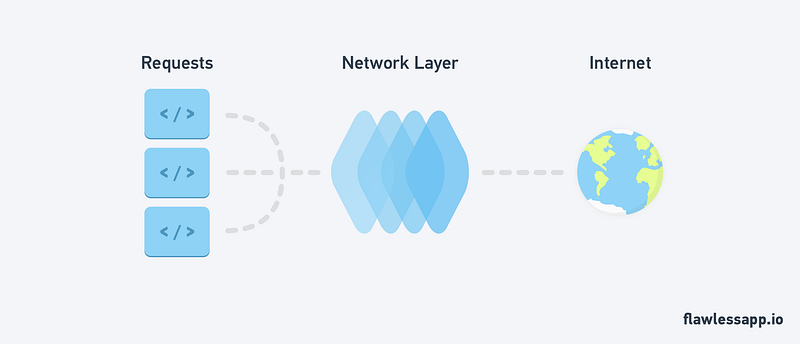
In this guide we’ll look at how to implement a network layer in pure Swift without any third-party libraries. Lets’ jump straight to it! After reading the guide, our code should be:
- protocol-oriented
- easy to use
- easy to implement
- type safe
- use enums to configure endPoints.
Below is an example of what we’ll ultimately achieve with our network layer:
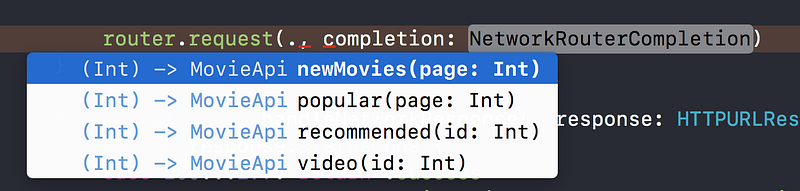
By just typing router.request(. with the power of enums we can see all the endPoints that are available to us and the parameters needed for that request.
First, Some Structure
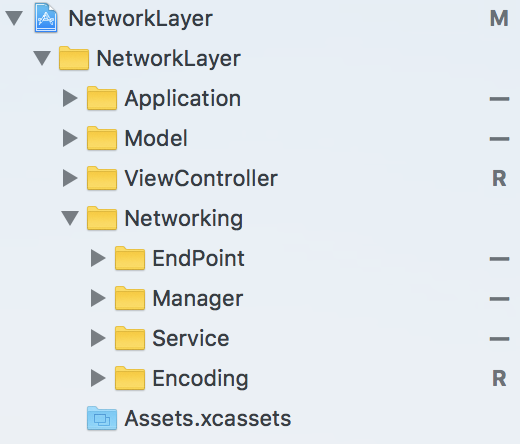
When creating anything it is always important to have structure, so it will be easy to find things later on. I’m a firm believer that folder structure is a key contributor to software architecture. To keep our files well organised let’s create all our groups beforehand and I will make note of where each file should go. Here is an overview of the project structure. (Please note names are only suggestions, you can name your classes and groups whatever you prefer.)
EndPointType Protocol
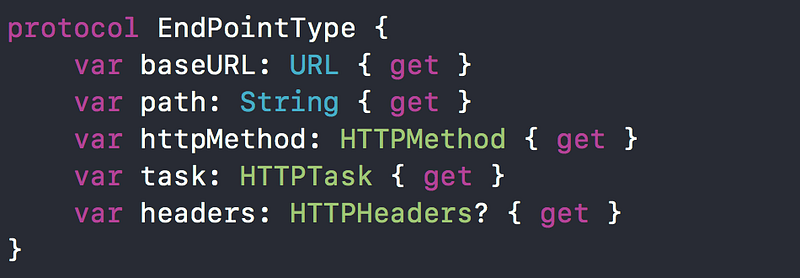
The first thing that we need is to define our EndPointType protocol. This protocol will contain all the information to configure an EndPoint. What is an EndPoint? Well, essentially it is a URLRequest with all its comprising components such as headers, query parameters, and body parameters. The EndPointType protocol is the cornerstone of our network layers implementation. Go ahead, create a file and name it EndPointType. Place this file in the Service group. (Not the EndPoint group, this will be made clearer as we continue).
HTTP Protocols
Our EndPointType has a number of HTTP protocols that we need for building an entire endPoint. Let’s explore what these protocols entail.
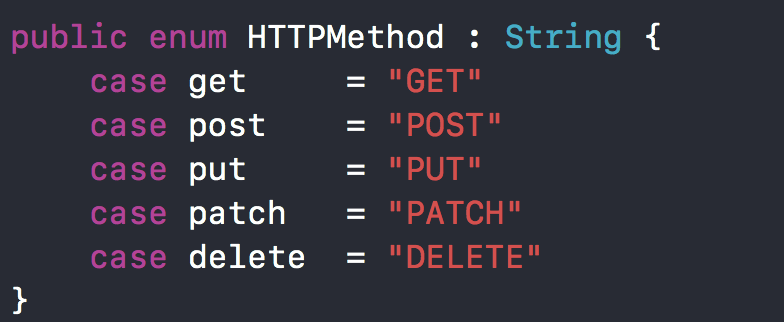
HTTPMethod
Create a file named HTTPMethod and place it in the Service group. This enum will be used to set the HTTP method of our request.
HTTPTask
Create a file named HTTPTask and place it inside the Service group. The HTTPTask is responsible for configuring parameters for a specific endPoint. You can add as many cases as are applicable to your Network Layers requirements. I will be making requests so I only have three cases.
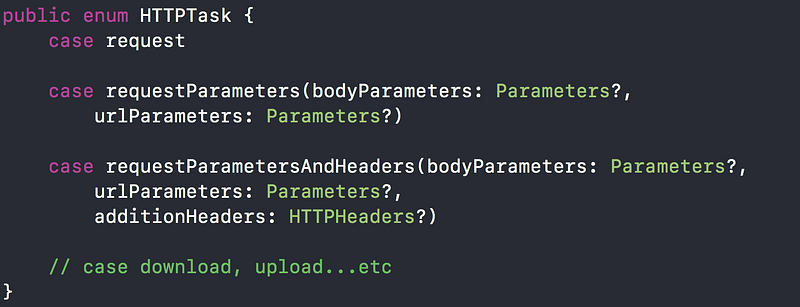
We will discuss Parameters and how we handle encoding parameters in the next section.
HTTPHeaders
HTTPHeaders is simply just a typealias for a dictionary. You can create this typealias at the top of your HTTPTask file.
public typealias HTTPHeaders = [String:String]Parameters & Encoding
Create a file named ParameterEncoding and place it inside the Encoding group. The first thing that we define is a Parameters typealias. We use a typealias to make our code cleaner and more concise.
public typealias Parameters = [String:Any]Next, define a protocol ParameterEncoder with one static function encode. The encode method takes two parameters an inout URLRequest and Parameters. (To avoid ambiguity from henceforth I will refer to function parameters as arguments.) INOUT is a Swift keyword that defines an argument as a reference argument. Usually, variables are passed to functions as value types. By placing inout in front of the argument we define it as a reference type. To learn more about inout arguments you can head over here. The ParameterEncoder protocol will be implemented by our JSONParameterEncoder and URLPameterEncoder.
public protocol ParameterEncoder {
 static func encode(urlRequest: inout URLRequest, with parameters: Parameters) throws
}
A ParameterEncoder performs one function which is to encode parameters. This method can fail so it throws an error and we need to handle.
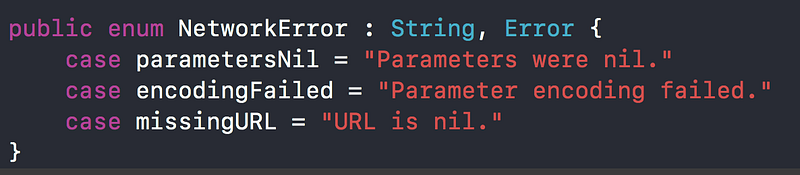
It could prove valuable to throw custom errors instead of standard errors. I always find myself having a hard time trying to decipher some of the errors Xcode gives. By having custom errors you can define your own error message and know exactly where the error came from. To do this I simply create an enum that inherits from Error.
URLParameterEncoder
Create a file named URLParameterEncoder and place it inside the Encoding group.
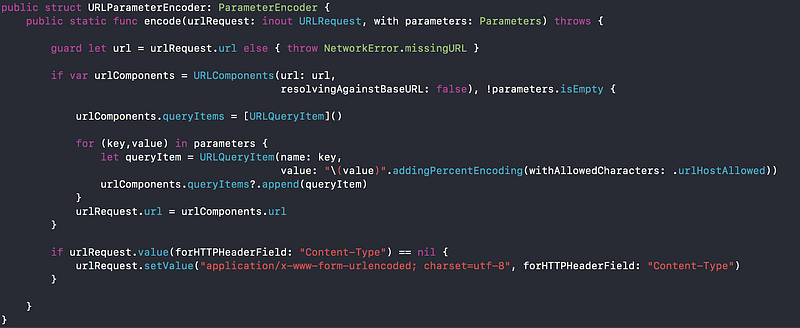
The code above takes parameters and makes them safe to be passed as URL parameters. As you should know some characters are forbidden in URLs. Parameters are also separated by the ‘&’ symbol, so we need to cater for all of that. We also add appropriate headers for the request if they are not set.
This sample of code is something that we should consider testing with Unit Tests. It’s crucial that the URL is built correctly as we could get many unnecessary errors. If you are using an open API you would not want your request quota to be used up by a number of failing test. If you would like to learn more about Unit Testing you can get started by reading this post by S.T.Huang.
JSONParameterEncoder
Create a file named JSONParameterEncoder and place it inside the Encoding group too.
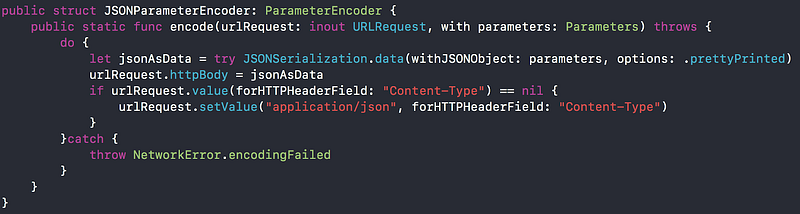
Similar to the URLParameter encoder but here we encode the parameters to JSON and add appropriate headers once again.
NetworkRouter
Create a file named NetworkRouter and place it inside the Service group. We start by defining a completion typealias.
public typealias NetworkRouterCompletion = (_ data: Data?,_ response: URLResponse?,_ error: Error?)->()Next we define a protocol NetworkRouter.

A NetworkRouter has an EndPoint which it uses to make requests and once the request is made it passes the response to the completion. I have added the cancel function as an extra nice to have but don’t go into its use. This function can be called at any time in the life cycle of a request and cancel it. This could prove to be very valuable if your application has an uploading or downloading task. We make use of an associatedtype here as we want our Router to be able to handle any EndPointType. Without the use of associatedtype the router would have to have a concrete EndPointType. For more on associatedtypes I suggest checking this post by NatashaTheRobot.
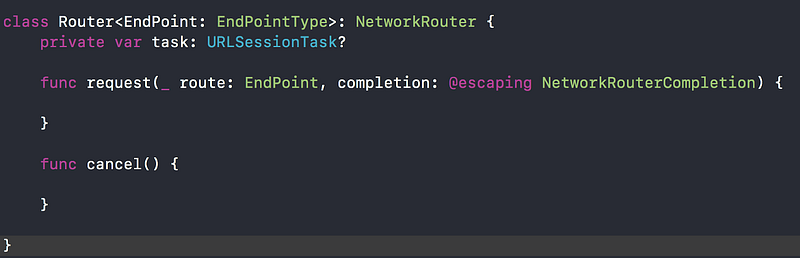
Router
Create a file named Router and place it inside the Service group. We declare a private variable task of type URLSessionTask. This task is essentially what will do all the work. We keep the variable private as we do not want anyone outside this class modifying our task.
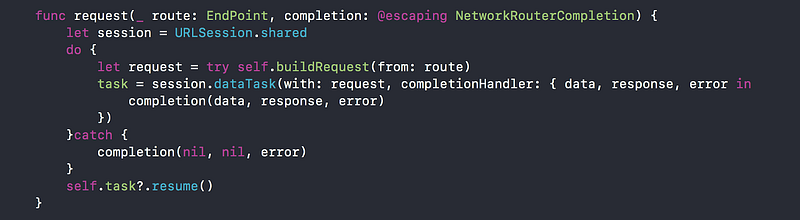
Request
Here we create a URLSession using the shared session. This is the simplest way of creating a URLSession. But please bear in mind that it is not the only way. More complex configurations of a URLSession can be implemented using configurations that can change the behavior of the session. For more on this I would suggest taking some time to read this post.
Here we create our request by calling buildRequest and giving it a route which is an EndPoint. This call is wrapped in a do-try-catch block as buildRequest because an error could be thrown by our encoders. We simply pass all response, data, and error to the completion.
Build Request
Create a private function inside Router named buildRequest. This function is responsible for all the vital work in our network layer. Essentially converting EndPointType to URLRequest. Once our EndPoint becomes a request we can pass it to the session. A lot is being done here so we will look at each method separately. Let’s break down the buildRequest method:
- We instantiate a variable request of type URLRequest. Give it our base URL and append the specific path we are going to use.
- We set the httpMethod of the request equal to that of our EndPoint.
- We create a do-try-catch block since our encoders throws an error. By creating one big do-try-catch block we don’t have to create a separate block for each try.
- Switch on route.task
- Depending on the task, call the appropriate encoder.

Configure Parameters
Create a function named configureParameters inside the Router.
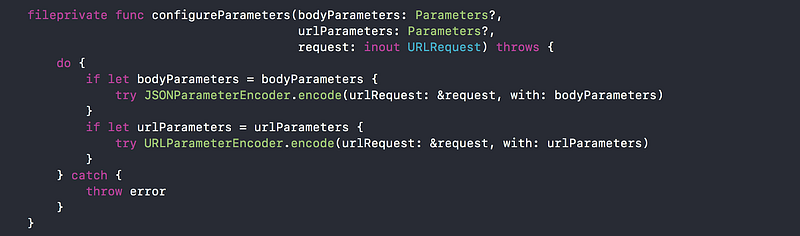
This function is responsible for encoding our parameters. Since our API expects all bodyParameters as JSON and URLParameters to be URL encoded we just pass the appropriate parameters to its designated encoder. If you are dealing with an API that has varied encoding styles I would suggest amending the HTTPTask to take a encoder Enum. This enum should have all the different styles of encoders you need. Then inside configureParameters add an additional argument of your encoder Enum. Switch on the enum and encode parameters appropriately.
Add Additional Headers
Create a function named addAdditionalHeaders inside the Router.

Simply add all the additional headers to be part of the request headers.
Cancel
Cancel function implementation will be like this:

In Practice
Let’s now use our built network layer on a practical example. We will make use of TheMovieDB🍿 to get some movie data into our application.
MovieEndPoint
The MovieEndPoint is very similar to the Target Type we had in Getting Started with Moya (check it out if you haven’t read it yet). Instead of implementing Moya’s TargetType we now just implement our own EndPointType. Place this file inside the EndPoint Group.
MovieModel
Our MovieModel also does not change as the response for TheMovieDB is still the same JSON. We make use of Decodable protocol to convert our JSON to our model. Place this file inside the Model group.
NetworkManager
Create a file named NetworkManager and place it inside the Manager group. For now our NetworkManager will just have two static properties: your API key and the network environment (Reference MovieEndPoint). NetworkManager also has a Router which is of type MovieApi.

Network Response
Create an Enum named NetworkResponse inside the NetworkManager.
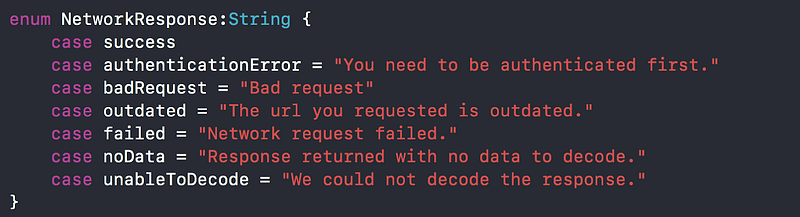
We will utilise this enum to handle responses from the API and display a suitable message.
Result
Create an Enum Result inside the NetworkManager.
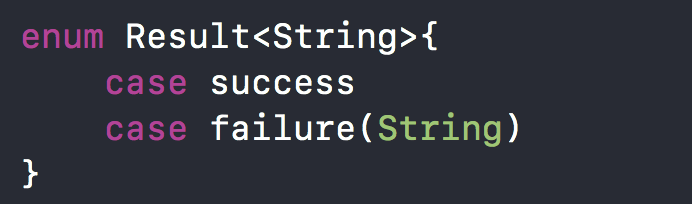
A result Enum is very powerful and can be used for many different things. We will use Result to determine whether our call to the API was a success or failure. If it failed we would return an error message with the reason. For more on Result Oriented programming you can watch or read this talk.
Handle Network Responses
Create a function named handleNetworkResponse.This function takes one argument which is a HTTPResponse and returns a Result<String>.
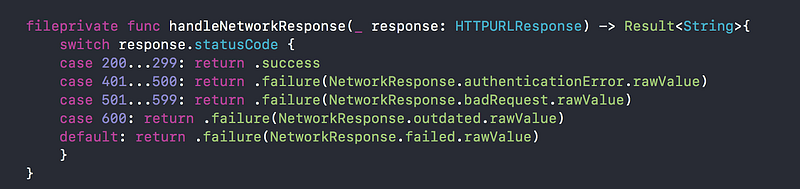
Here we switch on the HTTPResponse’s statusCode. The statusCode is a HTTP protocol that tells us the status of the response. Generally anything between 200 and 299 is a success. For more on statusCodes read this.
Making The Call
So now we have laid down a solid foundation for our networking layer. It is time to make the call!
We will be fetching a list of new movies from the API. Create a function named getNewMovies.
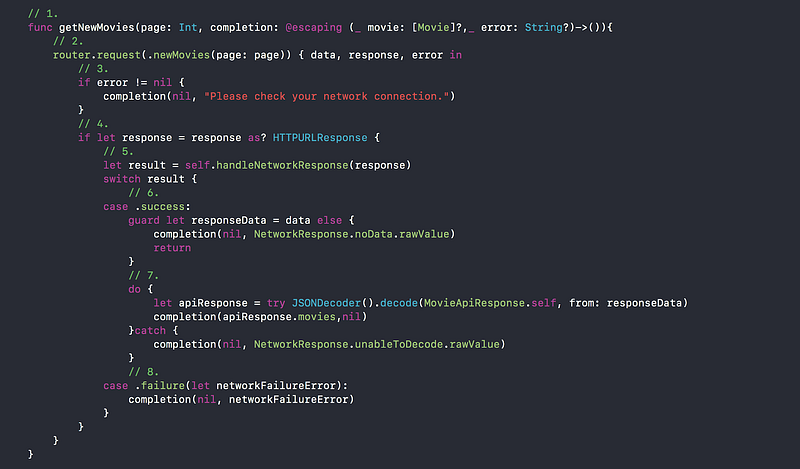
Let’s break down each step of this method:
- We define the method getNewMovies with two arguments: a page number and a completion which returns optional Movie array or optional error message.
- We call our Router. Pass in the page number and handle the completion inside a closure.
- A URLSession returns an error if there is no network or the call to the API could not be made for some reason. Please note that this is not an API failure. Such failures are client side and will probably be due to a poor internet connection.
- We need to cast our response to a HTTPURLResponse because we need access to the statusCode property.
- We declare a result which we get from our handleNetworkResponse method. We then examine the result in switch-case block.
- Success means we were able to communicate with the API successfully and got an appropriate response back. We then check if the response came back with data. And if there is no date we simply exit the method with return statement.
- If the response comes back with data, we need to decode the data to our model. Then we pass the decoded movies to the completion.
- In the case of failure we simply pass the error to the completion.
And done! That is our Network Layer in pure Swift no Cocoapods or third-party libraries. To make a test api request to get movies create a viewController with a Network Manager then call getNewMovies on the manager.
DETOUR- NETWORK LOGGER
One of my favorite features of Moya is the network logger. It makes it so much easier to debug and see what is going on with requests and response by logging all network traffic. This was definitely a feature I wanted when I decided to implement this network layer. Create a file named NetworkLogger and place it inside the Service group. I have implemented the code to log the request to the console. I won’t show where we should place this code in our networking layer. As a challenge to you go ahead and create a function that will log the response to the console and also find an appropriate place in our architecture to place these function calls. [Place Gist file]
HINT: static func log(response: URLResponse) {}
Bonus
Ever find yourself inside Xcode with a placeholder that you do not really understand? For example let’s look at the code we just implemented for our Router.

NetworkRouterCompletion is something we implemented. Even though we implemented it, it’s sometimes hard to remember exactly what that type is and how we should use it. Our beloved Xcode to the rescue! Just double click on the placeholder and Xcode will do the rest.

Conclusion
Now we have an easy to use protocol oriented networking layer that we can customise. We have complete control over its functionality and complete understanding of its mechanics. By embarking on this exercise I can truly say that I myself have learned a few new things. So I’m more proud of this piece of work than a piece of work that just requires installing a library. Hope, this post proves that it is really not that hard to create your own networking layer in Swift. 😜 Just don’t do this:
You can find the Source code on my GitHub. Thanks for reading!


