
Pandas Melt, Stack and wide_to_long For Reshaping Columns into Rows
Understand how to reshape a Pandas DataFrame using practical examples

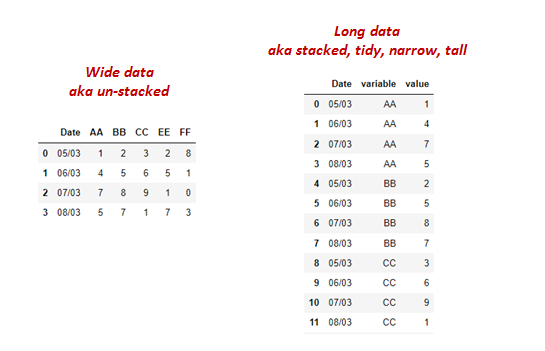
Reshaping a dataframe usually involves converting columns into rows or vice versa.
There are a few reasons to reshape a dataframe;
- To tidy up a messy dataset so that each variable is in its column and each observation in its row.
- To prepare part of the dataset for analysis or visualization.
I used to mostly Google whenever I needed to use any of these functions and copy-paste the solution. Thanks stackoverflow!
In this article, I talk about Pandas .melt(), .stack(), and .wide_to_long(). These functions are used to convert Columns into rows, also known as reshaping a dataframe from a Wide to a Long format.
Hopefully after reading this, the only Googling now will be for the official documentation and to brush up on the syntax!
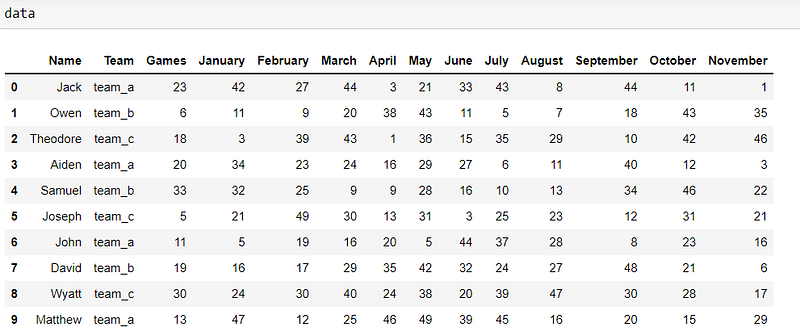
For the first two functions, we’ll be working with the dataset below.
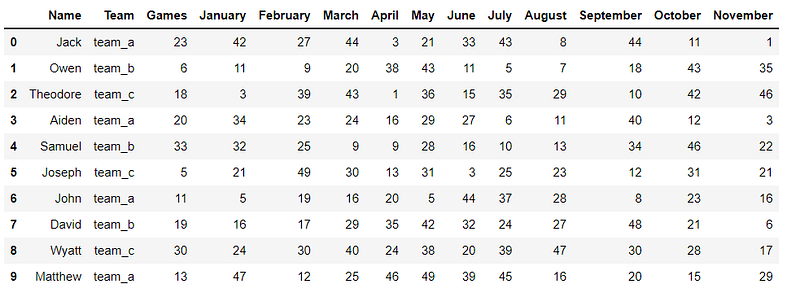
The task: Move all the Month columns to be under one column called ‘Month’. The values in their cells will be placed in another column called ‘Score’.
1.Melt()
The Pandas .melt() is usually the to-go-to function for transforming a wide dataframe into a long one because it’s flexible and straightforward.
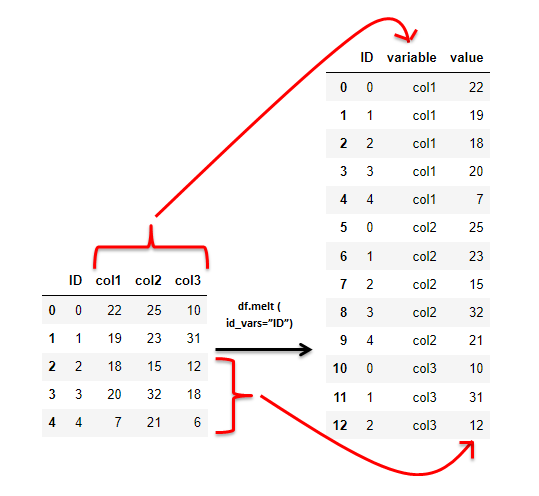
df.melt() takes related columns with common values and bundles them into one column called ‘variable’. The values that were initially in these columns are stored in another column called ‘value’.
.melt() syntax.
df.melt(id_vars=None, value_vars=None, var_name=None, value_name='value', col_level=None, ignore_index=True)
All these parameters are optional. Let’s see what they mean.
id_vars — a list of column names that will remain as they are and not be reshaped, also called identifier variables. If not provided, all columns will be stacked into 1 column.
value_vars — a list of columns to be stacked into a single column.
var_name– the preferred name for the new column that holds the reshaped column names. If not provided, the default name is ‘variable’.
value_name– the preferred name of the column with the values from the reshaped columns. If not provided, the default name is ‘value’.
Let‘s explore .melt() with different parameters.
df.melt() — No parameters provided
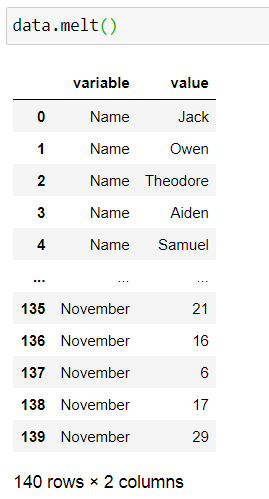
All the columns are reshaped
df.melt ( id_vars= …)
Here, we provide a list of identifier columns we don’t want to stack (you can also provide a single column here). All the other columns will be reshaped.
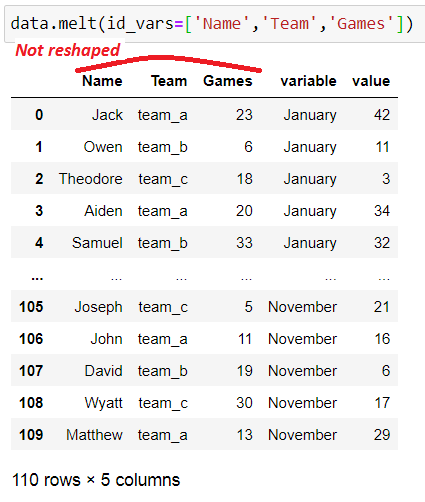
Note that these identifier columns will be repeated for every reshaped column. For example, the player names, team, and games are repeated every month.
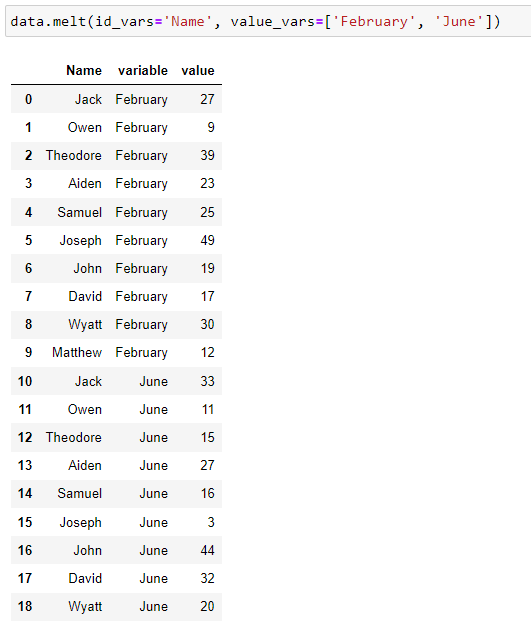
df.melt ( id_vars = … , value_vars = …)
value_vars holds the column (or list of columns) to be stacked. Below, only two columns are reshaped; ‘February’ and ‘June’ and there’s one id variable ‘Name’. The rest are dropped from the resulting dataframe.
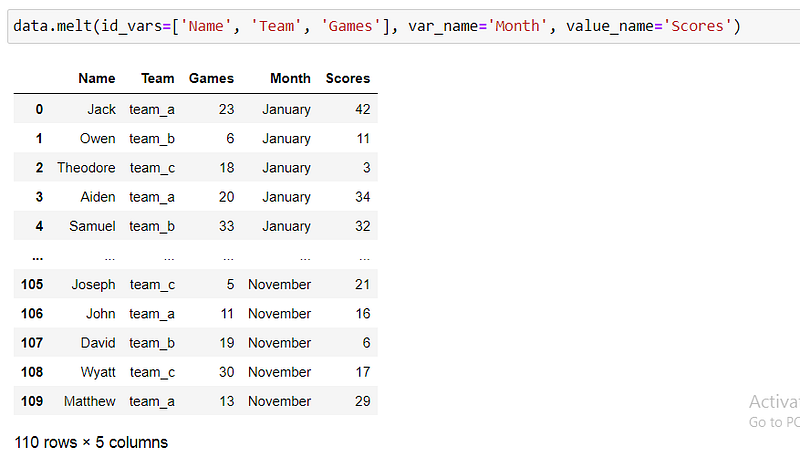
df.melt ( id_vars = … , value_vars = … , var_name = … , value_name = …)
var_name and value_name provide the names of the stacked columns and their corresponding values respectively. The default names are ‘variable’ and ‘value’ .

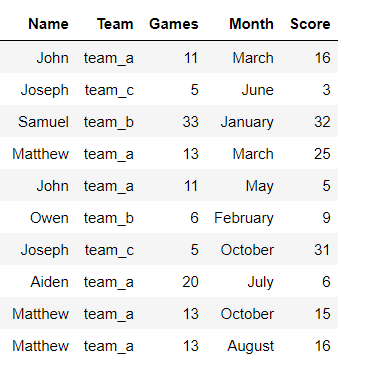
Our intended task results: Here, we do not provide the value_varsto be stacked. Therefore all the columns that are not id_vars will be stacked. We also pass the names of the stacked columns.
Preserving the index after melt()
ignore_index = True is the default for the melt function. This means that the old index is removed and replaced with a RangeIndex from 0.
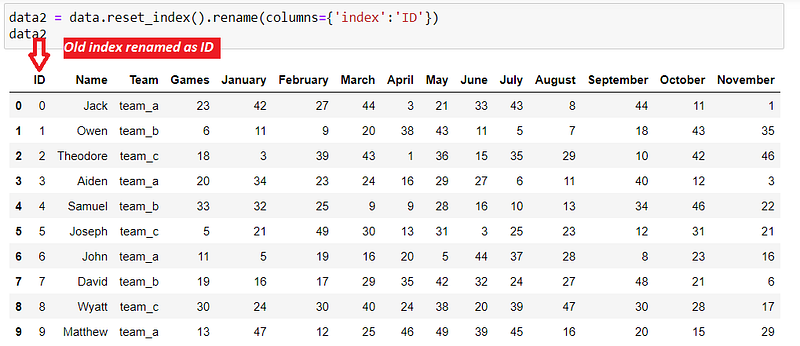
If the index is meaningful to the dataframe, (for example it contains actual IDs for each player), first reset the index. The original index becomes a column and a new RangeIndex is created.
step 1: use reset_index() to release the index into a column called ‘index’. Then rename this column to ‘ID’.
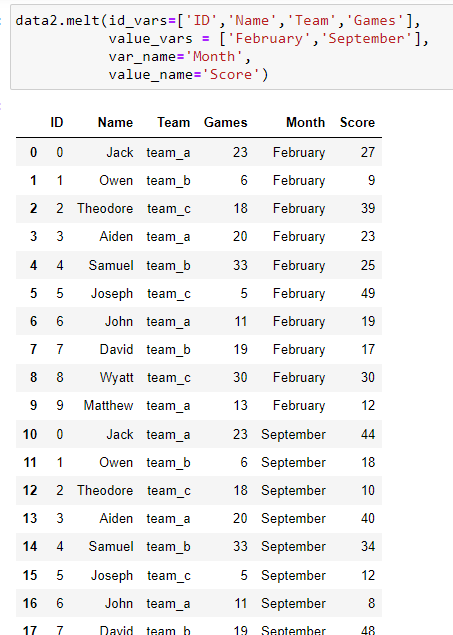
Step 2: melt() the dataframe. Include ‘ID’ as an identifier variable so that it is not reshaped.
2. stack()
The Pandas’ .stack() method also converts wide dataframes into tall ones.
The big difference is that .stack() utilizes the index, reshaping all columns that are not the index.
Let’s take our original Player scores dataset.
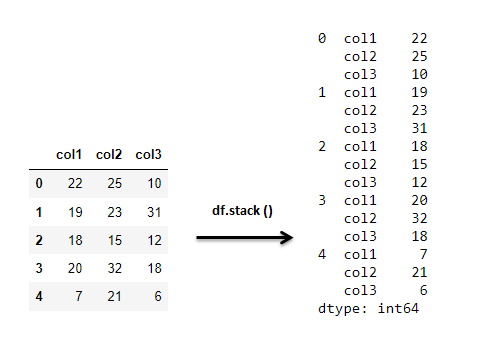
Now let’s stack it.
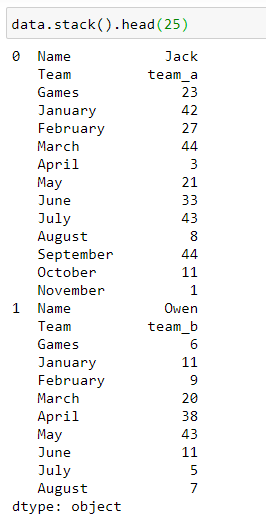
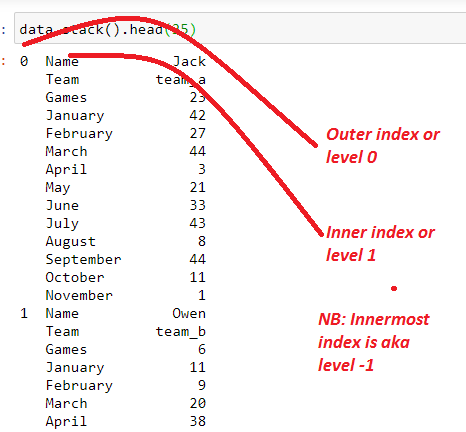
All the columns have been stacked for every index. The result is a multi-level index Series object.
The .stack() method took all the columns and brought them to the innermost index.
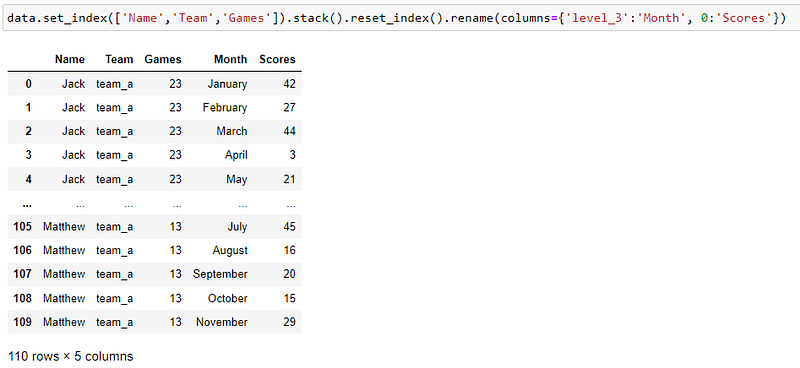
Now, if we want to reproduce the same output as our melt function above, we need to go through a series of steps;
set_index(). set the index to our identifier variables;Name, team,and number ofgames.
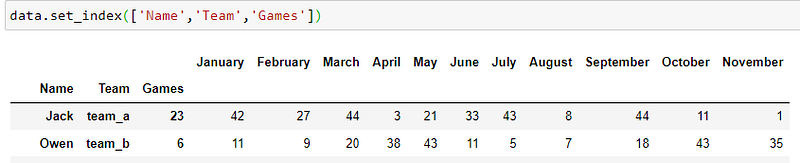
2. stack(). This will result in a multi-level index dataframe.
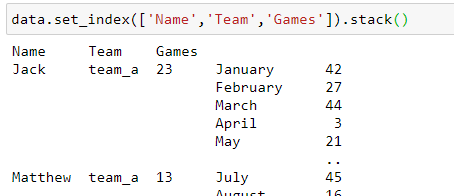
3. reset_index(). This will release the multi-level index and create a new RangeIndex.

4. rename the columns to match ‘Month’ and ‘Score’
Another example of df.stack()

Task: Stack the columns AA, BB and CC under one column named ‘Labels’. Date should not be reshaped as it is the identifier variable.
df1 = df.set_index('date')
df1 = df1.stack()
df1 = df1.reset_index()
df1 = df1.rename(columns = {'level_1':"Labels",
                   0: 'Values'})
df1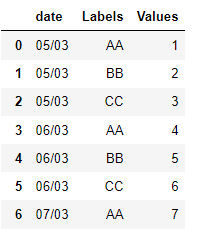
The same example using df.melt()
df.melt(id_vars = 'date',
       var_name = 'Labels',
       value_name = 'Values')
3. wide_to_long()
The melt() and stack() functions take several columns and stack them into one column.
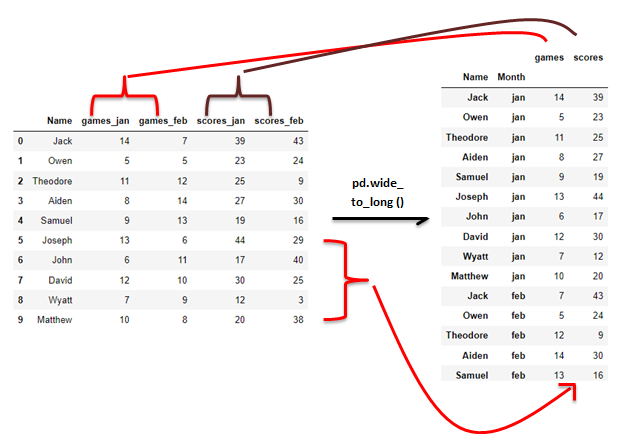
What if we had several columns that we wish to bundle into two meaningful columns? For example, instead of grouping scores per month as before, we group scores per month and games per month.
Enter Pandas .wide_to_long().
wide_to_long() works in a very specific manner and it actually utilizes Pandas’ .melt() under the hood. It takes four necessary parameters, but the most important aspect is how the column names appear.
The column names to be stacked must be in a specific format.
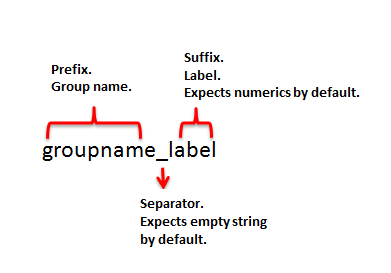
For example, for our dataframes above, below are the columns.
- df_1 columns to be stacked;
games_jan, games_feb, scores_jan, scores_feb. - df_2 columns;
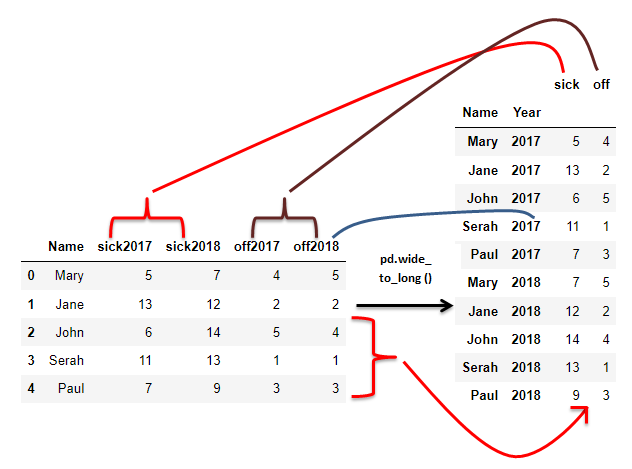
sick2017, sick2018, off2017, off2018
Group names are 'games', ‘scores’, ‘sick’, ‘off’.
Labels are ‘jan’, ‘feb’, ‘2017’, ’2018'.
Separators are ‘_’ and empty string ''.
You will need to rename the columns if they are not in a similar format.
Syntax
pandas.wide_to_long(df, stubnames, i, j, sep='', suffix='\\d+')
The first four parameters must be provided.
df— the dataframe to be reshaped.stubnames— the groups (prefixes) of related columns. Columns beginning with these strings will be grouped together.i— identifier variables, or the columns that will not be stacked.j— the name of the column that holds the suffixes, or the labels of the columns.
The optional parameters
5. sep- The character that separates the group name (prefix) from the label (suffix) in the column’s name. the default separator is an empty string.
6. suffix — The format (regular expression) of the suffix. By default, the function accepts numeric characters; suffix = ‘\d+’. If the suffix contains non-numerical characters, for example, ‘jan’ and ‘feb’ in our examples above, use the regular expression ’.+’ which searches for characters of any number in the suffix.
Let us explore a few examples of Pandas’ wide_to_long()
Example 1.
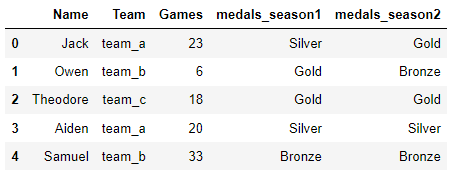
Consider that dataframe below;
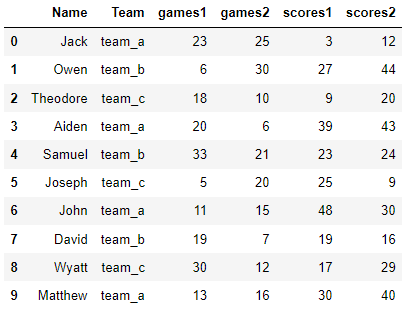
Task: The two groups (games and scores) each get their own column holding the values. The season labels (suffixes 1 and 2) go under one column called ‘Season’.
pd.wide_to_long(data_d,
                stubnames=['games','scores'],
                i=['Name','Team'],
                j='Season')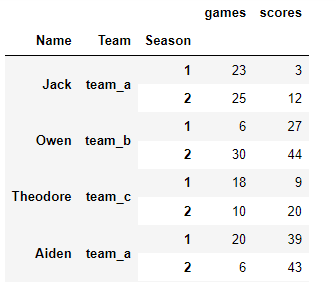
Note that we don’t provide the parameters sep and suffix because the defaults work with our dataframe.
The last step is to reset the index to get rid of the multiIndex.
wtl.reset_index()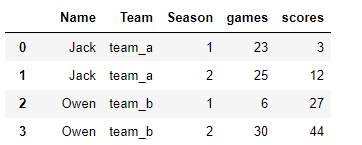
Example 2
Here we have medals won by players in seasons 1 and 2.
Task: Aggregate the medals columns into one column called ‘medals’. The labels are stacked in another column called ‘Season’. Show only one id variable ‘Name’.
pd.wide_to_long(data_g,
               stubnames=['medals'],
               i=['Name'],
               j='Season',
               sep = '_',
               suffix='.+')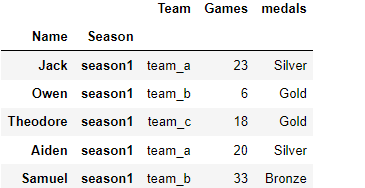
There is only one group; ‘medals’. We also provide the sep and suffix parameters because they are different from the default.
Note: we used one identifier column i= ‘Names’, but all the other columns still showed up in the results. We can drop the unwanted columns when passing the df parameter to the function.
pd.wide_to_long(df = data_g.drop(['Team','Games'],axis=1) ,
               stubnames=['medals'],
               i=['Name'],
               j='Season',
               sep = '_',
               suffix='.+').reset_index()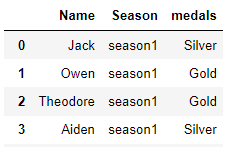
Example 3:
I found this problem on stackoverflow here.
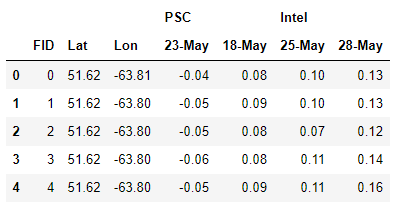
Task: Reshape the top-level columns ‘PSC’ and ‘Intel’ to be under one column called ‘SAT’. The dates should also be stacked in their own column called ‘Date’. Their values go under a column called ‘NVAL’. The id variables are ‘FID’, ‘Lat’, and ‘Long’.
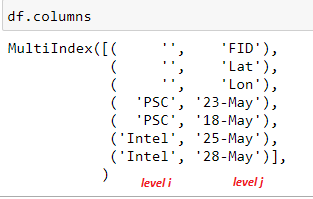
Step 1: Merge the 2 column levels by joining the names. See the column levels above. We need PCS and Intel (level i) to be the suffixes (last part) of the column names hence ‘{j}{i}’ in the code below.
#List comprehension.
#every column has 2 names
#on different levels.
#return names joineddf.columns = [f'{j}{i}' for i,j in df.columns]
df
Step 2: use wide_to_long to transform the labels PSC and Intel to be under one column ‘SAT’. The dates are all different hence four groups under ‘stubnames’ parameter.
df_wtl = pd.wide_to_long(df,
                stubnames = ['23-May','18-May','25-May','28-May'],
                i=['FID','Lat','Lon'],
                j='SAT',
                suffix= '.+',
                sep='')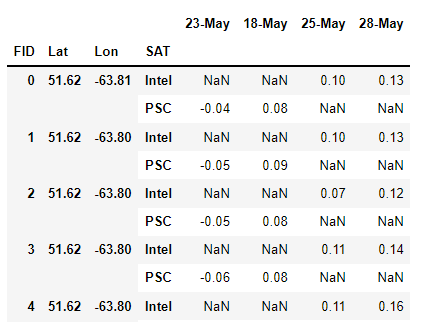
We see a lot of NaNs because Intel and PSC each applied to specific dates.
Step 3: use df.melt to stack the dates under one column called ‘Date’. The values go into another column called ‘NVAL’. Remember to reset_index() before .melt() and dropna() after. SAT created above is now one of the identifier columns.
#reset the index
#melt
#drop Nans
df_wtl = df_wtl.reset_index()df_wtl.melt(id_vars =['FID','Lat','Lon','SAT'],
var_name = 'Date',
value_name = 'NVAL').dropna()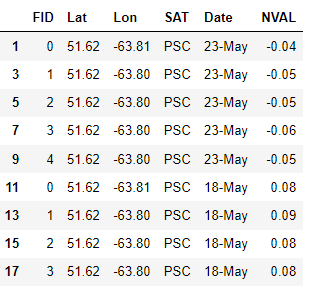
Finally, call df.reset_index(drop=True) to create a new index starting from 0 and drop the existing one in the image above.
Conclusion
In this article, we looked at three Pandas methods for transforming columns into rows.
We noted that df.melt() and df.stack() functions do the same thing by bundling several columns into one column.
df.stack() takes columns and transposes them to be the innermost index retaining the original index, creating a multi-level index. Columns that should not be stacked should be set as the index.
df.melt() offers the flexibility of choosing the columns to be reshaped, and names for the resulting columns. It however drops the existing index and replaces it with a new one.
pd.wide_to_long() bundles groups of columns into two or more columns. It also requires the column names to be in a specific format.
Find the Jupyter notebook containing all the code here. Thank you for reading!


