
Why Every Creator Needs a Print-On-Demand Store and How to Create One
An overlooked and underrated way to easily scale your business
Are you a content creator and you want to scale up your business but you’re not sure how to do it? Consider adding a print-on-demand store to your business. It is a brilliant way to scale up your income because you can easily create designs your audience can buy, without the hassle of needing to test, store or ship the product; the print-on-demand company will do all of that heavy lifting for you.
There is no such thing as passive income and having print-on-demand definitely takes some initial work. However, once your store is set up, there is very little ongoing work, making it super simple and as close to passive income as you can get. I created my Redbubble store in August 2020, and regularly get sales, even though I rarely even log in to my account. I don’t need to put any more work into it anymore unless I feel like making new designs.
You might be thinking that your chosen niche won’t work well with physical products. You might be thinking that your audience won’t buy t-shirts or mugs from you. That’s not true. If you are a content creator with an audience, you can sell something suitable. The benefits of selling physical products aren’t talked about enough.
Imagine for a second that you review books on your chosen platform. You have about 10k highly engaged followers who consistently consume, like and share your content. They honestly love your recommendations and you’ve built a community. Now imagine how many of those highly engaged followers would love to buy a book bag from you like the one below.
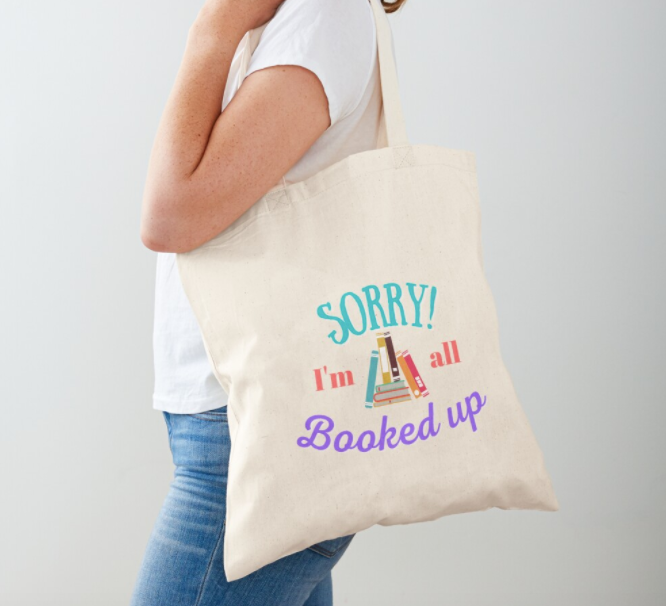
You can set your own profit margins for all your products. Let’s say you set your profit for this bag at a low $3.50. If only 10% of your 10k followers bought this bag, you would make $3500. That’s profit in your pocket after all printing and shipping costs. And that is the low end.
Or, perhaps your followers might like to buy this same print on a mug or a laptop case or a t-shirt.
This can work for literally any type of content creator. For example, if your niche is yoga, create a design that has a lotus and the phrase, ‘inhale, exhale’. A writer could create a design with a pencil and the phrase, ‘write on!’ A golf expert could design a golf club and the phrase, ‘the next Tiger Woods’.
It doesn’t matter what your chosen niche is, you can create designs to suit. Your audience will likely buy them because you designed and use them yourself. If you foster a close relationship with your followers, you will certainly have some that will buy from you.
The best thing? You don’t have to be a graphic designer to get started. You can easily use a free program such as Canva or Photopea to edit and manipulate free stock images and add text.
Compare the platforms
You can create your own print-on-demand store using Printful or Printify with Shopify, or you can use an existing platform such as Merch by Amazon, Redbubble, Teepublic or Society6.
The pros of creating your own Shopify store include:
- you own your domain name
- you can establish a brand that suits your niche
- there’s no competition on your website. When people go to your site, they see only your work and can’t be tempted by another artist’s designs
The cons of having Shopify include:
- it is harder to get organic traffic. You really need to advertise and drive people to your store. However, if you have an existing following and e-mail list, you’ll find it easier to get customers
- there is a small upfront cost as you will need to pay for hosting and the initial set-up of your shop. However, it is a very low cost, and you don’t need to pay for any products unless you make a sale first
- it takes time to get your shop running. Having said that, it is easy to set up a shop because Shopify has step-by-step instructions to help you
Of course, you could always go the route of a print-on-demand platform as mentioned above.
The pros of using an established platform include:
- there are already existing customers that might come to your store. This is how I was able to make sales without having an existing audience. Not only can you make sales from your audience, but you can also receive organic traffic from the platform
- it is completely free to start. You don’t need to pay anything to join and run a store with websites like Redbubble
- you can get your store up and running within a day
- you don’t need to worry about customer service; the platform will take care of that for you
The cons of using an established platform include:
- there is competition on these websites as there are already thousands of artists using them. However, this is mainly a problem with organic traffic. If you have an existing audience, they will likely only want to purchase from you, especially if they click on your link to your store
- you can’t really create your own brand because you’ll be associated with the platform
How to start a Redbubble store
Once you weigh up the pros and cons, you will need to choose your platform. I will be showing you how to work with Redbubble, but a lot of the information I share with you will be transferrable to other print-on-demand platforms, including your own Shopify store.
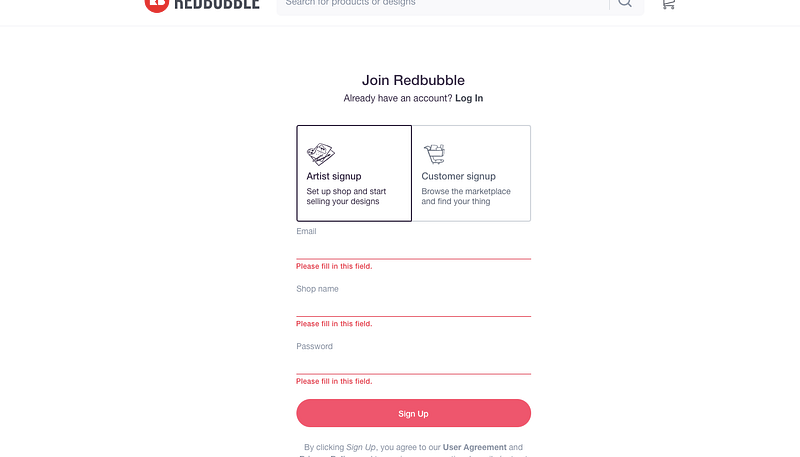
Step 1: Sign up and set up
The first thing you need to do is sign up to Redbubble. When you sign up, make sure you do choose Artist signup instead of Customer signup as shown below.
The next thing you will see is your dashboard and three columns titled: Create Items, Set Up Shop and Get Paid. Beneath those headings are the links that will help you get your shop going step-by-step.
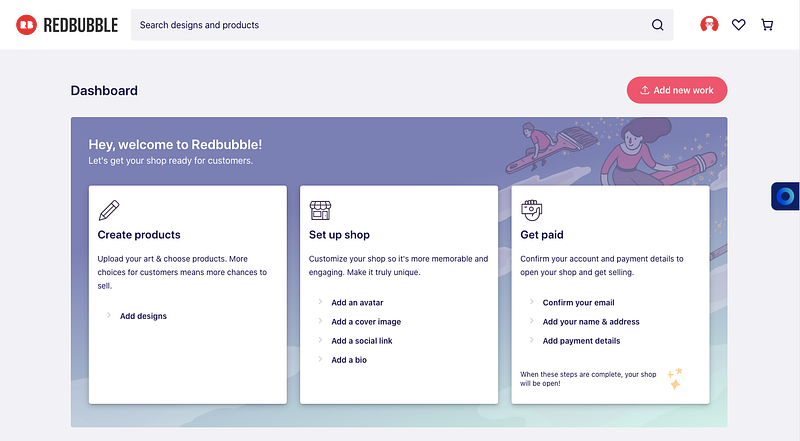
I recommend starting with ‘Get Paid’ on the right hand side, before moving onto ‘Set up shop’ and finishing with ‘Create products’.
Step 2: Design
Once your store is set up, you’ll need to start making designs.
I, personally, like to use Canva because it is very easy to use and it has images you are allowed to use. You will need to sign up for the premium Canva to remove backgrounds, but they actually have a 30-day free trial. You could make your designs first, sign up for the free trial to download them all and then cancel your subscription before having to pay anything. I do pay for Canva because I use it so much in my day job and across my businesses.
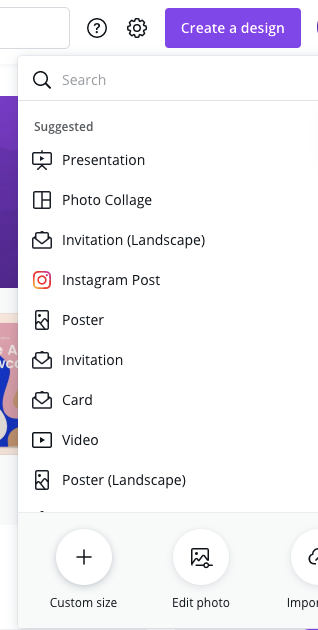
To begin designing, you’ll need to log into Canva and click on ‘create a design’, then ‘custom size’ at the bottom. See below.
If you are new to designing products on Canva, I recommend beginning with the size 2600 x 3200 px because I have found that size suits most products quite well. When you get a bit of practice, it is a good idea to have a play around with the dimensions to see what you like.
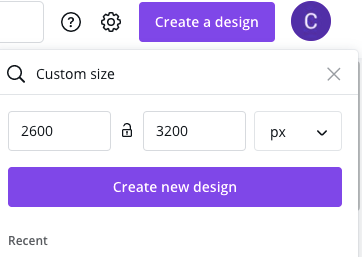
Click on ‘create new design’ and your blank page will pop up.
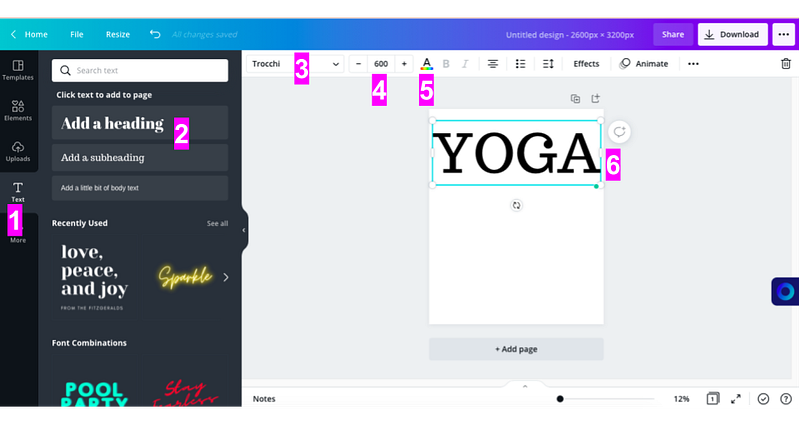
On the left hand side, you will have options to help you with your editing. ‘Elements’ will have different images that you can use; ‘Uploads’ will allow you to upload any image you already have (great if you want to put your logo on your products); and ‘Text’ will allow you to add writing.
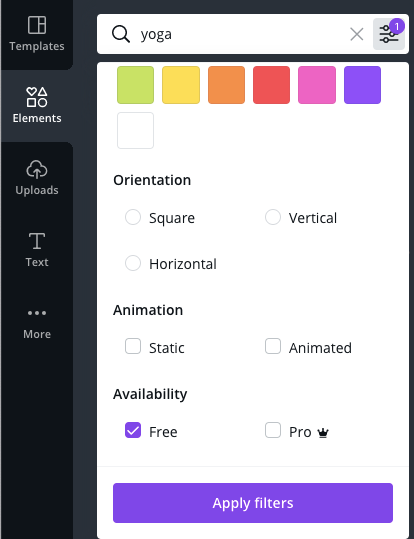
Just an important note: only use text and elements that are free. If they are ‘pro’ and have the crown symbol, they will have restrictions on their use. The free ones have no restrictions.

And now you can be creative and start designing.
I am going to pretend I am in the yoga niche for this example. I want to have a text that says, ‘yoga is for posers’, with a picture of a yoga pose.
So to create the word ‘yoga’, I will do the following actions:
- Choose Text
- Add a heading
- Choose my free font (no crown next to the font)
- Choose my font size
- Choose my font colour
- Position my font
I’ll now repeat those steps for the words ‘is for posers’.
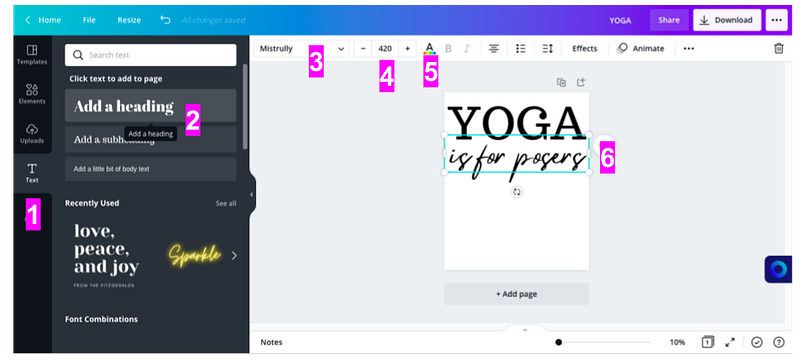
Then I’ll choose my image.
I’ll go to elements, search yoga and apply the free image filter.
My next actions will be:
- Choose an image
- Choose a colour for my image
- Resize and position
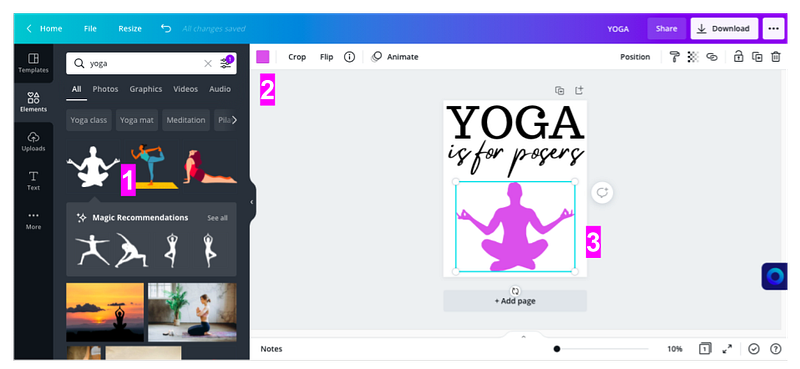
And that’s my design, which took me 5 minutes.
Now to click on download, make the image 3 times the size and give it a transparent background.
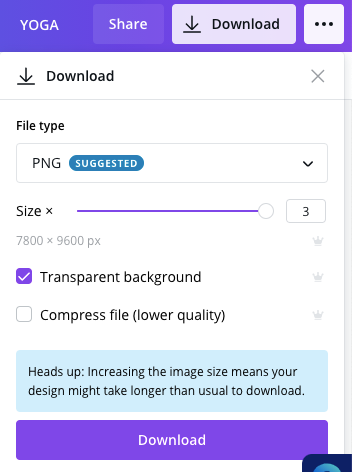
Remember, to download the image, you will need to sign up for the pro version of Canva so you can make it 3 times the size and make the background transparent. However, you can use the 30-day free trial.
Step 3: Upload to Redbubble
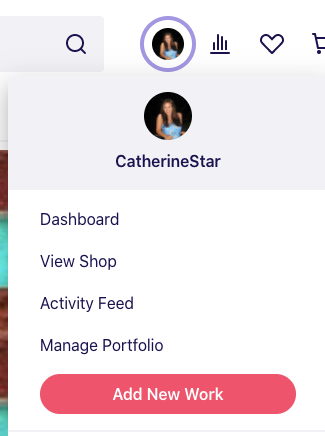
Click on your profile picture and choose ‘Add new work’.
Choose the left option of ‘Upload new work’.
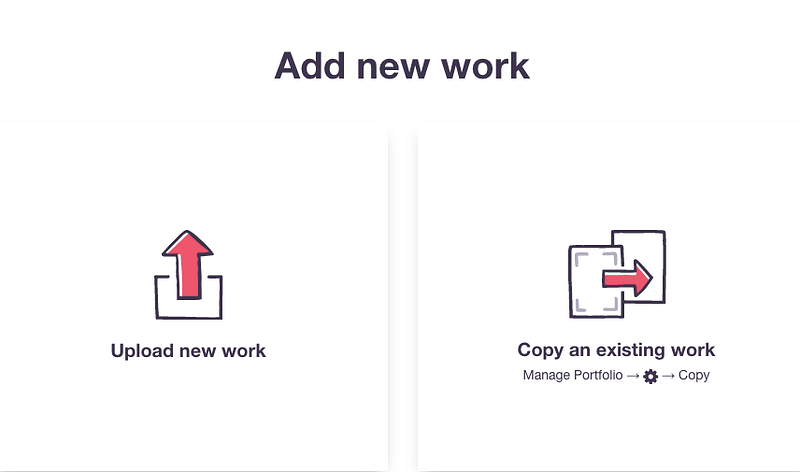
And then choose your design.
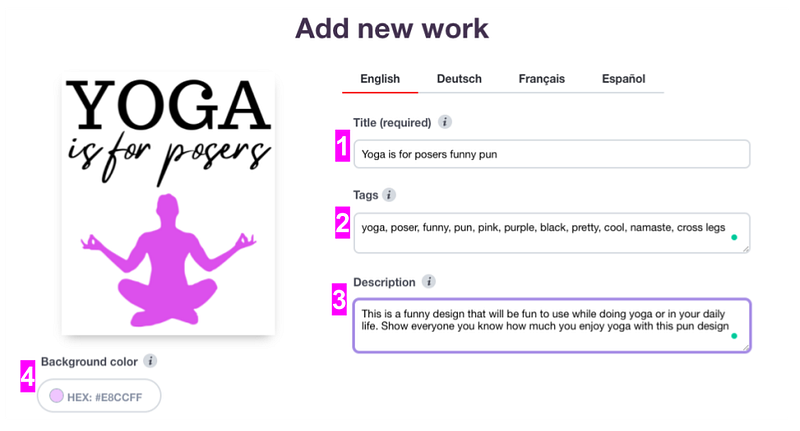
Next, you will need to:
- Give your work a title
- Write your tags. Put a comma between each tag and try to include as many relevant tags as you can. See how I included the colours used, the text and other relevant words. Try to aim for at least 15 tags
- Give a description. In order to best work on your SEO, try to repeat the main keywords. I wanted to target ‘yoga’, ‘funny’ and ‘pun’. Note that those words are in the title and tags as well
- You can add a background colour if you want (this is not necessary but it’s there as an option). I have chosen a pale pink-purple for this example, though I usually leave it plain
When you look at all of your products, you’ll see that your design won’t necessarily fit on each one.
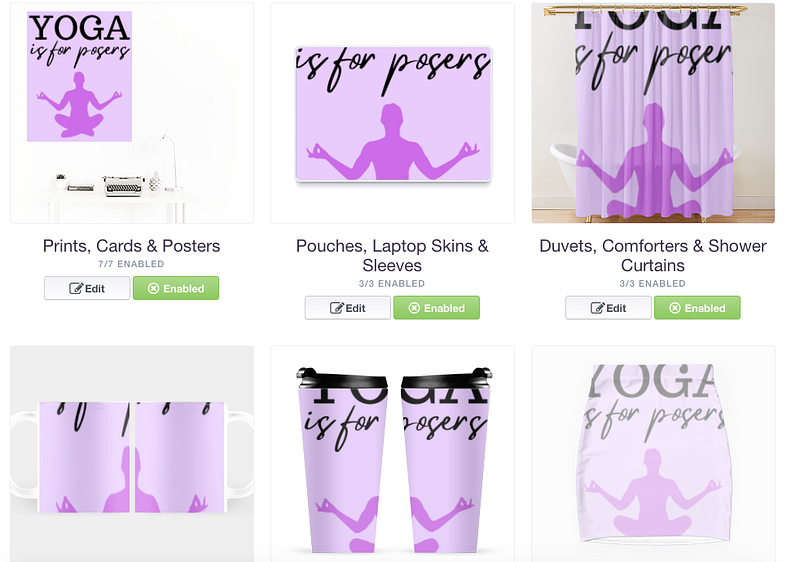
Click on the products that don’t look right and tweak them a little.
You can:
- Replace the image entirely if you have edited it again and want to use something else (I recommend more experience for this one)
- Centre the image vertically
- Centre the image horizontally
- Change the background colour (I already made the background colour pink-purple before, but I can change individual colours here)
- Scale the image to fit the outline
- Turn the image into a pattern (optional)
- Apply changes
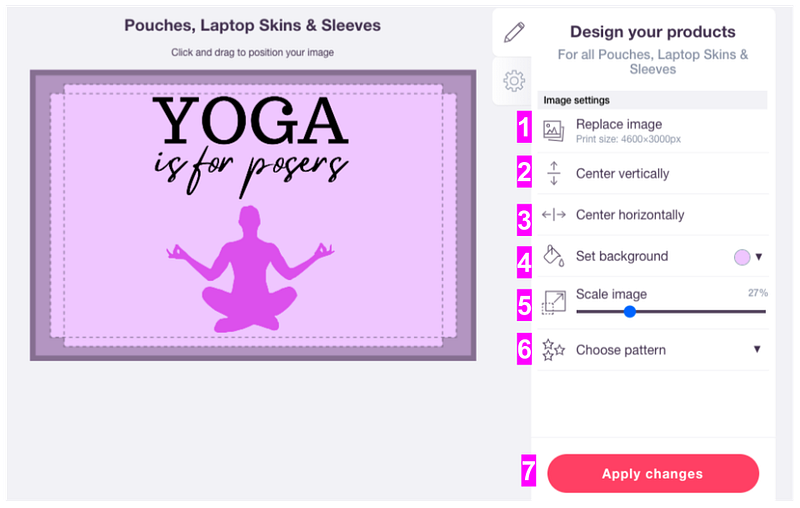
I recommend you spend about 10 minutes checking each product is okay. The more you do this, the faster you will be.
When you are at the bottom, choose:
- your media,
- collections (you can create these later if you like),
- NOT mature content
- public viewing
- you have the right to sell
- save work
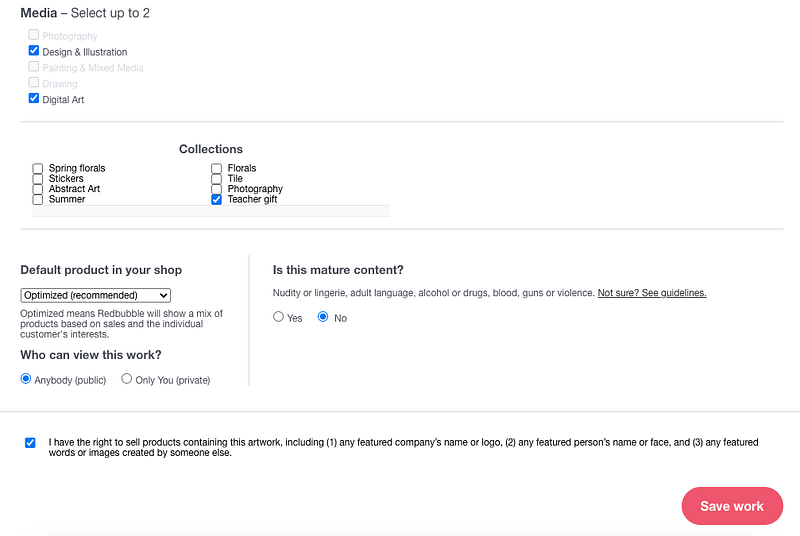
And in 15 minutes, your design will be up in your store and ready to sell to the public. There is no need for any further work on this, and it can be sold by Redbubble forever.
Step 4: Market your work
If you already have a platform and an audience, you’ll find it easy to market your work.
Announce your new store to your audience and provide the link so they can click on it. Make sure you show some of the items that are available.
Using Redbubble, you are selling about 60 products for each design including t-shirts, mugs, bags, laptop cases and more. Show your audience all of the products that they can choose.
Another helpful tip would be that it might be helpful for you to purchase one of your own products to use while marketing it. So, if you have a YouTube channel about yoga, use your design on a bag going to your yoga class. Or if you have Instagram, do a story showing the unboxing of your design with a ‘swipe up’ link to your store. Get creative in your marketing
Final tips
As you can see, it does take some work to establish your shop. However, if you already have an audience, it is one of the best ways to monetise because it doesn’t require very much ongoing upkeep. I have found print-on-demand to be super helpful to make some money on the side, even before I started building my own audience.
Here are my final notes:
- Expect to spend about 15 minutes creating and uploading each design
- Have at least 5 designs up before you advertise to your audience so they have some choice
- Keep uploading designs. If your audience is buying them, aim to upload a couple of designs a month. The more you have in your store, the more likely you’ll receive organic traffic outside of your audience
- Keep it within your niche
- If you prefer one of the other platforms, you can use the same designing and titling techniques in this tutorial
- You can use these tips for Shopify too. You will need to set up your store and connect it to Printful. They are partners and they both have step-by-step tutorials to help you connect
- If you use Shopify, make sure you utilise SEO as I showed you in this tutorial. So use keywords in your title, tags and description
- There are some more advanced features with Redbubble. However, I recommend mastering the basics in this tutorial first. I will create a more advanced tutorial in the future
Enjoy scaling up your business.
If you enjoyed this article, please consider signing up for my mailing list. I share information about entrepreneurship, health and parenting as well as free printables.