
What The Heck Is A Virtual Environment — Python
Understand virtualenv Python and how to create one

Introduction
If you’re a Python programmer, especially a beginner, you will somehow hear about Virtual Environment in every project you create. So why not talk about it now?
Python allows you to create an independent environment for each of your projects with the goal of avoiding compatibility issues among projects.
Each project might have its set of requirements and dependencies that they need to run. If we put every project we create in one place, and some of them use the same dependency, but one in a newer version than the other, we might have a compatibility issue.
You can think of a virtual environment as s subset of your base Python — the Python installed on your computer. It isolates all the dependencies of Project A from Project B.
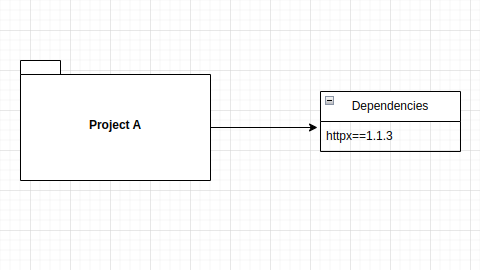
Imagine that you’re working on Project A, and it needs a library named httpx. You’ve been working on this project for a couple of months now, everything is fine and ready for production.
Now, you’ve decided to take on a new project, Project B. This project also needs httpx to work. But this library is now in a new version, 1.1.5 for instance. If we install it, Project A might complain about it not being compatible. So how do we fix it? Using Python Virtual Environment — virtualenv.
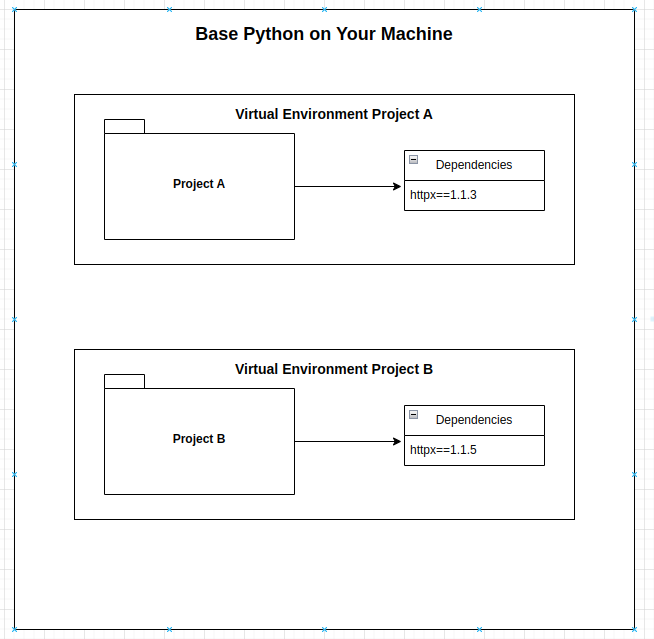
As you can see, we have two projects existing on the same computer, but they are isolated from each other. Everything you need to install for one of the projects needs to be done inside their respective environment.
Creating a Virtual Environment (VE)
Now that you have an understanding of what a VE is and why you need one, let’s create one, shall we?
The first thing you need to do is install virtualenv, which is a Python library to manage VE. To install simply run the following command on your terminal:
pip install virtualenv
After installing it you’re ready to create your own VE. But, before creating one, make sure you are inside your project on your terminal:
cd path/to/my/project
Now, to create a VE run the command below:
virtualenv env # being env the name of your environment
The env is the name of your environment. After running this command you should see a folder named env inside your current directory.
But just creating a VE, is not enough to isolate your project’s dependencies. You have to use it and tell Python that everything that you’ll install for that project should be placed in that VE.
To do that you need to activate your VE every time you’re working on your project. Simply run the following command to activate it:
source env/bin/activate
Boom! You have created your first virtual environment and made activated.
Now you can install everything you need to make your awesome project. To install, just run your pip command as you would do normally.
pip install my-lib
If you want to close your VE and use a different one, you need to deactivate it first before activating a new one. To deactivate a VE, run the following command:
deactivate
Requirements
Since the goal of a VE is to isolate your project dependencies to avoid compatibility issues, would be good to have those dependencies somewhere in case you want to share your project with someone or build it with Docker.
It’s a good practice to have all your project dependencies stored in a file named requirements.txt inside your project. This is useful in case you share your project or want to build it for production or whatever. It contains all your project dependencies with the precise version for each of them.
There are two ways you can create it:
- Writing the installed package with the specific version (e.i. my-lib==1.1–1)
- Or, running a command that will put everything installed in your VE in the file
If you choose the second option, you can do it by running the following command:
pip freeze > requirements.txt
You can also do the opposite of this, which is having a requirements.txt file and you want to install everything in it in your VE. This can be done using the command below:
pip install -r requirements.txt
Conclusion
That’s all folks! Now go and create your VE whenever you start a new Python project 🚀.
PlainEnglish.io 🚀
Thank you for being a part of the In Plain English community! Before you go:
- Be sure to clap and follow the writer️
- Learn how you can also write for In Plain English️
- Follow us: X | LinkedIn | YouTube | Discord | Newsletter
- Visit our other platforms: Stackademic | CoFeed | Venture


