
What Is OpenAPI Specification? (And Why You Should Start Using It Now)

I’ve already built several APIs, yet I’d never heard of OpenAPI. I discovered it recently, and it’s a life-changer when it comes to building APIs.
If you don’t know what it is, this article is your chance to find out, and you’ll understand that there are only benefits to using the OpenAPI specification.
What is OpenAPI?
OpenAPI, is a specification for building and documenting web APIs. It provides a standardized way to describe the structure, operations, and interactions of an API, allowing developers to understand and work with the API without needing to inspect its underlying implementation details.
OpenAPI uses a machine-readable YAML or JSON format to define the API’s endpoints, request and response payloads, supported HTTP methods (such as GET, POST, PUT, DELETE), authentication requirements, and other relevant information. This specification acts as a contract between the API provider and consumers, ensuring consistency, clarity, and interoperability.
With an OpenAPI definition, you can automatically generate client SDKs, server stubs (more about this in another article), interactive API documentation, and perform validation and testing of API requests and responses. It fosters collaboration between frontend and backend developers, streamlines the development process, and allows for easier integration of APIs into various applications.
Additionally, OpenAPI provides tools and frameworks that support the full lifecycle of an API, from design and development to testing and deployment.
Why Use OpenAPI?
Before I knew about OpenAPI, I was doing my APIs a bit haphazardly. What’s more, they were rarely documented. Maybe it’s just me doing things badly, but in any case, using the OpenAPI specification allows me to impose a certain rigor on the APIs I make from now on, and to have an overview of the API before I start coding it.
On top of that, the tools offered by OpenAPI are quite practical, especially the ability to test your API via a graphical interface, which saves time and avoids having to copy all the requests to Postman.
Finally, all this leads to a code being cleaner when using OpenAPI specification.
Online Store API
Let’s imagine that we want to create an API for our online store so that we can add, modify and delete orders and products automatically. We have a rough idea of the requirements we need, but let’s write them down explicitly, along with the endpoints we will setup:
- Return all products: GET /products
- Add a product: POST /products
- Return a product with productId: GET /products/{id}
- Update a product with productId: PUT /products/{id}
- Partially update a product with productId: PATCH /products/{id}
- Delete a product with productId: DELETE /products/{id}
- Return all orders: GET /orders
- Add an order: POST /orders
There are obviously more in a real-life situation, but for the example it’s fine.
Now we have our endpoints, we want to define our objects.
Product object:
{
  "productId": "123456",
  "name": "Example Product",
  "description": "This is an example product",
  "price": 19.99,
}
Order object:
{
  "orderId": "789012",
  "customerId": "987654",
  "products": [
    {
      "productId": "123456",
      "quantity": 2
    },
    {
      "productId": "789012",
      "quantity": 1
    }
  ],
  "totalPrice": 59.97,
}
Now, our requirements are clearly defined, and we can create our OpenAPI file.
OpenAPI Syntax
I said earlier that the OpenAPI specification uses a YAML or JSON syntax to define the structure and details of an API. Here are some components of its syntax:
- Info: This section contains general information about the API, such as its title, version, description, and contact details.
- Paths: The “paths” section defines the available API endpoints and their associated operations. Each endpoint is represented by a URL path, and the supported HTTP methods (e.g., GET, POST, PUT, DELETE) are specified along with their corresponding request and response definitions.
- Parameters: Parameters define the input values that can be passed to API operations. They can be query parameters, path parameters, header parameters, or request body parameters. Each parameter has properties like name, type, description, and whether it is required or optional.
- Responses: The “responses” section describes the possible responses that an API endpoint can return. Each response is associated with an HTTP status code, such as 200 for a successful response or 404 for a not found response. The response definition may include the response body schema, headers, and descriptions.
- Request and Response Bodies: OpenAPI allows you to specify the structure and format of request and response bodies using JSON Schema or other compatible formats. You can define the properties, types, formats, and validation rules for the data expected in the request payload or returned in the response.
- Security: The “security” section enables you to define the security requirements for accessing the API endpoints. It includes authentication schemes, such as API keys, OAuth, or JWT, and specifies which endpoints require authentication and how it should be performed.
- Tags: Tags are used to categorize and group related API endpoints. They provide a way to organize and navigate through the API documentation and can be helpful in large API specifications.
Creating our OpenAPI File
Now, let’s start creating our OpenAPI file. We name it openapi.yml (I’m using YAML, but you can use JSON if you want).
We first need to specify the OpenAPI version of the specification:
openapi: 3.0.0We’ll use OpenAPI 3.0.0.
Then, we can specify our info component:
info:
  title: Example API
  version: 1.0.0
We can provide some more attributes such as description , contact , license , etc… But I will use only the main attributes, you can find the others in OpenAPI’s documentation
If we want to be able to try our API from a UI, we have to specify the servers component. This way we will have a button next to each endpoint to try it.
In this component, we can specify as many URLs as we want. When we will try an endpoint, it will send the corresponding request to the selected server.
servers:
  - url: https://localhost:8080/api
Then, we can specify our Productand Orderschemas. Schemas are just data types. They can be anything. Objects, arrays, primitives… It’s useful to specify them here so that we will be able to reference them later when specifying our endpoints.
Here is the syntax, it’s not difficult to understand I think so I let you with this:
components:
  schemas:
    Product:
      type: object
      properties:
        productId:
          type: string
        name:
          type: string
        description:
          type: string
        price:
          type: number
      required:
        - productId
        - name
        - description
        - price
    Order:
      type: object
      properties:
        orderId:
          type: string
        customerId:
          type: string
        products:
          type: array
          items:
            type: object
            properties:
              productId:
                type: string
              quantity:
                type: integer
        totalPrice:
          type: number
      required:
        - orderId
        - customerId
        - products
        - totalPrice
For each attribute, we can specify an example if we want:
components:
  schemas:
    Product:
      type: object
      properties:
        productId:
          type: string
          example: 123456
        name:
          type: string
          example: A product
        description:
          type: string
        price:
          type: number
      required:
        - productId
        - name
        - description
        - price
Specifying our Endpoints
To specify our endpoints, we need to add a paths object to our file. This object contains as many paths as you want, and a path object can contain each HTTP method.
OpenAPI 3.0 supports get, post, put, patch, delete, head, options, and trace.
OpenAPI defines operations as a combination of a path and a method. Then, each operation may have some attributes including description , summary , responses , parameters , etc…
Let’s start with our first operation: GET all products.
paths:
  /products:
    get:
      summary: Return all products
      responses:
        '200':
          description: OK
          content:
            application/json:
              example:
                - productId: "123456"
                  name: "Example Product"
                  description: "This is an example product"
                  price: 19.99
It takes no parameters and returns a list of products.
The responses object can contain as many responses as you want. Each response has a content and a description. You can specify an example in the content if you want. But you can also specify a schema, such as the schemas we’ve defined just before. And even better, you can add a reference to an existing schema:
paths:
  /products:
    get:
      summary: Return all products
      responses:
        '200':
          description: OK
          content:
            application/json:
              schema:
                $ref: '#/components/schemas/Product'
Now, imagine we want to add an operation that takes parameters. Let’s see how to do this:
  /products/{id}:
    get:
      summary: Return a product with productId
      parameters:
        - in: path
          name: id
          required: true
          schema:
            type: string
      responses:
        '200':
          description: OK
          content:
            application/json:
              schema:
                $ref: '#/components/schemas/Product'
Here, we’ve added the /products/{id} path. id is a parameter, so we should use brackets. Then, we add a parameters object containing the list of our parameters. Here, we just have one. We specify the location of the parameter (query, path…), its name, if it is required, and its schema. We can also add a description and an example if we want.
Now, let’s move on to an operation that requires a request body:
paths:
  /products:
    post:
      summary: Add a product
      requestBody:
        required: true
        content:
          application/json:
            schema:
              $ref: '#/components/schemas/Product'
We just add a requestBody object, specify whether it’s required, and its content.
Now, you know everything you need to know to add the remaining operations.
Security
We can add security schemes in the securitySchemes object. For example, if we want to secure our API with an API key:
  securitySchemes:
    ApiKeyAuth:
      type: apiKey
      in: header
      name: X-API-Key
There are many authentication mechanisms available, check the doc for more details.
Tags
You can add tags if you want to organize your operations. First, add a tags object:
tags:
  - name: Products
    description: Everything about products
  - name: Orders
    description: Everything about orders
Then, add tags to operations:
paths:
  /products:
    get:
      summary: Return all products
      tags:
        - Products
Putting It All Together
Here is an example of a whole openapi.yaml file:
openapi: 3.0.0
info:
  title: Example API
  version: 1.0.0
servers:
  - url: https://localhost:8080/api
tags:
  - name: Products
    description: Everything about products
  - name: Orders
    description: Everything about orders
paths:
  /products:
    get:
      summary: Return all products
      tags:
        - Products
      responses:
        '200':
          description: OK
          content:
            application/json:
              schema:
                $ref: '#/components/schemas/Product'
    post:
      summary: Add a product
      requestBody:
        required: true
        content:
          application/json:
            schema:
              $ref: '#/components/schemas/Product'
      responses:
        '200':
          description: OK
          content:
            application/json:
              example:
                productId: "123456"
                name: "Example Product"
                description: "This is an example product"
                price: 19.99
  /products/{id}:
    get:
      summary: Return a product with productId
      parameters:
        - in: path
          name: id
          required: true
          schema:
            type: string
      responses:
        '200':
          description: OK
          content:
            application/json:
              schema:
                $ref: '#/components/schemas/Product'
    put:
      summary: Update a product with productId
      parameters:
        - in: path
          name: id
          required: true
          schema:
            type: string
      requestBody:
        required: true
        content:
          application/json:
            schema:
              $ref: '#/components/schemas/Product'
      responses:
        '200':
          description: OK
          content:
            application/json:
              example:
                productId: "123456"
                name: "Updated Product"
                description: "This is an updated product"
                price: 24.99
    patch:
      summary: Partially update a product with productId
      parameters:
        - in: path
          name: id
          required: true
          schema:
            type: string
      requestBody:
        required: true
        content:
          application/json:
            schema:
              $ref: '#/components/schemas/Product'
      responses:
        '200':
          description: OK
          content:
            application/json:
              example:
                productId: "123456"
                name: "Updated Product"
    delete:
      summary: Delete a product with productId
      parameters:
        - in: path
          name: id
          required: true
          schema:
            type: string
      responses:
        '200':
          description: OK
  /orders:
    get:
      summary: Return all orders
      responses:
        '200':
          description: OK
          content:
            application/json:
              example:
                - orderId: "789012"
                  customerId: "987654"
                  products:
                    - productId: "123456"
                      quantity: 2
                    - productId: "789012"
                      quantity: 1
                  totalPrice: 59.97
    post:
      summary: Add an order
      requestBody:
        required: true
        content:
          application/json:
            schema:
              $ref: '#/components/schemas/Order'
      responses:
        '200':
          description: OK
          content:
            application/json:
              example:
                orderId: "789012"
                customerId: "987654"
                products:
                  - productId: "123456"
                    quantity: 2
                  - productId: "789012"
                    quantity: 1
                totalPrice: 59.97
components:
  schemas:
    Product:
      type: object
      properties:
        productId:
          type: string
          example:
        name:
          type: string
        description:
          type: string
        price:
          type: number
      required:
        - productId
        - name
        - description
        - price
    Order:
      type: object
      properties:
        orderId:
          type: string
        customerId:
          type: string
        products:
          type: array
          items:
            type: object
            properties:
              productId:
                type: string
              quantity:
                type: integer
        totalPrice:
          type: number
      required:
        - orderId
        - customerId
        - products
        - totalPrice
  securitySchemes:
    ApiKeyAuth:
      type: apiKey
      in: header
      name: X-API-Key
Swagger Editor
If we want a UI to view our specification file, we can use Swagger Editor. Just paste the content of your spec file and you’ll be able to view it.
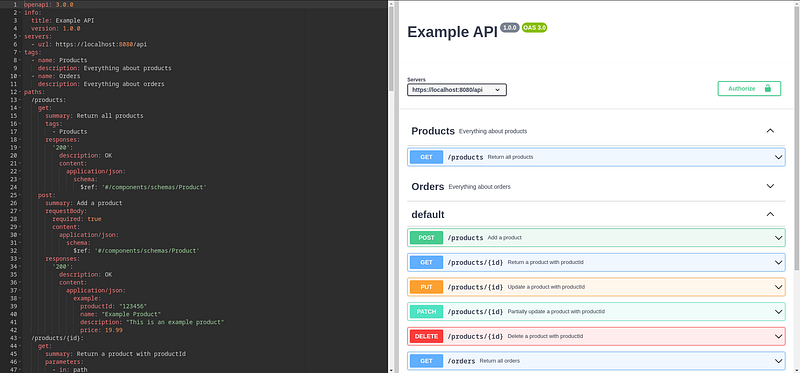
There are also other editors and other ways to view your API’s documentation. For example, there is Redocly (and here is an API doc I deployed with Redocly).
Final Note
I hope this article has whetted your appetite for OpenAPI, because it’s a really good way of making clean code, and above all the visual interface is so handy for quickly testing your API.
Thanks for reading! Here are some links that may interest you: