
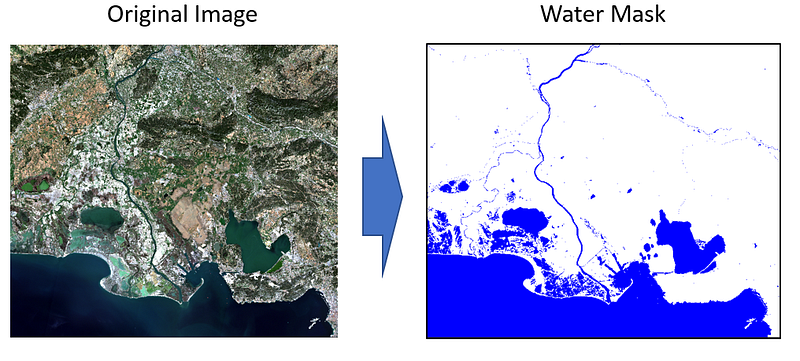
Water Detection in High Resolution Satellite Images using the waterdetect python package
Enjoy an easy-to-use unsupervised water detection algorithm for Sentinel 2 and Landsat 8 images that uses a multi-dimensional clustering coupled with naïve bayes classifier for improved performance.
This story is divided in two parts: Methodology and the waterdetect package. In the methodology, the main concepts of the algorithm are given, in order to provide the reader a better understanding of the package and how to tune it. The second part is a tutorial on the waterdetect package with sample codes to run it.
For information about the course Introduction to Python for Scientists (available on YouTube) and other articles like this, please visit my website cordmaur.carrd.co.
Methodology
Introduction
The use of deep learning techniques for remote sensing applications has been increasing in recent years. The recently published review paper “Object Detection and Image Segmentation with Deep Learning on Earth Observation Data: A Review-Part I: Evolution and Recent Trends” (Hoeser and Kuenzer 2020)[1] presents the evolution of Convolutional Neural Networks (CNN) in satellite applications, notably Object Detection and Image Segmentation, where it achieves state-of-the-art results.
One drawback of this approach is the need to train the neural network for every possible condition (water type, atmospheric condition, etc.) and there are few pretrained models ready to be used anywhere on the globe (DeepWaterMap 2.0 being one of them)(Isikdogan et al., 2017; Isikdogan et al., 2019)[2, 3]. Besides that, there are moments where we just want a quick unsupervised tool to do the task, without the complexities of model training. In such cases, I believe there is still room for a more traditional approach and that’s what is proposed in waterdetect package.
The Algorithm
To fill this gap we have recently proposed the methodology that is implmented in the waterdetect package through the following paper: “Automatic Water Detection from Multidimensional Hierarchical Clustering for Sentinel-2 Images and a Comparison with Level 2A Processors”(Cordeiro et. al., 2020)[4].
The method combines a multidimensional agglomerative clustering with a machine learning classifier to make the detection effective and fast at the same time. It’s not the objective of this post to enter in the details of the algorithm, as it is already described in the paper. However, some knowledge on the rational behind it is needed to make proper use of the package.
Detecting water
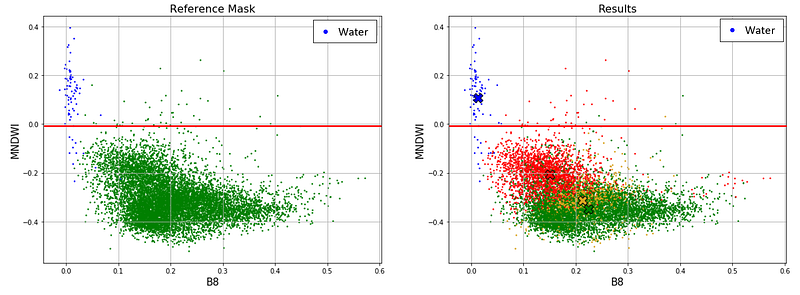
The main idea of the algorithm is to combine water indexes (NDWI, MNDWI, etc.) with reflectance bands (NIR, SWIR, etc.) into an automated clustering process. Water indexes tend to have high values in water surfaces, however, as shown in the literature, just a single index associated with a threshold suffer from false positives or false negatives and the optimal threshold value is hard to find, depending on the scene. In the multidimensional clustering we can take advantage of water reflectance properties like the high absorption on SWIR and combine it with indexes for a better pixel discrimination. Figure 2 shows an example of water pixels (blue dots) separated through a multidimensional clustering and what would be the single threshold (red line).
This is important because the algorithm let’s the user choose the best combination for the water detection in the desired area in the WaterDetect.ini configuration file. Currently, the supported indexes are:
- NDWI — Normalized Water Index
- MNDWI — Modified Normalized Water Index
- AWEI — Automated Water Extraction Index
- MBWI — Multiband Water Index
The combinations that provides better balance between robustness and accuracy are [MNDWI, NDWI, Mir2] and [NDWI, Mir2], where Mir2 is the second SWIR band present on Sentinel 2 and Landsat 8 images.
The algorithm will look for the best number of clusters (K) by testing different possibilities and deciding for the best according to the Calinsk Harabasz index. The maximum and minimum values for K are also configurable in the WaterDetect.ini.
To identify among all the clusters, the one that contains the water pixels, the algorithm implements the following methods:
- minmir: selects as water the pixels in the cluster with minimum mir value
- maxmndwi: selects as water the pixels in the clusterthe cluster with maximum mndwi value
- maxndwi: selects as water the pixels in the clusterthe cluster with maximum ndwi value
- maxmbwi: selects as water the pixels in the cluster the cluster with maximum mbwi value
Performance
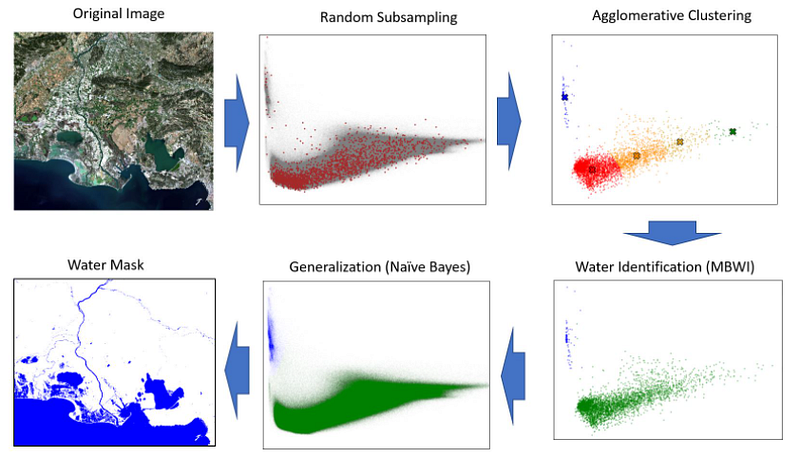
The clustering algorithm used is agglomerative because the usual K-means don’t provide good results when the clusters have different sizes. The problem is that a single Sentinel 2 scene has 120 million pixels in full resolution (10m) and the agglomerative clustering has time complexity (O²) and space complexity of (O³) making it unfeasible for processing this kind of image.
To overcome this limitation we subsample the pixels randomly and apply the clustering in this subsample. Afterwards, a machine learning classifier (we chose näive bayes) is applied to generalize from the subsampled pixels to reconstruct the whole scene. With this solution, the full resolution Sentinel 2 image can be processed in less than 3 minutes. I have already written a full story about the k-means problem and the this upsampling procedure in “Leveraging the Performance of Agglomerative Clustering for High-Resolution Satellite Images”. Figure 3 has an overview of how the algorithm works.
The waterdetect package
The algorithm proposed in [4] is available as a python package called waterdetect. The source code can be found in the git repository https://github.com/cordmaur/WaterDetect.
Instalation
The easiest way to install waterdetect package is through thecommand pip install waterdetect .
Alternatively, you can clone the repository and install from its root throught the following commands:
Alternatively, you can clone the repository and install from its root throught the following commands:
git clone https://github.com/cordmaur/WaterDetect.git
cd WaterDetect
pip install .
Running from Script
Once installed, a waterdetect entry point is created in the path of the environment. The waterdetect can be run from this entry point (refer to the git repository for more information). Typing waterdetect -h displays the help.
usage: waterdetect [-h] [-GC] [-i INPUT] [-o OUT] [-s SHP] [-p PRODUCT]
                   [-c CONFIG]
The waterdetect is a high speed water detection algorithm for satellite
images. It will loop through all images available in the input folder and
write results for every combination specified in the .ini file to the output
folder. It can also run for single images from Python console or Jupyter
notebook. Refer to the onlinedocumentationoptional arguments:
-h, --help show this help message and exit
-GC, --GetConfig Copy the WaterDetect.ini from the package into the
specifieddirectory and skips the processing. Once
copied you can edit the .ini file and launch the
waterdetect without -c option.
-i INPUT, --input INPUT
The products input folder. Required.
-o OUT, --out OUT Output directory. Required.
-s SHP, --shp SHP SHP file. Optional.
-p PRODUCT, --product PRODUCT
The product to be processed (S2_THEIA, L8_USGS, S2_L1C
or S2_S2COR)
-c CONFIG, --config CONFIG
Configuration .ini file. If not specified
WaterDetect.ini from current dir and used as defaultTo copy the package's default .ini file into the current directory, type:
`waterdetect -GC .` without other arguments and it will copy WaterDetect.ini
into the current directory.A configuration file specifying the clustering bands, water cluster detection method and other parameters is necessary for the algorithm to run. The command waterdetect -GC will copy the default configuration file to current directory. You can create other variants of this file and pass them as an argument using the -c option. If it is not explicitly specified, a WaterDetect.ini in the current directory is searched for. The input_folder argument should point to a directory that contains uncompressed images of the same product type (an example of the structure is shown in Figure 4), so the algorithm can loop through all the images and process them at once.

During running, one folder for each image will be created in the output directory. The final water mask, as well as the clustering results, will be available inside the folder with the name corresponding to the bands used for clustering. If more than one combination of bands is specified in the config file, they all will be processed and saved. In the config it is also possible to specify pdf_reports=True and plot_graphs=True. With these options the algorithm will save a .PDF file with the results in low resolution and include any graphs that you have specified in the configuration. For the above directory configuration, the commands to run are:
(waterdetect_env) PS D:\> waterdetect -GC
Copying d:\programs\anaconda\envs\waterdetect_env\lib\site-packages\waterdetect\WaterDetect.ini into current dir.
WaterDetect.ini copied into D:\.
(waterdetect_env) PS D:\> waterdetect -i d:\Images\Download\France-MAJA -o d:\Images\out -p S2_THEIA
Loading configuration file WaterDetect.ini
File WaterDetect.ini verified.
Folder d:\Images\Download\France-MAJA verified.
Folder d:\Images\out verified.
Opening image in loader
Retrieving bands for image: d:/Images/Download/France-MAJA/SENTINEL2B_20190224-103835-289_L2A_T31TGK_C_V1-0
The following bands were found:
SENTINEL2B_20190224-103835-289_L2A_T31TGK_C_V1-0_SRE_B11.tif
SENTINEL2B_20190224-103835-289_L2A_T31TGK_C_V1-0_SRE_B12.tif
SENTINEL2B_20190224-103835-289_L2A_T31TGK_C_V1-0_SRE_B2.tif
...
T31TGK_C_V1-0_MTD_ALL.xml verified.
---------------------------
VALUES ANGLE GLINT
[58.89489588415046, 59.00516357439775, 59.125230327623676, 59.1975351244004, 59.27428320701952, 59.35296101146046, 58.94729756082948, 59.43995100981233, 59.260483478237774, 59.45799750367317]
PAS DE GLINT SUR IMAGE d:/Images/Download/France-MAJA/SENTINEL2B_20190224-103835-289_L2A_T31TGK_C_V1-0/SENTINEL2B_20190224-103835-289_L2A_T31TGK_C_V1-0_MTD_ALL.xml
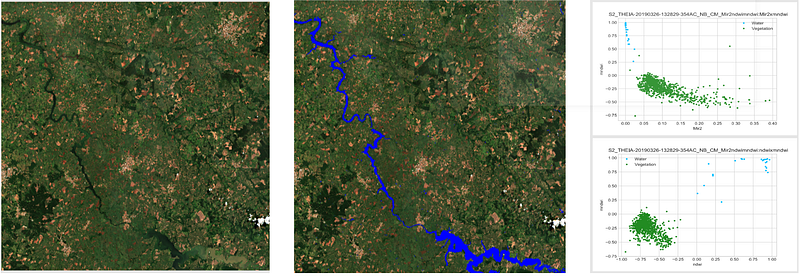
---------------------------A full Sentinel 2 tile has approximately 120million pixels and it takes about 3–5 min depending on the processor and operating system. At the end of each image’s processing, a message indicating a probability of sun glint is displayed. An example of the PDF report is shown in Figure 5.
Running it from a jupyter noteboook
Instead of calling the waterdetect from script, it is also possible to import the package into a console or jupyter notebook to launch it. This way, two options are available. There is the run_batch, that is pretty similar to the script call and also the run_single, that runs the algorithm for one image only and returns the result in memory.
When you execute import waterdetect it initializes and declares the most important classes.
- DWWaterDetect
- DWImageClustering
The DWWaterDetect class is responsible for orchestrating the full chain, since the opening of the satellite images, to the contstruction of reports. For that, it will use the other modules. The DWWaterDetect allows two main modes:
- Batch mode: the algorithm will loop through all the images available in the input folder and save the results to the output folder. Additionally, it can provide more than one result for each image, with different clustering parameters, depending on the configuration.
- Single mode: in the single mode, just one image is processed and just one combination of bands (the first) is used to create the products. Additionally, a
DWClusteringImageinstance is returned with the resultings mask and clustering.
The following code shows an example on how to launch both modes from a jupyter notebook.
Running without GDAL
If GDAL is not installed on the environment, the waterdetect will display a message and none of the above methods will work as GDAL is needed to open the satellite images. However, if you want to feed the algorithm with your own arrays in the case you use other library (such as rasterio) or the satellite you are using is not supported it is still possible to use the waterdetect package.
In such case, the bands should be passed to the DWImageClustering object as a dicionary. To work with multiple satellites (Sentinel 2 and Landsat at the moment) the waterdetect uses the following convention for the bands names
Blue: 492nm
Green: 559nm
Red: 665nm
RedEdg1: 703nm
RedEdg2: 739nm
RedEdg3: 780nm
Nir: 833nm
Nir2: 864nm
Mir: 1610nm
Mir2: 2185nm
The minimum required bands will depend on the bands combination that has been chosen and the method for detecting the water cluster. The following code shows an example on using the waterdetect with bands loaded manually using the rasterio.
As you can see, the attributes water_mask and clustering_matrix store numpy arrays with the resulting mask and the intermediate clustering result. The resulting values are:
water_mask: 0= non water; 1= water; 255= no data
clustering_matrix: 1= water; 2…n= other clusters; 255= no data
Conclusion
As seen throughout this story, the waterdetect package is a good solution for extracting water masks from high resolution satellite images without any prior knowledge about the scene or arbitrary thresholds. Important to notice that for tasks other than water detection, it can still be used as a high performance clustering algorithm that delivers much better results than the most common K-means that would not be feasible due to memory and time to process.
The package is still under development, so if you find any trouble or have suggestions on how to improve this tutorial feel free to leave a message or open an issue in the github repository (https://github.com/cordmaur/WaterDetect).
See you next story.
References
[1] Hoeser, T.; Kuenzer, C. Object Detection and Image Segmentation with Deep Learning on Earth Observation Data: A Review-Part I: Evolution and Recent Trends. Remote Sensing 2020, 12 (10), 1667. https://doi.org/10.3390/rs12101667.
[2] Isikdogan, F., Bovik, A. C., & Passalacqua, P. (2017). Surface Water Mapping by Deep Learning. IEEE Journal of Selected Topics in Applied Earth Observations and Remote Sensing, 10(11), 4909–4918. https://doi.org/10.1109/JSTARS.2017.2735443
[3] Isikdogan, L. F., Bovik, A., & Passalacqua, P. (2019). Seeing Through the Clouds With DeepWaterMap. IEEE Geoscience and Remote Sensing Letters, 1–5. https://doi.org/10.1109/LGRS.2019.2953261
[4] Cordeiro, M. C. R.; Martinez, J.-M.; Peña-Luque, S. Automatic Water Detection from Multidimensional Hierarchical Clustering for Sentinel-2 Images and a Comparison with Level 2A Processors. Remote Sensing of Environment 2021, 253, 112209. https://doi.org/10.1016/j.rse.2020.112209.


