
VS Code + Java + Spring Boot — A Step-By-Step Guide
Let’s dive into the 4 steps guide to build your first Java Spring Boot GET and POST API on VS Code!
TL;DR code repo for this guide is here

Step 0. Java Environment Setup
The setup varies based on the operating system you are using
- Ensure
javaandjavaccommand is available on your terminal
Step 1. VS code Plugins, Search `Spring Boot`
- Spring Boot Tools
- Sprint Boot Dashboard
- Spring Boot Extension Pack
- Spring Initializr Java Pack

Step 2. Create a java project
To start by bring up the vs command by Command + P or Ctrl + P, then pick the project configurations like below


Pick some dependenies, Spring Web and Lombok (Lombok is useful for templating code)

Pick a folder you want to generate your project under.

After finishing, you will have this

Bottom left ‘Java Project’ Panel is what we will use more extensively than the normal file explorer on the top left
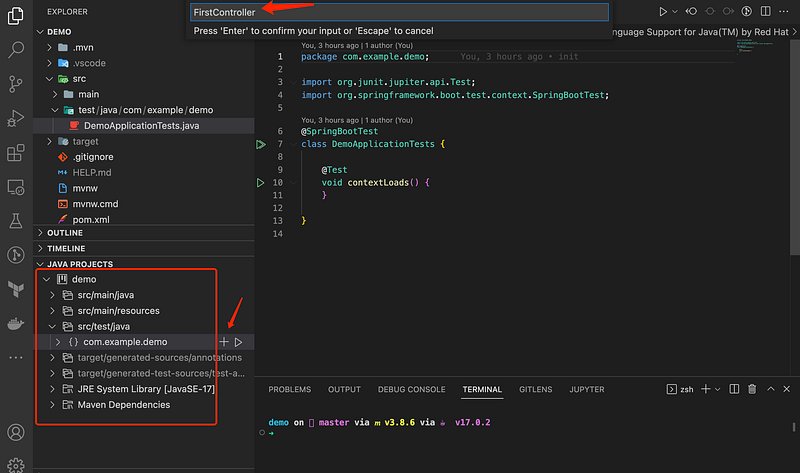
Step 3 Adding First Controller
Expanding the java project and click the + button on the com.example.demo Then write the controller name MovieControlleron the input bar
Add first GET route the controller
package com.example.demo;

import org.springframework.web.bind.annotation.GetMapping;
import org.springframework.web.bind.annotation.RestController;

@RestController
public class MovieController {
 @GetMapping("/")
 public String first() {
  return "Hello World";
 }

 private Ticket getTicketForAge(int age) {
  Ticket ticket = new Ticket();
  if (age >= 18 && age < 65) {
   ticket.setTotalCost(25);
   ticket.setTicketType(TicketType.Adult);
   ticket.setQuantity(1);
  } else if (age >= 65) {
   ticket.setTotalCost(25 * 0.7);
   ticket.setTicketType(TicketType.Senior);
   ticket.setQuantity(1);
  } else if (age >= 11 && age < 18) {
   ticket.setTotalCost(12);
   ticket.setTicketType(TicketType.Teen);
   ticket.setQuantity(1);
  } else if (age >= 0 && age < 11) {
   ticket.setTotalCost(5);
   ticket.setTicketType(TicketType.Children);
   ticket.setQuantity(1);
  }
  // throw error
  else {
   throw new RuntimeException("Invalid age");
  }
  return ticket;
 }

 @PostMapping(path = "/", consumes = "application/json", produces = "application/json")
 @ResponseBody
 public Response post(@RequestBody Body body) {
  Response response = new Response();
  response.setTransactionId(body.getTransactionId());
  for (int i = 0; i < body.getCustomers().length; i++) {
   Customer customer = body.getCustomers()[i];
   Ticket ticket = getTicketForAge(customer.getAge());
   response.addTicket(ticket);
  }
  return response;
 }
}
Run the project and visit localhost:8080


Step 4. Add Another POST Route
Let’s assume Body is post body we want to accept. Create Customer.java andBody.java
package com.example.demo;

class Customer {
 private String name;
 private int age;
 // getters and setters
 public String getName() {
  return name;
 }
 public void setName(String name) {
  this.name = name;
 }
 public int getAge() {
  return age;
 }
 public void setAge(int age) {
  this.age = age;
 }
}
public class Body {
private String transactionId;
private Customer[] customers;
public String getTransactionId() {
return transactionId;
}
public void setTransactionId(String transactionId) {
this.transactionId = transactionId;
}
public Customer[] getCustomers() {
return customers;
}
public void setCustomers(Customer[] customers) {
this.customers = customers;
}
}Let’s assume Response is the body we want to respond by the post endpoint. Create Response.java and add below
package com.example.demo;

import java.util.ArrayList;

public class Response {
 private String transactionId;
 private ArrayList<Ticket> tickets = new ArrayList<Ticket>();
 private double totalCost = 0;

 public String getTransactionId() {
  return transactionId;
 }

 public void setTransactionId(String transactionId) {
  this.transactionId = transactionId;
 }

 public ArrayList<Ticket> getTickets() {
  return tickets;
 }

 public void setTickets(ArrayList<Ticket> tickets) {
  this.tickets = tickets;
 }

 public double getTotalCost() {
  return totalCost;
 }

 public void setTotalCost(double totalCost) {
  this.totalCost = totalCost;
 }

 public void calculateTotalCost() {
  double temp = 0;
  for (int i = 0; i < tickets.size(); i++) {
   if (tickets.get(i).getTicketType() == TicketType.Children && tickets.get(i).getQuantity() >= 3) {
    temp += tickets.get(i).getTotalCost() * 0.75;
   } else {
    temp += tickets.get(i).getTotalCost();
   }
  }
  this.setTotalCost(temp);
 }

 private ArrayList<TicketType> getTicketTypes() {
  ArrayList<TicketType> ticketTypes = new ArrayList<TicketType>();
  for (Ticket ticket : tickets) {
   ticketTypes.add(ticket.getTicketType());
  }
  return ticketTypes;
 }

 public void addTicket(Ticket ticket) {
  ArrayList<TicketType> ticketTypes = this.getTicketTypes();
  if (ticketTypes.contains(ticket.getTicketType())) {
   for (Ticket existingTicket : tickets) {
    if (existingTicket.getTicketType() == ticket.getTicketType()) {
     existingTicket.setQuantity(existingTicket.getQuantity() + 1);
     existingTicket.setTotalCost(existingTicket.getTotalCost() + ticket.getTotalCost());
     this.calculateTotalCost();
     return;
    }
   }
  } else {
   this.tickets.add(ticket);
   this.calculateTotalCost();
  }
 }
}
Add to our controller the post route
@PostMapping(path = "/", consumes = "application/json", produces = "application/json")
 @ResponseBody
 public Response post(@RequestBody Body body) {
  Response response = new Response();
  response.setTransactionId(body.getTransactionId());
  for (int i = 0; i < body.getCustomers().length; i++) {
   Customer customer = body.getCustomers()[i];
   Ticket ticket = getTicketForAge(customer.getAge());
   response.addTicket(ticket);
  }
  return response;
 }
Run the project and make a post request using another vscode plugin Thunder client or Postman
// URL: localhost:8080// post body
{
"transactionId": "111",
"customers": [
{
"name": "Alert",
"age": 72
}
]
}
If you find the guide helpful, feel free to clap and follow me. Join medium via this link to access all premium articles from me and all other awesome writers here on medium.


