
Virtual Environments for Data Science: Running Python and Jupyter with Pipenv
Setting up a virtual environment for Python.
By: Edward Krueger Data Scientist and Instructor and Douglas Franklin Teaching Assistant and Technical Writer.
In this article, we’ll talk about virtual environments and why they are useful. You’ll learn how to set up a virtual environment in Pipenv for Python. You’ll also learn how to run a Jupyter kernel out of a Pipenv environment!

Why environments matter for Data Science
Environments are the space in which developers work, learn, and create. For example, if you plan to run Python code, you must have some local software setup to practice Python. That setup is called a programming environment. These environments contain the specified tools required for a developer to create and test code. For example, an environment might contain Python and some packages. Once an environment is set up correctly, a developer can work unimpeded and seamlessly share environment specs with others.
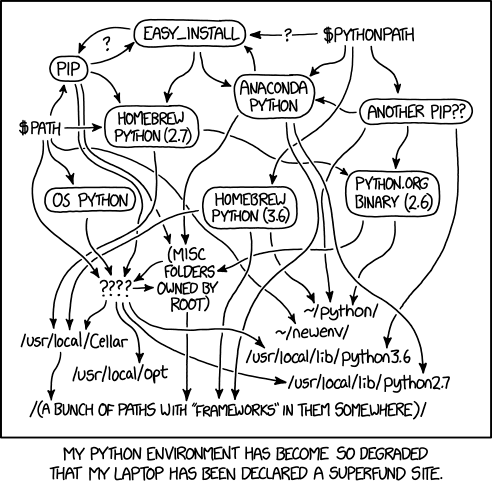
Newer developers often install everything at the system level due to a lack of understanding of, or experience with, virtual environments. Packages installed with pip are placed at the system level. The result of doing this for every project is a bloated and unmanageable singular Python environment.
Effective environment management saves time and allows developers to create an isolated software product such that collaborators or contributors can recreate your environment and run your code.
Pipenv combines package management and virtual environment control into one tool for installing, removing, tracking, and documenting your dependencies; and to create, use, and manage your virtual environments. Pipenv is essentially pip and virtualenv wrapped together into a single product.
We have all encountered this error in our development process.
ModuleNotFoundError: No module named 'pandas'This error implies that the module, which is also called a dependency or package, can not be found by Python. You are sure you installed pandas at some point or another, but where is it?
The primary purpose of Python virtual environments is to create an isolated environment for Python projects. Proper isolation means that each project can have its dependencies, regardless of what dependencies every other project has. The above error and many others can be avoided with proper maintenance of environments and dependencies. Sanitary environment management practice reduces dependency version conflicts between your projects and keeps the base development environment from becoming bloated with packages.
Data science and deployment issues
Data Scientists are often interdisciplinary and have not been formally taught to work collaboratively with others and push projects into production. Hence good environment and module management skills are often lacking. This can cause issues with code reproducibility or difficulty advancing or sharing a project. Reproducible data science projects are those that allow others to recreate and build upon your analysis and to reuse and modify your code easily.
Sanitary environment management practices reduce dependency version conflicts between your projects and keep the base development environment from becoming bloated and unmanageable, helping users to create reproducible projects.
Pipenv: a better workflow
Pipenv’s combination of package management and virtual environment control into one tool makes it a fantastic tool for data scientists and developers.
When you begin a project with Pipenv, the tool automatically creates a virtual environment, a Pipfile, and a Pipfile.lock. The Pipfile, which is similar to a requirements.txt, handles dependency management. The Pipfile is automatically updated with the new dependencies when you use the Pipenv install.
To manage complex dependencies, Pipenv keeps a tree of our project’s dependencies in a file called Pipfile.lock; for example, old versions of dependencies that depend on other old versions of dependencies. Pipfile.lock also verifies that correct versions of dependencies are used in production.
Finally, with Pipenv, you present to others a standardized way to install project dependencies and testing and development requirements.
Pipenv is an environment manager and a package manager. This means that Pipenv makes it possible to create an environment with Python then download and install packages into an environment with pipenv install.
This command will look to the Pipfile to create an environment the Pipfile exists; if not, Pipenv will create a Pipfile for this environment.
Packages appended to this command will be added to the Pipfile.
pipenv install pandas matplotlib kerasPipenv Workflow: Terminal
Setting up your first Pipenv: Installing Python, Pipenv, and Pandas
- Install Python 3.7
- Open a terminal and install Pipenv with
pip install pipenv3. Create a new directory and navigate into it.
mkdir pipenv_test
cd pipenv_test
4. Install pandas and NumPy for the environment by running:
pipenv install pandas numpyNote that Pipenv will create a virtual environment, a Pipfile, and a Pipfile.lock for this project.
Packages can be removed similarly with the uninstall keyword.
pipenv uninstall pandas5. Activate the project’s virtual environment with:
pipenv shellTest an import
After completing the above, you should now be able to run:
pipenv shellNext, open the Python interpreter with:
pythonThen in the Python interpreter:
import pandas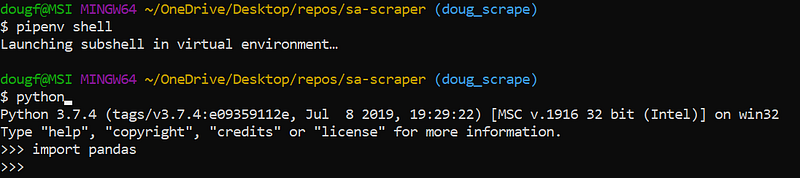
If successful, you are on your way to improving your development workflow!
If any issues arose be sure that you have run pipenv shellbefore running pythonand verify the dependencies are in the environment by running.
pipenv graph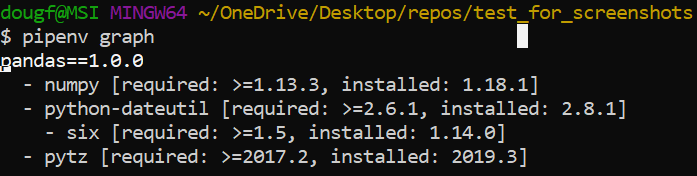
Pipenv Workflow: Jupyter
Setting up your first Pipenv: Installing Pipenv, Python, and Jupyter
- Install Python 3.7
Note: 3.8 was incompatible with Jupyter at the time of authorship
2. Open a terminal and Install Jupyter Lab on your machine.
pip install jupyterlab3. Install Pipenv with:
pip install pipenv4. Create a new directory and navigate into it.
mkdir pipenv_test
cd pipenv_test
5. Install Ipykernel and Numpy for the environment by running:
pipenv install ipykernel numpyNote that Pipenv will create a virtual environment and a Pipfile for this project.
6. Activate the project’s virtual environment with:
pipenv shell7. Connect the environment to a kernel:
python -m ipykernel install --user --display-name pipenv_test --name pipenv_testAfter completing the above, you should now be able to run:
jupyter notebookOr if you prefer the Lab user interface and added functionality.
jupyter labIn Jupyter Notebook, select ‘new’ to see a dropdown to see a list of available kernels. Note that ‘example_env’ created in step 3 above is the name of the kernel.
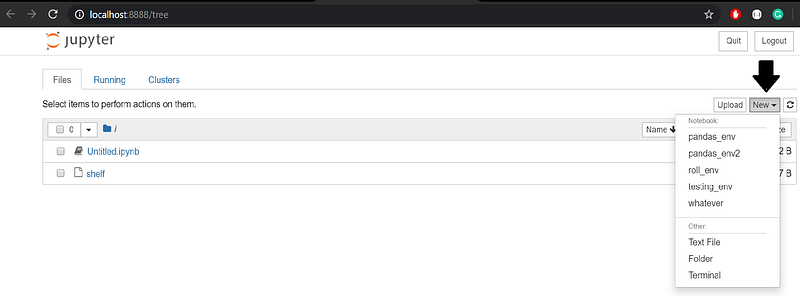
In Jupyter Lab, you will have to click the kernel box in the upper right to access a kernel list. Or you can click the kernel tab and select ‘change kernel’ to access the same dropdown.

Test an import
In a new .ipynb file, attempt to run the below code in a cell.
import pandasIf successful, you are on your way to improving your development workflow!
If any issues arose, be sure you have the correct kernel selected, that you have run pipenv shellbefore running jupyter labor jupyter notebook and before connecting the kernel. Once again, you can verify the dependencies in the environment by running.
pipenv graphEnvironment Management:
Pipenv can be used to specify Python versions and package versions.
pipenv install django=1.11.10Python specification:
pipenv --python <path>
#or
pipenv --python python3
A Pipenv can be built from a requirements.txt file:
$ pipenv install -r requirements.txtAnd a requirements.txt file can be created from a Pipfile with the package pipenv-to-requirements.
pipenv install pipenv_to_requirementsThen run:
pipenv run pipenv_to_requirementsThis will generate requirements.txt and, if applicable, requirements-dev.txt, in the current directory.
Development dependencies
The Pipfile organizes dependencies into two categories, dev-packages, and packages. A package can be specified as a development dependency (not to be used in production) by appending a dev flag.
pipenv install black --dev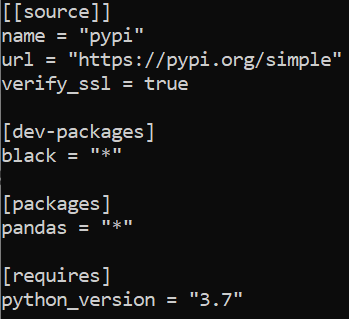
Delete an Environment
Deleting an environment is easy using the pipenv —-rm command. To create the environment again, use the command pipenv install.
Files in your project directory will remain. If you wish to remove these, delete the entire directory.
Conclusion
Having all of your packages installed in a single environment becomes an issue when you want to reproduce code. Imagine exporting a requirements.txt file that lists 200 packages when the project only needs 6.
Pipenv combines package management and virtual environment control into one tool for installing, removing, tracking, and documenting your dependencies; and to create, use, and manage your virtual environments.
It’s great to add the Pipfiles to your Git repository so that another user can clone the repository and install Pipenv on their system and then type:
pipenv installPipenv then locates the Pipfiles, creates a new virtual environment, and installs the necessary packages.
Pipenv is great because.
- Virtual environments can easily be reconstructed from a Pipfile
- Virtual environments easily deploy to a server
- Pipenv makes hygienic package and environment management easy
- Properly managed environments make it easy for collaborators to interact with and run your code
For more information, check out the Pipenv docs instructions for virtual environments.