
Using Source Control with Tableau
There usually come a few pain points when you are developing dashboards in Tableau that make you stop and think about how your authoring flow is working. The most telltale and painful is losing work because two people edited the same dashboard during the same time frame. You are now unable to keep the changes from both versions of the workbook and must pick who is going to have to start over again. Doing this once can be a headache and a good learning lesson, doing it multiple times can be a serious drag on productivity and morale of your dashboard developers.
Another pain point that can come up is not having good enough version history to track down what changed and when. Maybe a bug was introduced somewhere in your dashboard design. Did a number change in a calculation and you have no idea why? This can be even more problematic with multiple developers participating in the development on the same set of dashboards. One developer may not even be aware of another’s changes. Couple this with the high percentage of people now working remote and communication of changes and design becomes even more key to dashboard collaboration.
A third issue can be as simple as stating where you source of truth is. If a new developer joins and asks, how do I get a copy of the latest workbooks? Where do you point them? Do you have a different set of workbooks that represent your environments such as development, test and production? Source control can also help with this by making a concrete source of truth that can be split by environments and easily acquired by a new developer.
Can you relate to any of these pain points? Sounds great let’s get rid of them, right? Let’s take some time and review how source control can help with some of these problems.
You have choices between source control nowadays and can pick from several options such as GitHub or Bitbucket, your company may already be using one. I am going to focus on GitHub for outlining source control, and my main reason in that it supports LFS file locking, we will get to more on that below.
Source control at its core is a robust way to track changes to files over time with comments to explain what changed. Sounds simple right? It really is not different at its simplest form than someone saving files in versions locally, such as Q1_Metrics_V1.twbx, you then make some changes and it becomes Q1_MetricsV2.twbx. However, source control is a platform built entirely around this whose sole focus is to make it easier and more robust.
By storing our Tableau files in a repository, we now have a centralized source of truth that all developers can work from. No more guessing which copy is being used or where it is located. We can also setup separate branches to track things in development versus things that are currently live and in production. If you don’t have source control in place already, sign up for a GitHub account and download a git client.
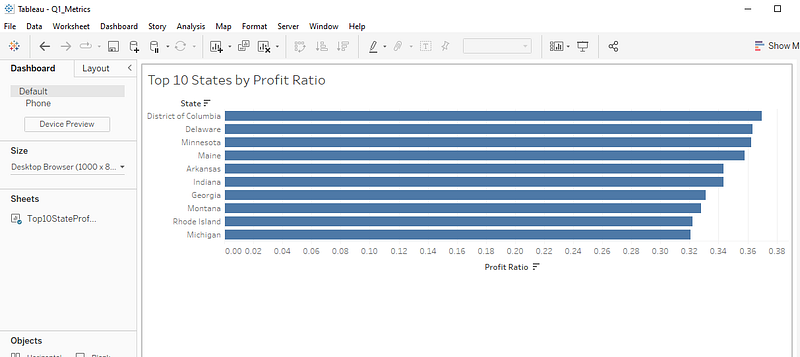
Let’s jump into some examples of how this works. Take an example of a basic dashboard. You might look at it and wonder what the heck is a .twb file? Well it is really just an XML file underneath, which is a popular markup language for hierarchies defined by tags or nodes. It is how Tableau stores all that information about how to load your dashboard and what it should look like. If you open it up with a text editor, you will see the XML underneath.
The simple workbook on the left is represented by the XML on the right.
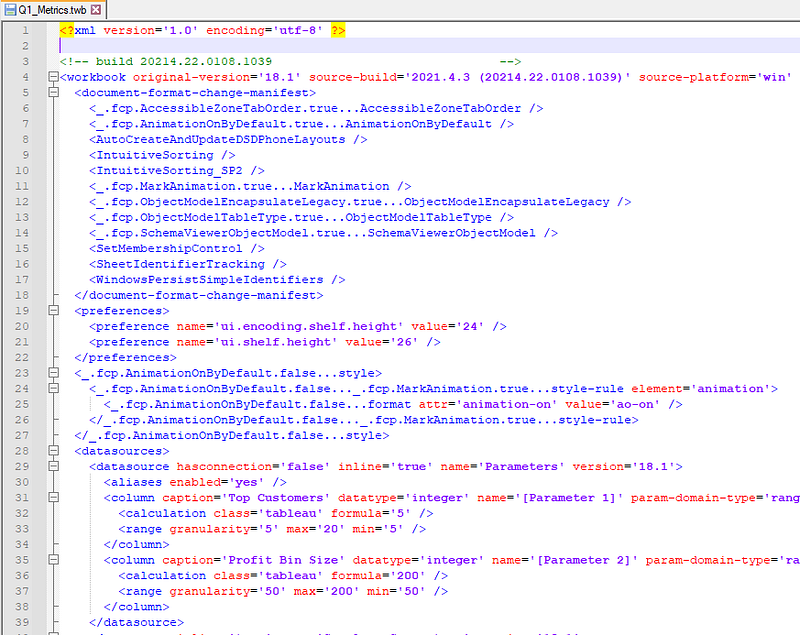
This is important because source control works by default by comparing the changes of text in a file from one version to the next. What lines were added, deleted, or changed. The difference between Tableau and say for example writing SQL queries is that Tableau is auto generating these lines, often many lines in many different places of the XML. When you write SQL queries by hand you are explicitly changing lines at a time in a way that is more explicitly understood by a person. Why do we care? Well because asking someone to validate and track lines individually when it is done in large quantities by a system is overwhelming and confusing. Our simple example above is already over 3300 lines of code for 1 sheet in 1 dashboard, yikes.
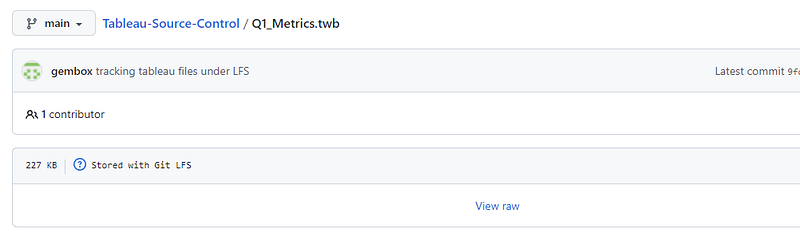
So, do we have an alternative? Thankfully yes, source control has been dealing with large messy, not meant to be human interpreted files long before Tableau. The key to making this work well is to enable Tableau files to be tracked as entire references rather than line by line. Now we have alleviated the burden of having someone examine each line by comparison. To get this setup, open your repo where Tableau files are stored and begin tracking tableau patterns with the command git lfs track "*.twb*" This will let your repo know to consider the Tableau file extensions as LFS files. Push your changes to your remote repo and voila now we no longer track these items line by line.

If we look at it on the remote repo on GitHub now, we notice that GitHub is no longer attempting to show the detail but lets us know it is now an LFS file.
The other benefit we get by using LFS is that we can circle back to another pain point we talked about early on, simultaneous changes on the same workbook. I have seen folks try their best to communicate who has what workbook out and what is being changed. Inevitably there is a conflict at some point in time between versions because it requires constant communication and the sensitivity to the slightest changes to a workbook all being tracked by busy people. Here is where we can use another great LFS feature of locking.
Locking files under LFS will prevent other users from editing a file that is locked. Seems pretty self-explanatory right? Let us consider the workflow behind it, say the first user is going to update Q1_Metrics based on stakeholder feedback. User two has another item they are working on to update all workbooks to use the new colors that correspond to the new company logo colors. In a non-locking world user one and two might do this at the same time causing someone to lose work. With locking, user one can lock the file right before the anticipated changes. This will prevent anyone else from making changes to it at the same time and also notify them who has the file out for changes. It can be done with a simple locking command git lfs lock Q1_Metrics.twb This now locks the file to me and will stop anyone else from changing it by leaving it in a read-only state elsewhere.

I can also see what files are locked and who they are locked to by using the command to show all current locks git lfs locks.

Remember all that messy tracking of what files are being worked on and who is working on them. I can see that listed out in my locks. User two can now ask user one, hey I have to make some color changes, when are you going to be done with that file? No more guesswork or lost changes.
When the first user is done with the file, they commit their changes and unlock it git lfs unlock Q1_Metrics.twb Now other users can see the file available again as it will clear the lock.

This now takes that guesswork process and puts it into a clear workflow. It does depend on people being diligent about locking and releasing files in a timely manner. They should only be locking files that are currently being worked on and release them as soon as changes are committed.
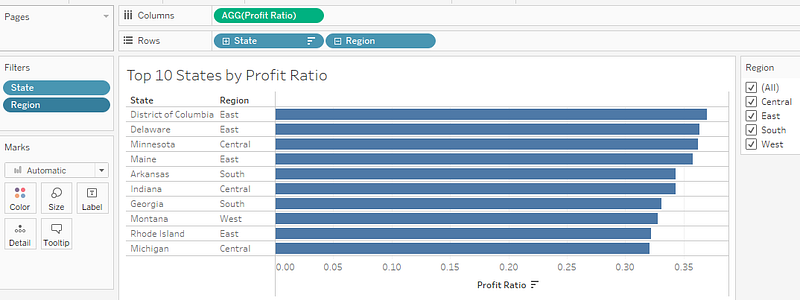
Now that we have a solid setup for file storage and collaborative work in place, let’s talk about the concept of incremental changes and separation of development and production work. One of the underlying principles of git is that you can more granularly track changes over time. This is important conceptually to know both how a workbook has changed and what has changed during the lifecycle. Let’s take an example in our Q1_Metrics workbook, we want to update the workbook to be able to show and filter by region. We also want to preserve the existing workbook as is for others to use. This is where the concept of branching comes into play.
I can create a new branch called development in git which will represent the in-progress work that might not be ready for release to production to my end users. I do this using the following commandgit checkout -b development After executing you will notice git now switched to the development branch in the command line.

The same files exist as on my main branch, but they are now separate copies. I can begin to make my region changes while still having my production ready version intact. I now make my changes to introduce the requested region functionality and save my workbook.
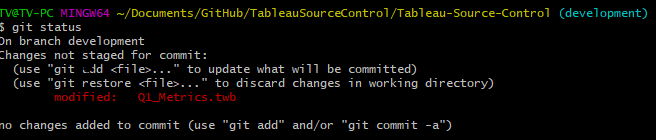
If I look in git and use the status command git status git lets me know I have changes that are pending from my latest save. Here is where the git workflow kicks in. I can add these changes from staged to committed and push them to the remote repository where all users will be able to see them. First I use git add Q1_Metrics.twb to let git know which changes I want to commit.
Next I put a meaningful message to go with my changes. This is a very important concept as the ability to figure out what changes occurred and when are only as good as your commit messages. They should be action oriented and descriptive, what action did you take and on what objects. I commit the message with git commit -m "adding region to Top10StateProfit rows and filters" Now everyone else knows the scope of my changes and intent. It helps to keep changes targeted and small so that they can be understood. Committing often will keep changes from growing large and unwieldy. Lastly, I push it to the remote branch for everyone else to see via git push origin development Once I receive feedback and testing, I can then make this available on my production branch. This can also continue for further changes before production. For example, someone might tell me I forgot to put my filter in context since I am dealing with a TopN and I might not be getting the results I expect. I would make the update, issue a new commit and update the branch. This is a great reason to be developing in a non-production environment first.

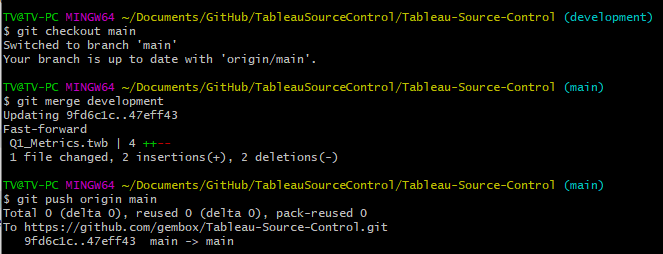
Once I am satisfied with the changes, I can merge this branch into my main branch with a few commands. First, I checkout the main branch. I then merge the two using git merge development and finally I push the changes to the main branch via git push origin main which can be seen below.
I will note that I have simplified the steps above to be as linear as possible for the example of how this works conceptually. In a robust git usage environment, you will want to be using more features in git such as pull requests on branches to manage changes and code reviews.
Hopefully this article gives you an idea of how source control can help alleviate some of the problems around co-development in Tableau workbooks. There are certain equivalents of this built into Tableau server but in my opinion, they are not nearly as robust. For example, server offers version histories as an option, but it takes up space on your server and comes with a limit to the number of versions. They also offer a description field within a workbook that I have seen people try and use to track history. The problem is that it is a running total of all cumulative text and isn’t tied specifically to what version goes with what change. My hope is that in the future Tableau embraces source control in a native way that makes the process easier to implement.
Finally, you might wonder in what scenarios is source control not a good idea or worth it. I am always a proponent of using the right amount of effort and tool to accomplish the outcome you are looking for. Some scenarios in which source control might not be worth it including single developer scenarios in which they already have a good enough versioning system and are not comfortable with git or command line. Another scenario would be where you have lots of decentralized contributors who are producing content independently and would have a large learning curve to git.
Having items under source control also opens up a path towards making large, controlled changes programmatically to our Tableau library. In my past I have been responsible for 100+ dashboard environments from the same data source. Concepts like adding a new parameter can be time consuming and daunting, but with some smarts and python we can execute a parameter addition to 100+ workbooks in minutes rather than hours. We can also create flexible deployments and script out publishing tasks using the APIs. I will cover more of these topics in future posts.


