

Using Jupyter Notebooks?
Be more productive with these shortcuts
I think it’s fair to say that Jupyter notebooks are fast becoming the de-facto tool of choice for many data engineers, data scientists and even software developers for quickly setting up proof-of-concept data wrangling jobs or even as full-blown development and data analysis environments. Almost uniquely, a Jupyter Notebook lets you code, analyse, document and visualise your data and data processing all in one place, right there in a browser window.
As you use Notebooks for any length of time, you’ll find yourself typing in the same commands over and over again and you might start thinking if there are any tips and tricks available on how to be even more productive using them. The answer is yes there is and they are not that hard to find using the Help system but I thought it might be useful to bring the most common and useful of them together in one short article. We will be talking about keyboard and magic shortcuts.
Keyboard shortcuts
When entering keyboard shortcuts, you should remember that Jupyter has two modes of operation, command mode and edit mode. You know when you’re in command mode since the current cell will have a green border around it. In edit mode, the current cell has a blue border around it. To switch from edit mode to command mode you should press the Escape (ESC) key first. Here are what I consider to be the most useful keyboard shortcuts.
Command Mode shortcuts
Keystrokes               Effect
----------               ------

CTRL Enter               run the contents of  cell and stay in the cell

Shift Enter              run the contents of cell and move to the cell below

CTRL c/x/v               copy/cut/paste text operations in the cell

CTRL z                   undo changes made to the cell

CTRL Shift z             redo changes made to cell

ALT Left/Right Arrow     goto beginning/end of the current line in the cell

CTRL Home/End            goto first/last character of the cell

CTRL f                   display a find dialog box

ALT selection            select columns of text


CTRL [                   indent selected or current line in a cell


CTRL ]                   dedent selected or current line in a cell


CTRL /                   comment/uncomment selected lines in a cell

Shift M                  merge selected cells into one cell


Shift M    merge selected cells into one cell
Edit mode shortcuts
I have pre-pended each of the below commands with the Escape key just as a reminder that you need to be in Command mode before running them. It’s a useful habit to get into doing and doesn’t affect the operation of the shortcuts in any way except to ensure that you’re in the correct mode before they’re run.
Keystrokes                   Effect
----------                   ------

ESC a                        create a new cell above current cell

ESC b                        create a new cell below current cell

ESC l                        toggle cell line numbers on/off

ESC dd                       delete current cell

ESC Shift Up/Down Arrow      select adjacent cells in the up or down direction
As I said before I think these shortcuts are the most useful but there are a bunch more that you see by clicking Help->Keyboard Shortcuts on your notebook.
Magic shortcuts
Magic commands are shortcuts that can extend the capabilities of Jupyter Notebooks. There are two types of magic commands, Line Magics and Cell Magics.
Line Magics start with the percent (%) character. The rest of the line is the Magic argument passed without parentheses or quotes. Line magics can be used as an expression and their return value can be assigned to a variable.
Cell Magics start with double per cent (%%) characters. Unlike line magic functions, they can operate on multiple lines below their call. They can in fact make arbitrary modifications to the input they receive, which need not even be a valid Python code at all. They receive the whole block as a single string.
Many magics can be run as either a line or cell magic. To run a magic command just enter them at the start of your Notebook cell followed by any other normal cell input.
Here are the most useful magic commands together with some examples of their use. Just type them into a cell and run the cell.
%lsmagic
List all magic commands available in your Notebook.
Available line magics:

%alias  %alias_magic  %autoawait  %autocall  %automagic  %autosave  %bookmark  %cd  %clear  %cls  %colors  %conda  %config  %connect_info  %copy  %ddir  %debug  %dhist  %dirs  %doctest_mode  %echo  %ed  %edit  %env  %gui  %hist  %history
%killbgscripts  %ldir  %less  %load  %load_ext  %loadpy  %logoff  %logon
%logstart  %logstate  %logstop  %ls  %lsmagic  %macro  %magic  %matplotlib
%mkdir  %more  %notebook  %page  %pastebin  %pdb  %pdef  %pdoc  %pfile
%pinfo  %pinfo2  %pip  %popd  %pprint  %precision  %prun  %psearch  %psource
%pushd  %pwd  %pycat  %pylab  %qtconsole  %quickref  %recall  %rehashx
%reload_ext  %ren  %rep  %rerun  %reset  %reset_selective  %rmdir  %run  %save
%sc  %set_env  %store  %sx  %system  %tb  %time  %timeit  %unalias  %unload_ext
%who  %who_ls  %whos  %xdel  %xmode

Available cell magics:

%%!  %%HTML  %%SVG  %%bash  %%capture  %%cmd  %%debug  %%file  %%html
%%javascript  %%js  %%latex  %%markdown  %%perl  %%prun  %%pypy  %%python
%%python2  %%python3  %%ruby  %%script  %%sh  %%svg  %%sx  %%system
%%time  %%timeit  %%writefile

Automagic is ON, % prefix IS NOT needed for line magics.
%<magic_command>? e.g %timeit?
Display the docstring/help on a particular magic command.
Docstring:
Time execution of a Python statement or expression
Usage, in line mode:
%timeit [-n<N> -r<R> [-t|-c] -q -p<P> -o] statement
or in cell mode:
%%timeit [-n<N> -r<R> [-t|-c] -q -p<P> -o] setup_code
code
code...
Time execution of a Python statement or expression using the timeit
module. This function can be used both as a line and cell magic:
- In line mode you can time a single-line statement (though multiple
ones can be chained with using semicolons).
- In cell mode, the statement in the first line is used as setup code
(executed but not timed) and the body of the cell is timed. The cell
body has access to any variables created in the setup code.
Options:
-n<N>: execute the given statement <N> times in a loop. If <N> is not
provided, <N> is determined so as to get sufficient accuracy.
-r<R>: number of repeats <R>, each consisting of <N> loops, and take the
best result.
Default: 7
-t: use time.time to measure the time, which is the default on Unix.
This function measures wall time.
-c: use time.clock to measure the time, which is the default on
Windows and measures wall time. On Unix, resource.getrusage is used
instead and returns the CPU user time.
-p<P>: use a precision of <P> digits to display the timing result.
Default: 3
-q: Quiet, do not print result.
-o: return a TimeitResult that can be stored in a variable to inspect
the result in more details.
.. versionchanged:: 7.3
User variables are no longer expanded,
the magic line is always left unmodified.
Examples
--------
::
In [1]: %timeit pass
8.26 ns ± 0.12 ns per loop (mean ± std. dev. of 7 runs, 100000000 loops each)
In [2]: u = None
In [3]: %timeit u is None
29.9 ns ± 0.643 ns per loop (mean ± std. dev. of 7 runs, 10000000 loops each)
In [4]: %timeit -r 4 u == None
In [5]: import time
In [6]: %timeit -n1 time.sleep(2)
The times reported by %timeit will be slightly higher than those
reported by the timeit.py script when variables are accessed. This is
due to the fact that %timeit executes the statement in the namespace
of the shell, compared with timeit.py, which uses a single setup
statement to import function or create variables. Generally, the bias
does not matter as long as results from timeit.py are not mixed with
those from %timeit.
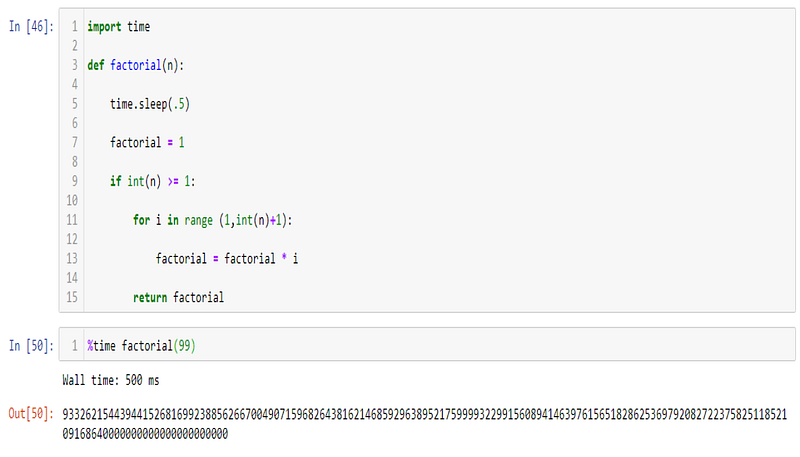
File: c:\users\thoma\anaconda3\lib\site-packages\ipython\core\magics\execution.py%time
Print the elapsed wall clock time of a Python statement or expression. This function can be used both as a line and cell magic. In line mode you can time a single-line statement (though multiple ones can be chained with using semicolons). In cell mode, you can time the cell body.
%timeit
A slightly more advanced version of the %time magic. %timeit can run your code or expression R times and optionally repeat those R runnings N number of times in a loop where N and R are user-supplied integer values. At the end of the run, the average time taken per run is reported.

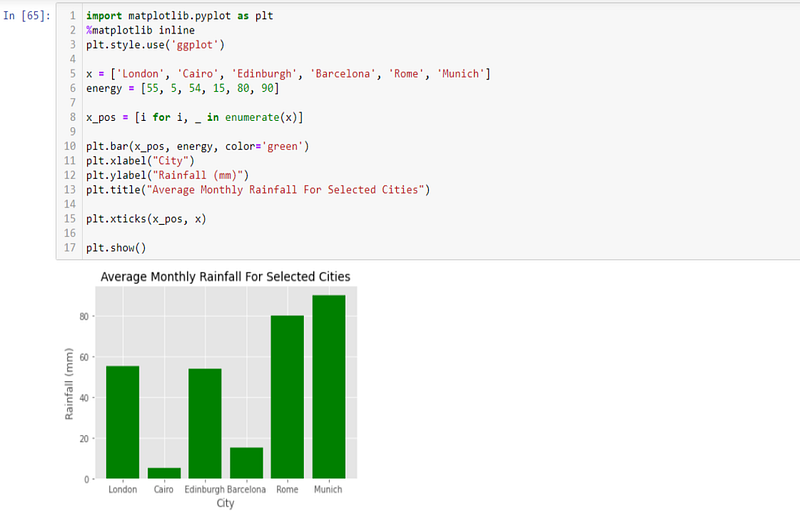
%matplotlib
Set up matplotlib to work interactively. This function lets you activate matplotlib interactive support anytime during a session. It does not import anything into the interactive namespace.
%prun
Run the Python code profiler. This will tell you what parts of your code are taking the longest time to run so you can optimize it if possible.

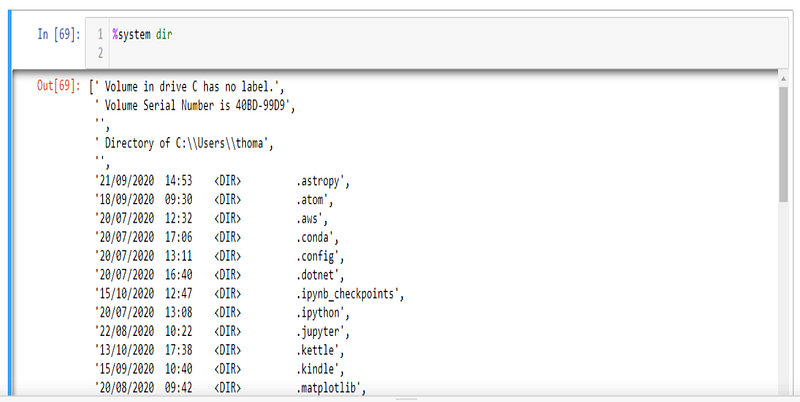
%system
Allows you to run a shell command
Ok, that’s all I have for now. If you found this content useful please consider following me for more content like this.


