
UX Case Study: Redesigning the U.S. Holocaust Memorial Museum App
The full UX process from discovery to stakeholder presentation.
I was fortunate to be on the team petitioned to redesign the native iOS and Android app for the United States Holocaust Memorial Museum (abbreviated as USHMM throughout the rest of this case study). The current app is outdated and is no longer being supported by the museum in Washington D.C.
The UX team was given three weeks to complete the project. If ever there was a project where empathy would come into play, this is the one. It has been an honor and privilege to have taken part in this redesign. This project got underway Monday, February 20th, 2017 and ended Friday, March 31st, 2017.
My Role
UX Designer, assigned to the native iOS app redesign.
Design Process
Understanding a good UX process and having a plan in place beforehand helped facilitate the design process and served as a guideline along the way.
Step 1: Build Empathy
- Stakeholder Interview
- Assumptions
- Business Goals
Step 2: Define
- Survey & Research
- Project Creative Brief
- Personas
- Content Audit
- Sitemap
Step 3: Ideate
- User Story Map / Story Boarding
- User Flows
- 10x10 Sketching
- Low-Fidelity Wireframes & Prototypes
Step 4: Design & Prototype
- Implement a Style Guide
- High-Fidelity Mockups
- Prototype in InVision
- User Testing
Step 5: Stakeholder Design Review
- Setup up Web Conference & Assign Roles
- Feedback & Discussion with the Museum
Conclusion
- Project Impact & Outcomes
- Special Thanks
- Design Toolkit
Step 1: Build Empathy
Stakeholder Interview
A meeting was scheduled with the museum’s Creative Director, Shawn Perkins, to discuss the overall goals, requirements, and outlook for the app. Below are the notes I took during the interview.
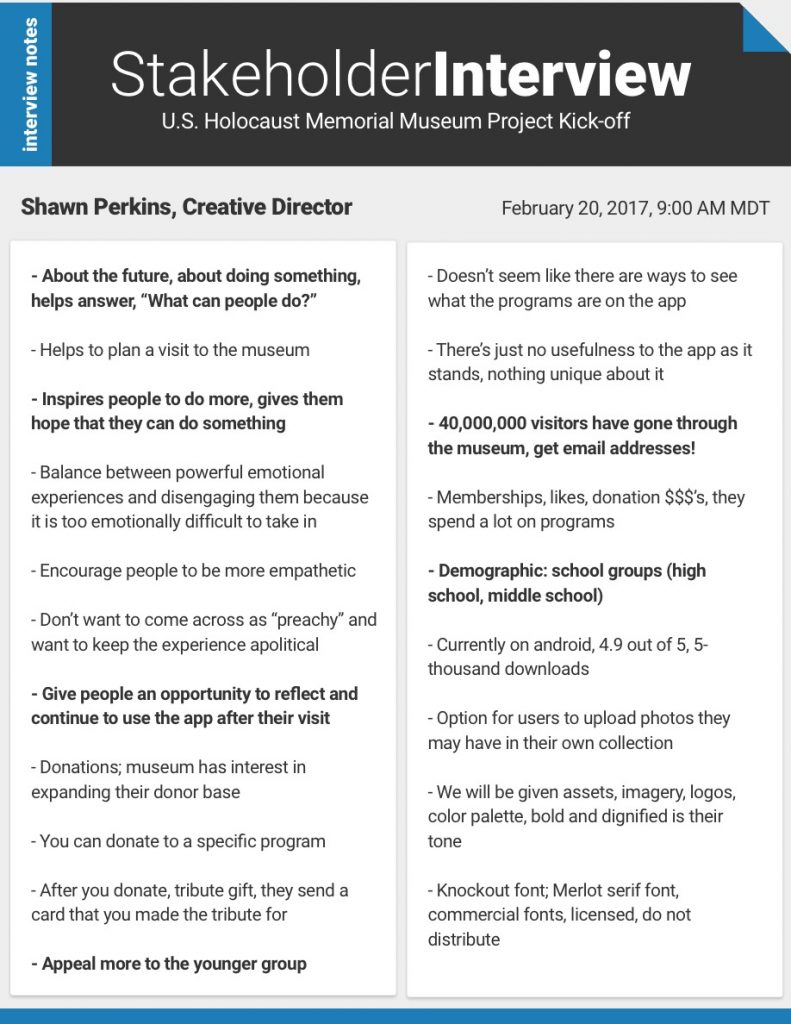
During the interview and immediately following, I began to notice a trend from the Creative Director leaning towards a younger demographic. Key indicators stood out such as the need for the app to appeal to the younger crowd and USHMM’s desire to obtain the email addresses from the millions of visitors they receive. Having the interview with the stakeholder helped lead perfectly into assumptions about the app.
Assumptions
What is already known about the app? What is known or assumed about potential or existing users? What can be safely assumed about museum donors? Time to get brainstorming! These were some of the questions asked to establish direction, thoughts, and lead closer towards business goals for USHMM.
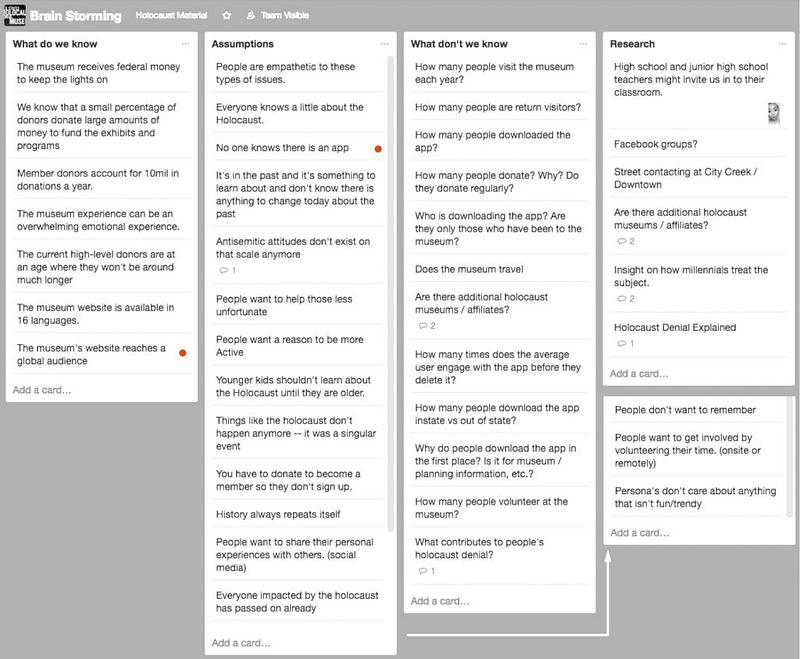
Assumptions proved vital to the UX process. Asking these questions got the creative juices flowing and aided in furthering empathy towards the project and potential users.
Business Goals
Using the list of key questions, assumptions, unknowns, and stakeholder interview notes, I was able to compile this information and establish Business Goals for USHMM.
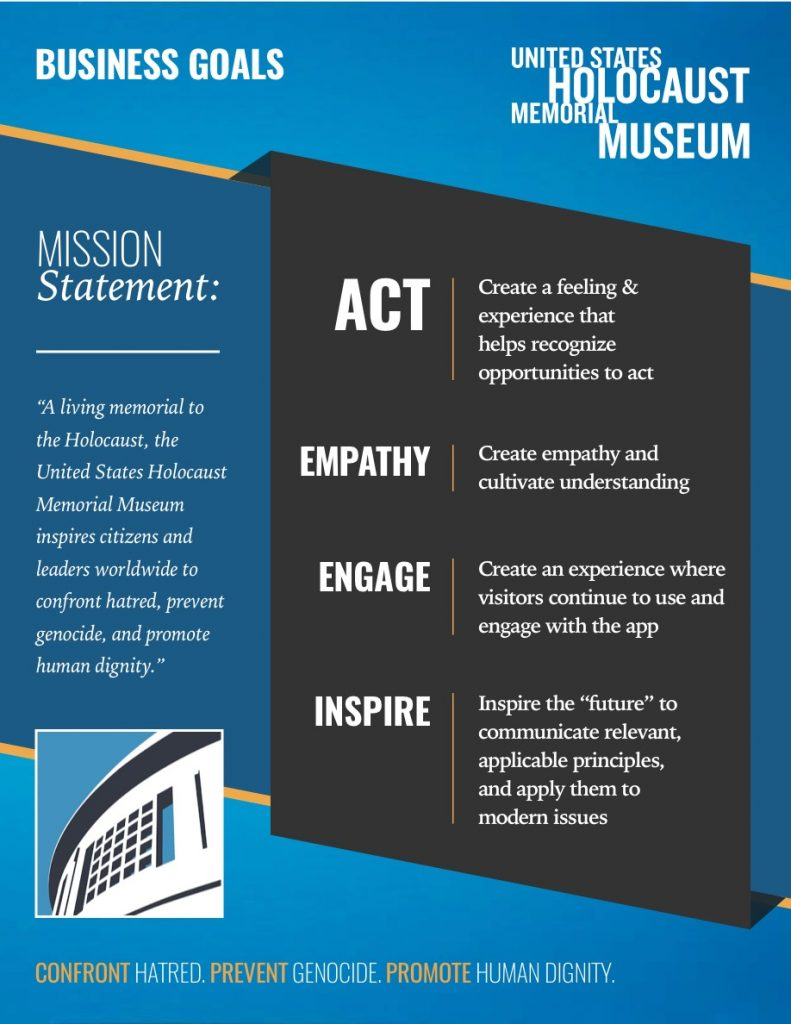
Borrowing the mission statement from USHMM, I analyzed the stakeholder notes and assumptions to come up with four key goals: Act, Empathy, Engage and Inspire. These goals represented what the app should do and how it should behave in the hands of the users.
However, this was merely based off assumptions and an interview with the Creative Director at the museum. These goals needed to be validated through surveying & further research. Let’s move there next.
Step 2: Define
Survey & Research
The Android team tackled the creation of a Google survey. While I can’t take credit for the creation and results of the survey, its results were eye-opening and validated our Business Goals ten-fold! Over a hundred results came in and respondents answered 12 questions pertaining to bullying, the Holocaust, and social media to name a few. Full survey responses can be viewed here on Google Sheets.
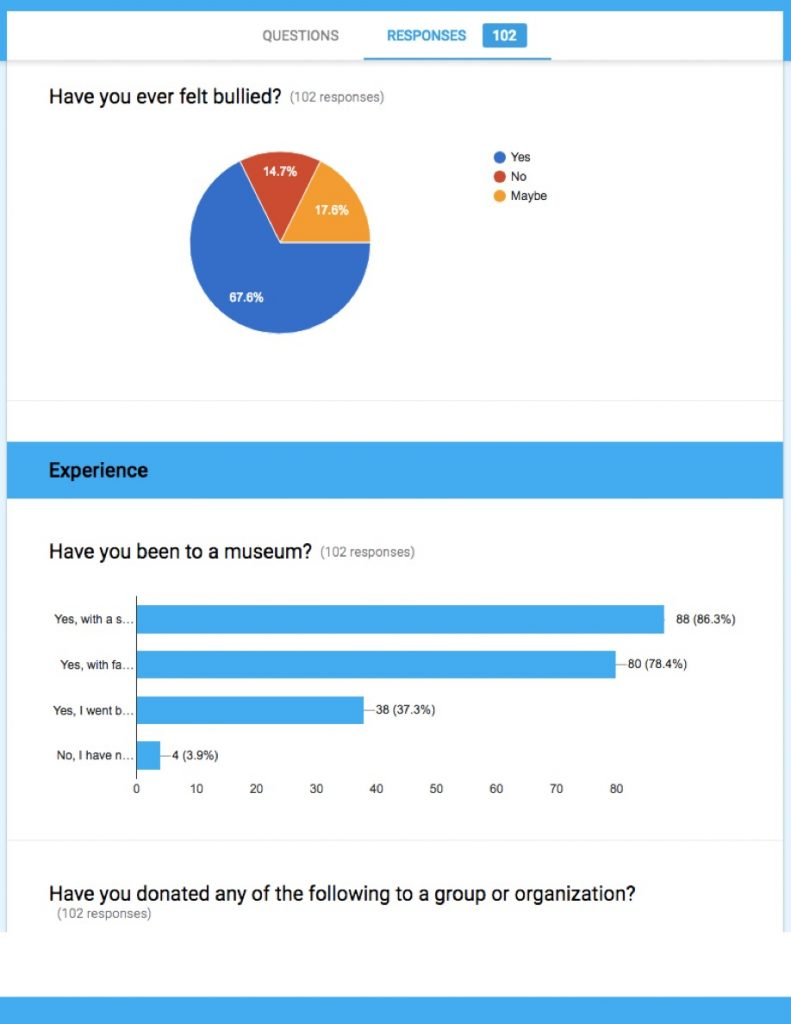
Nearly 70% of respondents had felt bullied! Wow! Nearly 85% learned about current events from social media! These were humbling responses. Most had heard about the Holocaust and learned about it at school. While a majority of responses came in from teenagers age 13–18, the millennials (Born 1977 to 1995) also filled up the survey. Thinking back to my goal sheet of act, empathy, engage, and inspire, I could see validation through this survey. Surveying helped progress to the creation of the Project Creative Brief and shortly thereafter, the Personas.
Project Creative Brief
A four-page project brief was created to cover the project’s primary audience, they key message being sent by the app, challenges/obstacles, and how success could be measured.
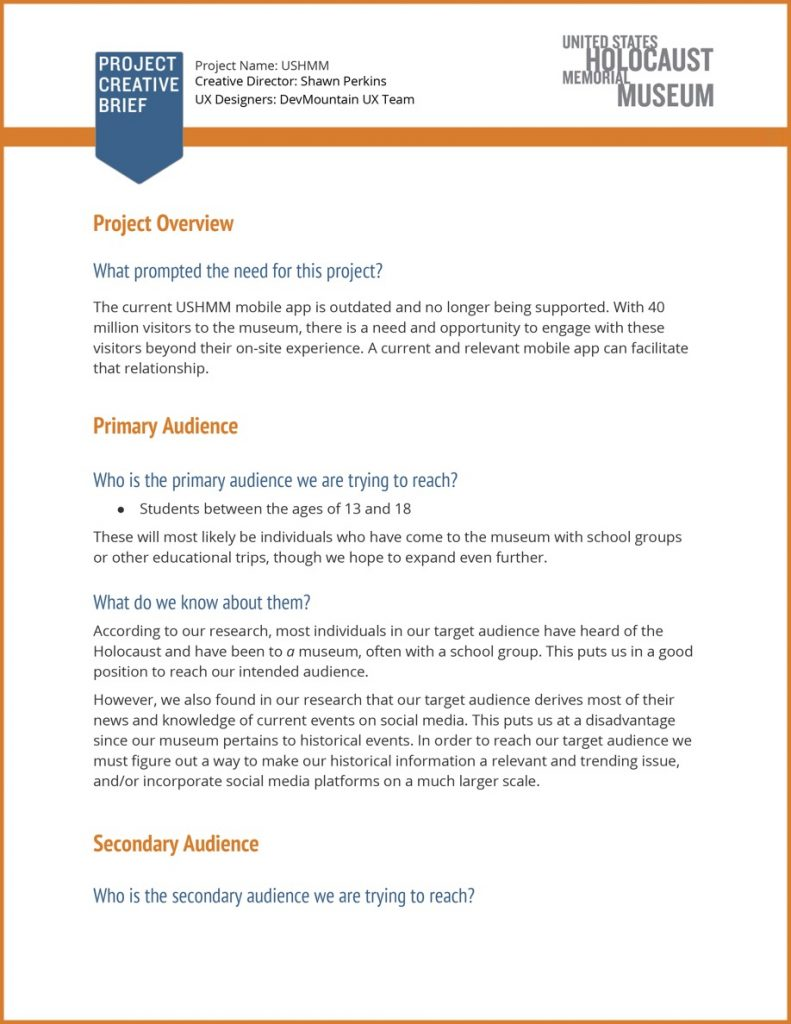
The Project Creative Brief can be viewed in its entirety as an attachment here. I really felt like the project was starting to take shape at this point! Using all of the above information, it was time to put a face to all this work and create Personas.
Personas
I love creating Personas! Three Personas were created: a student (primary), millennial (secondary), and teacher (tertiary). Each was created with goals, frustrations, and motivations in mind.
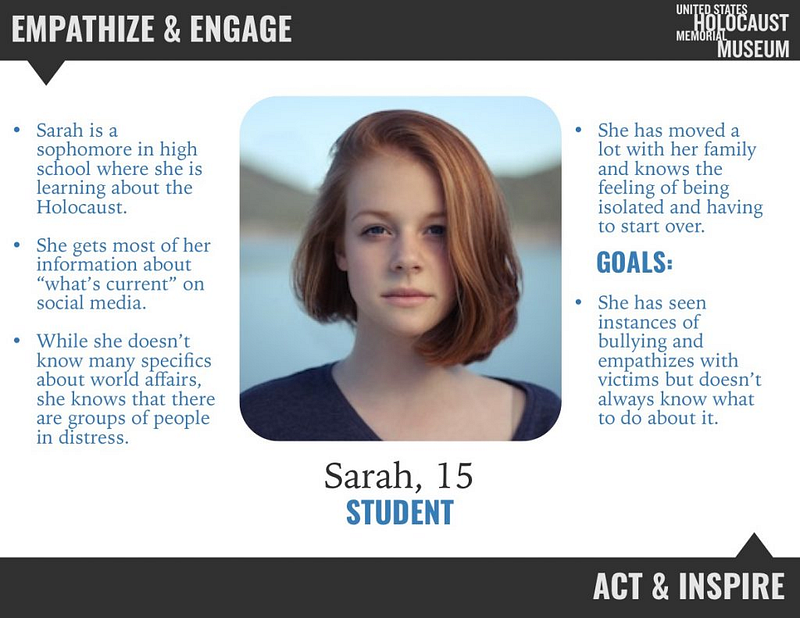
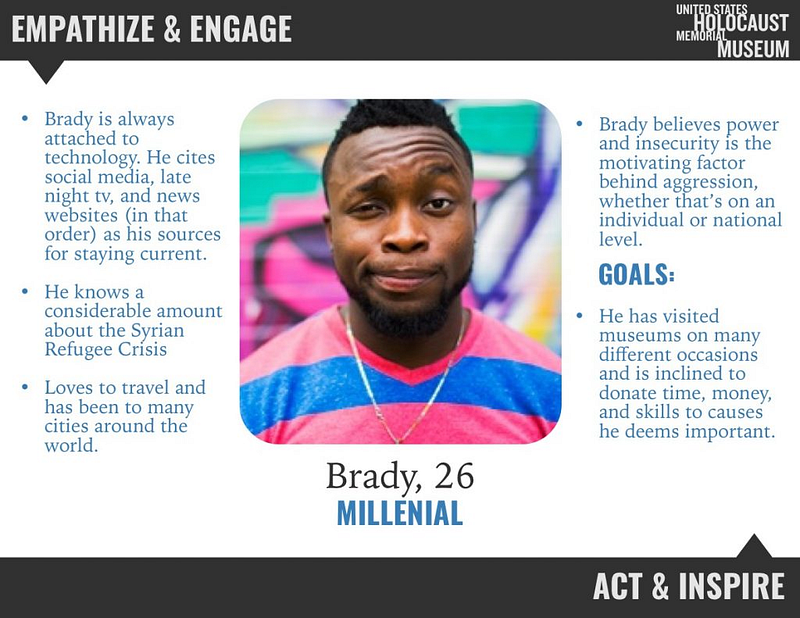

These Personas stayed on the wall during the entire project and were referred to often to ensure the app was headed in the right direction!
Content Audit
It felt like a natural move to grab the goals, Creative Brief, and Personas, and begin looking at the existing content of the app and website. While part of the team looked at the current website, I took the app under close observation and mapped out the structure of it in a Google Sheets document as seen below.
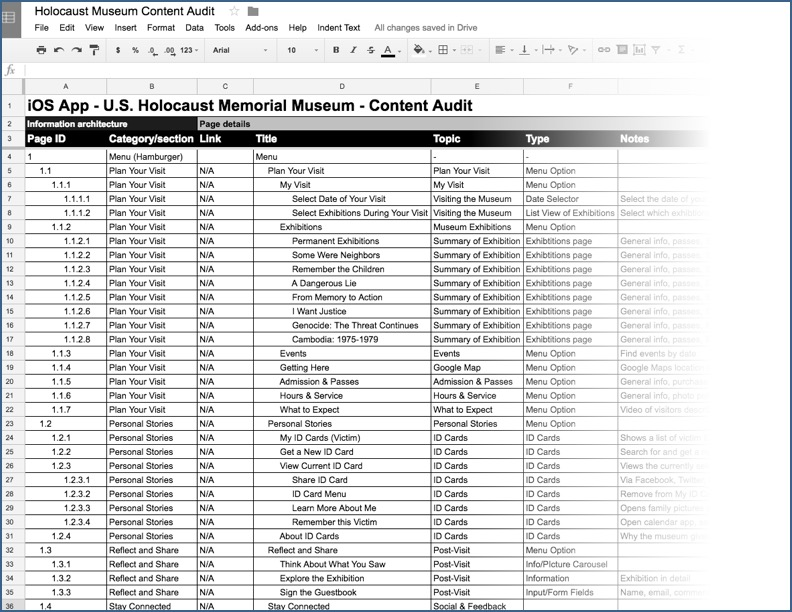
It didn’t take long to recognize that the existing app was full of pain points. It wasn’t useful, most of the content was stuffed into the “hamburger” menu, and it was difficult to navigate. I began seeing design patterns that weren’t conducive to a user-friendly experience.
Sitemap
To get an even more in-depth look at the structure of their existing product at the museum, I put together a sitemap in SlickPlan.
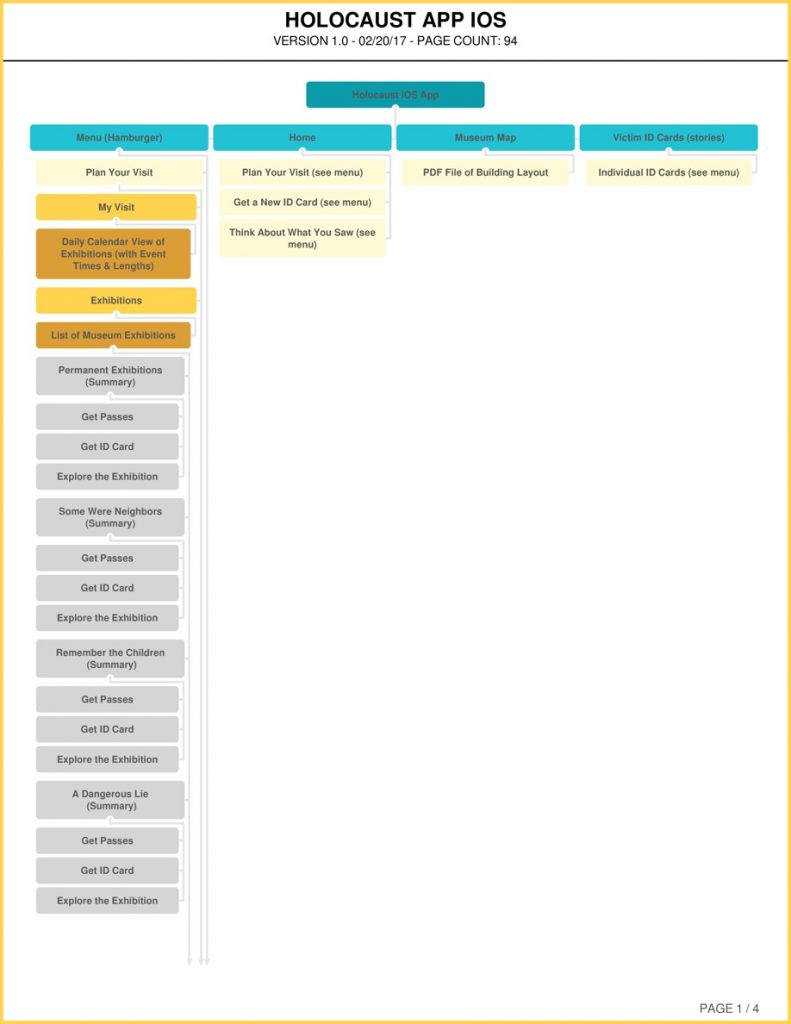
The sitemap helped in understanding the hierarchy, taxonomy, and what their process was at the museum in grouping content on the app. With all this information in my tool belt, the logical progression of the design phase could now move forward to creating a user story map!
Step 3: Ideate
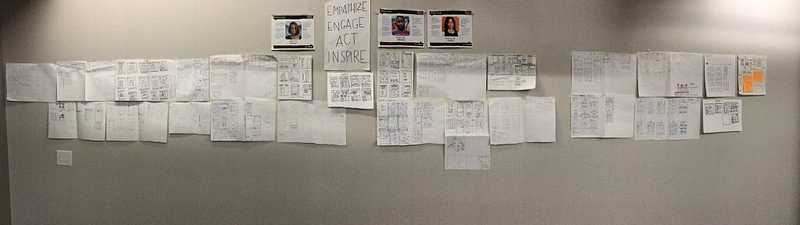
User Story Map / Story Boarding
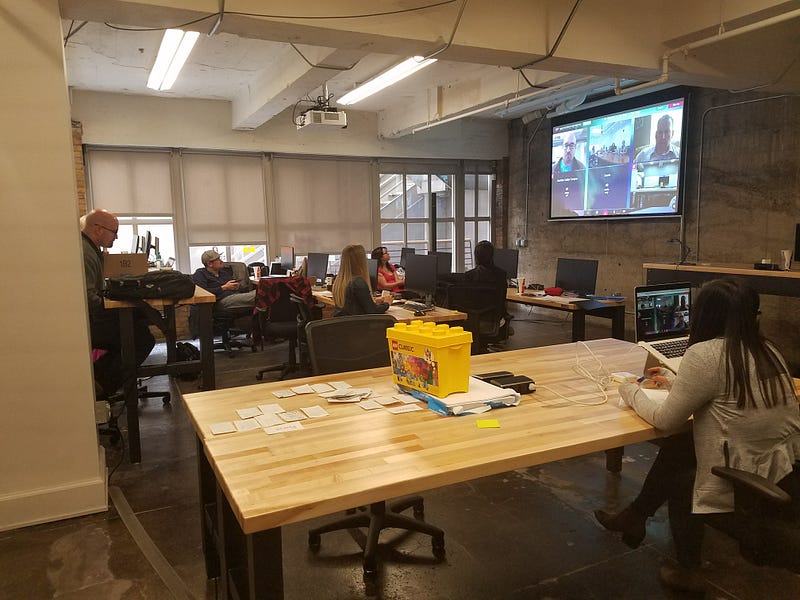
I loved getting the team together, grabbing the Post-it notes, and getting to work on the story map. This is the phase where ideas for the app really start coming out.
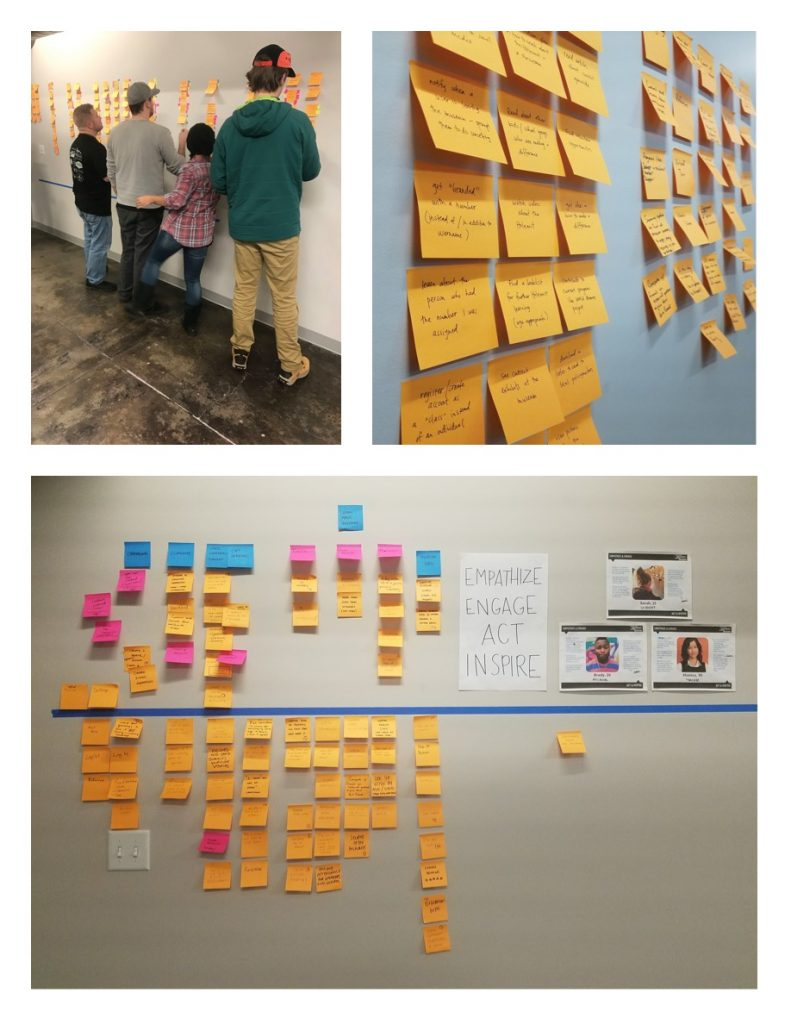
As you’ll notice, Business Goals and Personas were constantly close as a reminder of the direction of the app. The blue line was drawn and an MVP (Minimum Viable Product) was selected. The app was to focus on these key areas: Onboarding, the Holocaust, Current Events, Getting Involved/Making an Impact, Resources, and the user’s Profile.
More specifically, the high-level view of the app was as follows:
- Past: Focusing on the Holocaust itself
- Present: Current events, genocide today
- Future: Getting involved, taking a pledge, and making a difference
Where could the app have gone? This came up in storyboarding as well. The app could have taken a much different approach, by being more of a companion app at the museum. The app could help users walk through the museum, connect with Bluetooth beacons, and assist users with their museum visit. It was decided that this did not best address the business goals, survey results, and personas; it felt like an entirely different app experience.
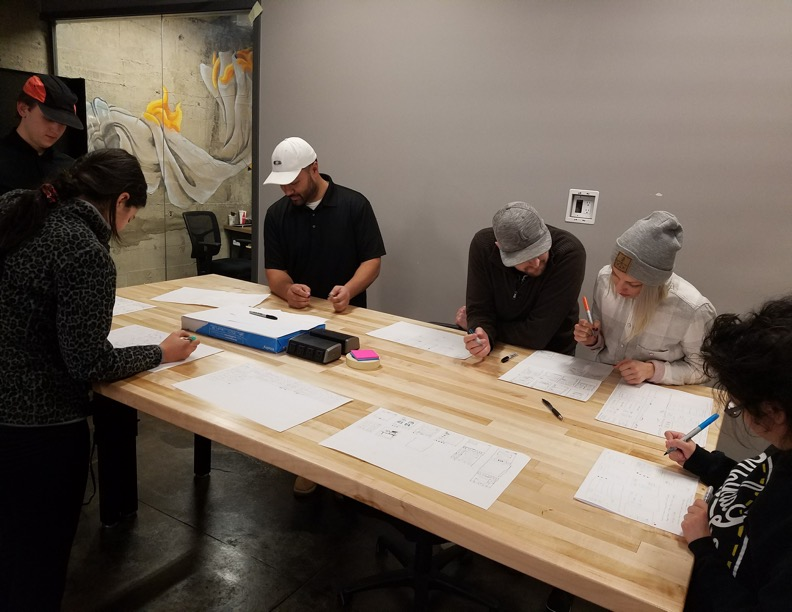
User Flows
To help understand movement through the app, a User Flow was created. I created the Onboarding section in Sketch.

Still trying to keep our Personas in mind, I wanted the User Flow to be easily understood and make sense to our demographic. After each team member created their flow for the app, the 10x10 sketching process could begin!
10x10 Sketching
I joined in on the sketching and generated many ideas in a short amount of time, which is the key component when doing 10x10's!
Below are my screens for the “Current” view of the app:
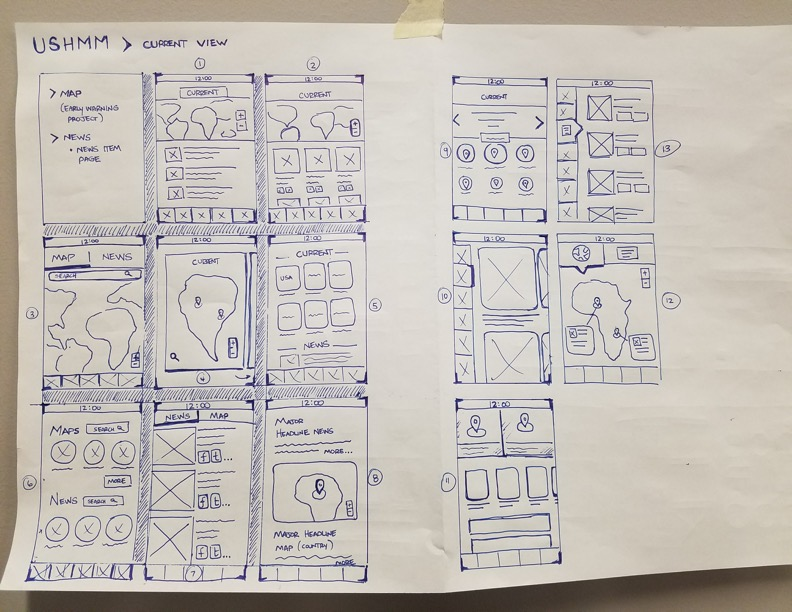
The entire wall was full of a collaboration of amazing ideas!
Using a voting system, the best screens were chosen so that low-fidelity wireframing could begin.
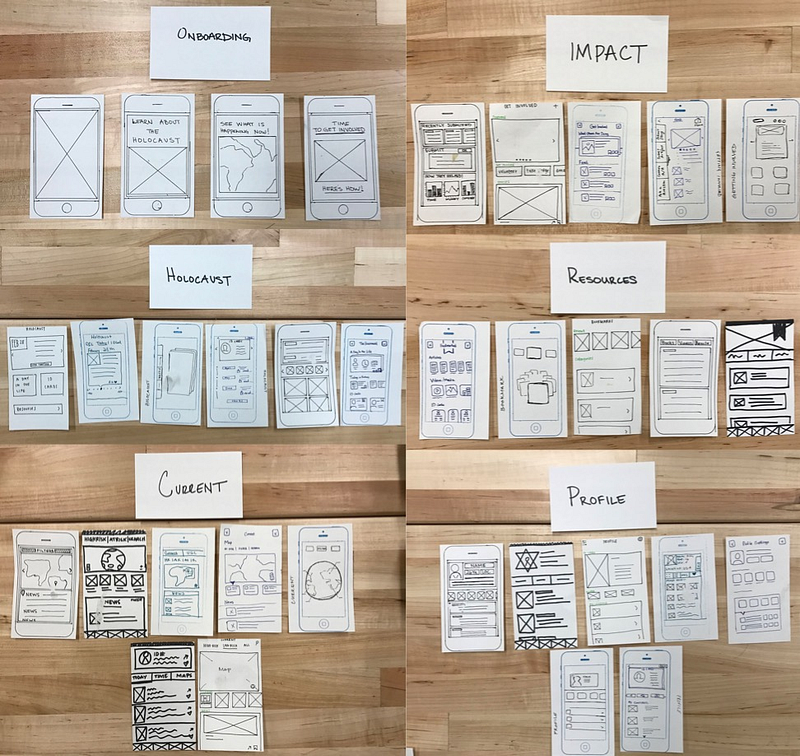
Once the screens were chosen by the team, it was on to wireframes and low-fidelity mockups.
Low-Fidelity Wireframes
I took on “The Holocaust” and “Resources” in the redesign. It seemed like a daunting task! The Holocaust section needed to focus on three key areas for our users: About the Holocaust, Stories of the Victims, and a Timeline of Events. The Resources page was also full of information, including maps, traveling exhibits, and general information about the museum itself. Thanks to the power of 10x10 sketches, the wireframes came together nicely.
Step 4: Design & Prototype
Implement a Style Guide
I can’t take credit for this part as another team member took on this role, but I did want to make a quick mention to how useful, critical, and essential the Style Guide was to our process. A Style Guide for both the iOS team and Android was created using the Craft library plugin in Sketch. Each team member pulled from the style guide and had to make a request to the library owner before any changes could be made to a button, color, or font choice.
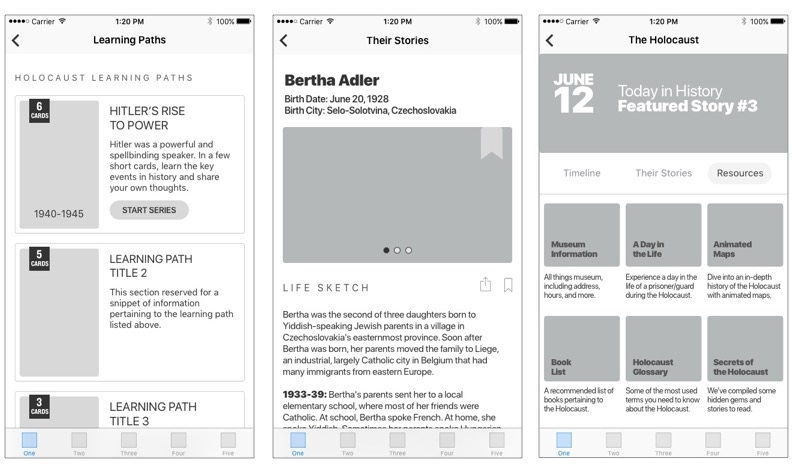
High-Fidelity Mockups
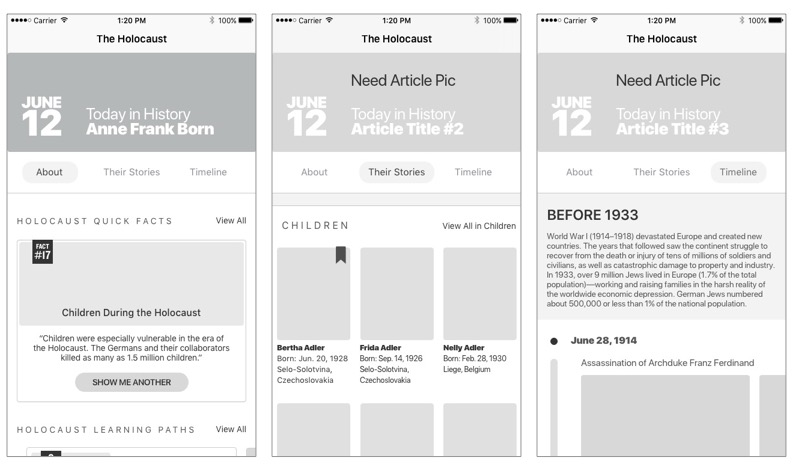
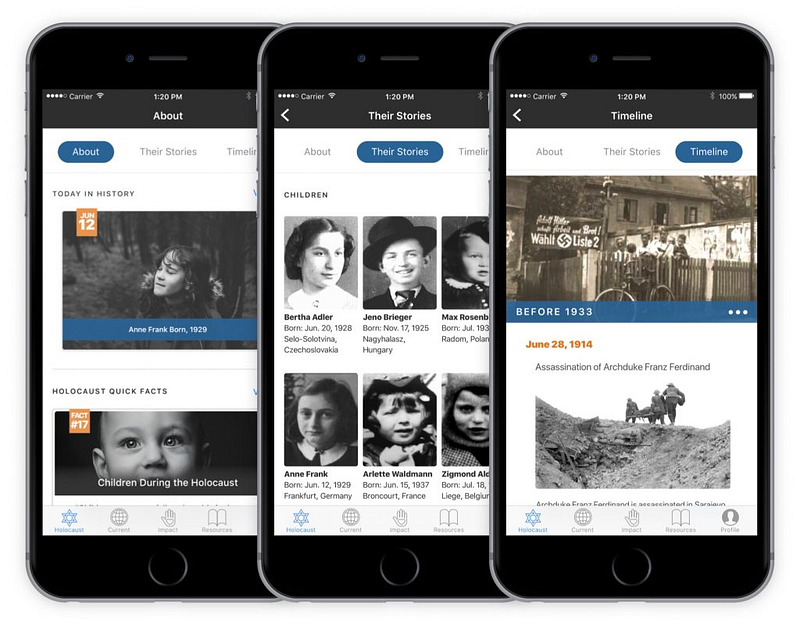
Using the Style Guide and a bit of flair, the screens started to come to life. Things were looking amazing at this point! Again, I took control of The Holocaust, Stories of the Victims, Holocaust Timeline, and the Resources area for the app. Here is some of my design work:

Prototype
InVision was the go-to tool of choice when prototyping the designs. Each team member had access to the project in InVision and synced their screens accordingly.
I came up with a concept to introduce “Learning Paths” to our users. Learning Paths are not something new, they’re actually all over apps and websites right now, but I had the idea to incorporate them into the app. In essence, the user can progress through a topic pertaining to the Holocaust in a few, quick slides that teach the basic Holocaust lessons. Here’s a quick prototype of the concept in action.
User Testing
Because of the time restrictions on the project, only a few user tests were conducted. We were fortunate however to at least include our primary persona in the testing.
Looking back, this was the area that was most difficult when pressed for time. Our team was given a few short weeks to complete this app. A majority of that time should have been spent on discovery and testing, but it wasn’t. Definitely an area to improve on the next project!
Step 5: Stakeholder Design Review
Setup up Web Conference & Assign Roles
A web conference was scheduled with the USHMM UX team back in Washington D.C. on Friday, March 31st. As our team was in Salt Lake City, UT, roles were assigned to our team and an outline was created so we knew who would be presenting what to the museum.
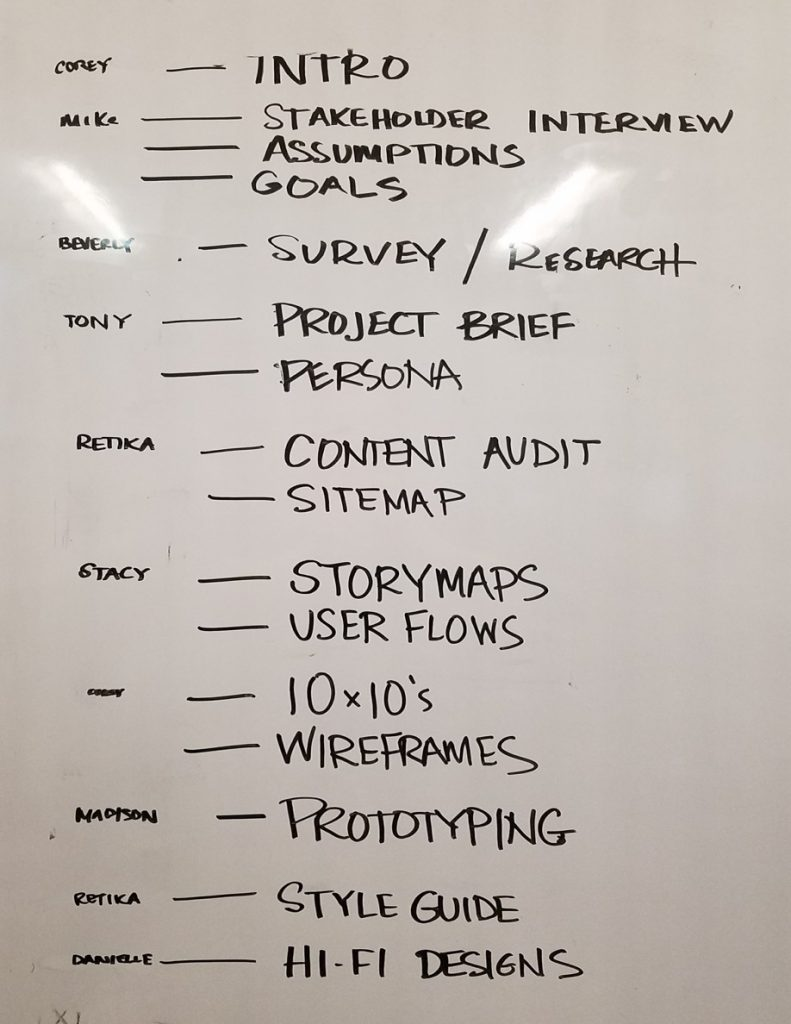
As you can see above, I took on discussing with the creative team in D.C. the initial Stakeholder Interview, the initial assumptions that were made, and the Business Goals document that was generated as our guide along the way.
Feedback & Discussion with the Museum
The museum was impressed and pleased with the progress made in only a few weeks time. Each team member was able to present, discuss, give/receive feedback, and collaborate towards perfecting the designs.
I’ll mention it again here because it was brought up several times. The museum, on multiple occasions during the design review, asked about user testing. Our team had some usability tests we could discuss, but not nearly enough. So, what can be learned here… Test, and test often!
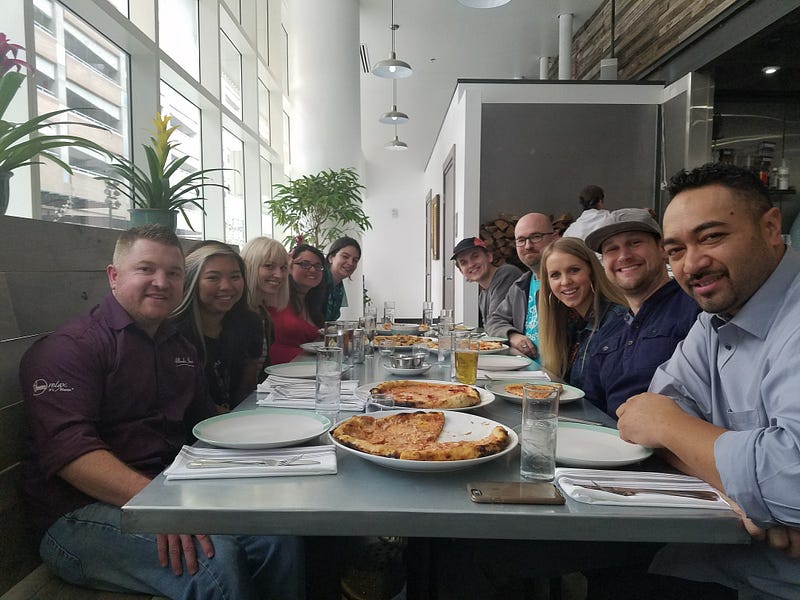
Probably unnecessary for this case study, but we felt so proud, we celebrated afterwards with a little team building pizza lunch! When you complete a project, and heck, along the way too, celebrate your accomplishments, have fun with your team, and build lasting relationships! I can look at the faces of each of these team members and pinpoint the exact, vital contributions they made.
Conclusion
Project Impact & Outcomes
The United States Holocaust Memorial Museum now has our designs in-hand, along with the other deliverables created for this project; that is an incredible feeling! While it is uncertain the timeline for when these designs will be implemented into an existing product by the museum, I feel privileged to have worked with such a dedicated team towards something so powerful.
At so many stages of the project I felt humbled by the events of the Holocaust. Our team forfeited lunch breaks during the day just so we could watch Holocaust documentaries on Netflix. I stayed long hours and lost sleep trying to perfect critical areas of design. Our team wanted this app to focus on a demographic that has the potential to truly introduce change in our society. I firmly believe the work I did, along with my teammates, will accomplish just that in the coming years.
I sit here writing this case study a much more inspired and humbled individual. It fills me with hope as our society recognizes the lessons from the Holocaust and younger generations act, get involved, and stand up for human atrocities that happen all around us.
Special Thanks
- Shawn Perkins, Creative Director for USHMM
- Team Members: Beverly, Retika, Corey, Madison, Stacy, Tony, Danielle
- Project Managers: Brandon, Greg
- The United States Holocaust Memorial Museum UX Team
- DevMountain in Salt Lake City, UT
Design Toolkit
- Sketch, SlickPlan, InVision, Photoshop, Trello, Google Docs, Google Sheets, Appear.in Video Collaboration
If you enjoy reading stories like these and want to support me as a writer, consider signing up to become a Medium member. It’s $5 a month, giving you unlimited access to stories on Medium. If you sign up using my link, I’ll earn a small commission.
Uncle Mikey helps amplify people and products through human-centered design. With 20+ years experience in design, marketing, e-commerce, and UX, his passion is helping people & businesses apply their skills to the way they’re experienced by others. You can connect with him on LinkedIn, Instagram, Twitter, or follow his writing here on Medium.


