

Upload files to Cloudinary using Vue & Vuetify
Not long ago I was building a SaaS platform where we were using Cloudinary to store images. The file upload had to be done from the client-side, so I had two options. Either use the Cloudinary upload widget or build it on my own. I chose the latter, as the upload widget came with a lot of JS overhead in size, and had minimal ways to style it.
So let’s get to it.
Just for doing the whole thing from scratch, we will start off by creating a new project.
Boot up a new Vue app by using the command vue create cloudinary-demo
After the process is done, we’ll add Vuetify by running vue add vuetify — For this purpose, just choose the default setup.
Great, so now that we’ve got a running project, we can get started on what this article is all about.
Let’s start by opening the your project in your favourite editor, i’m using WebStorm.
If you dont want to follow this article step by step, you can check out a link to the full source code on Git in the bottom of this article.
Open the file App.vue and clean it up, so it looks something like
<template>
    <v-app>
        <v-app-bar
                app
                color="primary"
                dark>
        </v-app-bar>
        <v-content>
            <!-- Upload file here -->
        </v-content>
    </v-app>
</template>

<script>
export default {
    name: 'App',

    data: () => ({
        //
    }),
};
</script>
Now that we have a clean component, we can get started.
For uploading images to Cloudinary, we need to have a file input type, so we can choose the files we want to upload. We’ll use the component <v-file-input /> (see the documentation here)
We’ll add this component inside <v-content></v-content>
The component needs to be hooked to to a change event so we can catch the files chosen. Add a function to methods{}, i’ll call this onAddFiles() and add that to the component as well.
<v-content>
    <!-- Upload file here -->
    <h1>
        Upload file to Cloudinary
    </h1>
    <v-file-input multiple label="Add your files" chips @change="onAddFiles" />
</v-content>
....
methods: {
onAddFiles() {}
}In the function we’ve created in methods, we can catch all the files selected from the component. We need to have a parameter in the function. This parameter will contain the files. The file input component will return an array of File Objects to the method. Go ahead and add this as well.
Try logging the parameter in the function, and see the console in the browser after you’ve selected a few files.
<template>
    <v-app>
        <v-app-bar
                app
                color="primary"
                dark>
        </v-app-bar>
        <v-content>
            <!-- Upload file here -->
            <h1>
                Upload file to Cloudinary
            </h1>
            <v-file-input multiple label="Add your files" chips @change="onAddFiles" />
        </v-content>
    </v-app>
</template>

<script>
export default {
    name: 'App',
    data: () => ({
    }),
    methods: {
        onAddFiles(files) {
            window.console.log(files);
        }
    }
};
</script>
You should see an array of files. This means we can work with that data. Next step in to take each file and upload it too Cloudinary.
If you haven’t already got an account on Cloudinary, you can go sign up now, it’s free.
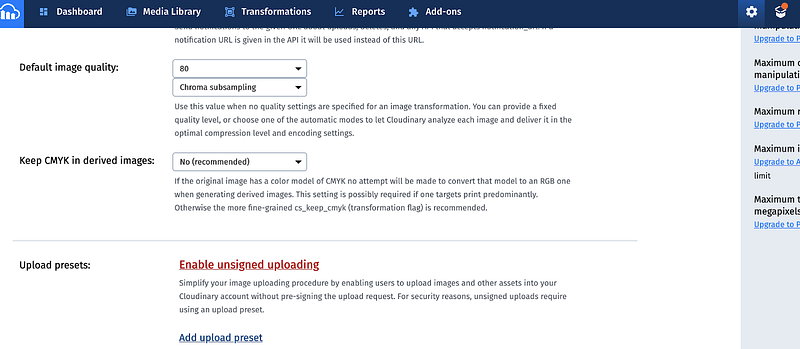
When you’ve signed up, you need to setup a few things. Go to “settings” -> “upload” and enable “unsigned uploads”.
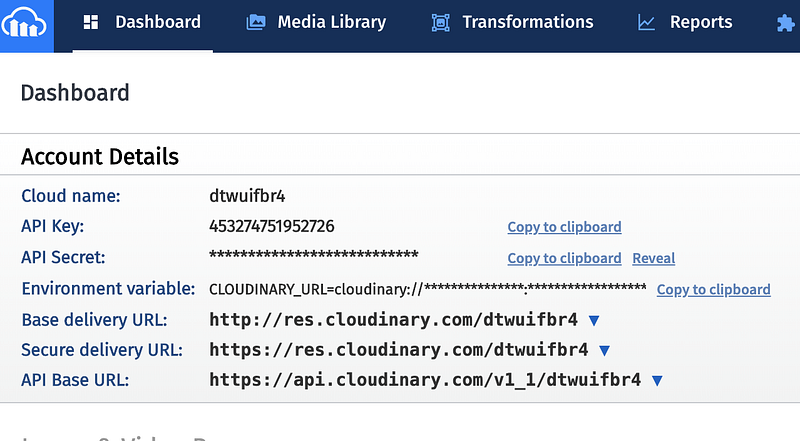
This will generate an upload preset that we need to use to upload our files. We need to add that in our code together with API base url (which can be found on the “Dashboard” tab, under “Account details”), later on.
Now that that we’ve got the upload preset and the API Base Url, we can go back to the code.
Cloudinary doesn’t support sending an array of files, which means we will have to iterate over the files array and upload each file separately.
Extend the method to:
onAddFiles(files) {
    if(files.length > 0) {
        files.forEach((file) => {
            window.console.log(file);
        });
    }
}
Now that we’ve got each file, we need to create the upload function that can pass the files onto Cloudinary.
In this function, we’ll need the two things. The upload preset and the API Base Url as I mentioned earlier.
NOTE: We’ll need to extend the base url with /upload/ for it to work correctly.
Add a new function in methods, i’ll name it uploadFileToCloudinary() and add the following code:
You need to replace CLOUDNAME and YOURUPLOADPRESET in the two variables CLOUDINARY_URL and CLOUDINARY_UPLOAD_PREEST with the base url and upload preset from before.
uploadFileToCloudinary(file) {
    return new Promise(function (resolve, reject) {
        //Ideally these to lines would be in a .env file
        const CLOUDINARY_URL = 'https://api.cloudinary.com/v1_1/CLOUDNAME/upload';
        const CLOUDINARY_UPLOAD_PRESET = 'YOURUPLOADPRESET';

        let formData = new FormData();
        formData.append('upload_preset', CLOUDINARY_UPLOAD_PRESET);
        formData.append('folder', 'cloudinary-demo');
        formData.append('file', file);

        let request = new XMLHttpRequest();
        request.open('POST', CLOUDINARY_URL, true);
        request.setRequestHeader('X-Requested-With', 'XMLHttpRequest');

        request.onreadystatechange = () => {
            // File uploaded successfully
            if (request.readyState === 4 && request.status === 200) {
                let response = JSON.parse(request.responseText);
                resolve(response);
            }

            // Not succesfull, let find our what happened
            if (request.status !== 200) {
                let response = JSON.parse(request.responseText);
                let error = response.error.message;
                alert('error, status code not 200 ' + error);
                reject(error);
            }

        };

        request.onerror = (err) => {
            alert('error: ' + err);
            reject(err);
        };

        request.send(formData);
    });
}
Next, we’ll add a few additional properties to the data that will come in handy later on.
Add the following:
data: () => ({
    files: [],
    isError: false,
    errorText: null
})
Now we’ll modify the onAddFiles(), call the upload method for each file, and push the response to this.files, which points to the empty array that we’ve created in the data.
onAddFiles(files) {
    if (files.length > 0) {
        files.forEach((file) => {
            window.console.log(file);
            this.uploadFileToCloudinary(file).then((fileResponse) => {
                this.files.push(fileResponse);
            });
        });
    }
}
Let’s modify the HTML a bit, so we can see which files are uploaded when done and also display an error message if the upload failed.
<template>
    <v-app>
        <v-app-bar
                app
                color="primary"
                dark>
        </v-app-bar>
        <v-content style="padding:50px; margin-top:30px;">
            <!-- Upload file here -->
            <h1>
                Upload file to Cloudinary
            </h1>
            <v-file-input multiple label="Add your files" chips @change="onAddFiles" />

            <v-card v-if="files.length > 0">
                <v-card-text>
                    <v-alert type="success" v-for="file in files" :key="file.public_id">
                        File uploaded: {{file.original_filename}} at {{file.url}}
                    </v-alert>
                </v-card-text>
            </v-card>

            <v-alert v-if="isError">
                {{errorText}}
            </v-alert>

        </v-content>
    </v-app>
</template>
Last thing and we’re done. Right now we’re just alerting all errors from the uploadFileToCloudinary() function. We need to change this in order to see the error in the UI.
Replace all alerts with:
this.errorText = 'error uploading files ' + error;
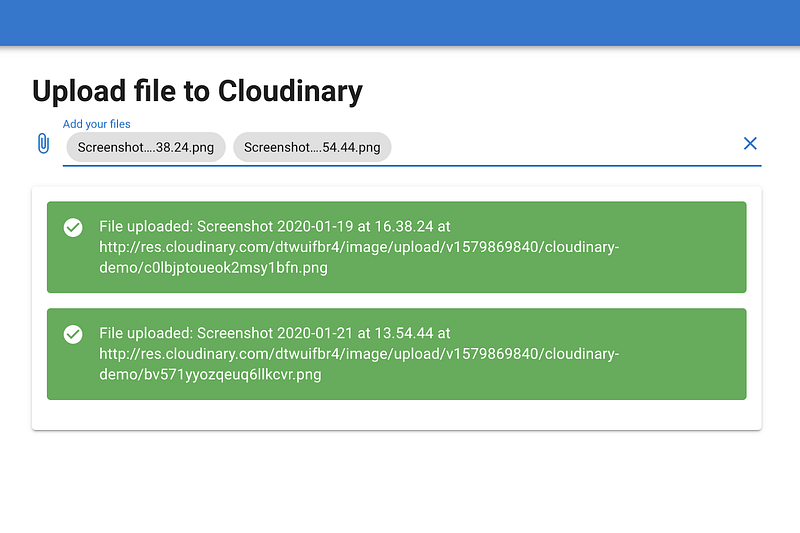
this.isError = true;Done, and there you have it, we’ve got a fully functional way of uploading files to Cloudinary.
Your end result should be looking something like this after you’ve uploaded your files:
To sum up: this is an ultra simple way of uploading files to Cloudinary, and can be extended in multiple ways to make it even better and more flexible.
I’ve also added the full source code on Github, so be sure to make a fork from there if you’re in doubt:
https://github.com/nickycdk/vue-cloudinary-demo
Thanks for reading and I hope you liked the article, if so, please help supporting me by hitting that clap button or subscribing.
If you’re not a Medium member yet, consider becoming one! You get access to great content and get the chance to share your own knowledge with others. Sign up here for only $5 a month.
If you’d like to catch up with me sometime, follow me on Twitter | LinkedIn or simply visit my website (That is however in Danish)


