
Unlocking Docker’s Potential: Best Practices, Common Pitfalls, and Optimal Dockerfile Strategies

Introduction
In the ever-evolving landscape of software deployment, the journey from physical servers to containers has revolutionized how applications are built, deployed, and scaled.
This article explores the transition through virtualization to containerization, highlighting the benefits and best practices along the way.
From Physical Servers to Virtual Machines
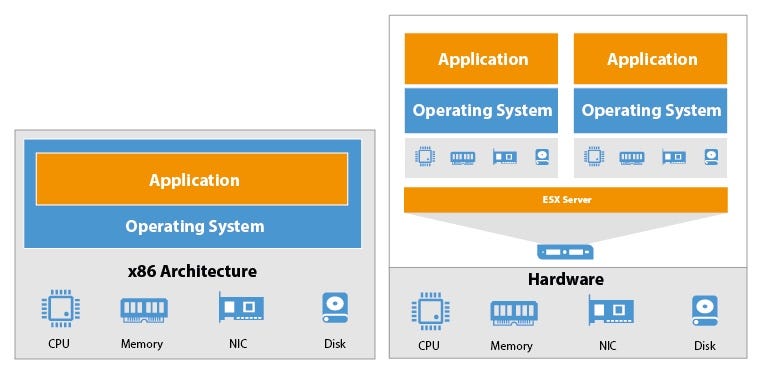
In the era of physical servers, applications were tied to specific hardware, leading to inefficient resource utilization and scalability challenges. The introduction of virtual machines (VMs) transformed this landscape. By abstracting hardware into virtual environments, VMs offered isolation, scalability, and reduced hardware costs. Transitioning involved installing a hypervisor on physical servers, which enabled the creation of multiple VMs running various operating systems on a single physical machine.
From Virtual Machines to Containers
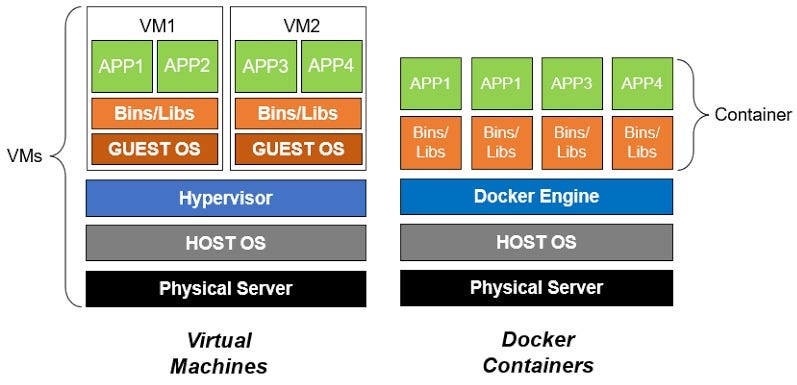
While VMs were a leap forward, they still carried some overhead due to their complete OS virtualization. Containers emerged as a lightweight alternative. Containers package an application, its runtime, libraries, and dependencies into a single unit. Unlike VMs, containers share the host OS kernel, making them more efficient and portable. Docker, a pioneer in containerization, simplified the packaging, distribution, and deployment of applications.
Benefits of Containers
Containers bring numerous benefits:
- Resource Efficiency: Containers share resources, optimizing hardware utilization.
- Rapid Deployment: Containers boot quickly, enabling agile development and scaling.
- Consistency: Applications run consistently across various environments.
- Isolation: Containers isolate applications from one another, enhancing security.
- Scalability: Containers can scale horizontally with ease.
Dockerfile 101
Docker offers several crucial options to optimize containerisation.
Here are the explanations for each option to be used in writing dockerfile.
1. WORKDIR
– Explanation: The `WORKDIR` instruction sets the working directory for subsequent instructions in the Dockerfile.
– Use Case: It helps avoid specifying absolute paths for every command, making the Dockerfile more readable and maintainable.
– Example:
WORKDIR /app2. EXPOSE
– Explanation: The `EXPOSE` instruction informs Docker that the container will listen on specific ports at runtime, but it doesn’t actually publish the ports.
– Use Case: It serves as documentation for users of the image about which ports are intended to be published.
EXPOSE 80803. ENV
– Explanation: The `ENV` instruction sets environment variables within the container, which can be used to customize container behavior.
ENV NODE_ENV=production4. CMD
– Explanation: The `CMD` instruction provides a default command to run when the container starts. It can be overridden during container runtime.
CMD [“npm”, “start”]5. ENTRYPOINT
– Explanation: The `ENTRYPOINT` instruction configures the container to run as an executable, accepting command line arguments.
ENTRYPOINT [“npm”, “start”]6. USER
– Explanation: The `USER` instruction sets the user context within the image for subsequent instructions.
USER node7. COPY
– Explanation: The `COPY` instruction copies files or directories from the host machine to the image filesystem.
COPY app.js /app/8. ADD
– Explanation: The `ADD` instruction is similar to `COPY` but also supports extracting archives from URLs and copying local files to remote locations.
ADD https://example.com/files/app.zip /app/9. VOLUME
– Explanation: The `VOLUME` instruction creates a mount point for external volumes that can be used to persist data.
VOLUME /data10. ARG
– Explanation: The `ARG` instruction defines variables that can be passed to the builder with the `docker build` command using the ` – build-arg` flag.
ARG VERSION=1.0Common Dockerfile Pitfalls and Solutions
1. Pitfall: Running Multiple Processes
- Explanation: Running multiple processes within a single container contradicts the container philosophy, which advocates running a single main process. This can lead to complications in process management, resource utilization, and debugging.
- Alternative: Use a process manager like `pm2` to manage multiple processes within a container or separate services into multiple containers using a container orchestration tool like Docker Compose or Kubernetes.
- Example:
# Don’t do this

CMD npm start && redis-server
# Better Approach
FROM node:14
# Set working directory
WORKDIR /app
# Copy package.json and package-lock.json
COPY package*.json ./
# Install dependencies
RUN npm install
# Copy application code
COPY . .
# Install pm2 globally
RUN npm install -g pm2
# Start the application using pm2
CMD ["pm2-runtime", "app.js"]2. Pitfall: Large Images
- Explanation: Creating large container images can lead to longer deployment times, increased storage consumption, and unnecessary transfer of unused files.
- Alternative: Utilize multi-stage builds to create smaller, optimized images. Build your application in one stage and then copy only the necessary artifacts to the final stage.
- Example:
# Better Approach

# Multi-stage build example
FROM node:14 AS builder
WORKDIR /app
COPY . .
RUN npm install && npm build

FROM node:14 AS final
WORKDIR /app
COPY --from=builder /app/dist ./dist
3. Pitfall: Hardcoding Secrets
- Explanation: Storing sensitive information directly in the Dockerfile can lead to exposure of secrets, security vulnerabilities, and difficulties in managing credentials.
- Alternative: Use environment variables to pass sensitive information. These variables can be provided at runtime, ensuring that secrets remain hidden.
- Example:
# Avoid this
ENV DB_PASSWORD=mysecretpassword
# Better Approach
# Set environment variable for sensitive information during build
ARG DATABASE_PASSWORD
ENV DB_PASSWORD=$DATABASE_PASSWORD
ENV DB_PASSWORD=$DATABASE_PASSWORD4. Pitfall: Neglecting .dockerignore
- Explanation: Not using a `.dockerignore` file can lead to including unnecessary files and directories in the Docker context, which results in larger image sizes and slower builds.
- Alternative: Create a `.dockerignore` file to specify which files and directories to exclude from the build context.
- Example:
# Avoid: Including unnecessary files
COPY . /app
# Better Approach
# Use a .dockerignore file
node_modules
.git5. Pitfall: Bloated Layers
- Explanation: Adding multiple commands within a single `RUN` instruction can result in bloated image layers, making the image larger than necessary.
- Alternative: Combine related commands in a single `RUN` instruction to minimize the number of layers.
- Example:
# Avoid this
# Creating unnecessary layers
RUN apt-get update
RUN apt-get install -y curl
# Better approach
RUN apt-get update && \
apt-get install -y package1 package26. Pitfall: Excessive Image Layers
- Explanation: Adding unnecessary files and directories to an image layer can bloat the image size, affecting deployment speed and efficiency.
- Alternative: Use the `COPY` command to add only the necessary files and directories to the image layer.
- Example:
# Avoid this
COPY . /app

# Better approach
COPY package.json package-lock.json /app/
COPY src /app/src/
7. Pitfall: Using `latest` Tag
- Explanation: Using the `latest` tag for images can lead to unpredictability, as the image might change without your knowledge.
- Alternative: Specify a specific version tag to ensure consistent and predictable behavior when pulling images.
- Example:
# Avoid this
FROM node:latest

# Better approach
FROM node:14
8. Pitfall: Tight Coupling
- Explanation: Embedding configuration settings directly within the Dockerfile makes it challenging to update configurations without rebuilding the image.
- Alternative: Use environment variables to pass configuration settings. This allows for dynamic configuration without modifying the Dockerfile.
- Example:
# Avoid this

FROM node:14

# Set working directory
WORKDIR /app

# Embed configuration settings (Tightly Coupled)
ENV API_URL=http://api.example.com
ENV LOG_LEVEL=info

# Copy package.json and package-lock.json
COPY package*.json ./

# Install dependencies
RUN npm install

# Copy application code
COPY . .

# Start the application
CMD ["node", "app.js"]
# Better approach

FROM node:14

# Set working directory
WORKDIR /app

# Copy package.json and package-lock.json
COPY package*.json ./

# Install dependencies
RUN npm install

# Copy application code
COPY . .

# Use environment variables for configuration
ENV API_URL
ENV LOG_LEVEL

# Start the application
CMD ["node", "app.js"]
docker run -e "API_URL=http://new-api.example.com" -e "LOG_LEVEL=debug" my-node-app9. Pitfall: Redundant Dependencies
- Explanation: Installing unnecessary dependencies can increase the image size and introduce security risks.
- Alternative : Install only production dependencies. Instead of all dev dependencies which not required in production.
# Avoid this
# Unnecessary: Installing development dependencies
RUN npm install
# Better approach
# Installing only production dependencies
RUN npm install --only=production
10. Pitfall: Hardcoding Dependencies
- Explanation: Hardcoding specific versions of dependencies in the Dockerfile can lead to outdated packages and potential vulnerabilities.
- Alternative: Use a package manager to manage dependencies dynamically.
# Avoid: Hardcoding dependencies
RUN npm install package@1.0.0
# Better approach
# Use a package manager to install dependencies
COPY package*.json ./
RUN npm install11. Pitfall: Unoptimized COPY Order
- Explanation: When copying files into a Docker image using the COPY instruction, the order in which you perform these copies can impact the efficiency of image caching and the resulting image size. Docker caches each layer, and if a layer’s contents change, all subsequent layers are invalidated. Inefficient COPY order can lead to more layers being invalidated, which negatively affects caching and increases image size.
- Example: Consider a scenario where you copy the application source code before installing dependencies. This is inefficient because any code change will invalidate the dependency installation layer, causing it to be re-run every time you modify the code.
- DONT DO THIS : Inefficient Unoptimized COPY Order:
FROM node:14

WORKDIR /app

# Copying application source code first
COPY . /app/

# Install dependencies
RUN npm install

CMD ["node", "app.js"]- Efficient COPY Order: To optimize the COPY order, you should copy only the necessary files required for installing dependencies first, allowing Docker to cache this layer. Then copy the rest of the application files, ensuring changes in the application code don’t invalidate the dependency layer.
FROM node:14

WORKDIR /app

# Copying only package files for dependency installation
COPY package*.json ./
COPY npm-shrinkwrap.json ./

# Install dependencies
RUN npm install

# Copying the rest of the application code
COPY . .

CMD ["node", "app.js"]
By understanding and avoiding these pitfalls, you can create efficient, secure, and maintainable Docker images that enhance the reliability and performance of your containerized applications.
Complete Production Grade Dockerfile
# Use a specific version of Node.js as an argument
ARG NODE_VERSION=14
FROM node:${NODE_VERSION}-alpine

# Set working directory
WORKDIR /app

# Copy package.json and package-lock.json
COPY package*.json ./
COPY npm-shrinkwrap.json ./

# Install production dependencies
RUN npm install --only=production

# Copy the rest of the application code
COPY . .

# Set environment variables (can be overridden at runtime)
ENV NODE_ENV=${NODE_ENV:-production}
ENV API_URL=${API_URL:-https://api.example.com}
ENV LOG_LEVEL=${LOG_LEVEL:-info}
ENV VERSION=${VERSION:-v1.0.0}

# Install pm2 globally
RUN npm install -g pm2

# Start the application with pm2
CMD ["pm2-runtime", "app.js", "--", "-v", "$VERSION"]
docker build -t my-node-app --build-arg NODE_VERSION=14 .
docker run -e "VERSION=v1.0.1" my-node-app
Conclusion:
The progression from physical servers to containers marks a significant shift in software deployment. Virtualization laid the groundwork, while containers revolutionized efficiency, scalability, and consistency. Leveraging Docker’s options and avoiding common pitfalls empower developers to create production-ready applications that thrive in the containerized ecosystem. By embracing this evolution, software deployment becomes agile, scalable, and responsive to modern development demands.
Follow me on LinkedIn for more such content: https://au.linkedin.com/in/anav-mahajan-a9b5a376?trk=profile-badge