
Maximizing Data Pipelining Efficiency with DBT-Snowflake: A Netflix Use Case
Introduction
With an overwhelming growth in data, there’s an increasing need for powerful tools to handle and draw insights from this data. This is where technologies like DBT (Data Build Tool) and Snowflake come in. Our goal in this article is to guide you through a DBT-Snowflake project setup using Netflix movies and series data as our case study, providing a hands-on understanding of DBT’s functionality and its role in the ETL process.
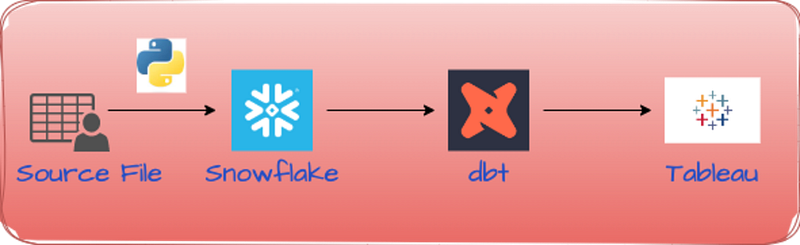
The Tech Stack
Our toolkit for this project includes:
Language: Python, SQL
Tool: DBT
Database: Snowflake
Architecture Diagram:
Setting Up DBT with Snowflake
The first step in our journey is to set up DBT with Snowflake. This involves creating a Snowflake instance, installing DBT, and configuring the DBT profiles.yml file to connect with our Snowflake database. This setup will allow us to run DBT commands on our data stored in Snowflake.
1. Install DBT
First, you need to install DBT. If you are using pip, you can install it with the following command:
pip3 install dbt-snowflake
2. Check the Version
After installation, check the version of DBT and Snowflake using below,
dbt --versionThis will output the following:
Core:
  - installed: 1.5.0
  - latest:    1.5.0 - Up to date!

Plugins:
  - snowflake: 1.5.0 - Up to date!
  - postgres:  1.5.0 - Up to date!
3. Create a Snowflake Account
If you haven’t already, sign up for a Snowflake account. They offer a free trial period, which can be useful for initial setup and testing.
4. Create a Snowflake Database and Warehouse
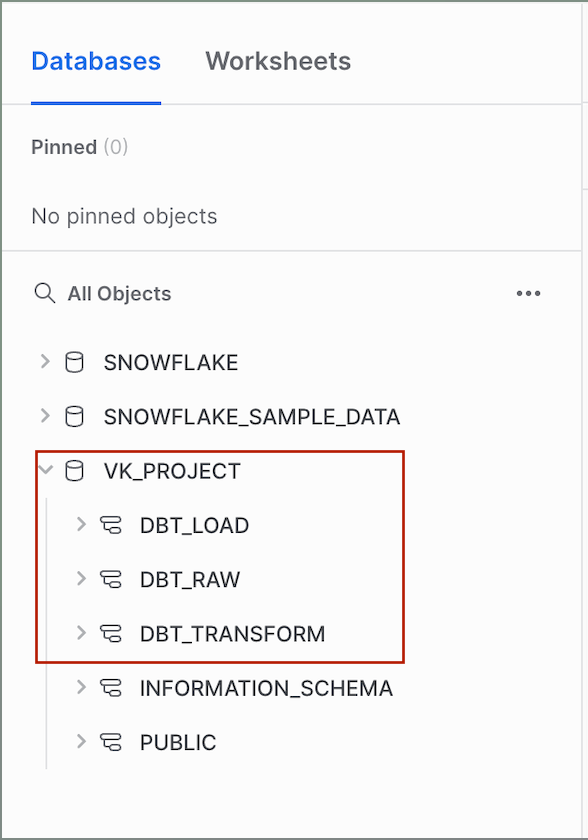
Once you have a Snowflake account, log into the Snowflake Web Interface. Create a new database and warehouse for your DBT project.In this case, we have created a database called VK_PROJECT and three schemas namely DBT_RAW , DBT_TRANSFORM, and DBT_LOAD to store and manage our data.
5. Set Up DBT Profile
Next, you need to set up a DBT profile. DBT uses profiles to define connection information. Create a new file called profiles.yml in the ~/.dbt/ directory.
The
.dbtdirectory is a hidden folder that usually resides within the home directory of your user profile on your computer. The purpose of this directory is to house theprofiles.ymlfile which is used by DBT (Data Build Tool) to manage and store connection details for the various databases you interact with.
Here’s an example of what the profiles.yml file should look like for Snowflake:
dbt_snowflake_project:
  outputs:
    dev:
      account: <account_name>
      database: vk_project
      password: <password>
      role: accountadmin
      schema: DBT_RAW
      threads: 1
      type: snowflake
      user: <username>
      warehouse: compute_wh
    dev_stg:
      account: <account_name>
      database: vk_project
      password: <password>
      role: accountadmin
      schema: DBT_TRANSFORM
      threads: 1
      type: snowflake
      user: <username>
      warehouse: compute_wh
    dev_tgt:
      account: <account_name>
      database: vk_project
      password: <password>
      role: accountadmin
      schema: DBT_LOAD
      threads: 1
      type: snowflake
      user: <username>
      warehouse: compute_wh
Be sure to replace <account_name>, <username>, <password> with your actual Snowflake details.
6. Initialize Your DBT Project
In your terminal, navigate to the directory where you want to create your DBT project, and run the following command:
dbt init dbt_snowflake_projectReplace dbt_snowflake_projectwith your desired project name.
Once the above command executed, it will ask for sequence of steps like database to choose, user name, password, role, warehouse, database, schema and thread.
This command will create a new directory with the project name you specified, complete with the basic structure of a DBT project.
6. Test Your Setup
Navigate into your new project directory and run:
dbt debugThis command will verify that dbt can connect to your specified data warehouse. If everything is set up correctly, you should see a message saying the connection test passed.
That’s it! You now have DBT set up with Snowflake, and you’re ready to start your first project.
Loading Data into Snowflake
Once DBT and Snowflake are up and running, we’ll load the ‘titles.csv’ file into the Snowflake database. We can do this using Python, pandas, and the Snowflake Connector for Python.
import pandas as pd
import snowflake.connector as snow
from snowflake.connector.pandas_tools import write_pandas

conn = snow.connect(
    user='your user name',
    password='your password',
    account='your account id',
    warehouse='warehouse name',
    database='database name',
    schema='schema name'
)
cur=conn.cursor()
print('Connection Created')

cur = conn.cursor()
sql_titles = "TRUNCATE TABLE IF EXISTS TITLES_RAW"
cur.execute(sql_titles)
print('Tables truncated')

cur=conn.cursor()
titles_file = "titles.csv"

titles_df = pd.read_csv(titles_file,sep=',')

write_pandas(conn, titles_df, "TITLES",  auto_create_table=True)
print("Title files loaded")

cur.close()
conn.close()
When you set auto_create_table=True, the function will automatically create a new table in your Snowflake database if the table you specified in the function call doesn't already exist.
This script truncates the ‘TITLES_RAW’ table if it exists, reads the ‘titles.csv’ file into a pandas DataFrame, and writes the DataFrame to the ‘TITLES’ table in the Snowflake database.
Let’s query the data:
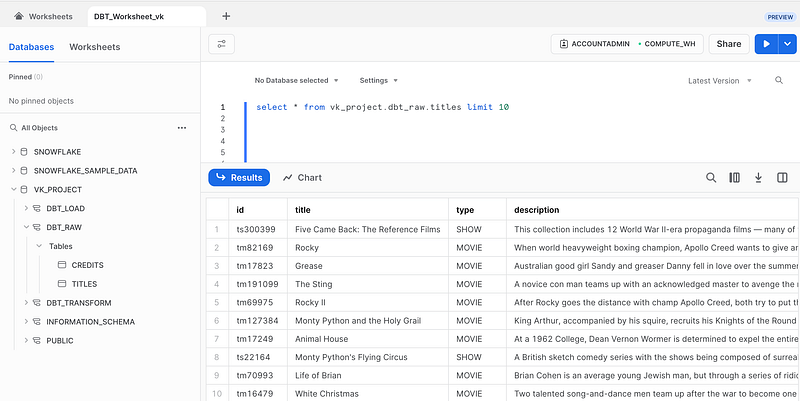
The table TITLE contains various details about different shows and movies such as ID, title, type, description, release year, age certification, runtime, genres, production countries, seasons, IMDB ID, IMDB score, IMDB votes, TMDB popularity, and TMDB score. It serves as the raw data source that we will use to perform transformations using DBT and Snowflake.
Data Transformation
With our raw data in Snowflake, we can begin to transform it using DBT. In this project, we’re focusing on extracting two dimensions from our raw data: show details and scores and votes. We accomplish this by creating two DBT models: SHOW_DETAILS_DIM.sql and SCORES_VOTES_DIM.sql.
Let’s break down what’s happening in these files.
- SHOW_DETAILS_DIM.sql
{{ config(
    pre_hook="ALTER SESSION SET QUOTED_IDENTIFIERS_IGNORE_CASE = true"
) }}

SELECT
ID
,TITLE
,TYPE
,DESCRIPTION
,RELEASE_YEAR
,AGE_CERTIFICATION
,RUNTIME
,GENRES
,PRODUCTION_COUNTRIES
,SEASONS
FROM
{{ var('titles') }}
2. SCORES_VOTES_DIM.sql
{{ config(
    pre_hook="ALTER SESSION SET QUOTED_IDENTIFIERS_IGNORE_CASE = true"
) }}

SELECT
ID
,IMDB_ID
,IMDB_SCORE
,IMDB_VOTES
,TMDB_POPULARITY
,TMDB_SCORE
FROM
{{ var('titles') }}
The config block at the top of each file sets some configurations for the SQL that follows. The pre_hook setting runs a piece of SQL before the main query, which is used here to alter the session setting QUOTED_IDENTIFIERS_IGNORE_CASE = true. This setting ensures that Snowflake ignores the case of identifiers in queries, which can be useful when dealing with mixed-case identifiers.
The SELECT statement that follows the config block is where the actual transformation happens. It selects the columns we're interested in from our raw data.
The {{ var('titles') }} piece is a DBT variable that references our raw data. In our dbt_project.yml file, we've set this variable to point to the Snowflake table that holds our raw data:
vars:
  titles: 'VK_PROJECT.DBT_RAW.TITLES'
  credits: 'VK_PROJECT.DBT_RAW.CREDITS'
With these two SQL files, we can now transform our raw data into more meaningful dimensions, enabling us to gain better insights from the data.
Data Analysis
After transforming our raw data into two meaningful dimensions, the next step is to perform data analysis. For this project, we’re interested in identifying the popularity of the movies and shows. We’ll leverage both our transformed tables to create a data view that can be used for this analysis.
Here is the SQL code for creating the table:
{{ config(
    pre_hook="ALTER SESSION SET QUOTED_IDENTIFIERS_IGNORE_CASE = true"
) }}

WITH VOTES AS
(
SELECT ID
,NVL(IMDB_ID,'N/A') AS IMDB_ID
,NVL(IMDB_SCORE,0) AS IMDB_SCORE
,NVL(IMDB_VOTES,0) AS IMDB_VOTES
,NVL(TMDB_POPULARITY,0) AS TMDB_POPULARITY
,NVL(TMDB_SCORE,0) AS TMDB_SCORE
FROM
VK_PROJECT.DBT_TRANSFORM.SCORES_VOTES_DIM
)

SELECT
TITLE
,TYPE
,DESCRIPTION
,RELEASE_YEAR
,VOTES.*
FROM VK_PROJECT.DBT_TRANSFORM.SHOW_DETAILS_DIM DETAILS
LEFT JOIN
VOTES
ON
DETAILS.ID=VOTES.ID
This query first generates a ‘VOTES’ temporary table that fetches data from the ‘SCORES_VOTES_DIM’ dimension. Here, NVL() function is used to replace NULL values with a default value. The temporary table includes columns like IMDB ID, IMDB Score, IMDB Votes, TMDB Popularity, and TMDB Score.
Next, we join this ‘VOTES’ table with the ‘SHOW_DETAILS_DIM’ dimension on the ‘ID’ field to create a combined view of our data. This final table provides us with a unified view that includes the details of each show, along with their respective scores and votes from IMDB and TMDB.
Through this data view, we can analyze various attributes like which show has the highest IMDB score, the correlation between the number of votes and scores, how the popularity of shows has evolved over the years, and much more.
Conclusion
This project demonstrates the power of DBT and Snowflake in handling and processing large datasets efficiently. It shows how you can transform raw data into meaningful insights using the capabilities of these tools.
Feel free to clone my Github repository to explore further.
Happy data pipelining!
If you found this article useful, please consider sharing it with your friends and colleagues. Your support helps others discover valuable content and encourages me to continue writing. Don’t forget to follow me for more insightful articles, and if you enjoyed reading this piece, kindly show your appreciation by giving it a clap!
Your feedback is vital in helping me understand how helpful my articles are to you.
Thank you for your support!