
Unleash the Power of Python Pip
TL;DR
Python pip can do way more than just installing and uninstalling Python packages. Knowing the right tweaks, it can be a powerful tool that helps you to better manage your Python projects and speed-up the installation process of your applications.
Table of Contents
· TL;DR · Table of Contents · Upgrading Pip to the Newest Version · The Pip Configuration ∘ Configuration Naming · Pip Cheat Sheet · What You Didn’t Know About Pip ∘ Why Freezing Your Package Environment Is Not Always Making Sense ∘ Why Pip Uninstall Might Leave Unwanted Traces in Your Environment ∘ Do Not Reinvent the Wheel · Final Words · About the Author
Upgrading Pip to the Newest Version
Upgrading pip to the newest version is super easy. Still, you need to keep in mind, that every virtualenv (or venv) has a separate pip version installed. This means you might have to upgrade pip independently in every project setup you use. Luckily, upgrading pip follows the same command as we would use to upgrade any other Python package in our venv, so the command should get into your muscle memory effortlessly.
# using pip3 to install pip and upgrade if necessary
pip3 install -U pip

# alternatively you can use the longer complete python command for this
python3 -m pip install -U pip
The Pip Configuration
Typically, you can get along, without the need of manually configuring your pip package manager. Still, you might come into situations, where some configuration is necessary. To achieve this, you have three different levels of configuration files, that are loaded in the given order.
global: system-wide configuration file, shared across users.user: per-user configuration file.site: per-environment configuration file; (i.e. per-virtualenv).
Depending on the system you use, the location of the configuration files may vary. The best way to figure out where the configuration files should be located is to ask pip:
pip3 config debug

# on macos this command might output something like this
env_var:
env:
global:
  /Library/Application Support/pip/pip.conf, exists: False
site:
  /Users/remo/testdir/temp/venv/pip.conf, exists: False
user:
  /Users/remo/.pip/pip.conf, exists: False
  /Users/remo/.config/pip/pip.conf, exists: False
Configuration Naming
The names of the configuration settings are the same as the long command line options when using pip directly. Further, the settings can be configured per command, which overrides the global settings. Boolean values are set with yes or true, negative boolean settings like no-cache-dir needs to be disabled with double negativity:
[global]
timeout = 60
no-cache-dir = false

[freeze]
timeout = 10

[install]
ignore-installed = true
no-dependencies = yes
no-compile = no
no-warn-script-location = false
This is an example of what a configuration could look like. I do not recommend configuring it like this, since it is just used for visualization. More information can be found in the pip documentation.
Pip Cheat Sheet
The following cheat sheet shows the most used pip commands. There might be commands missing, but I find that you can get along with the commands on this list pretty well. Some commands will be explained in more details later in this post.
# upgrading pip
# or any other package, replace "-U pip" with "-U package name"
pip3 install -U pip
# install any package
pip3 install fastapi
# install all packages from a requirements.txt file
pip3 install -r requirements.txt
# install a local project in editable mode for development
# highly recommended since it enables proper import package resolution
pip3 install -e path/to/project
# install from local wheelhouse, without using the index
# this will be covered in more detail later in the post
pip3 install --no-index --find-links=tmp/wheelhouse fastapi
# uninstall any package
pip3 uninstall fastapi
# output all installed packages into the requirements.txt format
# I DO NOT RECOMMEND THIS TO CREATE A requirements.txt
# AN EXPLANATION WHY WILL FOLLOW LATER
pip3 freeze
# optionally directly output to file (not recommended)
pip3 freeze > requirements.txt
# inspect your python environment, very detailed!
pip3 inspect
# list all your packages
pip3 list
# show information about an installed package
# very helpful to figure out the location of a Python package
pip3 show fastapi
# check if all package compatibilities are fine
pip3 check
# create a wheel from a package
# I will cover this in more detail later in the post
pip3 wheel fastapi
# create a wheelhouse
# this will be covered in more detail later in the post
pip3 wheel --wheel-dir=tmp/wheelhouse fastapi
# build a wheel for a package from source
pip3 wheel --no-binary fastapi fastapi
# build a wheel for a package and all it's dependencies from source
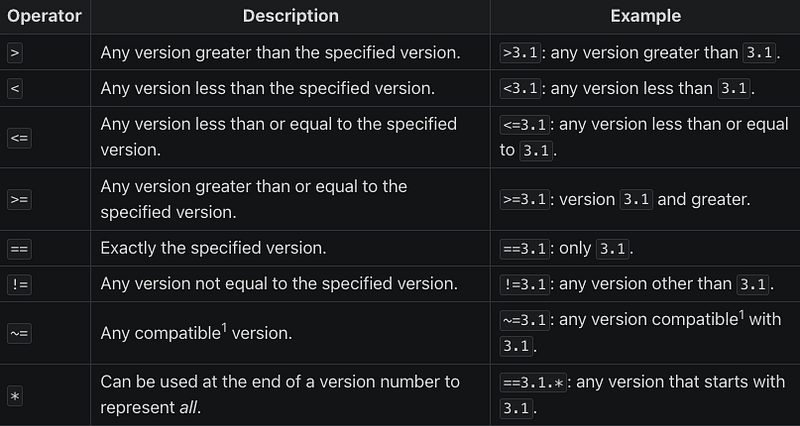
pip3 wheel --no-binary :all: fastapiFor reference when writing requirements.txt files, I put the table for the version specifiers here.
What You Didn’t Know About Pip
There are some details about pip and working with pip, that I figured out over time and I wish I knew them earlier, so I try to share my findings here. I hope they will be helpful to you as well.
Why Freezing Your Package Environment Is Not Always Making Sense
Using the command pip freeze, we can easily create a requirements.txt file with all the packages we have installed in our Python environment. This comes in super handy, but also with a drawback that is uncovered if we pay a bit more attention to the details.
To emphasize what I mean, let’s do the following example:
# this test is done in a new venv

# creating a requirements.txt file with fastapi in it
echo "fastapi==0.109.2" > requirements.txt

# install the requirements
pip3 install -r requirements.txt

# freeze the environemnt to the requirements2.txt file
pip3 freeze > requirements2.txt

# check the initial file
cat requirements.txt

# check the frozen file
cat requirements2.txt
With this simple test, we can see that pip freeze might have some unwanted effects if we use it to create a requirements.txt of the packages we need. When initially installing fastapi, we basically told pip to install fastapi and all the dependencies necessary. When freezing the environment to the requirements2.txt file, pip took all the packages that were installed, which resulted in a longer requirements file. Assuming at some point fastapi drops one of its dependencies, it will still be in our requirements file.
Fortunately, there is pipreqs, to solve exactly this problem. pipreqs uses the imports of your Python files to create the requirements files. Be aware that pipreqs comes with numerous dependencies that are not always needed, so it might be helpful to install it with the --no-deps option and add the needed dependencies manually.
# pipreqs full install
pip3 install pipreqs

# pipreqs light-weight install
pip install --no-deps pipreqs
pip install yarg==0.1.9 docopt==0.6.2

# creating a requirements.txt to location/of/project/requirements.txt
pipreqs location/of/project
Why Pip Uninstall Might Leave Unwanted Traces in Your Environment
When removing packages, pip uninstall is not exactly the reverse option to pip install. Again, the issue comes with the dependencies. Let’s do the following test.
# this test is done in a new venv

# list the environment
pip3 list

# installing fastapi
pip3 install fastapi

# uninstalling fastapi
pip3 uninstall fastapi

# list the environment again
pip3 list
As we can see in the second pip3 list, there are some leftover dependencies still installed in our Python environment. This is due to the fact, that pip3 uninstall, does not automatically remove unneeded dependencies. Again, we are happy that the Python community already got us covered with a package called pip3-autoremove to solve this issue. This package checks if dependencies are needed by other packages installed and if not, they are removed together with the package that needed them on the first hand.
# installing pip3-autoremove
pip3 install pip3-autoremove

# removing fastapi including all its dependencies, that aren't needed by
# other packages
pip-autoremove fastapi
Do Not Reinvent the Wheel
Sometimes, installing packages also requires compilation of code. Depending on the packages, this can take quite a while, and depending on how many systems you need to install the packages to, it can end up in a lot of wasted time waiting for the compilation to be finished. Luckily, this doesn’t need to be the case, and we do not need to reinvent the wheel for every single installation. With Python wheels we can easily make use of the built-package format that prevents us from recompiling our software during every install. Wheels can be built with the following commands, depending on what suits your situation.
# building wheels for our own project and its dependencies
# if we have a pyproject.toml or setup.py file
pip3 wheel path/to/project

# build a wheel for a package including its dependencies
pip3 wheel fastapi

# building a wheel for a package without its dependencies
pip3 wheel --no-deps fastapi

# build a wheel for a package from source
pip3 wheel --no-binary fastapi fastapi
# build a wheel for a package and all it's dependencies from source
pip3 wheel --no-binary :all: fastapi
Storing your wheels in a wheelhouse, can make it much easier to handle them. If you compress the wheelhouse directory, you got yourself a portable file that holds are your dependencies and can easily be copied to the target system. Often, it is nothing different from what pip does.
# create a wheelhouse (directory to store all your wheels)
pip3 wheel --wheel-dir=tmp/wheelhouse fastapi

# create wheels for all your dependencies into wheelouse
pip3 wheel --wheel-dir=tmp/wheelhouse -r requirements.txt
Building the wheels is only half of the story. We also need to install them in the desired system. Doing this is as easy as using other pip install commands.
# installing a wheel directly
pip3 install fastapi-0.109.2-py3-none-any.whl

# installing a wheel from a wheelhouse, without using the PyPI index
pip3 install --no-index --find-links=tmp/wheelhouse fastapi
With this install, you are set with your new pair of wheels =).
Final Words
In this article, I covered some topics concerning the pip Python package manager, that occur in the daily life of a software developer. I hope it was helpful for you, and you had fun reading it.
I will cover more Python topics in my future blog posts. So make sure to follow me and get informed on new articles on Medium. Furthermore, please let me know if you have any questions and thoughts on this topic, or if you find that I missed any important point. If you know people who are interested in these kinds of articles, sharing it with them would mean the world to me. Anyway, thank you so much for reading and see you next time.
About the Author
Remo Höppli is Co-Founder and Software Engineer at Earlybyte.
Earlybyte is an IT consultancy company specialized in developing digital solutions. The main focus of Earlybyte lies in the field of robotics backend systems and IoT.
Follow me on X/Twitter to get informed on new blog posts. Furthermore, add me on LinkedIn if you’d like to interact.