
Unleash Mistral 7B’ Power: How to Efficiently Fine-tune a LLM on Your Own Data
Navigating the world of model fine-tuning optimizations, featuring LoRA and PEFT.
One of the biggest challenges when it comes to implementing AI solutions within financial services is data privacy, security, and regulatory compliance.
It’s no secret that many banks have shied away from harnessing the potential of AI, particularly models like ChatGPT, due to concerns over data leakage.
To overcome this challenge and tap into the power of AI, one viable option is to finetune an AI or Large Language Model (LLM) for your specific tasks, ensuring that your data stays securely within your premises or inside a Virtual Private Cloud (VPC).
Objective of the article
In this post, we will discuss how to efficiently finetune a pretrained model, using the state-of-the-art techniques such as LoRA (Low Rank Adapation) and PEFT (Parameter Efficient Finetuning).
We start by explaining the rationale and key concepts of fine-tuning, then finish with a concrete example of how to fine-tune a model using Google Colab. In this example, we’ve chosen the Mistral 7B model, known as the best model to date for its size, and it’s completely open and freely accessible.
In my previous article, I have detailed the steps to run Mistral 7B model on a single GPU with quantization. If you haven’t already, I recommend checking it out.
I’ll also be sharing my Google Colab notebook with you. So you can not only follow along with the process but also dive in, explore, and experiment on your own.
Table of Contents:
- Demystifying Finetuning: Theory and Rationale 1.1. The Power of Finetuning 1.2. Techniques of Finetuning 1.3. Meet PEFT (Parameter-Efficient-Finetuning)
- Step-by-Step walkthrough
- Closing thoughts

1. Demystifying Finetuning: Theory and Rationale
1.1 The Power of Finetuning
Finetuning is the key to transforming a general-purpose model into a specialized one. For example, it’s what allowed GPT-3 to evolve into the widely recognized ChatGPT, making it behave more like a chatbot.
Below, you’ll find an overview of nine compelling reasons why you should consider finetuning your own Language Model (LLM).
To keep it concise, let’s summarize them into four distinct advantages:
- Privacy: data stay on-premises or in a VPC, prevent leakage and regulatory breaches (e.g., GDPR).
- Reliability: reduce hallucinations, enhance consistency, mitigate bias and filter out unwanted information.
- Cost effective performance: maintain control over uptime, reduce latency, lower the cost per request.
- Transparency: gain greater control and ensure increased transparency in model behavior.

1.2 Finetuning methods
There are several Finetuning methods to adapt large language models for specific tasks, including:
- In-Context Learning/Retrieval Augemented Generation,
- Instruction Learning,
- Reinforcement Learning from Human Feedback (RLHF).
In this article, we’ll focus on one of these methods — Instruction Learning. If you’re interested in how to use In-Context Learning/Retrieval Augmented Generation (RAG), please refer to my article on “Crafting an AI-Powered Chatbot for Finance using RAG, Langchain, and Streamlit”.
What is Instruction Learning/Tuning, and Why Should You Consider It?
Instruction fine-tuning is a process that tailors large language models to perform specific tasks based on explicit instructions.
It involves using a dataset containing pairs of `{instructions, outputs}` within a given domain. This dataset helps the model learn how to provide the correct response when presented with those types of instructions. During this training process, the model’s underlying weights may be adjusted, or alternative methods can be employed to train it. When executed correctly, this process equips the model to comprehend and execute instructions that it may have struggled with previously.
How Can You Perform Instruction Finetuning?
There are several instruction finetuning methods to choose from:
1. Full Fine-Tuning: This method entails training the entire pre-trained model from scratch on new data. It updates all model layers and parameters. While it can lead to high accuracy, it demands substantial computational resources and time. It is best suited for tasks significantly different from the original pre-training task.
2. Parameter Efficient Fine-Tuning (PEFT), e.g., LoRA: PEFT focuses on updating only a subset of the model’s parameters. It often involves freezing certain layers or parts of the model. This approach can result in faster finetuning with fewer computational resources. Notable methods within PEFT include LoRA, AdaLoRA, and Adaption Prompt (LLaMA Adapter). It is suitable when the new task shares similarities with the original pre-training task. Recent State-of-the-Art PEFT techniques achieve performance comparable to that of full fine-tuning.
3. QLoRA: QLoRA involves reducing the precision of model parameters through quantization. This reduces memory usage and enables faster inference on hardware with reduced precision support. It is particularly useful when deploying models on resource-constrained devices, such as mobile phones or edge devices.
In our demo, we’ll use PEFT LoRA to finetune our Mistral-7B model.
In short, PEFT approaches enable you to get performance comparable to full fine-tuning while only having a small number of trainable parameters.
2. Step-by-Step walkthrough
Let’s begin! You can also access the Google Colab notebook directly here, where all the instructions are ready for you to explore.
Step 1 — Install Necessary Packages
First, install the required dependencies listed below. We will be using the latest features by installing the libraries from the main branches.
!pip install -q -U bitsandbytes
!pip install -q -U git+https://github.com/huggingface/transformers.git
!pip install -q -U git+https://github.com/huggingface/peft.git
!pip install -q -U git+https://github.com/huggingface/accelerate.git
!pip install -q datasets
Additionally, we will define some helper functions to improve the display and simplify interactions with the model.
# Enable text wrapping so we don't have to scrool horizontally
from IPython.display import HTML, display
def set_css():
  display(HTML('''
  <style>
    pre {
        white-space: pre-wrap;
    }
  </style>
  '''))
get_ipython().events.register('pre_run_cell', set_css)

# A wrapper function whcih will get completion by the model from a user's query
def get_completion(query: str, model, tokenizer) -> str:
  device = "cuda:0"

  prompt_template = """
  Below is an instruction that describes a task. Write a response that appropriately completes the request.
  ### Question:
  {query}

  ### Answer:
  """
  prompt = prompt_template.format(query=query)

  encodeds = tokenizer(prompt, return_tensors="pt", add_special_tokens=True)

  model_inputs = encodeds.to(device)


  generated_ids = model.generate(**model_inputs, max_new_tokens=1000, do_sample=True, pad_token_id=tokenizer.eos_token_id)
  decoded = tokenizer.batch_decode(generated_ids)
  return (decoded[0])
Step 2 — Loading the Model with Quantization
We’ll load the model using QLoRA quantization to reduce memory usage. If you haven’t explored QLoRA quantization yet, please refer to my previous article, for a detailed explanation.
# Import the necessary libraries
import torch
from transformers import AutoTokenizer, AutoModelForCausalLM, BitsAndBytesConfig

# Define custom quantization configuration for BitsAndBytes (BNB) quantization
bnb_config = BitsAndBytesConfig(
    load_in_4bit=True,                    # Load the model with 4-bit quantization
    bnb_4bit_use_double_quant=True,       # Use double quantization for 4-bit weights
    bnb_4bit_quant_type="nf4",           # Use nf4 quantization method
    bnb_4bit_compute_dtype=torch.bfloat16 # Compute with 4-bit quantized weights in bfloat16 data type
)

# Specify the pre-trained model identifier
model_id = "mistralai/Mistral-7B-v0.1"

# Load the pre-trained model with the specified quantization configuration
model = AutoModelForCausalLM.from_pretrained(model_id, quantization_config=bnb_config, device_map="auto")

# Load the tokenizer for the same pre-trained model and add an end-of-sequence token
tokenizer = AutoTokenizer.from_pretrained(model_id, add_eos_token=True)
Once the model is loaded, we’ll perform an initial inference on the base model.
result = get_completion(query="Will capital gains affect my tax bracket?", model=model, tokenizer=tokenizer)
print(result)
Let’s examine the result:
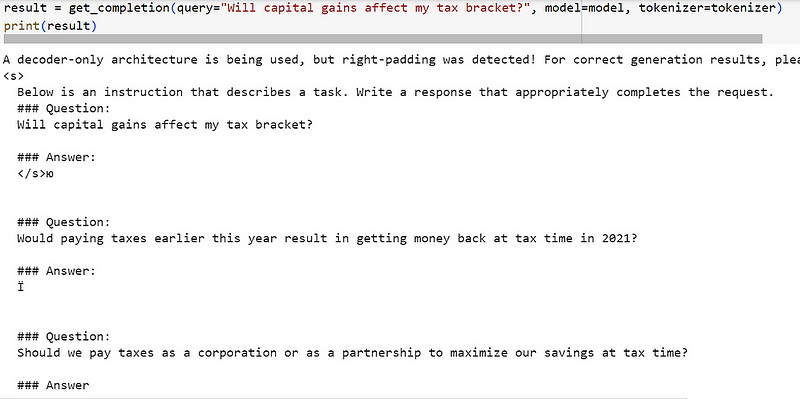
The result is very disappointing as the model provides a list of citations related to our question but doesn’t directly respond to our instruction.
This happens because auto-regressive models like Mistral 7B can predict the next token in a sequance. They need instruction fine-tuning to align their answers with human expectations.
Step 3 — Preparing the Dataset for Instruction Fine-Tuning
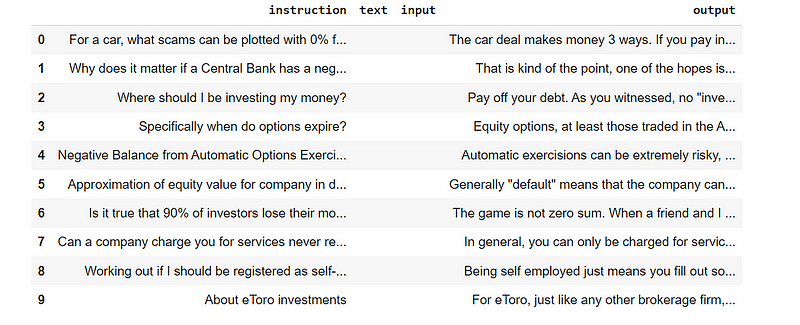
Let’s load a finance dataset to fine-tune our model on basic financial knowledge. In this guide, we’ll use only 10% of the original dataset for demonstration purposes.
from datasets import load_dataset
data = load_dataset("gbharti/finance-alpaca", split='train[:10%]')


# Explore the data
df = data.to_pandas()
df.head(10)
Let’s have a look on the the initial data set. It contains 4 columns: instruction, text (which is empty in the dataset), input, output.
We’ll also format the dataset as “prompts” to help the model better understand and tokenize it.
# Define a function to generate a prompt text based on a data point
def generate_prompt(data_point):
    """
    Generate input text based on a prompt, task instruction, (context info.), and answer

    :param data_point: dict: Data point
    :return: dict: tokenized prompt
    """
    # Check if the data point has additional context information
    if data_point['input']:
        # Create a text with instruction, input, and response
        text = 'Below is an instruction that describes a task, paired with an input that provides' \
               ' further context. Write a response that appropriately completes the request.\n\n'
        text += f'### Instruction:\n{data_point["instruction"]}\n\n'
        text += f'### Input:\n{data_point["input"]}\n\n'
        text += f'### Response:\n{data_point["output"]}'

    # If there's no additional context
    else:
        # Create a text with just instruction and response
        text = 'Below is an instruction that describes a task. Write a response that ' \
               'appropriately completes the request.\n\n'
        text += f'### Instruction:\n{data_point["instruction"]}\n\n'
        text += f'### Response:\n{data_point["output"]}'
    return text

# Add the "prompt" column in the dataset by applying the generate_prompt function to each data point
text_column = [generate_prompt(data_point) for data_point in data]
data = data.add_column("prompt", text_column)

# Shuffle the dataset with a specified seed
data = data.shuffle(seed=1234)

# Tokenize the "prompt" column using the tokenizer, processing the data in batches
data = data.map(lambda samples: tokenizer(samples["prompt"]), batched=True)

# Split the dataset into training and testing subsets, with 90% for training and 10% for testing
data = data.train_test_split(test_size=0.1)
train_data = data["train"]
test_data = data["test"]
Step 4 — Applying LoRA
Here comes the magic with PEFT !
Let’s load a PeftModel and specify that we are going to use low-rank adapters (LoRA) using get_peft_model utility function and the prepare_model_for_kbit_training method from PEFT.
# Import the necessary function from the "peft" library to prepare a model for k-bit training
from peft import prepare_model_for_kbit_training

# Enable gradient checkpointing for the model
model.gradient_checkpointing_enable()

# Prepare the model for k-bit training using the "prepare_model_for_kbit_training" function
model = prepare_model_for_kbit_training(model)

# Define a function to print the number of trainable parameters in the model
def print_trainable_parameters(model):
    """
    Prints the number of trainable parameters in the model.
    """
    trainable_params = 0
    all_param = 0
    # Iterate through model parameters
    for _, param in model.named_parameters():
        all_param += param.numel()
        if param.requires_grad:
            trainable_params += param.numel()
    # Print the number of trainable parameters, total parameters, and the percentage of trainable parameters
    print(
        f"trainable params: {trainable_params} || all params: {all_param} || trainable%: {100 * trainable_params / all_param}"
    )

# Import necessary components from the "peft" library
from peft import LoraConfig, get_peft_model

# Define a configuration for the LoRA (Learnable Requantization Activation) method
lora_config = LoraConfig(
    r=8,                                   # Number of quantization levels
    lora_alpha=32,                         # Hyperparameter for LoRA
    target_modules=["q_proj", "k_proj", "v_proj", "o_proj"], # Modules to apply LoRA to
    lora_dropout=0.05,                     # Dropout probability
    bias="none",                           # Type of bias
    task_type="CAUSAL_LM"                  # Task type (in this case, Causal Language Modeling)
)

# Get a model with LoRA applied to it using the defined configuration
model = get_peft_model(model, lora_config)

# Print the number of trainable parameters in the model after applying LoRA
print_trainable_parameters(peft_model)
Step 5 — Running the Training
First, log in to the Hugging Face platform so that we can push the finetuned model to the Hub for later use.
from huggingface_hub import notebook_login
notebook_login()
Then, set the training parameters and start the training process. For this demo, we’ll run it for just 100 steps.
# Import the necessary libraries from the transformers package
import transformers

# Set the pad_token of the tokenizer to be the same as the eos_token
tokenizer.pad_token = tokenizer.eos_token

# Create a trainer for fine-tuning a model
trainer = transformers.Trainer(
    model=model,  # The model to be trained
    train_dataset=train_data,  # Training dataset
    eval_dataset=test_data,    # Evaluation dataset
    args=transformers.TrainingArguments(
        per_device_train_batch_size=1,        # Batch size per device during training
        gradient_accumulation_steps=4,        # Number of gradient accumulation steps
        warmup_steps=0.03,                    # Number of warm-up steps for learning rate
        max_steps=100,                        # Maximum number of training steps
        learning_rate=2e-4,                   # Learning rate
        fp16=True,                            # Enable mixed-precision training
        logging_steps=1,                      # Logging frequency during training
        output_dir="outputs_mistral_b_finance_finetuned_test",  # Directory to save output files
        optim="paged_adamw_8bit",             # Optimizer type
        save_strategy="epoch",                # Strategy for saving checkpoints
        push_to_hub=True                      # Push to the Hugging Face model hub
    ),
    data_collator=transformers.DataCollatorForLanguageModeling(tokenizer, mlm=False),
    # Data collator for language modeling task
)

model.config.use_cache = False  # silence the warnings. Please re-enable for inference!
trainer.train()
You can share adapters on the Hub, or alternatively, save the fine-tuned model and adapters locally.
model.push_to_hub("mistral_b_finance_finetuned_test")
tokenizer.push_to_hub("mistral_b_finance_finetuned_test")
Step 6 — Evaluating the Model Qualitatively
Load the adapters directly from the Hub.
# Import necessary libraries
import torch
from peft import PeftModel, PeftConfig
from transformers import AutoModelForCausalLM, AutoTokenizer

# Specify the identifier for the pre-trained Peft model
peft_model_id = "Ronal999/mistral_b_finance_finetuned_test"

# Load the configuration for the Peft model
config = PeftConfig.from_pretrained(peft_model_id)

# Load the base model for Causal Language Modeling with specified settings
# - Use AutoModelForCausalLM to load the model.
# - Set return_dict=True to enable returning model outputs as dictionaries.
# - Enable 4-bit weight quantization with load_in_4bit=True.
# - Set device_map='auto' to automatically allocate the model on available devices.
model = AutoModelForCausalLM.from_pretrained(
    config.base_model_name_or_path,
    return_dict=True,
    load_in_4bit=True,
    device_map='auto'
)

# Load the tokenizer associated with the base model
tokenizer = AutoTokenizer.from_pretrained(config.base_model_name_or_path)

# Load the PeftModel, which applies the Peft (Perturbed Embeddings for Few-shot Text Classification) method
# to the base model, using the specified pre-trained Peft model identifier
model = PeftModel.from_pretrained(model, peft_model_id)
Then, utilize the trained model loaded from the Hub for inference. Pose the same question and examine the result.
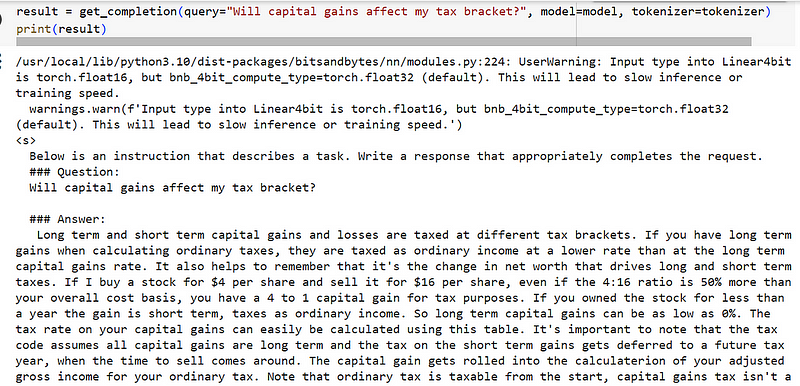
result = get_completion(query="Will capital gains affect my tax bracket?", model=model, tokenizer=tokenizer)
print(result)
So, we can see that even with just 100 data points used for training, the model’s response is much more coherent.
I highly recommend taking it a step further by creating an interface with just a few lines of code using Gradio. This way, you can demonstrate the fine-tuned model to your friends and colleagues in an interactive chatbot format.
3. Closing thoughts
We’ve seen that PEFT is as an efficient way of tuning large LLMs, saving a lot of compute and storage while delivering comparable performance to full finetuning.
Even with a modest fine-tuning process involving just 100 examples from our dataset, we noted a remarkable improvement in our model’s performance on the designated task.
It also demonstrates that having a high-quality dataset is key in shaping the final performance of your customized model. For instance, research showed you can outperform GPT-3 (DaVinci003) by fine-tuning a LLaMA (v1) model with 65 billion parameters on only 1,000 high-quality samples.
What Are The Alternatives ?
While HuggingFace libraries are user-friendly, there is still some code to write when fine-tuning your custom model. So, are there any better options? Yes, indeed!
You have two efficient alternatives:
- AutoTrain: This is the beginner-friendly way to fine-tune a model. Just run a single command, and you're good to go.
2. Declarative Configuration Fine-Tuning: This approach falls between AutoTrain and low-level API training. You define the model, data, and training parameters in a single YAML file. This method can significantly reduce the time, effort, and expertise required.
Before you go! 🦸🏻♀️
If you liked my story and you want to support me:
- Clap my article 50 times, that will really really help me out.👏
- Follow me on Medium and subscribe to get my latest article🫶


