
📈 Unit Testing in Swift: The Fundamentals
In this first part of the Unit Testing in Swift series, we will cover how to add a unit test target to your project and write your first unit test using the XCTest framework provided by Apple. If you, for whatever reason, missed the introduction to this series, you can read it here.
This part of the series is for you if you want to learn how to start unit testing your own Xcode project or simply just get a better understanding of the fundamentals of unit testing with XCTest in Swift.
Adding a unit test target
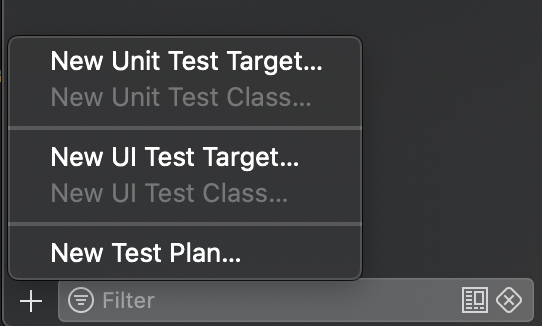
If you are starting completely from scratch, you will need to add a unit test target to your Xcode project. Don’t worry, this only takes 30 seconds. Click on the Test Navigator tab in the Xcode Navigator (the left-most window). This tab can also be reached by pressing ⌘ + 6. In the bottom left corner you can add the test target by pressing the ‘+’ button. Follow the instructions on the screen and voila: You are now ready to write your first unit test.

XCTestCase
Now that we are ready to write unit tests you will find that Xcode has added a unit test class for you. This class inherits the XCTestCase class, which is the base for all unit tests that you will be adding. A test case usually contains setup and teardown functions. These functions are called before and after each of the test functions, respectively. This allows us to set up prerequisites before the tests are being run and to clean up any mess we’ve made after the completion of each unit test.
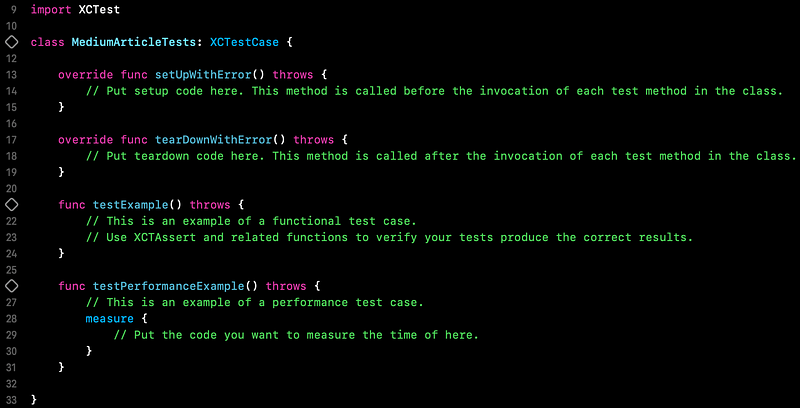
Prefixing a function in an XCTestCase class with “test”, tells Xcode that the given function is a unit test. For each unit test function you will see an empty diamond shape in the gutter on the line of the function declaration. Clicking this diamond will run the specific unit test. The whole suite of unit tests can be run in various ways, but my preference is the shortcut ⌘ + U.
In terms of naming conventions for the test classes and functions, I personally prefer following Apple’s suggestions:
To help clarify the organization of your tests, give each test case a name that summarizes the tests within it, such as
TableValidationTests,NetworkReachabilityTests, orJSONParsingTests.
To help identify failing tests, give each test method a name that makes it clear what is tested by that method, such as
testEmptyTableRowAndColumnCount(),testUnreachableURLAccessThrowsAnError(), ortestUserJSONFeedParsing().
If you are brand new to unit testing these naming examples may not make a lot of sense to you, but by the end of this series, they will.
Asserting
A unit test function is worth nothing without assertions. For that, we use the XCTAssert functions. There are many different assertion functions and I will not be covering all of them, however some of the most used are: XCTAssertTrue, XCTAssertFalse, XCTAssertNotEqual, XCTAssertEqual, XCTAssertNil and XCTAssertNotNil. I personally prefer using these Xcode providedXCTAssert functions, however there are multiple third-party alternatives available — for instance many people enjoy using Nimble.
Example
Let’s be honest… We won’t learn a lot from just reading about it, so it is time to add some code. For the sake of this article, we will be using a very simple example of schools with students and no complex logic.
Consider the Student struct above. It exposes a name, a list of grades and a computed property returning the GPA of the student. Since Student is a struct, we get the initialiser for free, hence there is no need to test if the properties are correctly set upon initialisation. The computed property, however, makes a perfect candidate for unit testing.
So let’s start by creating a new unit test class and call it StudentTests. Since our Student file is not included in our newly created test target, we have to import our main target with @testable. This makes all code with internal access available to your test class.
In order to first write our unit tests it is helpful to write a list of scenarios that the gpa computation should be able to handle:
- There should be no GPA for students with no grades.
- The calculation should work for students with only one grade
- The calculation should work for students with many grades
Additionally it would be nice to know that our GPA calculation still works in case the grading system changes to using more “extreme” numbers in the future. From these scenarios we can write our tests.
Some may say that adding 4 separate unit tests for a single computed property is an overkill, but in my opinion it’s better to be safe than sorry.
Notice how both the XCTAssertNil and XCTAssertEqual functions are being used. XCTAssertNotNil could also have been used for the cases that do not return nil, but the check is implicitly included in the XCTAssertEqual check. This, along with the name and documentation of each test, makes it very easy for any developer to understand what is being tested and how the GPA calculation should work.
Testing private functionality
Let’s take a look at the School our students are enrolled at.
In the code above we see that the School exposes two properties: students and topStudents. But it also has a private function that is inaccessible from our unit tests. Inexperienced unit testers will often change the accessibility of the function in order to test it directly, however I would strongly suggest not to expose anything that shouldn’t be exposed, just for the sake of testing.
There is always a way of testing the private functionality — in this case it’s quite simple as we just have to test the topStudents computed property in order to get unit test coverage of the students(withGPALimit:) -> [Student] function.
So, using the same approach as before we define our scenarios that the topStudents computed property should be able to handle:
- It should retrieve an empty list of students if there are no students enrolled in the school.
- It should retrieve an empty list of students if none of the enrolled students have a GPA of 4.0.
- It should retrieve a list of all students with a GPA of 4.0 if there are one or more students enrolled.
These scenarios may result in the following unit tests:
For the School tests we see that a lot more assertions are being used for each unit test function. This is done to ensure that everything behaves as expected — the more assertions the merrier. If we, for instance, only tested if the topStudents property held 2 students (in the scenario with 2 top students), we can’t be sure that the list in fact contained the correct students unless we specifically assert that.
Congratulations on writing your first unit tests in Swift.
To sum it up…
This was a short introduction to the fundamentals of unit testing your Xcode project. I can strongly advice working on the mindset of listing the different scenarios that your code should be able to handle, before starting to actually implement the logic. This allows you to write the unit tests before the actual implementation — a practice also known as test driven development (TDD). I won’t be covering TDD in this series, but there are plenty of interesting articles discussing this topic, here on Medium — including this one.
For more information on unit testing in Xcode, I can recommend watching this talk from WWDC 2019. I was lucky enough to be watching that talk live at the conference!
In the next chapter we will be going more into depth on how to test asynchronous code within your project.
As always, if you have any questions or comments, feel free to reach out to me by commenting on these articles. I will reply to all messages.


