avatarJordan P. Raychev

Free AI web copilot to create summaries, insights and extended knowledge, download it at here

4449

Abstract

72dd/auth-sequence-auth-code.png</a></figcaption></figure><p id="6bf4">A user typically clicks on a link which redirects him to a page where the flow would start. Since we want to access resources inside a Kubernetes cluster we will mock this part by creating the URL to which the user has to authenticate. The typical request should have the following format. The code below will generate a request which will take the user to their identity provider page and make the logic with their credentials. Since we’ve provided a redirect URI, the user will get redirected to it and the authorization code will be embedded into the URL.</p><div id="626a"><pre>import os import urllib.parse

<span class="hljs-meta prompt_">>>></span> <span class="language-python">authorization_endpoint = <span class="hljs-string">'https://example.com/oauth2/authorize'</span></span> <span class="hljs-meta prompt_">>>></span> <span class="language-python">params = {</span> <span class="hljs-meta prompt_">...</span> <span class="language-python"> <span class="hljs-string">'response_type'</span>: <span class="hljs-string">'code'</span>,</span> <span class="hljs-meta prompt_">...</span> <span class="language-python"> <span class="hljs-string">'client_id'</span>: <span class="hljs-string">'client_id'</span>,</span> <span class="hljs-meta prompt_">...</span> <span class="language-python"> <span class="hljs-string">'redirect_uri'</span>: <span class="hljs-string">'http://localhost:8000'</span>,</span> <span class="hljs-meta prompt_">...</span> <span class="language-python"> <span class="hljs-string">'scope'</span>: <span class="hljs-string">'openid'</span>,</span> <span class="hljs-meta prompt_">...</span> <span class="language-python"> <span class="hljs-string">'state'</span>: os.urandom(<span class="hljs-number">16</span>).<span class="hljs-built_in">hex</span>(),</span> <span class="hljs-meta prompt_">...</span> <span class="language-python"> }</span>

<span class="hljs-meta prompt_">>>></span> <span class="language-python"><span class="hljs-built_in">print</span>(<span class="hljs-string">f'<span class="hljs-subst">{authorization_endpoint}</span>?<span class="hljs-subst">{urllib.parse.urlencode(params)}</span>'</span>)</span> https://example.com/oauth2/authorize?response_type=code&amp;client_id=client_id&amp;redirect_uri=http%3A%2F%2Flocalhost%3A8000&amp;scope=openid&amp;state=19bd0ffcaca6b06270d027ad38e8e1c9</pre></div><p id="857f">By trying to access the above URL for your identity provider you will get something similar as shown below.</p><figure id="67af"><img src="https://cdn-images-1.readmedium.com/v2/resize:fit:800/1*KQkJVrjHW4bl-MYLE06Xrw.png"><figcaption>Two factor authentication using time-based passcode</figcaption></figure><p id="a29b">Next you will get redirected to locahost (redirect URI mentioned above) with the generated code and state.</p><figure id="38f7"><img src="https://cdn-images-1.readmedium.com/v2/resize:fit:800/1*kuM7ji0706-Usj_MRKXeSg.png"><figcaption></figcaption></figure><p id="6c24">At this point, we can continue with either requiring the user to provide manually us with the code or start (having working) a web service that will fetch the code automatically and create the access token for the user). For now lets continue with the manual approach but if you are interested how the other method would work I can make a follow up article on that one (similar approach is done by kubectl + kubelogin plugin).</p><p id="5f90">Having the code at our disposal, we can make a POST request to another identity provider URL which will generate the JWT token itself. Below is the snipped of code that will make the actual request using python requests library</p><div id="2414"><pre>import requests

<span class="hljs-meta prompt_">>>></span> <span class="language-python">token_endpoint = <span class="hljs-string">'https://example.com/oauth2/token'</span></span> <span class="hljs-meta prompt_">>>></span> <span class="language-python">params = {</span> <span class="hljs-meta prompt_">...</span> <span class="language-python"> <span class="hljs-string">'grant_type'</span>: <span class="hljs-string">'authorization_code'</span>,</span> <span class="hljs-meta prompt_">...</span> <span class="language-python"> <span class="hljs-string">'client_id'</span>: <span class="hljs-string">'client_id'</span>,</span> <span class="hljs-meta prompt_">

Options

...</span> <span class="language-python"> <span class="hljs-string">'client_secret'</span>: <span class="hljs-string">'client_secret'</span>,</span> <span class="hljs-meta prompt_">...</span> <span class="language-python"> <span class="hljs-string">'code'</span>: <span class="hljs-string">'authorization code from previous step'</span>,</span> <span class="hljs-meta prompt_">...</span> <span class="language-python"> <span class="hljs-string">'redirect_uri'</span>: <span class="hljs-string">'http://localhost:8000'</span></span> <span class="hljs-meta prompt_">...</span> <span class="language-python">}</span> <span class="hljs-meta prompt_">>>></span> <span class="language-python">headers = {</span> <span class="hljs-meta prompt_">...</span> <span class="language-python"> <span class="hljs-string">'content-type'</span>: <span class="hljs-string">'application/x-www-form-urlencoded'</span></span> <span class="hljs-meta prompt_">...</span> <span class="language-python">}</span> <span class="hljs-meta prompt_">>>></span> <span class="language-python">response = request.post(token_endpoint, headers=headers, data=payload)</span> <span class="hljs-meta prompt_">>>></span> <span class="language-python"><span class="hljs-built_in">print</span>(response.json()</span></pre></div><p id="be41">The above will generate a payload that look something similar to the one below. There you will find an access token to access your protected resources, an refresh token to generate a new access token in case it has expired and an id token with information about your user.</p><div id="07d0"><pre><span class="hljs-punctuation">{</span> <span class="hljs-attr">"access_token"</span><span class="hljs-punctuation">:</span> <span class="hljs-string">"eyJra..."</span><span class="hljs-punctuation">,</span> <span class="hljs-attr">"refresh_token"</span><span class="hljs-punctuation">:</span> <span class="hljs-string">"1ce..."</span><span class="hljs-punctuation">,</span> <span class="hljs-attr">"scope"</span><span class="hljs-punctuation">:</span> <span class="hljs-string">"openid"</span><span class="hljs-punctuation">,</span> <span class="hljs-attr">"id_token"</span><span class="hljs-punctuation">:</span> <span class="hljs-string">"eyJraWQ..."</span><span class="hljs-punctuation">,</span> <span class="hljs-attr">"token_type"</span><span class="hljs-punctuation">:</span> <span class="hljs-string">"Bearer"</span><span class="hljs-punctuation">,</span> <span class="hljs-attr">"expires_in"</span><span class="hljs-punctuation">:</span> <span class="hljs-number">3600</span> <span class="hljs-punctuation">}</span></pre></div><p id="3fe6">Having the information above, you are now able to make any requests (if you are authorized to do so) to your Kubernetes resources or any other resources for that matter which are protected using the described flow.</p><h1 id="7a97">Conclusion</h1><p id="6aa8">In this article, we’ve explored the OAuth2 Authorization Code Flow and its significance in securing access to resources. I have provided you with a practical workflow for accessing protected OIDC resources within a Kubernetes cluster and a tested script for JWT generation.</p><p id="0c93">OAuth2 Authorization Code Flow is a robust mechanism that not only protects sensitive data but also empowers users to have granular control over their data sharing preferences. As you delve deeper into the world of modern web security, understanding and implementing OAuth2 Authorization Code Flow will be a valuable asset in safeguarding your applications and their users’ data.</p><h1 id="0002">In Plain English</h1><p id="0106"><i>Thank you for being a part of our community! Before you go:</i></p><ul><li><i>Be sure to <b>clap</b> and <b>follow</b> the writer! 👏</i></li><li><i>You can find even more content at <a href="https://plainenglish.io/"><b>PlainEnglish.io</b></a><b> 🚀</b></i></li><li><i>Sign up for our <a href="http://newsletter.plainenglish.io/"><b>free weekly newsletter</b></a>. 🗞️</i></li><li><i>Follow us on <a href="https://twitter.com/inPlainEngHQ"><b>Twitter</b></a><b>(X</b></i>), <a href="https://www.linkedin.com/company/inplainenglish/"><b><i>LinkedIn</i></b></a>, <a href="https://www.youtube.com/channel/UCtipWUghju290NWcn8jhyAw"><b><i>YouTube</i></b></a>, and <a href="https://discord.gg/GtDtUAvyhW"><b><i>Discord</i></b></a><b><i>.</i></b></li></ul></article></body>

Understanding OAuth2 Authorization Code Flow

Accessing protected resourced in a Kubernetes (K8S) Clusters

What is OAuth2 Authorization Code Flow?

The OAuth2 Authorization Code Flow is a security protocol that allows a client application to obtain access to protected resources on behalf of a resource owner (typically a user). It is designed to be highly secure and is especially well-suited for scenarios where the client application is a web server or runs in a secure environment.

Photo by Growtika on Unsplash

Why Use OAuth2 Authorization Code Flow?

OAuth2 Authorization Code Flow offers several advantages, making it a preferred choice for securing access to resources:

  1. Enhanced Security: It ensures that sensitive user credentials, such as usernames and passwords, are never exposed to the client application.
  2. User Consent: Users have control over which resources the client application can access, as they grant explicit consent during the authentication process.
  3. Refresh Tokens: The flow provides a mechanism to obtain refresh tokens, enabling long-lived access to resources without requiring users to repeatedly authenticate.
  4. Scalability: OAuth2 is highly scalable and works well in distributed environments, such as microservices and Kubernetes clusters.

Accessing Protected OIDC Resources in Kubernetes

Typically the access to Kubernets resources is done through the kubectl tool and kubelogin plugin provided by int128. The plugin provides a capability to authorize users but they are required to have the two tools installed on their PC. However, my use case is slightly different and I would need to access the resources on behalf of multiple users from a single location/server. This can be hardly done with the above plugins, so we would need another setup and workflow in order to achieve the desired output.

To illustrate the above, we will go through a practical implementation of OAuth2 Authorization Code Flow, I will guide you through a workflow to access protected OIDC resources within a Kubernetes cluster. OpenID Connect (OIDC) is an identity layer built on top of OAuth2, adding authentication capabilities to the authorization process.

Workflow Overview:

  1. User Authentication: A user initiates the process by accessing a client application running in a Kubernetes cluster. The client redirects the user to an OIDC provider for authentication.
  2. Authorization Code: After successful authentication, the OIDC provider issues an authorization code to the client application.
  3. Token Exchange: The client application exchanges the authorization code for an access token and a refresh token.
  4. Accessing Protected Resources: With the access token, the client application can now securely access protected resources within the Kubernetes cluster.

Generating JSON Web Tokens (JWTs) for Secure Access

To facilitate secure access to protected resources in Kubernetes, I have prepared a script that generates JSON Web Tokens (JWTs) based on the obtained access token. This script simplifies the process of interacting with OIDC providers and handling authentication tokens, making it easier to integrate OAuth2 Authorization Code Flow into your Kubernetes applications.

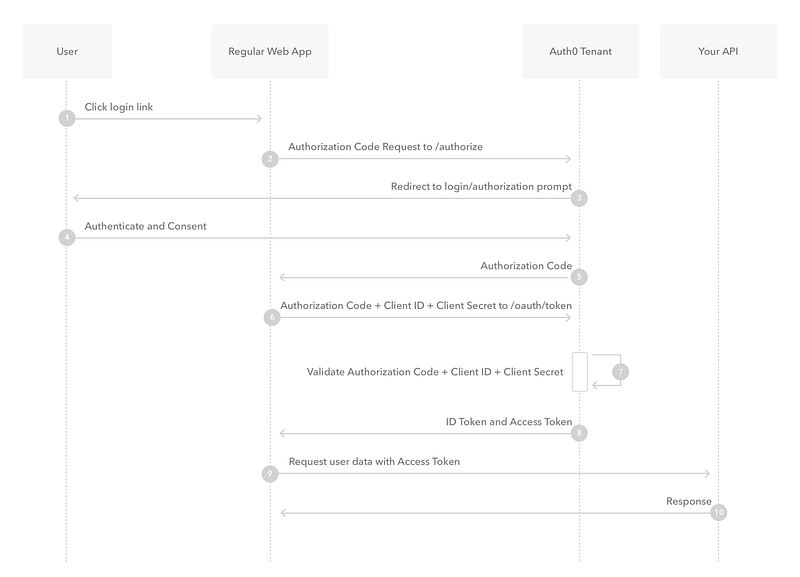
Below you will find a diagram showing each stage of the authorization code flow. I will try to match the diagram with the code that we will be writing. Without further ado, lets jump into it.

https://images.ctfassets.net/cdy7uua7fh8z/2nbNztohyR7uMcZmnUt0VU/2c017d2a2a2cdd80f097554d33ff72dd/auth-sequence-auth-code.png

A user typically clicks on a link which redirects him to a page where the flow would start. Since we want to access resources inside a Kubernetes cluster we will mock this part by creating the URL to which the user has to authenticate. The typical request should have the following format. The code below will generate a request which will take the user to their identity provider page and make the logic with their credentials. Since we’ve provided a redirect URI, the user will get redirected to it and the authorization code will be embedded into the URL.

import os
import urllib.parse

>>> authorization_endpoint = 'https://example.com/oauth2/authorize'
>>> params = {
...     'response_type': 'code',
...     'client_id': 'client_id',
...     'redirect_uri': 'http://localhost:8000',
...     'scope': 'openid',
...     'state': os.urandom(16).hex(),
...     }

>>> print(f'{authorization_endpoint}?{urllib.parse.urlencode(params)}')
https://example.com/oauth2/authorize?response_type=code&client_id=client_id&redirect_uri=http%3A%2F%2Flocalhost%3A8000&scope=openid&state=19bd0ffcaca6b06270d027ad38e8e1c9

By trying to access the above URL for your identity provider you will get something similar as shown below.

Two factor authentication using time-based passcode

Next you will get redirected to locahost (redirect URI mentioned above) with the generated code and state.

At this point, we can continue with either requiring the user to provide manually us with the code or start (having working) a web service that will fetch the code automatically and create the access token for the user). For now lets continue with the manual approach but if you are interested how the other method would work I can make a follow up article on that one (similar approach is done by kubectl + kubelogin plugin).

Having the code at our disposal, we can make a POST request to another identity provider URL which will generate the JWT token itself. Below is the snipped of code that will make the actual request using python requests library

import requests

>>> token_endpoint = 'https://example.com/oauth2/token'
>>> params = {
...   'grant_type': 'authorization_code',
...   'client_id': 'client_id',
...   'client_secret': 'client_secret',
...   'code': 'authorization code from previous step',
...   'redirect_uri': 'http://localhost:8000'
... }
>>> headers = {
...   'content-type': 'application/x-www-form-urlencoded'
... }
>>> response = request.post(token_endpoint, headers=headers, data=payload)
>>> print(response.json()

The above will generate a payload that look something similar to the one below. There you will find an access token to access your protected resources, an refresh token to generate a new access token in case it has expired and an id token with information about your user.

{
    "access_token": "eyJra...",
    "refresh_token": "1ce...",
    "scope": "openid",
    "id_token": "eyJraWQ...",
    "token_type": "Bearer",
    "expires_in": 3600
}

Having the information above, you are now able to make any requests (if you are authorized to do so) to your Kubernetes resources or any other resources for that matter which are protected using the described flow.

Conclusion

In this article, we’ve explored the OAuth2 Authorization Code Flow and its significance in securing access to resources. I have provided you with a practical workflow for accessing protected OIDC resources within a Kubernetes cluster and a tested script for JWT generation.

OAuth2 Authorization Code Flow is a robust mechanism that not only protects sensitive data but also empowers users to have granular control over their data sharing preferences. As you delve deeper into the world of modern web security, understanding and implementing OAuth2 Authorization Code Flow will be a valuable asset in safeguarding your applications and their users’ data.

In Plain English

Thank you for being a part of our community! Before you go:

Oidc
Python
Kubernetes
Oauth2
Recommended from ReadMedium