
Understanding Kubernetes Kubeconfig File — A Beginner’s Guide
kubeconfig File: Your Key to Kubernetes Authentication?
Find Complete mind map of A Beginner’s Guide to Kubernetes
Welcome back to our Understanding Kubernetes series! In our previous article, we explored the important topic of authentication in Kubernetes.
But, we’ll continue our journey by diving into the kubeconfig file and understanding its role in managing authentication and accessing Kubernetes clusters.
The kubeconfig file is a crucial component that allows users to interact with Kubernetes clusters securely.
Let’s explore its key concepts and functionalities together!
Check out “Understanding Kubernetes — A Beginner’s Guide” for the comprehensive series🚀
Certificates and PKI in Kubernetes
In a Kubernetes cluster created using kubeadm, a self-signed Certificate Authority (CA) is automatically generated and stored in the /etc/kubernetes/pki directory.
This CA consists of a private key (ca.key) and a CA certificate (ca.crt).
The CA certificate is copied to all nodes in the cluster, allowing the nodes to trust certificates signed by this CA.
These certificates are signed by the CA and are used to authenticate and secure communication between the components within the cluster.
Additionally, the CA certificate is also included in the kubeconfig file.
kubernetes-admin
A special user called “kubernetes-admin” is created during cluster setup. This user has administrative privileges and can perform management operations on the cluster.
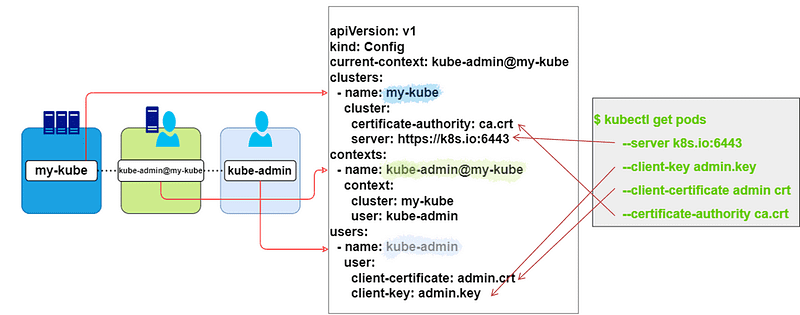
The kubeconfig file includes the necessary credentials for this user, allowing administrators to access and manage the cluster securely.
Now, let’s explore its components with practial example in more detail.
Adding an Authenticated User to the Cluster
In Kubernetes, certificates play a crucial role in authenticating users and establishing trust within the cluster.
Let’s walk through a practical example of how to add an authenticated user to the cluster using certificates.
Step 1: Create a Certificate
To add an authenticated user to your Kubernetes cluster, the first step is to create a certificate for the user.
This certificate will be used to authenticate the user when interacting with the cluster. Follow the steps below to generate the certificate:
1.Generate a Private Key:
$ openssl genrsa -out demouser.key 2048This command generates a private key file named demouser.key with a key length of 2048 bits.
2.Generate a Certificate Signing Request (CSR):
$ openssl req -new -key demouser.key -out demouser.csr -subj "/CN=demouser"The above command generates a Certificate Signing Request (CSR) file named demouser.csr. The -subj flag sets the subject of the CSR, with the /CN field representing the common name (username) of the user. You can customize the common name and add additional information as needed.
3.Encode the CertificateSigning Request (CSR):
$ cat demouser.csr | base64 | tr -d "\n"This command encodes the contents of the CSR file to base64 format. The encoded CSR will be used in the next steps to create a CertificateSigningRequest object in Kubernetes.
The generated CSR file contains the user’s public key and other relevant information. This CSR will be sent to the cluster’s Certificate Authority (CA) for signing and approval. Once approved, the signed certificate will be used for authenticating the user in the cluster.
Step 2: Create a CertificateSigningRequest Object
Once you have generated the Certificate Signing Request (CSR) in the previous step, the next step is to create a CertificateSigningRequest object in Kubernetes.
This object represents the request to the cluster’s Certificate Authority (CA) for signing and approval of the certificate.
Follow the example below to create the CertificateSigningRequest object:
Create a YAML file (e.g., demouser-csr.yaml) with the following content:
apiVersion: certificates.k8s.io/v1
kind: CertificateSigningRequest
metadata:
    name: demouser
spec:
    groups:
    - system:authenticated
    request: <put the base64 encoded CSR here>
    signerName: kubernetes.io/kube-apiserver-client
    usages:
    - client auth
Replace <put the base64 encoded CSR here> with the base64-encoded CSR generated in the previous step. This YAML file specifies the details of the certificate signing request, including the groups the user belongs to (system:authenticated in this example), the encoded CSR, the signer name, and the desired usages of the certificate.
Apply the YAML file to create the CertificateSigningRequest object:
$ kubectl apply -f demouser-csr.yamlStep 3: Approve the CertificateSigningRequest
Once the CertificateSigningRequest object is created, it needs to be approved by the cluster administrator.
The approval process verifies the user’s identity and grants them access to the cluster.
Follow the steps below to approve the CertificateSigningRequest:
$ kubectl certificate approve demouserThis command approves the CertificateSigningRequest with the name demouser. Once the request is approved, the cluster's Certificate Authority (CA) signs the certificate and creates a signed certificate object.
To retrieve the signed certificate, use the following command:
$ kubectl get certificatesigningrequests demouser -o jsonpath='{.status.certificate}' | base64 --decode > demouser.crtThis command retrieves the signed certificate from the CertificateSigningRequest object, decodes it from base64 format, and saves it to a file named demouser.crt.
The approved and signed certificate is now ready to be used for authenticating the user in the Kubernetes cluster.
It establishes trust between the user and the cluster, allowing the user to perform authorized actions based on their assigned roles and permissions.
In the next step, we will explore how to configure the kubeconfig file to include the user’s certificate and use it for authentication.
Step 4: Update the kubeconfig File
To authenticate the user and enable them to interact with the Kubernetes cluster using their newly created certificate, we need to update the kubeconfig file.
Again, the kubeconfig file is a configuration file used by the kubectl command-line tool to manage multiple clusters and their associated users and contexts.
First, add the demo user to the kubeconfig file using the following command:
$ kubectl config set-credentials demouser --client-key=demouser.key --client-certificate=demouser.crt --embed-certs=trueNext, check the available users in the kubeconfig file to verify that the demo user has been added:
$ kubectl config get-users
NAME
demouser
kubernetes-admin
Now, create a context for the demo user using the following command:
$ kubectl config set-context demo --user=demouser --cluster=kubernetesVerify that the context has been created successfully:
$ kubectl config get-contexts
CURRENT   NAME                          CLUSTER      AUTHINFO           NAMESPACE
          demo                          kubernetes   demouser
*         kubernetes-admin@kubernetes   kubernetes   kubernetes-admin   default
Switch to the demo context using the following command:
$ kubectl config use-context demoVerify that the current context has been switched to the demo context:
$ kubectl config get-contexts
CURRENT   NAME                          CLUSTER      AUTHINFO           NAMESPACE
*         demo                          kubernetes   demouser
          kubernetes-admin@kubernetes   kubernetes   kubernetes-admin   default
Now, here is the important thing, let’s check what we can do:
Try to list the nodes in the cluster using the kubectl get nodes command.
You will see an error message like the following:
Error from server (Forbidden): nodes is forbidden: User "demouser" cannot list resource "nodes" in API group "" at the cluster scopeThis error indicates that even though the user is authenticated, they do not have the necessary authorization to perform the kubectl get nodes command.
This brings us to the next topic: Role-Based Access Control (RBAC) and Authorization.
Key Takeaway
In this article, we explored the importance of the kubeconfig file in Kubernetes authentication.
Here are the key takeaways from our discussion:
1. The kubeconfig file is a configuration file used by the kubectl`command-line tool to manage multiple clusters, users, and contexts.
2. The kubeconfig file contains information about authentication mechanisms, including certificates and authentication tokens.
3. Creating a certificate and a CertificateSigningRequest (CSR) allows us to add an authenticated user to the Kubernetes cluster.
4. Updating the kubeconfig file with the user’s credentials enables the user to authenticate and interact with the cluster.
Remember that authentication is just the first step in securing your Kubernetes cluster.
In the next article, we will explore Role-Based Access Control (RBAC) and authorization, which provide fine-grained control over user permissions and access within the cluster.
Stay tuned for our next article in the Understanding Kubernetes series, where we will dive into RBAC and learn how to define and manage user roles and permissions within your Kubernetes cluster.
🔔 Stay tuned or subscribe to my series: “Understanding Kubernetes — A Beginner’s Guide” to explore everything about Kubernetes. 🚀
➕Join the Medium Membership Program to support my work and connect with other writers.
📝 Have questions or suggestions? Leave a comment or message me through Medium. Let’s connect!
Thank you for your support! 🌟