
Types of Edge detection algorithms
Edge detection
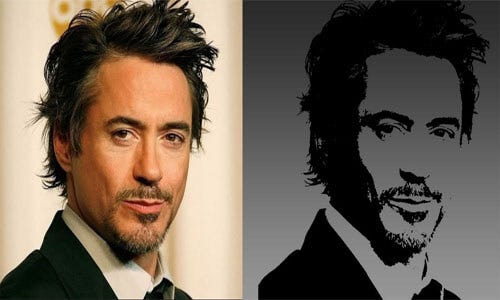
In image processing and pattern recognition, it is always important to find contours and boundaries to understand continuities , discontinuities and overall structure. edges are the portions from which objects are separated .A significant or explicit change in gray scale levels or intensities indicate edges. Edges allow us to identify features from images.
the above beautiful explanation of brain and visual perception I got from my class lecture which is extremely informative in the point of view of edge detection .When we consider image as a data then it is important to extract features from it . For that purpose we use different kinds of filters/kernels to do convolution operation with image to get a feature maps. If we start from scratch means if we don’t use any pre-trained model , then model has to learn everything from image, every feature from scratch .Then we have to set kernels which will identify all features from images. On primary basis in initial stage for average image features can be termed as edges, contours . So its always important to identify edges in images. There are few algorithms which are built on purpose of detecting edges. I tried to include as many as possible and as many as I explored while working on edge detection.
1) Canny edge detection
It was developed by John F. Canny in 1986. Canny edge detection uses different steps to give us output as edges. We firstly convert image into gray scale image for ease of processing. Probably, converting all images into grayscale will be the first task in every edge detection algorithm. Then we use gaussian blur filter. Gaussian blur is simply a method of blurring an image with the help of a Gaussian function. Blurring images make edges stronger.
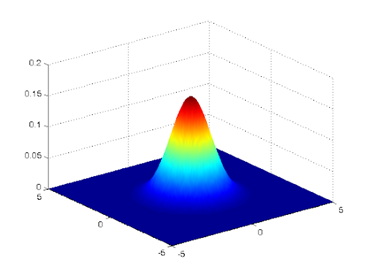
Imagine superimposing this type of distribution on group of pixels. The output we will get is gaussian blur. We use this to smoothen image. After reducing noise from image, finally we use canny filter in which we can specify threshold levels. The pixel intensity less than minimum threshold value will be excluded from final output. Like wise we can arrange different levels according to our needs.
import cv2
import numpy as np
import matplotlib.pyplot as plt
image = cv2.imread("Your image address with extension")
gray = cv2.cvtColor(image, cv2.COLOR_BGR2GRAY)
#plt.imshow(gray, cmap='gray')blur = cv2.GaussianBlur(gray, (1,1), 0)
#plt.imshow(blur, cmap='gray')canny = cv2.Canny(blur, 100, 150, 3)
plt.imshow(canny, cmap='gray')If you uncomment “imshow” for gray and blur then you can see gray and blur converted version of your image to understand its processing .


2) Sobel edge detection
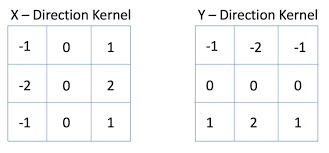
It is named after Irwin Sobel and Gary Feldman, colleagues at the Stanford Artificial Intelligence Laboratory (SAIL) .In Sobel edge detection, we have two kernels, horizontal and vertical. Firstly both kernel work separately and then sum-up overall result. Horizontal kernel captures edges in horizontal direction and vertical kernel captures edges in vertical direction.
#sobel edge detection
#we can provide minimum and maximum threshold according to our need
import cv2# Read the original imageimg = cv2.imread('Enter your image address with extension')# Display original image#cv2.imshow('Original', img)#cv2.waitKey(0)# Convert to graycsaleimg_gray = cv2.cvtColor(img, cv2.COLOR_BGR2GRAY)# Blur the image for better edge detectionimg_blur = cv2.GaussianBlur(img_gray, (3,3), 0)# Sobel Edge Detectionsobelx = cv2.Sobel(src=img_blur, ddepth=cv2.CV_64F, dx=1, dy=0, ksize=5) # Sobel Edge Detection on the X axissobely = cv2.Sobel(src=img_blur, ddepth=cv2.CV_64F, dx=0, dy=1, ksize=5) # Sobel Edge Detection on the Y axissobelxy = cv2.Sobel(src=img_blur, ddepth=cv2.CV_64F, dx=1, dy=1, ksize=5) # Combined X and Y Sobel Edge Detection# Display Sobel Edge Detection Images#cv2.imshow('Sobel X', sobelx)#cv2.waitKey(0)#cv2.imshow('Sobel Y', sobely)#cv2.waitKey(0)#cv2.imshow('Sobel X Y using Sobel() function', sobelxy)#cv2.waitKey(0)
##########################################################If we want to scratch code Sobel edge detection,import numpy as np
import cv2
import matplotlib.pyplot as plt
vertical_filter = [[-1,-2,-1],[0,0,0],[1,2,1]]
horizontal_filter = [[-1,0,1],[-2,0,2],[-1,0,1]]
img = plt.imread("enter your image address")
n,m,d = img.shape
edges_img = np.zeros_like(img)for row in range(3,n-2):
for col in range(3,m-2):
local_pixels = img[row-1:row+2,col-1:col+2, 0]
vertical_transformed_pixels = vertical_filter*local_pixels
vertical_score = vertical_transformed_pixels.sum()/4
horizontal_transformed_pixels = horizontal_filter*local_pixels
horizontal_score = horizontal_transformed_pixels.sum()/4
edge_score = (vertical_score**2 + horizontal_score**2)**.5
edges_img[row,col] = [edge_score]*3
edges_img = edges_img/edges_img.max()plt.imshow(edges_img)


3) By ROI
ROI stands for RIGION OF INTREST . As usual we firstly convert image into gray scaled image. Defining and removing boundary is main purpose of code. For recognizing contours, we take advantage of inbuilt function in cv2 that is “cv2.findContours”.
#edge detection on the basis of ROIbgr = cv2.imread('your image path with extension')
gray = cv2.cvtColor(bgr, cv2.COLOR_BGR2GRAY)
_, roi = cv2.threshold(gray, 0, 255, cv2.THRESH_BINARY)
cv2.imwrite('roi1.png', roi)#cv2.imshow("roi",roi)
cont = cv2.findContours(roi, cv2.RETR_EXTERNAL, cv2.CHAIN_APPROX_SIMPLE)
output = np.zeros(gray.shape, dtype=np.uint8)
cv2.drawContours(output, cont[0], -1, (255, 255, 255))# removing boundary
boundary = 255*np.ones(gray.shape, dtype=np.uint8)
boundary[1:boundary.shape[0]-1, 1:boundary.shape[1]-1] = 0toremove = output & boundary
output = output ^ toremove4) Using PIL
PIL stands for Python Imaging Library. It adds many image processing features to Python. Pillow is a fork of PIL that adds some user-friendly features. There are many interesting features of PIL for different kind of image manipulation . After importing “ImageFilter” from PIL, we can take advantage of inbuilt PIL feature for edge detection “ImageFilter.FIND_EDGES” . This will give us edges that we want.

#Edges detection using PIL libraryfrom PIL import Image, ImageFilter
image = Image.open(r"Your image path")
#In PIL grayscale is denoted by "L"
image = image.convert("L")
# Detecting Edges on the Image using the argument ImageFilter.FIND_EDGES
image = image.filter(ImageFilter.FIND_EDGES)
# Saving the Image Under the name Edges.png
image.save(r"Edges.png")Conclusion
- Each algorithms stands by its unique mathematical approach for detecting edges . Single algorithm wont work for every case but you can decide algorithm on the basis of test case you have.
- Edge detection is also dependent on what next steps and processing you want to do for your application so for that more deeper mathematical intuition is needed .
- Drastic ups and drops of intensities in images are termed as edges and all kernels are designed accordingly .
There are many algorithms for edge detection other than mentioned but I thought above as most common . For writing this blog and understanding concepts , I took inspiration for codes and concepts from many places. I really appreciate efforts of all writers and developers!
THANK YOU!