
Turn Data into Gold: Transforming Manufacturing with Tulip and AWS Next-Gen MES
Boost Efficiency, Slash Costs — Dive into the Manufacturing Data Age with Tulip & AWS
Introduction
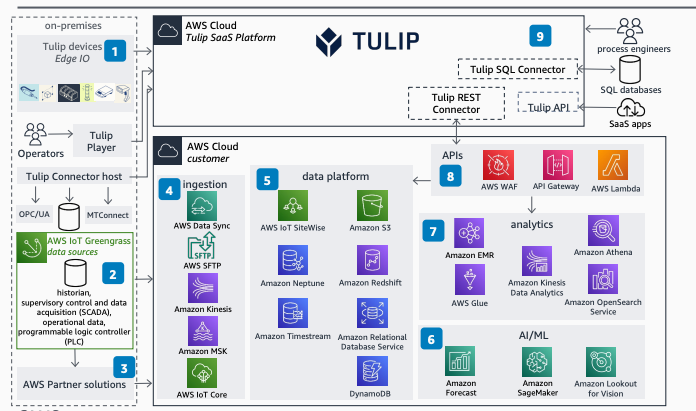
In the ever-evolving landscape of manufacturing, optimizing operations and harnessing the power of data are crucial for staying competitive. This tutorial will guide you through the process of turning raw manufacturing data into valuable insights using Tulip’s Manufacturing Execution System (MES) in conjunction with AWS cloud services.
Prerequisites
Before diving into the integration process, ensure you have the following in place:
- Tulip Devices: Set up Tulip-compatible devices to collect data from machines and sensors on the manufacturing floor.
- Edge Devices: Deploy edge devices for preprocessing data before transmitting it to the cloud.
- Tulip Connector Host: Establish a Tulip Connector host to gather data from devices and facilitate seamless communication with the AWS Cloud.
- AWS Account: Create an AWS account with the necessary permissions for configuring and deploying AWS services.
Now, let’s explore the integration steps.
On-Premises Setup
Tulip Devices and Edge Devices
Tulip devices, strategically placed on the manufacturing floor, capture data from machines and sensors. Edge devices preprocess this data, ensuring its readiness for cloud transmission.
Tulip Connector Host
Set up the Tulip Connector host, a crucial bridge between on-premises devices and the AWS Cloud. Configure it to efficiently collect data from Tulip devices and edge devices.
AWS Cloud Integration
AWS WAF and API Gateway
Implement AWS Web Application Firewall (WAF) for security. Use API Gateway to manage API requests and responses, ensuring secure and controlled data flow.
AWS Lambda and IoT Greengrass
Leverage AWS Lambda for serverless functions, processing data as it arrives. Extend AWS services to edge devices using IoT Greengrass, ensuring seamless connectivity and real-time data processing.
AWS DataSync
Use AWS DataSync to synchronize data between on-premises systems and AWS Cloud, maintaining data consistency.
AWS IoT SiteWise
Implement AWS IoT SiteWise to manage and analyze industrial data. Define models for equipment, processes, and assets to structure incoming data efficiently.
Amazon S3
Utilize Amazon S3 for scalable and durable object storage. Store raw data here before further processing.
Amazon EMR, Athena, and Redshift
For data processing and analytics, set up Amazon EMR to manage Hadoop clusters. Use Athena for SQL-based queries on data stored in S3, and Redshift as a data warehouse for robust analytics.
Amazon Neptune
Utilize Amazon Neptune, a graph database, to store relationships within the data.
Amazon Kinesis
Implement Amazon Kinesis for real-time data streams. Process and analyze streaming data for immediate insights.
AWS Glue
Catalog and prepare data for analysis using AWS Glue, a fully managed extract, transform, and load (ETL) service.
Amazon OpenSearch Service
Set up Amazon OpenSearch Service for advanced search and analytics capabilities.
Amazon Timestream, RDS, and MSK
Leverage Amazon Timestream as a time-series database, RDS as a relational database service, and MSK as a managed Kafka service for diverse data storage and processing needs.
Partner Solutions
Integrate third-party tools through partner solutions for additional functionality and customization.
Connections
Data Sources to Tulip Connector Host: Establishing Seamless Connectivity
The first step in our integration process involves creating robust connections between the various data sources on the manufacturing floor and the Tulip Connector Host. This critical link ensures that data is efficiently gathered from machines and sensors, setting the stage for its transformation and transmission to the AWS Cloud.
Prerequisites:
- Identify Data Sources: Clearly define the data sources on the manufacturing floor, including machines, sensors, and any relevant IoT devices.
- Tulip Devices Configuration: Ensure Tulip-compatible devices are appropriately configured and strategically positioned to capture real-time data from the identified sources.
- Edge Devices Setup: Deploy edge devices to preprocess the raw data before it is transmitted to the Tulip Connector Host. This step is essential for optimizing data quality and reducing the load on the network.
Steps to Connect Data Sources to Tulip Connector Host:
Step 1: Tulip Device Integration
Integrate Tulip devices with the manufacturing equipment to capture data seamlessly. Tulip’s user-friendly interface allows for easy configuration, ensuring that relevant parameters are recorded accurately.
# Sample Python code for Tulip device integration
import tulip

# Connect to Tulip device
device = tulip.Device('device_id')

# Define data capture parameters
parameters = ['parameter_1', 'parameter_2', 'parameter_3']

# Start data capture
data = device.capture_data(parameters)
Step 2: Edge Device Configuration
Configure edge devices to preprocess data locally, optimizing it for transmission to the Tulip Connector Host. This step is crucial for minimizing latency and ensuring that only relevant and processed data is sent to the cloud.
// Sample JavaScript code for edge device configuration
const edgeDevice = require('edge-device-library');

// Connect to edge device
const device = new edgeDevice('edge_device_id');

// Define data preprocessing logic
function preprocessData(rawData) {
    // Implement preprocessing steps here
    // ...
    return processedData;
}

// Capture and preprocess data before sending it to Tulip Connector Host
device.on('data', (rawData) => {
    const processedData = preprocessData(rawData);
    tulipConnectorHost.sendData(processedData);
});
Step 3: Tulip Connector Host Configuration
Configure the Tulip Connector Host to receive data from Tulip devices and edge devices. This centralized hub plays a pivotal role in aggregating data before it’s transmitted to the AWS Cloud.
# Sample Bash commands for Tulip Connector Host configuration
$ tulip-connector-host configure

# Start the Tulip Connector Host service
$ tulip-connector-host start
With these steps, you’ve successfully established connectivity between the diverse data sources on the manufacturing floor and the Tulip Connector Host. The next phase involves transmitting this data securely to the AWS Cloud for further processing and analysis.
Tulip Connector Host to AWS Cloud: Ensuring Seamless Data Transmission
Having successfully connected the manufacturing data sources to the Tulip Connector Host, the next crucial step is to establish a reliable and secure connection between the Tulip Connector Host and the AWS Cloud. This process involves configuring the Tulip Connector Host to efficiently send the collected data to AWS services, enabling further processing, analysis, and storage in the cloud environment.
Prerequisites:
- AWS Account: Ensure you have an active AWS account with the necessary permissions to create and configure AWS services.
- Tulip Connector Host Configuration: The Tulip Connector Host should be properly configured and running, with access to the manufacturing data collected from devices.
- Network Configuration: Confirm that network configurations allow for outbound communication from the Tulip Connector Host to AWS services.
Steps to Configure Tulip Connector Host to AWS Cloud:
Step 1: AWS DataSync for Data Synchronization
Configure AWS DataSync to synchronize data between the on-premises Tulip Connector Host and the AWS Cloud. This ensures that data consistency is maintained between the two environments.
# Sample Bash commands for AWS DataSync configuration
$ aws configure    # Set up AWS credentials
$ aws configure datasync    # Configure AWS DataSync

# Create and start a DataSync task
$ aws datasync create-task --source-location-arn <source_location_arn> --destination-location-arn <destination_location_arn>
$ aws datasync start-task-execution --task-arn <task_arn>
Step 2: AWS IoT SiteWise Integration
Integrate AWS IoT SiteWise to manage and analyze the industrial data collected by the Tulip Connector Host. Define models that represent the equipment, processes, and assets involved in the manufacturing processes.
# Sample Python code for AWS IoT SiteWise integration
import boto3

# Connect to AWS IoT SiteWise
client = boto3.client('iotsitewise')

# Define equipment model
equipment_model = {
    'name': 'MachineModel',
    'attributes': [
        {'name': 'Temperature', 'dataType': 'DOUBLE'},
        {'name': 'Pressure', 'dataType': 'DOUBLE'},
        # Add more attributes as needed
    ]
}

# Create equipment model
response = client.create_asset_model(
    assetModelName=equipment_model['name'],
    assetModelProperties=equipment_model['attributes']
)
Step 3: AWS Lambda for Data Processing
Utilize AWS Lambda for serverless data processing functions. These functions can be configured to process data received from the Tulip Connector Host in real-time, ensuring that it’s ready for storage and analysis.
# Sample Python code for AWS Lambda data processing
def lambda_handler(event, context):
    # Extract data from the event
    raw_data = event['raw_data']

    # Process data (add your processing logic)
    processed_data = process_data(raw_data)

    # Store processed data in the desired AWS service (S3, Neptune, Redshift, etc.)
    store_data_in_s3(processed_data)
    store_data_in_neptune(processed_data)
    store_data_in_redshift(processed_data)
    # ...

    return {
        'statusCode': 200,
        'body': 'Data processed successfully'
    }
Step 4: AWS IoT Greengrass for Edge Device Extension
Extend AWS services to edge devices using AWS IoT Greengrass. This enables bidirectional communication, allowing edge devices to interact seamlessly with AWS services.
# Sample Bash commands for AWS IoT Greengrass configuration
$ aws greengrass create-core-definition --name "MyCoreDefinition" --initial-version "1" --amzn-client-token "token"

$ aws greengrass create-device-definition --name "MyDeviceDefinition" --initial-version "1" --amzn-client-token "token"

$ aws greengrass create-group --name "MyGroup" --initial-version "1" --amzn-client-token "token" --core-definition-version "1" --device-definition-version "1"

# Add Lambda functions, subscriptions, and other resources to the Greengrass group
# ...

$ aws greengrass associate-service-role-to-account --role-name "Greengrass_ServiceRole"
These steps seamlessly connect the Tulip Connector Host to AWS services, enabling the efficient transmission of manufacturing data to the cloud. The integration of AWS DataSync, IoT SiteWise, Lambda, and IoT Greengrass forms a robust foundation for the subsequent stages of data processing, storage, and analytics within the AWS Cloud.
Data Processing and Storage in AWS: Unleashing the Power of Processing and Storage Services
With data seamlessly transmitted from the Tulip Connector Host to the AWS Cloud, the next critical phase involves processing and storing this data efficiently. AWS offers a suite of services, including AWS IoT SiteWise and AWS Lambda, which play pivotal roles in processing incoming data and directing it to appropriate storage solutions like Amazon S3, Amazon Neptune, Amazon Redshift, or other databases.
AWS IoT SiteWise for Industrial Data Management
AWS IoT SiteWise is a robust service designed explicitly for managing and analyzing industrial data at scale. It acts as a central hub for collecting, organizing, and processing data from various sources. Here’s how to integrate AWS IoT SiteWise into your workflow:
Step 1: Asset Modeling in AWS IoT SiteWise
Define models that represent the equipment, processes, and assets involved in your manufacturing processes. These models provide a structured framework for organizing and processing incoming data.
# Sample Python code for asset modeling in AWS IoT SiteWise
import boto3

# Connect to AWS IoT SiteWise
client = boto3.client('iotsitewise')

# Define equipment model
equipment_model = {
    'name': 'MachineModel',
    'attributes': [
        {'name': 'Temperature', 'dataType': 'DOUBLE'},
        {'name': 'Pressure', 'dataType': 'DOUBLE'},
        # Add more attributes as needed
    ]
}

# Create equipment model
response = client.create_asset_model(
    assetModelName=equipment_model['name'],
    assetModelProperties=equipment_model['attributes']
)
Step 2: Ingesting Data into AWS IoT SiteWise
Once models are defined, configure AWS IoT SiteWise to ingest data from the Tulip Connector Host. This involves mapping incoming data to the predefined asset models.
# Sample Python code for ingesting data into AWS IoT SiteWise
import boto3

# Connect to AWS IoT SiteWise
client = boto3.client('iotsitewise')

# Define data to be ingested
data_to_ingest = {
    'Temperature': 25.5,
    'Pressure': 100.2,
    # Add more data points as needed
}

# Ingest data into AWS IoT SiteWise
response = client.batch_put_asset_property_value(
    entries=[
        {
            'entryId': 'unique_entry_id',
            'assetId': 'asset_id',
            'propertyId': 'temperature_property_id',
            'propertyValues': [
                {
                    'timestamp': '2023-01-01T00:00:00Z',
                    'value': {'doubleValue': data_to_ingest['Temperature']}
                }
            ]
        },
        # Add more entries for other properties
    ]
)
AWS Lambda for Real-time Data Processing
AWS Lambda provides serverless computing capabilities, enabling the processing of data in real-time as it arrives from the manufacturing floor. Here’s how to leverage AWS Lambda for data processing:
Step 1: Create AWS Lambda Function
Define a Lambda function that contains the logic for processing incoming data. This can include data validation, transformation, and enrichment based on your specific requirements.
# Sample Python code for AWS Lambda data processing
def lambda_handler(event, context):
    # Extract data from the event
    raw_data = event['raw_data']

    # Process data (add your processing logic)
    processed_data = process_data(raw_data)

    # Store processed data in the desired AWS service (S3, Neptune, Redshift, etc.)
    store_data_in_s3(processed_data)
    store_data_in_neptune(processed_data)
    store_data_in_redshift(processed_data)
    # ...

    return {
        'statusCode': 200,
        'body': 'Data processed successfully'
    }
Step 2: Set up Event Sources
Configure event sources to trigger the Lambda function whenever new data arrives. This ensures that processing is initiated in real-time, allowing for swift insights and actions.
# Sample Bash commands for setting up Lambda event sources
$ aws lambda create-event-source-mapping --function-name MyLambdaFunction --event-source-arn arn:aws:sqs:us-east-1:123456789012:MyQueue
Storage in Amazon S3, Neptune, Redshift, or Other Databases
With data processed and enriched, it’s time to store it in the appropriate storage solutions based on your architecture and analytics requirements.
Storing Data in Amazon S3
Amazon S3 serves as a scalable and durable object storage solution. Store raw and processed data in S3 buckets, organizing it for easy retrieval and analysis.
# Sample Bash commands for storing data in Amazon S3
$ aws s3 cp processed_data.csv s3://my-s3-bucket/processed_data/
Storing Data in Amazon Neptune
For graph-based data relationships, Amazon Neptune provides an excellent solution. Store relevant data in Neptune for advanced querying and analysis.
# Sample Python code for storing data in Amazon Neptune
import boto3

# Connect to Amazon Neptune
client = boto3.client('neptune')

# Store data in Neptune
response = client.bulk_load_neptune(
    ...
)
Storing Data in Amazon Redshift
Amazon Redshift, a powerful data warehouse, is ideal for analytics and reporting. Store aggregated and transformed data in Redshift for efficient querying.
-- Sample SQL query for storing data in Amazon Redshift
COPY processed_data FROM 's3://my-s3-bucket/processed_data/' DELIMITER ',' CSV;
By seamlessly integrating AWS IoT SiteWise and AWS Lambda into your workflow, and efficiently storing data in Amazon S3, Neptune, Redshift, or other databases, you’ve created a robust foundation for advanced analytics and insights. The next steps involve utilizing real-time data streams, data cataloging, and leveraging analytics services for comprehensive insights into your manufacturing processes.
Real-time Analysis with Amazon Kinesis: Accelerating Decision-Making through Continuous Streaming
After processing and storing data in AWS, the next imperative is to enable real-time analysis to facilitate swift decision-making. Amazon Kinesis, a fully managed service, allows you to stream data continuously and perform real-time analytics. In this section, we’ll explore how to set up Amazon Kinesis for real-time analysis of your manufacturing data.
Prerequisites:
- Data Streaming Source: Ensure that your processed data from AWS IoT SiteWise, Lambda, or other services is ready for streaming.
- Amazon Kinesis Configuration: Set up an Amazon Kinesis stream to receive and process the streaming data.
Steps to Enable Real-time Analysis with Amazon Kinesis:
Step 1: Create an Amazon Kinesis Stream
Log in to the AWS Management Console, navigate to the Amazon Kinesis service, and create a new stream.
# Sample Bash commands for creating an Amazon Kinesis stream
$ aws kinesis create-stream --stream-name MyKinesisStream --shard-count 1
Ensure that the shard-count parameter is set appropriately based on your expected data volume and throughput.
Step 2: Produce Data to the Kinesis Stream
Configure your data processing service, such as AWS Lambda or another producer application, to publish processed data to the Amazon Kinesis stream.
# Sample Python code for publishing data to an Amazon Kinesis stream
import boto3

# Connect to Amazon Kinesis
client = boto3.client('kinesis')

# Publish data to the Kinesis stream
response = client.put_record(
    StreamName='MyKinesisStream',
    Data='{"temperature": 25.5, "pressure": 100.2}',
    PartitionKey='1'
)
Ensure that the PartitionKey is chosen appropriately to evenly distribute data across shards.
Step 3: Consume Data from the Kinesis Stream
Create consumers, such as AWS Lambda functions or applications, to process and analyze data from the Amazon Kinesis stream in real-time.
# Sample Python code for consuming data from an Amazon Kinesis stream
import boto3

# Connect to Amazon Kinesis
client = boto3.client('kinesis')

# Subscribe to the Kinesis stream
shard_iterator = client.get_shard_iterator(
    StreamName='MyKinesisStream',
    ShardId='shardId-000000000000',
    ShardIteratorType='LATEST'
)['ShardIterator']

# Continuously read and process data from the stream
while True:
    records = client.get_records(
        ShardIterator=shard_iterator,
        Limit=100
    )['Records']

    for record in records:
        process_real_time_data(record['Data'])

    # Update the shard iterator for the next set of records
    shard_iterator = client.get_shard_iterator(
        StreamName='MyKinesisStream',
        ShardId='shardId-000000000000',
        ShardIteratorType='AFTER_SEQUENCE_NUMBER',
        StartingSequenceNumber=records[-1]['SequenceNumber']
    )['ShardIterator']
This example assumes a simple continuous polling mechanism. Depending on your use case, you might want to consider AWS Lambda event sources, Kinesis Data Analytics, or other approaches for real-time data processing.
Step 4: Analyze and Respond in Real Time
Implement real-time analytics within your consuming application. This could involve running machine learning models, aggregating metrics, or triggering alerts based on predefined thresholds.
# Sample Python code for real-time analytics
def process_real_time_data(data):
    # Deserialize data
    data = json.loads(base64.b64decode(data).decode('utf-8'))

    # Perform real-time analytics
    analyze_temperature(data['temperature'])
    analyze_pressure(data['pressure'])

def analyze_temperature(temperature):
    # Implement temperature analysis logic
    if temperature > 30:
        trigger_alert('High temperature detected')

def analyze_pressure(pressure):
    # Implement pressure analysis logic
    if pressure > 120:
        trigger_alert('High pressure detected')

def trigger_alert(message):
    # Implement alerting mechanism (e.g., send notification, log to a system)
    print(f'ALERT: {message}')
By setting up Amazon Kinesis for real-time analysis, you’ve established a mechanism for continuous streaming and immediate insights into your manufacturing data. This enables prompt decision-making, allowing you to respond swiftly to changes on the manufacturing floor. The journey doesn’t end here; further stages involve data cataloging, advanced analytics, and visualization for a comprehensive understanding of your manufacturing processes.
Data Catalog and Preparation with AWS Glue: Orchestrating Data for In-Depth Analysis
As your manufacturing data flows seamlessly through various AWS services, the next crucial step is to catalog and prepare this data for downstream analysis. AWS Glue, a fully managed extract, transform, and load (ETL) service, plays a central role in automating the data preparation process. This section will guide you through the steps of leveraging AWS Glue to catalog and prepare your manufacturing data.
Prerequisites:
- Data Ingestion: Ensure that your data is available in the target storage solutions, such as Amazon S3, Amazon Neptune, or Amazon Redshift.
- AWS Glue Configuration: Set up an AWS Glue crawler to discover and catalog your data. Define ETL jobs to transform the data as needed.
Steps to Catalog and Prepare Data with AWS Glue:
Step 1: Set Up an AWS Glue Crawler
AWS Glue crawlers automatically discover and catalog metadata about your data. Create a crawler for each data store, specifying the location and format of the data.
# Sample Bash commands for setting up an AWS Glue crawler
$ aws glue create-crawler --name MyCrawler --role service-role/AWSGlueServiceRole \
  --database MyDatabase --targets S3Targets=[{Path='s3://my-s3-bucket/raw_data/'}]

# Start the crawler to catalog the data
$ aws glue start-crawler --name MyCrawler
Ensure the AWS Glue service role has the necessary permissions to access your data stores.
Step 2: Define AWS Glue Data Catalog Tables
After the crawler completes its task, review and define AWS Glue Data Catalog tables. These tables represent the structured metadata of your data, making it queryable using standard SQL queries.
-- Sample SQL commands for defining AWS Glue Data Catalog tables
CREATE EXTERNAL TABLE IF NOT EXISTS MyDatabase.MyTable (
  Temperature DOUBLE,
  Pressure DOUBLE,
  Timestamp TIMESTAMP
)
ROW FORMAT SERDE 'org.apache.hadoop.hive.serde2.lazy.LazySimpleSerDe'
WITH SERDEPROPERTIES (
  'serialization.format' = ',',
  'field.delim' = ','
)
LOCATION 's3://my-s3-bucket/raw_data/';
Adapt the table definition according to the schema and format of your data.
Step 3: Develop AWS Glue ETL Jobs
Create AWS Glue ETL jobs to transform and clean the data as required. These jobs can perform tasks such as filtering out irrelevant information, aggregating metrics, or joining data from different sources.
# Sample Python code for an AWS Glue ETL job
import sys
from awsglue.transforms import *
from awsglue.utils import getResolvedOptions
from pyspark.context import SparkContext
from awsglue.context import GlueContext
from awsglue.job import Job

# Boilerplate code for setting up the AWS Glue context
sc = SparkContext()
glueContext = GlueContext(sc)
spark = glueContext.spark_session
job = Job(glueContext)
args = getResolvedOptions(sys.argv, ['JOB_NAME'])
job.init(args['JOB_NAME'], args)

# Define the Glue ETL job
datasource = glueContext.create_dynamic_frame.from_catalog(
    database='MyDatabase',
    table_name='MyTable'
)

# Transformation logic (add your ETL transformations here)
transformed_data = ApplyMapping.apply(
    frame=datasource,
    mappings=[
        ('Temperature', 'double', 'temperature', 'double'),
        ('Pressure', 'double', 'pressure', 'double'),
        ('Timestamp', 'timestamp', 'timestamp', 'timestamp')
    ]
)

# Write the transformed data to a new location
glueContext.write_dynamic_frame.from_options(
    frame=transformed_data,
    connection_type='s3',
    connection_options={'path': 's3://my-s3-bucket/processed_data/'},
    format='parquet'
)

job.commit()
Adjust the transformation logic based on your specific data requirements.
Step 4: Schedule and Run AWS Glue ETL Jobs
Schedule AWS Glue ETL jobs to run at specified intervals or trigger them in response to events. This ensures that your data remains up-to-date and prepared for downstream analysis.
# Sample Bash commands for scheduling an AWS Glue ETL job
$ aws glue create-job --name MyETLJob --role service-role/AWSGlueServiceRole \
  --command Name=glueetl,ScriptLocation=s3://my-s3-bucket/etl_script.py

# Schedule the job to run hourly
$ aws glue create-schedule --schedule MyHourlySchedule --job-name MyETLJob \
  --cron-expression '0 * * * ? *'
By utilizing AWS Glue to catalog and prepare your manufacturing data, you’ve established a structured and queryable foundation for downstream analysis. The cataloged data is now ready for exploration using tools such as Amazon Athena, Amazon Redshift, Amazon OpenSearch Service, and Amazon QuickSight. The journey continues as we explore these analytics services for in-depth insights into your manufacturing processes.
Analytics with Athena, Redshift, OpenSearch, and QuickSight: Unleashing the Power of AWS Analytics Services
With your manufacturing data cataloged and prepared, the next phase involves extracting meaningful insights through analytics. Amazon Athena, Amazon Redshift, Amazon OpenSearch Service, and Amazon QuickSight are powerful AWS services tailored for diverse analytics needs. This section will guide you through utilizing these services to derive valuable insights from your structured manufacturing data.
Prerequisites:
- Cataloged Data: Ensure that your manufacturing data is cataloged in AWS Glue Data Catalog, making it accessible for analytics services.
- AWS Account: Have an active AWS account with the necessary permissions to create and configure AWS services.
Analytics with Amazon Athena:
Amazon Athena allows you to query your data in Amazon S3 using standard SQL queries without the need for complex ETL processes.
Step 1: Create a Table in Athena
Define an Athena table based on your cataloged data.
-- Sample SQL command for creating an Athena table
CREATE EXTERNAL TABLE IF NOT EXISTS my_database.my_athena_table (
  temperature DOUBLE,
  pressure DOUBLE,
  timestamp TIMESTAMP
)
STORED AS PARQUET
LOCATION 's3://my-s3-bucket/processed_data/';
Step 2: Run Queries in Athena
Execute SQL queries in Athena to analyze your manufacturing data.
-- Sample SQL query for average temperature by hour
SELECT
  DATE_TRUNC('hour', timestamp) AS hour,
  AVG(temperature) AS avg_temperature
FROM
  my_database.my_athena_table
GROUP BY
  DATE_TRUNC('hour', timestamp)
ORDER BY
  hour;
Analytics with Amazon Redshift:
Amazon Redshift is a fully managed data warehouse service that enables high-performance analytics.
Step 1: Load Data into Amazon Redshift
Load your processed data from Amazon S3 into Amazon Redshift.
-- Sample SQL command for loading data into Amazon Redshift
COPY my_redshift_table
FROM 's3://my-s3-bucket/processed_data/'
CREDENTIALS 'aws_access_key_id=<your_access_key>;aws_secret_access_key=<your_secret_key>'
FORMAT PARQUET;
Step 2: Run Queries in Redshift
Execute SQL queries in Amazon Redshift to perform complex analytics on your manufacturing data.
-- Sample SQL query for finding the maximum pressure by machine
SELECT
  machine_id,
  MAX(pressure) AS max_pressure
FROM
  my_redshift_table
GROUP BY
  machine_id
ORDER BY
  max_pressure DESC;
Analytics with Amazon OpenSearch Service:
Amazon OpenSearch Service (formerly Amazon Elasticsearch Service) is ideal for searching and analyzing large volumes of log data.
Step 1: Index Data in OpenSearch
Create an index in Amazon OpenSearch Service to index your manufacturing data.
// Sample JSON payload for indexing data in Amazon OpenSearch Service
POST /my_index
{
  "mappings": {
    "properties": {
      "temperature": { "type": "double" },
      "pressure": { "type": "double" },
      "timestamp": { "type": "date" }
    }
  }
}
Step 2: Run Queries in OpenSearch
Execute queries in Amazon OpenSearch Service’s Query DSL to gain insights into your manufacturing data.
// Sample JSON query for finding anomalies in temperature
POST /my_index/_search
{
  "query": {
    "bool": {
      "filter": {
        "range": {
          "temperature": { "gt": 30 }
        }
      }
    }
  }
}
Analytics with Amazon QuickSight:
Amazon QuickSight is a fully managed business intelligence service for creating interactive dashboards and visualizations.
Step 1: Connect QuickSight to Data Sources
Connect Amazon QuickSight to your data sources, such as Athena, Redshift, or S3.
Step 2: Create Dashboards and Visualizations
Design interactive dashboards and visualizations in Amazon QuickSight to convey insights effectively.
-- Sample SQL query for Amazon QuickSight dataset
SELECT
  timestamp,
  temperature,
  pressure
FROM
  my_database.my_athena_table;
By leveraging Amazon Athena, Amazon Redshift, Amazon OpenSearch Service, and Amazon QuickSight, you can unlock a spectrum of analytics capabilities. Whether you’re running ad-hoc queries in Athena, performing complex analytics in Redshift, searching for patterns in OpenSearch, or creating interactive dashboards in QuickSight, these services empower you to gain actionable insights and make informed decisions based on your manufacturing data. The final stages involve extending the solution with real-time data streams, machine learning, and further optimizations to enhance your manufacturing processes continuously.
Edge Device Connectivity with AWS IoT Greengrass: Empowering Edge Intelligence
AWS IoT Greengrass provides a powerful framework for extending AWS services to edge devices, enabling seamless bidirectional communication and fostering edge intelligence. This section will guide you through the process of setting up AWS IoT Greengrass to connect and empower your edge devices.
Prerequisites:
- Edge Devices: Ensure that your edge devices are configured and equipped with AWS IoT Greengrass Core software.
- AWS IoT Greengrass Group: Set up an AWS IoT Greengrass Group to manage the deployment of AWS Lambda functions and other resources to your edge devices.
- AWS IoT Greengrass Core Device Configuration: Configure the AWS IoT Greengrass Core device on each edge device with the necessary security credentials and permissions.
Steps for Edge Device Connectivity with AWS IoT Greengrass:
Step 1: Set Up an AWS IoT Greengrass Group
Log in to the AWS Management Console, navigate to AWS IoT Greengrass, and create a new Greengrass Group.
# Sample Bash commands for creating an AWS IoT Greengrass Group
$ aws greengrass create-group --name MyGreengrassGroup --region us-east-1
Step 2: Create an AWS IoT Greengrass Core Device
Register each edge device as an AWS IoT Greengrass Core device within the Greengrass Group.
# Sample Bash commands for registering an AWS IoT Greengrass Core device
$ aws greengrass create-core-definition --name MyCoreDefinition --initial-version 1
$ aws greengrass create-device-definition --name MyDeviceDefinition --initial-version 1
$ aws greengrass create-group-version --group-id <your_group_id> --core-definition-version 1 --device-definition-version 1
Ensure that each edge device’s AWS IoT Greengrass Core software is installed and configured with the necessary certificates and AWS IoT Greengrass Group information.
Step 3: Deploy AWS Lambda Functions and Resources
Develop AWS Lambda functions that encapsulate your edge device logic. These functions will run locally on the edge devices, allowing them to process data and communicate with AWS services.
# Sample Python code for an AWS Lambda function
import greengrasssdk

client = greengrasssdk.client('iot-data')

def lambda_handler(event, context):
    # Process data or perform edge-specific tasks
    processed_data = process_data(event['data'])

    # Send processed data to AWS IoT Core
    client.publish(
        topic='processed_data_topic',
        payload=processed_data
    )

    return {
        'statusCode': 200,
        'body': 'Data processed and sent to AWS IoT Core'
    }
Deploy the AWS Lambda functions and any required resources to the AWS IoT Greengrass Group.
# Sample Bash commands for deploying AWS Lambda functions
$ aws greengrass create-function-definition --name MyFunctionDefinition --initial-version 1
$ aws greengrass create-deployment --group-id <your_group_id> --deployment-type NewDeployment
Step 4: Establish Bidirectional Communication
AWS IoT Greengrass facilitates bidirectional communication between edge devices and AWS services. Ensure that your AWS Lambda functions on edge devices can communicate with AWS IoT Core, Amazon S3, or any other AWS services as needed.
# Sample Python code for bidirectional communication in an AWS Lambda function
import greengrasssdk
import boto3

client = greengrasssdk.client('iot-data')
s3_client = boto3.client('s3')

def lambda_handler(event, context):
    # Process data or perform edge-specific tasks
    processed_data = process_data(event['data'])

    # Send processed data to AWS IoT Core
    client.publish(
        topic='processed_data_topic',
        payload=processed_data
    )

    # Upload data to Amazon S3
    s3_client.put_object(
        Bucket='my-s3-bucket',
        Key='processed_data.txt',
        Body=processed_data
    )

    return {
        'statusCode': 200,
        'body': 'Data processed and sent to AWS IoT Core and Amazon S3'
    }
Step 5: Monitor and Manage Edge Devices
Utilize the AWS IoT Greengrass Console or AWS CLI to monitor and manage the status of edge devices in your AWS IoT Greengrass Group.
# Sample Bash commands for managing AWS IoT Greengrass devices
$ aws greengrass list-group-versions --group-id <your_group_id>
$ aws greengrass get-device-definition --device-definition-id <your_device_definition_id>
$ aws greengrass list-deployments --group-id <your_group_id>
By extending AWS services to edge devices using AWS IoT Greengrass, you’ve enabled seamless bidirectional communication. This empowers your edge devices to process data locally, respond to events, and communicate with AWS services, fostering edge intelligence. The next steps involve integrating the edge devices with the broader AWS ecosystem, leveraging real-time data streams, and exploring additional AWS services for enhanced edge computing capabilities.
Tulip SaaS Platform Interaction: Bridging the Gap Between MES and AWS Services
The Tulip SaaS Platform integration with AWS services is a key component in establishing a cohesive Manufacturing Execution System (MES) environment. Enabling interaction between Tulip and AWS through APIs allows for seamless data exchange and coordination. This section outlines the steps to facilitate a robust MES environment by connecting the Tulip SaaS Platform with AWS services.
Prerequisites:
- Tulip SaaS Platform Account: Ensure that you have access to the Tulip SaaS Platform and necessary credentials.
- AWS Account: Have an active AWS account with the required permissions to create and configure AWS services.
Steps for Tulip SaaS Platform Interaction:
Step 1: Set Up AWS API Gateway
AWS API Gateway acts as a bridge between Tulip and various AWS services. Create an API in API Gateway to expose endpoints that Tulip can call to interact with AWS services.
# Sample Bash commands for creating an API in AWS API Gateway
$ aws apigateway create-rest-api --name MyAPI
Define resources and methods within the API to represent the actions Tulip can perform.
# Sample Bash commands for creating resources and methods in AWS API Gateway
$ aws apigateway create-resource --rest-api-id <api_id> --parent-id <parent_resource_id> --path-part resource
$ aws apigateway put-method --rest-api-id <api_id> --resource-id <resource_id> --http-method POST
Step 2: Set Up AWS Lambda Functions
Develop AWS Lambda functions to encapsulate the logic for interactions between Tulip and AWS services.
# Sample Python code for an AWS Lambda function
import boto3

def lambda_handler(event, context):
    # Process data or perform specific tasks
    processed_data = process_data(event['data'])

    # Perform actions on AWS services (e.g., store data in S3, publish to an SNS topic)
    s3_client = boto3.client('s3')
    s3_client.put_object(
        Bucket='my-s3-bucket',
        Key='processed_data.txt',
        Body=processed_data
    )

    sns_client = boto3.client('sns')
    sns_client.publish(
        TopicArn='arn:aws:sns:us-east-1:123456789012:MyTopic',
        Message='Data processed successfully'
    )

    return {
        'statusCode': 200,
        'body': 'Data processed and actions performed on AWS services'
    }
Step 3: Integrate Tulip with AWS API Gateway
In the Tulip SaaS Platform, configure HTTP connectors or API calls to interact with the API Gateway endpoints.
- HTTP Connectors in Tulip: Create HTTP connectors in Tulip that call the API Gateway endpoints, specifying the necessary parameters and authentication details.
# Sample YAML configuration for an HTTP connector in Tulip
connector_id: my_http_connector
url: https://<api_gateway_endpoint>/resource
method: POST
headers:
  Content-Type: application/json
body:
  data: "{{context.data}}"
Step 4: Configure AWS API Gateway Integration
Integrate the API Gateway with AWS Lambda functions to execute the logic when Tulip makes API calls.
# Sample Bash commands for integrating AWS Lambda with API Gateway
$ aws apigateway put-integration --rest-api-id <api_id> --resource-id <resource_id> --http-method POST --type AWS_PROXY --integration-http-method POST --uri arn:aws:apigateway:<region>:lambda:path/2015-03-31/functions/<lambda_function_arn>/invocations
Step 5: Test Integration
Perform tests in Tulip to ensure successful communication between the Tulip SaaS Platform and AWS services through the configured API Gateway.
By enabling the Tulip SaaS Platform to interact with AWS services through APIs, you’ve established a seamless connection between your MES environment and the broader AWS ecosystem. This integration opens the door for real-time data exchange, advanced analytics, and coordinated actions between Tulip and AWS. The next stages involve leveraging AWS services for comprehensive analytics, visualization, and continuous optimization of your manufacturing processes.
Operator Interface with Tulip Player: Empowering Operators for Efficient Manufacturing Control
The Tulip Player serves as a powerful tool to provide operators with a user-friendly interface, facilitating the monitoring and control of manufacturing processes. This section outlines the steps to set up the Tulip Player, enabling operators to interact with and oversee various aspects of the manufacturing environment.
Prerequisites:
- Tulip SaaS Platform Account: Ensure that you have access to the Tulip SaaS Platform and necessary credentials.
- Tulip App Design: Have Tulip Apps designed to represent the workflows and processes that operators need to monitor and control.
Steps for Operator Interface with Tulip Player:
Step 1: Design Tulip Apps
Utilize the Tulip App Builder to design intuitive and user-friendly applications that represent different aspects of the manufacturing process. These apps can include data visualization dashboards, control panels, and workflows tailored to the needs of operators.
Step 2: Deploy Apps to Tulip Player
Deploy the designed Tulip Apps to the Tulip Player. This involves configuring the apps for deployment, specifying which devices or stations they should run on, and ensuring that the relevant operators have the necessary access.
# Sample YAML configuration for deploying Tulip Apps to Tulip Player
apps:
  - app_id: my_dashboard_app
    device_ids:
      - device_id_1
      - device_id_2
Step 3: Install and Configure Tulip Player on Devices
Install the Tulip Player on devices that operators will use. Configure the Tulip Player to connect to the Tulip SaaS Platform and retrieve the deployed apps.
# Sample Bash commands for installing and configuring Tulip Player
$ tulip-player install
$ tulip-player configure --username <your_username> --password <your_password>
Step 4: Provide Operator Training
Train operators on how to use the Tulip Player interface. Ensure they understand the functionalities of each app, including how to monitor real-time data, input information, and control manufacturing processes.
Step 5: Monitor and Control Processes
Operators can now use the Tulip Player interface to monitor manufacturing processes, view analytics, and control various aspects of the production line. This may include starting or stopping machines, inputting quality control data, and responding to alerts or notifications.
By setting up the Tulip Player as the operator interface, you empower operators with a versatile tool to monitor and control manufacturing processes efficiently. The user-friendly interface, coupled with the flexibility of Tulip Apps, enables operators to make informed decisions in real-time, contributing to the overall effectiveness and quality of the manufacturing environment. The next steps involve continuous optimization, feedback loops, and potential integrations with other MES components for a comprehensive manufacturing control system.
Customer Access: Fostering Transparency and Collaboration through Web and Mobile Platforms
Enabling customer access to your manufacturing platform via web browsers and mobile devices is a strategic move towards enhancing transparency, collaboration, and customer satisfaction. This section outlines the steps to provide customers with access to the platform, facilitating real-time visibility into manufacturing processes and fostering collaborative opportunities.
Prerequisites:
- Security Measures: Ensure robust security measures are in place to protect sensitive manufacturing data while allowing controlled customer access.
- User Authentication: Implement secure user authentication mechanisms to verify the identity of customers accessing the platform.
Steps for Customer Access:
Step 1: Develop Customer-Facing Dashboards
Design customer-facing dashboards within the Tulip SaaS Platform that offer relevant insights into manufacturing processes. These dashboards should present key performance indicators (KPIs), production metrics, and any other information pertinent to customer interests.
Step 2: Configure User Roles and Permissions
Define distinct user roles and permissions for customers within the Tulip SaaS Platform. This ensures that customers have access only to the data and functionalities relevant to their needs, maintaining data security and confidentiality.
# Sample YAML configuration for user roles and permissions in Tulip SaaS Platform
roles:
  - role_id: customer
    permissions:
      - view_real_time_data
      - access_production_reports
Step 3: Implement Multi-Factor Authentication (MFA)
Enhance the security of customer access by implementing multi-factor authentication. This additional layer of security ensures that only authorized individuals can log in, even if credentials are compromised.
Step 4: Develop Responsive Web Interface
Create a responsive web interface for customers to access the platform through web browsers. This ensures a seamless and user-friendly experience across various devices, from desktops to tablets and smartphones.
Step 5: Build Mobile Applications
Develop mobile applications for iOS and Android platforms, offering customers the flexibility to access the platform on the go. These applications should provide a condensed yet comprehensive view of manufacturing processes and key metrics.
Step 6: Enable Real-Time Collaboration Features
Implement real-time collaboration features within the platform, allowing customers to communicate with your team, submit requests, or receive updates. This fosters a collaborative environment and strengthens the partnership between your manufacturing operation and your customers.
Step 7: Conduct User Training
Provide comprehensive training sessions for customers to familiarize them with the platform’s features and functionalities. This ensures that customers can maximize the benefits of real-time data access and collaboration opportunities.
Step 8: Monitor and Gather Feedback
Regularly monitor customer interactions with the platform and gather feedback to identify areas for improvement. Continuous improvement based on customer input ensures that the platform remains aligned with customer expectations.
By allowing customers access to the manufacturing platform through web browsers and mobile devices, you not only enhance transparency but also open the door for collaborative opportunities. This customer-centric approach promotes a more informed and engaged partnership, leading to improved customer satisfaction and loyalty. As the manufacturing landscape evolves, continued collaboration with customers will be crucial for staying ahead in the industry.
Conclusion
In the journey to transform manufacturing processes through the integration of Tulip’s Next-Gen MES (Manufacturing Execution System) with the power of Amazon Web Services (AWS), a comprehensive and strategic approach has been outlined in the preceding steps. This tutorial has guided you through the entire process, from on-premises data collection using Tulip devices to the seamless integration with a multitude of AWS services for data processing, storage, analytics, and more. Let’s summarize the key takeaways:
Key Achievements:
- Data Flow Architecture: You’ve established a robust data flow architecture, starting from on-premises Tulip devices and edge devices, passing through the Tulip Connector host, and seamlessly integrating with various AWS services in the cloud.
- AWS Service Integration: Leveraging AWS services such as AWS IoT SiteWise, Amazon S3, AWS Lambda, Amazon Kinesis, AWS Glue, Amazon Redshift, and many others, you’ve created a comprehensive ecosystem for managing, processing, and analyzing manufacturing data.
- Real-time and Batch Processing: Through services like AWS IoT SiteWise, AWS Lambda, and Amazon Kinesis, you’ve enabled both real-time and batch processing capabilities, ensuring timely insights and analytics.
- Edge Device Connectivity: AWS IoT Greengrass has been utilized to extend AWS services seamlessly to edge devices, ensuring bidirectional communication and local data processing.
- User Interfaces and Interaction: The Tulip SaaS Platform, along with Tulip Player, has been integrated, providing a user-friendly interface for operators to monitor and control manufacturing processes.
- Customer Access and Collaboration: Customers have been granted access to the platform through web browsers or mobile devices, fostering transparency and collaboration opportunities.
- Practical Steps for On-Premises and AWS Cloud Setup: Detailed steps for both on-premises and AWS cloud setup have been provided, covering aspects from architecture definition to server installation, monitoring, and disaster recovery planning.
- Continuous Improvement and Optimization: A plan for continuous monitoring, optimization, and feedback loops has been outlined, ensuring that the manufacturing environment stays responsive, secure, and cost-effective over time.
Future Steps:
As manufacturing processes and technology continue to evolve, staying abreast of the latest advancements in Tulip, AWS, and related technologies is crucial. Continuous training, documentation updates, and user feedback will be integral to adapting to changing requirements and maintaining a cutting-edge manufacturing environment.
In conclusion, the integration of Tulip’s MES with AWS presents an exciting opportunity to revolutionize manufacturing processes, unlocking new levels of efficiency, analytics, and collaboration. By following the steps outlined in this tutorial and embracing a culture of continuous improvement, you’re well-positioned to navigate the dynamic landscape of manufacturing technology and turn your data into gold. Whether you’re optimizing processes, ensuring data security, or enhancing collaboration, the combination of Tulip and AWS provides a powerful platform for innovation in the manufacturing sector.
Want to connect?
https://www.linkedin.com/in/timothy-ugbaja-acfellow-osl-006b111a/
https://www.facebook.com/evangtimugbaja
https://twitter.com/TimothyUgbaja
Contact me if you have any issue for further assistance.


