
Transmit Network Data Using Volley in Android
An HTTP library that makes networking for Android apps easier and, most importantly, faster
By reading this article, you will learn to call REST API directly from an Android application. We will be using an HTTP library called Volley that is officially supported by Android.
Based on the feedback from one of the readers, Google has moved away from this library and no longer actively updating it. The last release is on July 17, 2018. Kindly take this into consideration if you are planning on using it inside your project.
According to the official documentation,
“Volley excels at RPC-type operations used to populate a UI, such as fetching a page of search results as structured data. It integrates easily with any protocol and comes out of the box with support for raw strings, images, and JSON. By providing built-in support for the features you need, Volley frees you from writing boilerplate code and allows you to concentrate on the logic that is specific to your app.”
The documentation lists the following benefits:
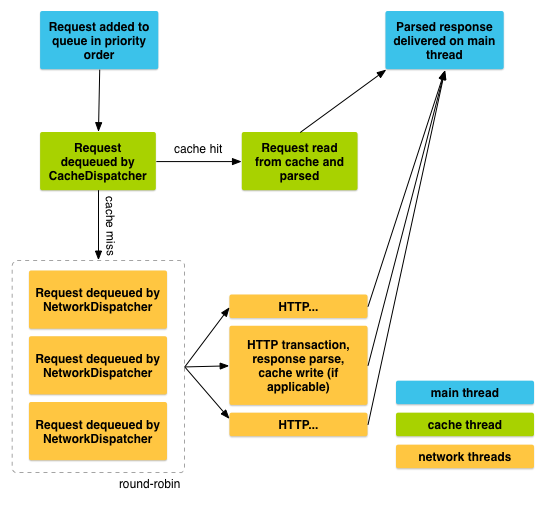
- Automatic scheduling of network requests
- Multiple concurrent network connections
- Transparent disk and memory response caching with standard HTTP cache coherence
- Support for request prioritization
- Cancellation request API. You can cancel a single request, or you can set blocks or scopes of requests to cancel
- Ease of customization, for example, for retry and backoff
- Strong ordering that makes it easy to correctly populate your UI with data fetched asynchronously from the network
- Debugging and tracing tools
Hence, Volley is an extremely useful library for calling REST API and transmitting network data. However, Volley is not suitable for large downloads or streaming operations since it stores all responses in memory during parsing. Kindly consider other alternatives such as Download Manager if you are looking for streaming operations.
There are three sections in this tutorial:
- Setup
- Implementation
- Conclusion
1. Setup
Make sure that you have installed Android Studio and the necessary SDK for development. Head over to the build.gradle (Module: app) and add the following code inside dependencies:
implementation 'com.android.volley:volley:1.1.1'Sync the gradle file and wait for it to finish. Add the following permission in the AndroidManifest.xml. We will need internet access for sending network data.
<uses-permission android:name="android.permission.INTERNET"/>Let’s proceed to the next section to kick-start your Android project.
2. Implementation
We will be setting up a RequestQueue class that serves as a service to our application. Let’s create a new class called RequestSingleton.java. It’s highly recommended to use the singleton approach, which is a lot more efficient.
Import
Add the following import into the class.
import android.content.Context;
import android.graphics.Bitmap;

import com.android.volley.DefaultRetryPolicy;
import com.android.volley.Request;
import com.android.volley.RequestQueue;
import com.android.volley.toolbox.StringRequest;
import com.android.volley.toolbox.Volley;
Initialization
Initialize the following variables inside your class.
private static RequestSingleton instance;
private RequestQueue requestQueue;
private static Context ctx;
Singleton object
Create a synchronized method called getInstance. We pass along a Context object as parameter. We will be calling this method to get the singleton.
public static synchronized RequestSingleton getInstance(Context context) {
    if (instance == null) {
        instance = new RequestSingleton(context);
    }
    return instance;
}
Constructor
Create the constructor for RequestSingleton with the following initialization. (You will see an error as the getRequestQueue function is not implemented yet.)
private RequestSingleton(Context context) {
    ctx = context;
    requestQueue = getRequestQueue();

}
Implement the missing getRequestQueue method with the following code.
public RequestQueue getRequestQueue() {
    if (requestQueue == null) {
        requestQueue = Volley.newRequestQueue(ctx.getApplicationContext());
    }
    return requestQueue;
}
Generic request method
Once you’re done, continue adding the following generic function to ensure that our singleton will be able to support all kinds of Request.
public <T> void addToRequestQueue(Request<T> req) {
    //retry policy

    getRequestQueue().add(req);
}
You can set the RetryPolicy to prevent it from timing out if the API call takes quite some time to finish. Add the following under the comment to set the timeout to one second.
req.setRetryPolicy(new DefaultRetryPolicy(
        1000,
        DefaultRetryPolicy.DEFAULT_MAX_RETRIES,
        DefaultRetryPolicy.DEFAULT_BACKOFF_MULT))
It accepts the following parameters:
Timeout— Specifies socket timeout in milliseconds per every retry attemptNumber Of Retries— Number of times retry is attemptedBack Off Multiplier— A multiplier that’s used to determine exponential time set to socket for every retry attempt
StringRequest
Head back to MainActivity.java and add a new function. It accepts a String input parameter. Let’s try a simple GET call using the built-in StringRequest. Create a new StringRequest object. There will be two listener events, in which you successfully get the response or the request has failed. Add the object via the addToRequestQueue method.
Make a call to ConnectURL and pass in a valid URL. You should be able to see the feedback from the server.
JSONObjectRequest
If you are going to do a POST request with JSON data, you will need to construct a JSONObject beforehand. Add the following import at the top part of your project.
import org.json.JSONException;
import org.json.JSONObject;
Create a new function and initialize a JSONObject. You need to call the put function to insert the data into it. It is required to wrap it inside a try-catch block to capture the JSONException error. Modify the data accordingly based on the accepted input of the POST call. You can even pass it in via the input parameters of the function. The rest of the implementation is similar to StringRequest, with the only exception being that you will pass the jsonObj variable when creating the JsonObjectRequest.
You can test it out by calling the ConnectURLJson function and passing in a valid URL.
JSONObjectRequest with Image
Sending image data is a bit tricky and requires a conversion into Base64. First and foremost, get the respective bitmap from your ImageView or any local files. Convert it to byte arrays and encode it via the java.util.Base64 function. It is now in string format, and you can easily add it into the JSONObject.
The encoded string needs to be decoded in the server back into the correct format.
3. Conclusion
Let’s recap what we have learned today. We started off with a simple setup by adding the library inside the gradle file. Then, we added the required internet permission inside AndroidManifest.xml.
Then we created a new singleton class that provides a generic method for us to add all kinds of Request.
In the implementation part, we tried out three different ways. The first is a simple GET call using the StringRequest. It was followed by a POST call that accepts a JSONObject. Lastly, we also tried sending image data in the form of a Base64 string.
Thanks for reading this article. Hope to see you again in the next article!


