
SYSTEM DESIGN
5 Must-Know Rate Limiting Tactics to Maximize Your Traffic Flow
Rate limiting defines the maximum number of requests a system can handle over a specified time frame.
If you found the infographic helpful, please give it a 👏 to let me know. I’d also love to hear any feedback you have.
Rate limiting is a strategy I’ve used to define the maximum number of requests a system can handle over a set time frame.
“Why did I ever feel the need to put such restrictions?”
There are a few core reasons I’ve found rate limiting indispensable in my work:
- Defensive strategy: It’s not just about controlling traffic, it’s about safeguarding the system from threats like DDoS attacks and potential abuse. Also, unrestricted requests can sometimes be a gateway for attackers to exploit vulnerabilities.
- Ensuring fairness: I can ensure that the system performs optimally for everyone, make sure every user gets a fair share of the system’s resources.
- Tiered access: higher request limits for premium users, and a standard limit for those on a free tier.
When it comes to choosing an algorithm, I’ve come across several.
Picking the right one is crucial and it should align with the specific needs of your system and the challenges you’re aiming to address.
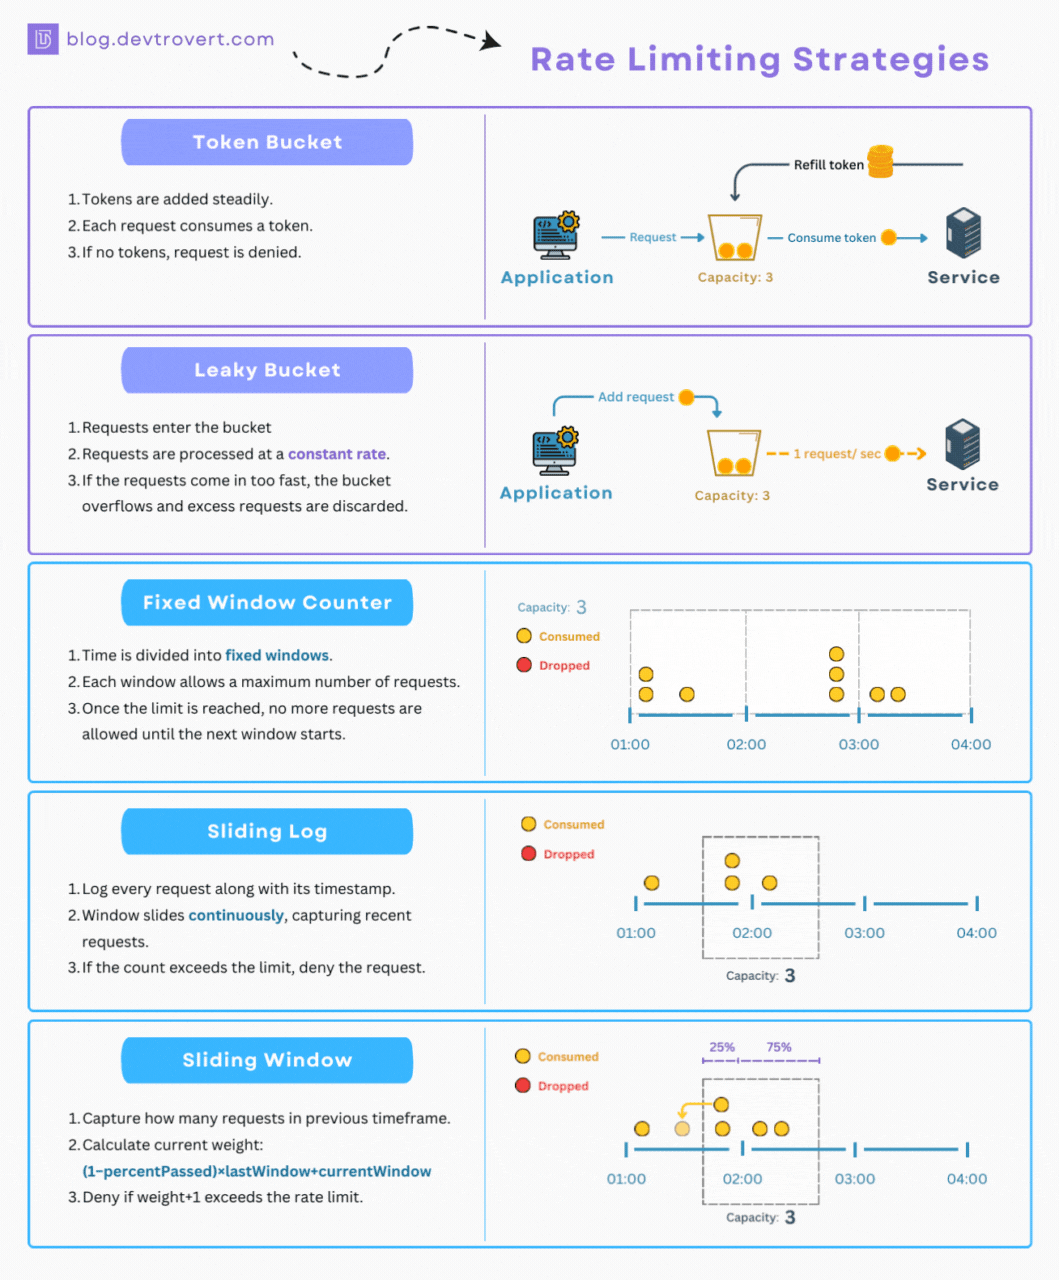
1. Token Bucket
When it comes to rate limiting, there’s a method I often find myself turning to due to its simplicity, and for this illustration, I’ll set it up at the user level.
“So, what exactly does ‘at the user level’ mean here?”
In essence, it denotes that the rate limits are tailored for each individual user, ensuring a unique limit tailored to them.
Imagine, if you will, that every user is handed a bucket with a capacity for 5 tokens and each time a user makes a request, 1 token is consumed. In a period of 10 minutes, the system is designed to refill up to 3 tokens in each respective bucket.
If a user’s bucket is empty, they won’t be able to make any further requests until some tokens are added back in.
Here’s a breakdown based on my configuration:
- Bucket limit: 5 tokens.
- Request usage: 1 token.
- Refill rate: 10 minutes/ 3 tokens.
Pros
- A key advantage I’ve observed with this approach is that it’s quite resource-efficient. It’s light on memory and doesn’t strain the CPU too much.
“You mentioned a refill every 10 minutes. Isn’t that resource-intensive if we have, say, 10 million users?”
Rather than continuously refilling tokens for each user, you can lean into a lazy refill strategy. This means you only update the token count when a user actually submits a request.
- On top of that, the method is relatively straightforward to implement.
- It’s designed to support burst behavior. In periods of inactivity, the tokens accrue up to their maximum limit, enabling users to occasionally make multiple requests in quick succession.
Cons
- Adjusting the parameters can be a bit of a balancing act, so determining the ideal bucket size, refill rate, and request usage might take some experimentation.
- While the allowance for bursts can be advantageous, it has its pitfalls. There’s the potential risk of users making a flurry of requests in a short time frame
To avoid bursts, we can apply the Leaky Bucket strategy for a more consistent workflow.
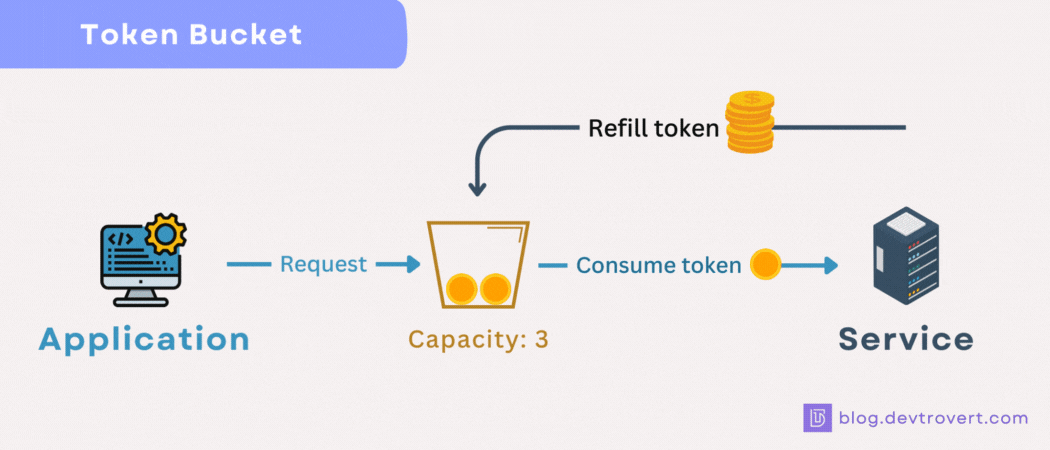
2. Leaky Bucket
While the token bucket processes each request swiftly, the leaky bucket takes a different approach. For this method, every request has a fixed processing time.
Think of the leaky bucket as operating like a queue, if the queue reaches its capacity, any incoming requests get turned away.
“But why give it the name ‘leaky bucket’? Where’s the leak in this?”
Picture this, a bucket with a tiny hole at its base, letting water drip out steadily. If you pour water into the bucket faster than it can leak out, what do you think will happen?
Exactly, it overflows, and any excess water, just like our excess requests, gets discarded.
How it works?
We’ll start with a bucket that can hold a maximum of 10 units, every request takes 1 second to process.
- Time 0s: Bucket is empty.
- Time 1s: You pour 8 units into the bucket and now it has
8units now. - Time 2s: 1 unit leaks out,
7units left. - Time 4s: With
6units remaining, we try adding 5 but only 4 can fit, causing 1 to overflow. The bucket is now full at 10 units.
Pros
- Implementation is straightforward, in many ways, it’s even simpler than the token bucket.
- Smooth out the burst, so there is no burst, client can be hurry but we always calm.
Cons
- Not the best fit for handling bursts, such as during special events or holidays.
- Too many discarded requests might become problematic
“But what about a read request that only lasts 100ms when our drain rate is set at 1s?”
The request would still require 1 second.
Though, one could adjust the settings: allowing for requests under 1 second to process at their natural speed.
However, doing so might prompt users to flood the system, negating the leaky bucket’s advantages, perhaps another approach might suit better in such a scenario.
“And if we have a slower request, say 1s, but the bucket’s drain rate is just 200ms?”
The bucket continues to release that request, but this could be an indicator that our drain rate might be set too low, so tread with caution.
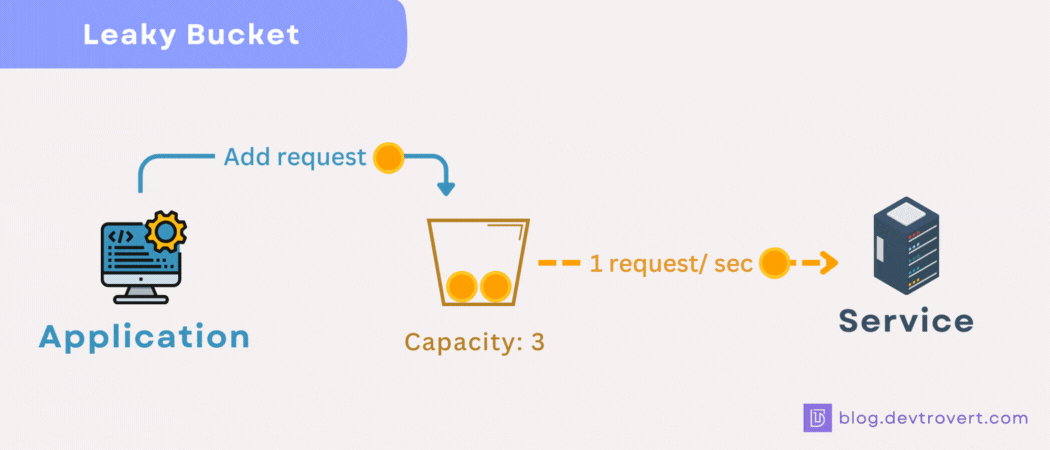
3. Fixed Window Counter
Moving to time-based algorithms, let’s discuss the Fixed Window Counter. While it might sound different, we can still use our familiar metaphor of the “bucket” and “token” to explain the concept.
Every hour (and this timing is crucial), clients are given an empty request bucket. Each time they make a request, a token is dropped into this bucket. Once the bucket is full, no more requests are allowed.
(You might picture clients starting off with a bucket full with tokens, and each request takes one away, no tokens left means no further requests.)
“But how does this differ from the token bucket method?”
I understand the confusion, both methods seem to allocate tokens over time.
Fixed Window Counter doesn’t account for past token usage when the hour wraps up, the counter resets to 0, irrespective of past activity. In contrast, the token bucket method refills based on remaining tokens: previous_tokens += refill_rate (but always within its maximum capacity).
How it works?
We’re working with a 1-minute window and our counter’s upper limit is set at 10
- Time 0s: The counter at 0, a client sends in 5 requests, bumping the counter to
5. - Time 10s: 3 more requests, pushing the counter to
8. - Time 30s: Another 2 requests, our counter tops out at 10 and that’s it, the limit for this window.
- Time 40s: A client attempts another request, but it’s turned down, the limit has been reached.
- Time 60s: A new window begins, resetting our counter to 0.
Pros
- This method is easy to implement and monitor.
- As soon as the time window starts over, clients can send a full set of requests right away, allowing burst behavior.
Cons
- There’s a chance for a burst of requests right at the boundary.
- Users have to wait until the reset to make a request
For instance, with a 1-hour window and a 10 request limit, a client could make 20 requests at the exact transition between 7:59:59 and 8:00:00
4. Sliding Log
Think of the sliding log as a better version of the fixed window. It’s designed to handle the problem of too many requests at the window’s edge.
Rather than sticking to a rigid window, this one slides along with time.
For each incoming request, our system will make a quick note of its timestamp. Every new request prompts a swift look-back to see ‘how many requests came in the past N seconds.
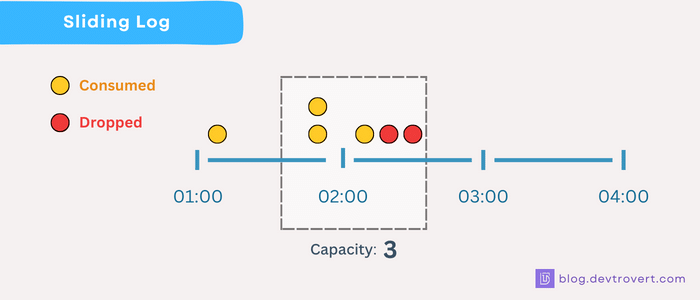
How it works
Imagine we set our window to 10 seconds and limit it to 3 requests, which means only 3 requests are allowed in any given 10-second span.
- Time 0s: : A request comes in, and we mark it —
[0]. - Time 4s, 8s: Two more requests come in —
[0, 4, 8]. - Time 9s: Another request tries to come in, but it’s rejected because we’ve hit our limit.
- Time 11s: First, we remove old entries that are more than 10 seconds old, leaving us with
[4, 8]. With space left, this request is allowed —[4, 8, 11]. - Time 15s: Two requests arrive, after removing the outdated one, our list looks like
[8, 11]. But we can only accept one of the two, updating the log to —[8, 11, 15]
The process is clear: Remove old logs, check new requests, and update the log.
Pros
- Helps avoid too many requests right at the window’s edge
- Clients don’t need to wait for a complete reset, providing a more even request flow.
Cons
- It needs more computing power because we must clean old entries for every new request.
- There’s a bigger storage need due to keeping track of timestamps, which could be an issue if we’re thinking big
5. Sliding Window
With the sliding window, instead of keeping track of every single request’s timestamp as the sliding log does, we streamline things a bit. We focus on the number of requests from the last window.
So, if you find yourself in 75% of the current window, you’d weight the requests. 25% would come from the previous window, and the rest from the current one:
weight = (100 - 75)% * lastWindowRequests + currentWindowRequestsNow, when a new request tries to join the party, you add one to that weight (weight+1). If this new total crosses our set limit, we have to reject the request.
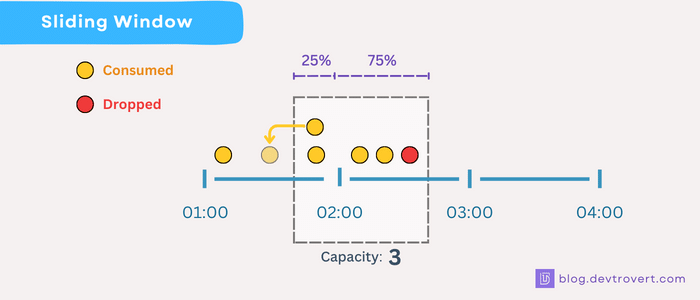
How it works?
Picture a scenario with a 10 requests per minute window.
Let’s break this into two phases, window A for the first minute and window B for the second.
- At 0s: We receive an initial request, this means window A’s counter starts ticking and is now at
A_counter = 1. - At 59s: 7 more requests come our way, so
A_counter = 8. - At 1m6s: A client decides to send over 3 more requests. Remember our count of 8 from Window A? Since we’re 6 seconds into Window B, which is about 10% gone, we’ll use 90% of Window A’s count for the next calculation.
current_weight = 90% * A_counter + 0 = 7.2This allows space for approximately 2 more requests (since 7.2 + 2 < 10). But what about the third request?
Sadly, it’s turned away, making B_counter now stand at 2.
“But wait, if a client sends 8 burst requests right at 59s and then sneaks in 2 more at 1m6s, they’d still get through, right?”
Precisely, and that’s where we see a little trade-off compared to the sliding log.
We’re opting for less computational work and storage space over perfect accuracy.
Using the equation (1 — percent_passed) * lastWindow + currentWindow, we’re guessing that requests from the previous window spread out evenly over time, rather than coming in all at once.
It’s a strategic choice, aiming for a more efficient approach even if it means skimming a bit on accuracy.
Considering your resources, how you want to manage sudden traffic, accuracy, and how much complexity you’re up for, pick the right rate limiter for your needs.
And if you’ve made it this far, you’re among the few. Not many get to this last line. If you’re one of them, leave a comment below. It’s great to know who sticks around till the end.
Connect with me, I’m sharing insights on https://www.linkedin.com/in/quocphuong and thoughts on Twitter.


