
Token Exchange using Keycloak

What is Token Exchange
Token Exchange is a way to obtain a completely different token from an already existing token. For example, if we have a token issued for a client then we can use that to obtain another new token for a different client. You can find more details about the Token Exchange from the RFC 8693
Keycloak
I’m using the Keycloak to demostrate these token exchange flows. At the time of writing this article, Token Exchange is a preview feature. We have to run the Keycloak using below command to enable the token exchange.
./kc.sh start-dev --features=preview
Internal to Internal
This token exchange happens between two Keycloak clients. First, we obtain a user token and then use that token to get another new user token for another client. For the demo purposes, I’m using the password grant type and I have omitted the client creation of the first client(starting-client).

Let’s create a new client to exchange the token obtained by the first client.
I named this client as target-client.

You can choose any name you like for this client.

Make sure to enable the Client authentication, this will change the Access Type to confidential. Token exchange only works with confidential clients.

For this, we don’t have to configure the login settings.
Next is the most important part. We should allow our first client to exchange tokens with this newly created client. To do that we have to define a policy in Keycloak.

Go to the Clients and select realm-management client.

Select the Authorization tab and click Create policy button.
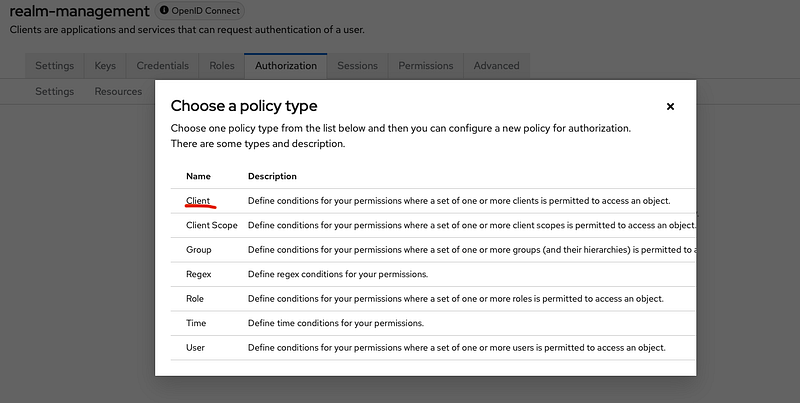
Select Client In the popup.

On the Create policy page, enter a name for the policy. Then select the client(s) we allow exchanging the token in the Clients field. In my case, I selected “starting-client”.

Next, go to the permission tab in targe-client(newly created client).

Enable the Permissions and select token-exchange.

Select the policy we created before in the Policies field.
Let’s exchange the tokens. Im going to use the token that I obtained earlier(if your token is expired obtain a new one).
curl --location 'http://localhost:8080/realms/demo/protocol/openid-connect/token' \
--header 'Content-Type: application/x-www-form-urlencoded' \
--data-urlencode 'client_id=starting-client' \
--data-urlencode 'client_secret=fvvl6ZuP8xSWqqfcPQywhS1JbNaGvjjl' \
--data-urlencode 'grant_type=urn:ietf:params:oauth:grant-type:token-exchange' \
--data-urlencode 'subject_token=<token generated for starting-client>' \
--data-urlencode 'requested_token_type=urn:ietf:params:oauth:token-type:access_token' \
--data-urlencode 'audience=target-client'- client_id: client id of the client who owns the first token(starting-client)
- client_secret: the secret of the above client
- grant_type: urn:ietf:params:oauth:grant-type:token-exchange
- subject_token: access token obtained from the target client
- requested_token_type: the new token type(access or refresh). This is optional and the default is refresh. That means you will get both access and refresh tokens. Possible values are urn:ietf:params:oauth:token-type:refresh_token and urn:ietf:params:oauth:token-type:access_token.
- audience: This is the client id that we are trying to exchange the token with. This is also optional, if you don't provide this, client_id will be used to generate the token.
External to Internal
We can exchange a token obtained by external IDP with Keycloak. First, we should set up an Identity provider in Keycloak. Im going to use Google as the identity provider and skipping the IDP configuration part.
There is one important thing we have to remember. If we have the same user in the Keycloak then that user should have logged into the system using the IDP at least one time before the token exchange. Otherwise, token exchange will not work. Or else we can manually link the user to the IDP using the “Identity Provider Links” tab in the user account.
I created a client called “external-to-internal” to demo this token exchange. Like before, we should create a policy in the realm-management client.

Select the client that we are going to exchange the google access token.

Go to the Permissions tab of the IDP and turn on the Permissions. Then click the token-exchange.
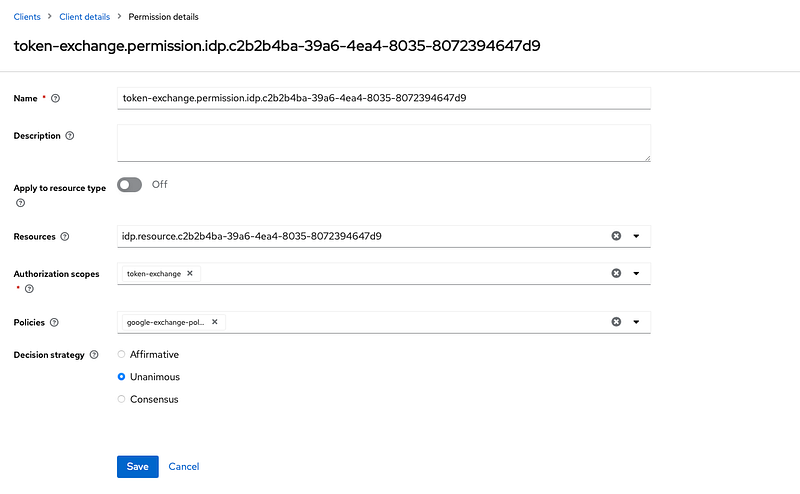
Select the policy we created for the external to internal token exchange in the Polices field.
curl --location 'http://localhost:8080/realms/demo/protocol/openid-connect/token' \
--header 'Content-Type: application/x-www-form-urlencoded' \
--data-urlencode 'grant_type=urn:ietf:params:oauth:grant-type:token-exchange' \
--data-urlencode 'requested_token_type=urn:ietf:params:oauth:token-type:access_token' \
--data-urlencode 'client_id=external-to-internal' \
--data-urlencode 'client_secret=EVPw15DtNpJ9s7kEfPbESVwQnQcsIPLn' \
--data-urlencode 'subject_token=<IDPs token >' \
--data-urlencode 'subject_issuer=google' \
--data-urlencode 'audience=external-to-internal'- client_id: client id of the client who owns the first token
- client_secret: the secret of the above client
- grant_type: urn:ietf:params:oauth:grant-type:token-exchange
- subject_token: IDP token
- requested_token_type: the new token type(access or refresh). This is optional and the default is refresh. That means you will get both access and refresh tokens. Possible values are urn:ietf:params:oauth:token-type:refresh_token and urn:ietf:params:oauth:token-type:access_token.
- audience: This is the client id that we are trying to exchange the token with. This is also optional, if you don’t provide this, client_id will be used to generate the token.
- subject_issuer: IDP’s id
Internal to External
In this token exchange flow, we are going to get a token issued by an external IDP (Google) by exchanging a Keycloak token.
There are two important things that we should do before making this flow work.
- Enable Store tokens in the IDP configuration.
- The user should have an active session(access token) with IDP.
There are two ways we can configure a policy for this exchange.
- Add a new client to the already created policy.
- Create a new policy.
If you decide to create a new policy, you will have to change the Decision Strategy to Affirmative

Im adding the new client to the existing policy I created earlier for the external to internal token exchange.
curl --location 'http://localhost:8080/realms/demo/protocol/openid-connect/token' \
--header 'Content-Type: application/x-www-form-urlencoded' \
--data-urlencode 'grant_type=urn:ietf:params:oauth:grant-type:token-exchange' \
--data-urlencode 'requested_token_type=urn:ietf:params:oauth:token-type:access_token' \
--data-urlencode 'client_id=internal-to-external' \
--data-urlencode 'client_secret=p5Vdz5u816rzn13pE827oMWWQvJAVKWT' \
--data-urlencode 'subject_token=<internal token generated by Keycloak>' \
--data-urlencode 'requested_issuer=google'- client_id: client id of the client who owns the first token
- client_secret: the secret of the above client
- grant_type: urn:ietf:params:oauth:grant-type:token-exchange
- subject_token: A user token issued by the Keycloak
- requested_token_type: urn:ietf:params:oauth:token-type:access_token. This is optional. We can only get an access token.
- requested_issuer: IDP provider id
Conclusion
Even though token exchange is still a preview in Keycloak implementation is very stable.
We can use token exchange in below scenarios,
- Can be used to impersonate a user
- Can be used to obtain a external token from a internal token
- Can be used to obtain a internal user token from trusted IDP token
- To generate a new user token for less trusted client.


