
ThreeJS/Shaders practicing: Building a performant interactive cube.
What can be more ordinary than start practicing WebGL/ThreeJS with building a second (after sphere) common shape — Cube, correct?
Dependent on provided details, this task can be not as easy as it can look at first glance. We may be asked to provide extraordinary performant levels, high interactivity, interaction with Web UI, and many other things which make this task way more complicated. Such kinds of challenges are especially popular in various technical interviews in big companies so let’s discuss the most common bottlenecks, refresh shaders/ThteeJS knowledge, and build a responsive application called CubeGL.
Problem statement
Let’s build a React web application with WebGL Cube as a visual layer inside.
Cube by itself should meet next requirements:
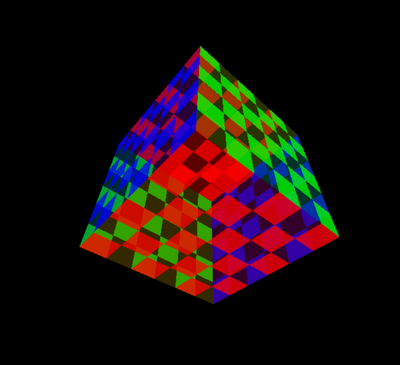
- Have each face be painted in a different color;
- Each face should have a chess grid formed by Shader! (no pattern usage — that will be too easy!);
- The granularity of chess grid rectangles should be adaptive based on input parameters passed from React interface;
- The opacity of odd and even chess grid rectangles should be different;
- The opacity of the chess grid of each face should change on hover independently;
- Additionally opacity of odd and even rectangles of the grid should change on different values;
- Cube should rotate and use an orbital camera;
React app requirements are fairly simple:
- The app should contain an FPS meter on the screen;
- The app should have a drop-down menu with the ability to change cube chess grid granularity;
An example of a ready application
Building a solution
Let’s start with our application skeleton. For the purposes of saving time, we are going to use create-react-app to provide basic functionality for us out of the box. The main folders structure will be next:

assets — static assets folder. Contains only cube.png image used in repository readme intro.
components — React components of our application.
- Main.tsx — file which contains Chess grid dimensions options dropdown and WebGLContainer.tsx component;
- WebGLContainer.tsx — component which handles ThreeJS cube dimensions update, window size update, and main cubeGL service initialization;
webgl— Stores all logic of WebGL cube:
cubeFragment.frag — cube fragment shader responsible for coordinates building;
cubeVertex.vert — cube vertex shader responsible for colors building;
TIP: To make WebPack bundler understand the import of .vert and .frag extensions first you need to get access to create-react-app WebPack config by running the command: npm run eject and then add next code into module -> rules -> oneOf array of webpack.config.js file:
{
  test: /\.(glsl|vert|frag)$/,
  type: 'asset/source',
},
cube.service.ts — cube ThreeJS logic (including shaders connection, camera setting, raycasting, etc.);
utils.ts — additional utilities responsible for cube faces colors and opacity control during interaction with the cube;
Now it’s time to build a logic of each of these files, so let’s start!
cubeVertex.vert
attribute vec3 vertexColor;
attribute vec2 vertexOpacity;
varying vec3 vColor;
varying vec2 vOpacity;
varying vec2 vUv;

void main() {
    vUv = uv;
    vColor = vertexColor;
    vOpacity = vertexOpacity;

    gl_Position = projectionMatrix * modelViewMatrix * vec4(position, 1.);
}
An average vertex shader file that gets vertexColor and vertexOpacity parameters as inputs, makes coordinates transformation and passes parameters further into fragment shader (including also uv parameters).
cubeFragment.frag
precision highp float;

uniform float repeat;
varying vec3 vColor;
varying vec2 vOpacity;
varying vec2 vUv;

void main(void) {
    // Normalized pixel coordinates (from 0 to 1)
    vec2 st = vUv;
    // Moving the coordinate system to middle of screen
    st -= 0.5;

    float result = mod(dot(vec2(1.0), step(vec2(0.5), fract(st * repeat))), 2.0);

    gl_FragColor = mix(vec4(vColor, vOpacity.x), vec4(vColor, vOpacity.y), result);
}
The fragment shader is a “Heart” of our solution which is responsible for building a checkerboard surface and juggling the transparency of elements, so let’s investigate it line by line:
We need our coordinate system to start from the middle of the screen, that makes things simpler, so let’s do it for our vector x, y coordinates:
st -= 0.5; More about uv coordinates you may read in this nice article
fract — Compute the fractional part of the argument. In our case argument will be a normalized uv coordinate multiplied by the amount of the repeat.
step — Generate a step function by comparing two values. vec2(0.5) — edge of our result. For element i of the return value, 0.0 is returned if fract[i] < edge[i], and 1.0 is returned otherwise.
dot — Calculate the dot product of two vectors.
mod — Compute value of one parameter modulo another. mod() returns the value of x modulo y. This is computed as x - y * floor(x/y).
float result = mod(dot(vec2(1.0), step(vec2(0.5), fract(st * repeat))), 2.0);Finally, let’s mix our colors with the opacity and the obtained result.
mix — Constrain a value to lie between two further values.
gl_FragColor = mix(vec4(vColor, vOpacity.x), vec4(vColor, vOpacity.y), result);utils.ts
Auxiliary file for working with the color and transparency of the geometry of the surfaces of our cube. Contains the following methods:
Generator of default colors for Cube faces:
const getColorsArray = () => {
    const arrayFaceColor = (r: number, g: number, b: number) => {
        return [
            r, g, b,
            r, g, b,
            r, g, b,
            r, g, b
        ]
    };

    // Build colors array
    let colorArray: any = [];

    colorArray = colorArray
        .concat(arrayFaceColor(0, 1, 0)) // right green
        .concat(arrayFaceColor(0, 1, 0)) // left green
        .concat(arrayFaceColor(1, 0, 0)) // top red
        .concat(arrayFaceColor(1, 0, 0)) // bottom red
        .concat(arrayFaceColor(0, 0, 1)) // front blue
        .concat(arrayFaceColor(0, 0, 1)); // back blue

    return colorArray;
};
Generator of default opacities for Cube faces:
const getOpacityArray = () => {
    let opacityArray: any = [];

    const arrayFaceOpacity = (odd: number, even: number) => {
        return [
            odd, even,
            odd, even,
            odd, even,
            odd, even,
        ]
    };

    opacityArray = opacityArray
        .concat(arrayFaceOpacity(0.2, 0.8)) // right
        .concat(arrayFaceOpacity(0.2, 0.8)) // left
        .concat(arrayFaceOpacity(0.2, 0.8)) // top
        .concat(arrayFaceOpacity(0.2, 0.8)) // bottom
        .concat(arrayFaceOpacity(0.2, 0.8)) // front
        .concat(arrayFaceOpacity(0.2, 0.8)); // back

    return opacityArray;
};
Create colors and opacities arrays:
export const defaultColors = getColorsArray();
export const defaultOpacity = getOpacityArray();
ThreeJS generates 2 triangles per each cube face so we need to map each face’s indices (for each of the triangles) to its corresponding opacities:
// Triangles faces indices, starting from left
const indicesMapper: any = {
  '0:1': [0, 7],
  '2:3': [8, 15],
  '4:5': [16, 23],
  '6:7': [24, 31],
  '8:9': [32, 39],
  '10:11': [40, 47],
};
Based on the faceIndex provided by ThreeJS we get the corresponding opacities array of indices from our mapper:
const mapFaceIndex = (faceIndex: number) => {
    let firstIndex = faceIndex - 1;
    let secondIndex = faceIndex;

    if (faceIndex % 2 === 0) {
        firstIndex = faceIndex;
        secondIndex = faceIndex + 1;
    }

    return indicesMapper[firstIndex + ':' + secondIndex];
};
Based on the faceIndex provided by ThreeJS we update corresponding opacities and return an updated array for further processing:
export const getUpdatedOpacity = (faceIndex: number) => {
    const rangeToUpdate = mapFaceIndex(faceIndex);
    const updatedOpacity = defaultOpacity.map((item: number, index: number) => {
        if (index >= rangeToUpdate[0] && index <= rangeToUpdate[1]) {
            if (item === 0.2) {
                item = 0.4;
            } else if (item === 0.8) {
                item = 1.0;
            }
        } else {
            if (item === 0.4) {
                item = 0.2;
            } else if (item === 1.0) {
                item = 0.8;
            }
        }

        return item;
    });

    return updatedOpacity;
};
cube.service.ts
This is the core service of ThreeJS cube creation and rendering, assigning some interactivity and defining the camera. Let’s explore this functionality in detail and describe most interesting parts.
Define our ThreeJS scene, camera, renderer and raycaster for the interaction with the cube. Nothing special.
const scene = new THREE.Scene();
const camera = new THREE.PerspectiveCamera(
    75,
    container.offsetWidth / container.offsetHeight,
    0.1,
    1000
);
camera.position.z = 2;

const renderer = new THREE.WebGLRenderer();
renderer.setSize(container.offsetWidth, container.offsetHeight);
container.appendChild(renderer.domElement);

const raycaster = new THREE.Raycaster();
Create attributes, Buffer geometries and set attributes to geometries.
TIP: Buffer geometries and InstancedBuffer geometries give a significant performance boost while passing parameters to shaders and further calculations. You may read more about this approach here, here and detailed explanation of difference here.
// Create a buffer attribute for the colors (for attribute vec3 vertexColor)
const colorAttribute = new THREE.Float32BufferAttribute(
    new Float32Array(defaultColors), 3);

// Create a buffer attribute for the opacity (for attribute vec2 vertexOpacity)
const opacityAttribute = new THREE.Float32BufferAttribute(
    new Float32Array(defaultOpacity), 2);

const geometry = new THREE.BufferGeometry().copy(new BoxGeometry(1,1,1));

// Set attribute vertexColor in vertex shader
geometry.setAttribute('vertexColor', colorAttribute);

// Set attribute vertexOpacity in vertex shader
geometry.setAttribute('vertexOpacity', opacityAttribute);
Define material for our Cube, connect shaders, form mesh, and add it to the scene.
const material = new THREE.ShaderMaterial({
    uniforms: {
      repeat: { value: dimension },
    },
    vertexShader: cubeVertex,
    fragmentShader: cubeFragment,
    side: THREE.DoubleSide,
    transparent: true
});

const cube = new THREE.Mesh(geometry, material);
scene.add(cube);
Small non-ThreeJS snippet. Let’s add a performance meter to our page to make sure that Cube is performant enough and generates stable 60 FPS independently on faces grid dimensions.
const stats = Stats();
document.body.appendChild(stats.dom);
The most interesting method in cube.service which responsible for the raycasting technique connection. Raycaster allows us to interact with the faces of the Cube and change the opacity of its grid rectangles based on described above logic.
First of all, let’s define a helper method highlightFace which will update opacity based on the intersected faces. Then we create a method onRaycast which interacts with a scene of children objects (Cube in our case), define which of 2 face triangles (as we remember — face consists of the 2 triangles) selected, and change the opacity of the chess pattern of this current face accordingly to our logic. onRaycast will be triggered on mousemove event. To not do unnecessary attribute updates while we are on the same face some optimization checks were added. Performance first for all! ;-)
TIP: Sometimes we may have a situations when Raycaster approach won’t work or won’t fulfill our needs. In this case, we can use another tricky but really interesting approach called GPU object picking.
const raycastEnable = () => {
    const headerShiftAdjustment = 80;
    let intersected: any = [];

    const highlightFace = (intersectedObject?: any) => {
        const opacity = intersectedObject ? getUpdatedOpacity(intersectedObject.faceIndex) : defaultOpacity;

        const updatedOpacity = new THREE.Float32BufferAttribute(
            new Float32Array(opacity), 2);

        geometry.setAttribute('vertexOpacity', updatedOpacity);
        geometry.getAttribute('vertexOpacity').needsUpdate = true;

        //renderer.render(scene, camera);
    };

    const onRaycast = (e: any) => {
        const x = (e.clientX / container.offsetWidth ) * 2 - 1;
        const y = - ( (e.clientY - headerShiftAdjustment) / container.offsetHeight ) * 2 + 1;

        raycaster.setFromCamera({ x, y }, camera);
        const intersections: any = raycaster.intersectObjects(scene.children);

        // Check if current cube face (2 triangles) already selected
        if (intersections.length > 0) {
            if (intersections[0].faceIndex % 2 === 0) {
                if (intersected[0] !== intersections[0].faceIndex || intersected[1] !== (intersections[0].faceIndex + 1)) {
                    highlightFace(intersections[0]);
                    intersected = [intersections[0].faceIndex, intersections[0].faceIndex + 1];
                }
            } else {
                if (intersected[0] !== (intersections[0].faceIndex - 1) || intersected[1] !== intersections[0].faceIndex) {
                    highlightFace(intersections[0]);
                    intersected = [intersections[0].faceIndex - 1, intersections[0].faceIndex];
                }
            }
        } else {
            if (intersected.length > 0) {
                highlightFace();
            }
            intersected = [];
        }
    };

    renderer.domElement.addEventListener('mousemove', onRaycast, false);
};
Now let’s animate the Cube to slowly rotate on the screen.
TIP: requestAnimationFrame is really efficient way of animation which guarantees smooth jerk-free transitions on the screen.
const animate = () => {
    requestAnimationFrame(animate);

    cube.rotation.x += 0.01;
    cube.rotation.y += 0.01;

    render();

    stats.update();
};
Methods are responsible for WebGl scene rendering, scene resize update and change of cube faces chess pattern granularity accordingly.
const render = () => {
    renderer.render(scene, camera);
};

const resizeEnable = (container: any) => {
    camera.aspect = container.offsetWidth / container.offsetHeight;
    camera.updateProjectionMatrix();
    renderer.setSize(container.offsetWidth, container.offsetHeight);
    render();
};

const updateDimension = (dimension: number) => {
    cube.material.uniforms.repeat.value = dimension;
    render();
};
Finally, let’s add orbital controls to our camera to rotate our cube manually and change the zoom level of the view.
const controls = new OrbitControls(camera, renderer.domElement);
controls.addEventListener('change', render);
The whole code:
import * as THREE from 'three';
import { BoxGeometry } from 'three';
import { OrbitControls } from 'three/examples/jsm/controls/OrbitControls'
import Stats from 'three/examples/jsm/libs/stats.module';
// @ts-ignore
import cubeVertex from './shaders/cubeVertex.vert';
// @ts-ignore
import cubeFragment from './shaders/cubeFragment.frag';
import { defaultColors, defaultOpacity, getUpdatedOpacity } from "./utils";

export const cubeGL = (container: HTMLDivElement, dimension: number) => {
    const scene = new THREE.Scene();
    const camera = new THREE.PerspectiveCamera(
        75,
        container.offsetWidth / container.offsetHeight,
        0.1,
        1000
    );
    camera.position.z = 2;

    const renderer = new THREE.WebGLRenderer();
    renderer.setSize(container.offsetWidth, container.offsetHeight);
    container.appendChild(renderer.domElement);

    const raycaster = new THREE.Raycaster();

    // Create a buffer attribute for the colors (for attribute vec3 vertexColor)
    const colorAttribute = new THREE.Float32BufferAttribute(
        new Float32Array(defaultColors), 3);

    // Create a buffer attribute for the opacity (for attribute vec2 vertexOpacity)
    const opacityAttribute = new THREE.Float32BufferAttribute(
        new Float32Array(defaultOpacity), 2);

    const geometry = new THREE.BufferGeometry().copy(new BoxGeometry(1,1,1));

    // Set attribute vertexColor in vertex shader
    geometry.setAttribute('vertexColor', colorAttribute);

    // Set attribute vertexOpacity in vertex shader
    geometry.setAttribute('vertexOpacity', opacityAttribute);

    // For instancedBufferGeometry when used
    //geometry.instanceCount = 6;

    const material = new THREE.ShaderMaterial({
        uniforms: {
          repeat: { value: dimension },
        },
        vertexShader: cubeVertex,
        fragmentShader: cubeFragment,
        side: THREE.DoubleSide,
        transparent: true
    });

    const cube = new THREE.Mesh(geometry, material);
    scene.add(cube);

    const stats = Stats();
    document.body.appendChild(stats.dom);

    const raycastEnable = () => {
        const headerShiftAdjustment = 80;
        let intersected: any = [];

        const highlightFace = (intersectedObject?: any) => {
            const opacity = intersectedObject ? getUpdatedOpacity(intersectedObject.faceIndex) : defaultOpacity;

            const updatedOpacity = new THREE.Float32BufferAttribute(
                new Float32Array(opacity), 2);

            geometry.setAttribute('vertexOpacity', updatedOpacity);
            geometry.getAttribute('vertexOpacity').needsUpdate = true;

            //renderer.render(scene, camera);
        };

        const onRaycast = (e: any) => {
            const x = (e.clientX / container.offsetWidth ) * 2 - 1;
            const y = - ( (e.clientY - headerShiftAdjustment) / container.offsetHeight ) * 2 + 1;

            raycaster.setFromCamera({ x, y }, camera);
            const intersections: any = raycaster.intersectObjects(scene.children);

            // Check if current cube face (2 triangles) already selected
            if (intersections.length > 0) {
                if (intersections[0].faceIndex % 2 === 0) {
                    if (intersected[0] !== intersections[0].faceIndex || intersected[1] !== (intersections[0].faceIndex + 1)) {
                        highlightFace(intersections[0]);
                        intersected = [intersections[0].faceIndex, intersections[0].faceIndex + 1];
                    }
                } else {
                    if (intersected[0] !== (intersections[0].faceIndex - 1) || intersected[1] !== intersections[0].faceIndex) {
                        highlightFace(intersections[0]);
                        intersected = [intersections[0].faceIndex - 1, intersections[0].faceIndex];
                    }
                }
            } else {
                if (intersected.length > 0) {
                    highlightFace();
                }
                intersected = [];
            }
        };

        renderer.domElement.addEventListener('mousemove', onRaycast, false);
    };

    const animate = () => {
        requestAnimationFrame(animate);

        cube.rotation.x += 0.01;
        cube.rotation.y += 0.01;

        render();

        stats.update();
    };

    const render = () => {
        renderer.render(scene, camera);
    };

    const resizeEnable = (container: any) => {
        camera.aspect = container.offsetWidth / container.offsetHeight;
        camera.updateProjectionMatrix();
        renderer.setSize(container.offsetWidth, container.offsetHeight);
        render();
    };

    const updateDimension = (dimension: number) => {
        cube.material.uniforms.repeat.value = dimension;
        render();
    };

    const controls = new OrbitControls(camera, renderer.domElement);
    controls.addEventListener('change', render);

    return {
        animate, render, resizeEnable, raycastEnable, updateDimension
    }
};
WebGLContainer.tsx
React component, which aggregates and initializes all methods to build and interact with ThreeJS Cube from the above service. Responsible for changing cube dimensions on corresponding input value change.
import React, { useRef, useEffect } from 'react';
import { cubeGL } from "../webgl/cube.service";

const WebGLContainer: React.FC<{ dimension: string }> = ({ dimension }) => {
    const containerRef = useRef<any>();
    let cGlService = useRef<any>();
    let resizeHandler: any = useRef<any>();

    useEffect(() => {
       if (containerRef.current) {
           if (!cGlService.current) {
               cGlService.current = cubeGL(containerRef.current, Number(dimension));
               cGlService.current.raycastEnable();
               cGlService.current.animate();
               //cGlService.render();

               resizeHandler.current = () => {
                   cGlService.current.resizeEnable(containerRef.current);
               };

               window.addEventListener('resize', resizeHandler.current);
           }
       }
    }, [dimension]);

    useEffect(() => {
        cGlService.current.updateDimension(Number(dimension));
    }, [dimension]);

    return (<div className='webGLContainer' ref={containerRef} />)
};

export default WebGLContainer;
Main.tsx
Main React component aggregates the Header name, the input component with the ability to change the cube chess pattern dimension, and the WebGlContainer component which contains all Cube logic underneath.
const Main = () => {
  const [dimension, setDimension] = useState('3');

  const handleChange = (event: SelectChangeEvent) => {
      setDimension(event.target.value as string);
  };

  return (
      <div className='main-container'>
          <div className='header'>
              CubeGL
              <Box sx={{ minWidth: 120 }}>
                  <FormControl fullWidth>
                      <InputLabel sx={{ color: '#fff' }} id="demo-simple-select-label">Choose dimension</InputLabel>
                      <Select
                          labelId="demo-simple-select-label"
                          id="demo-simple-select"
                          value={dimension}
                          label="Dimensiion"
                          onChange={handleChange}
                          sx={{ height: '36px', color: '#fff', marginLeft: '10px', border: 'none' }}
                      >
                          <MenuItem value={1}>2x2</MenuItem>
                          <MenuItem value={2}>4x4</MenuItem>
                          <MenuItem value={3}>6x6</MenuItem>
                          <MenuItem value={5}>10x10</MenuItem>
                      </Select>
                  </FormControl>
              </Box>
          </div>
          <WebGLContainer dimension={dimension} />
      </div>
  )
};
Conclusion
Woah, that was a big way, isn’t it? With this, we finish all our main methods and code logic for the ThreeJS high-performant Cube which fulfills all requirements mentioned at the beginning of this article. Hope you enjoyed it and this solution helps you to build your own ones and successfully passed a trick WebGL interviews!
Link to the repo with the full project
An example of a ready application
You can also check out my other article on interesting web geometry: