
This Is How Chainlink Oracles Work on Ethereum
Calling web APIs from Ethereum smart contracts using Chainlink Oracles.

Blockchains are essentially walled gardens. One of the biggest roadblocks to the adoption of decentralized applications is the ability to interact with data outside of the blockchain itself. Smart contracts which runs on Ethereum, for example, have no native way of accessing data outside of the Ethereum ecosystem.
Chainlink solves this problem by providing a platform for Blockchain Oracles. Oracles are nodes on the network which act as a bridge between on-chain and off-chain data, by enabling smart contracts to retrieve data from the outside world.
There are currently two ways in which smart contracts can obtain off-chain data using Chainlink:
- Reference Data
- Request & Receive
Reference data is the quickest way to obtain off-chain data. Reference data contracts are on-chain reference points for accessing external data and are updated regularly. Smart contracts can quickly and easily retrieve supported data from them in a single transaction. They are, however, restricted in what they offer.
Request & Receive allows smart contracts to obtain data from any external off-chain API. However, instead of being available in a single transaction call, the smart contract must request data from an oracle, then provide a callback function to receive a response to that request.
How To Request & Receive Data
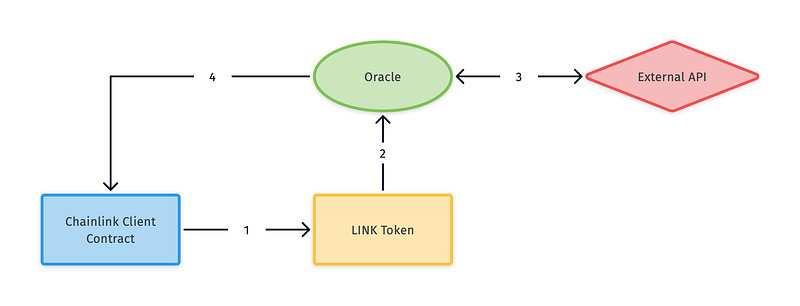
Figure 1 shows the data flow of how to use Chainlink’s Request & Receive functionality. Each entity in the diagram are as follows:
- Chainlink Client Contract: The smart contract that requires data from an external API.
- LINK Token: The LINK ERC20 token contract.
- Oracle: The bridge between on-chain and off-chain data.
- External API: The off-chain API that the Chainlink Client Contract wishes to retrieve data from.
Let’s walk through each of the arrows, representing transactions between entities.
- The initial Request: The Client Contract makes an initial request call to the LINK token contract. In the parameters to this call, the Client Contract specifies which Oracle it wishes to use, the External API call (or job ID) it wishes to make, and any other steps (supported by the Oracle). As part of the request, it also specifies the callback function the oracle must use to send the response to, and the payment for the request (in the form on LINK, to be paid to the Oracle for the work). This means that the Client Contract must hold enough LINK token to pay for the request.
- Call to the Oracle: The LINK Token passes the information in the parameters and the payment to the specified Oracle for processing.
- External API request: The Oracle makes the request to the External API using the parameters that were initially set by the Client Contract, and receives a response.
- Callback to Client Contract: The Oracle calls back to the Client Contract with the data retrieved from the External API, using the address and callback function specified in the original request.
This is the most basic implementation of Request & Receive. The drawback is that the Chainlink Client Contract must always have enough balance to pay the Oracle for each request. If this process is triggered many times, it could be very expensive for the Client Contract.
Offsetting Costs
To combat this, the Client could offset the cost to its users by using a 3rd party on-chain exchange. This would enable the Client Contract to receive payment in ETH, convert to LINK, then initiate the Request & Receive cycle in one transaction.
Figure 2 shows how this might work.
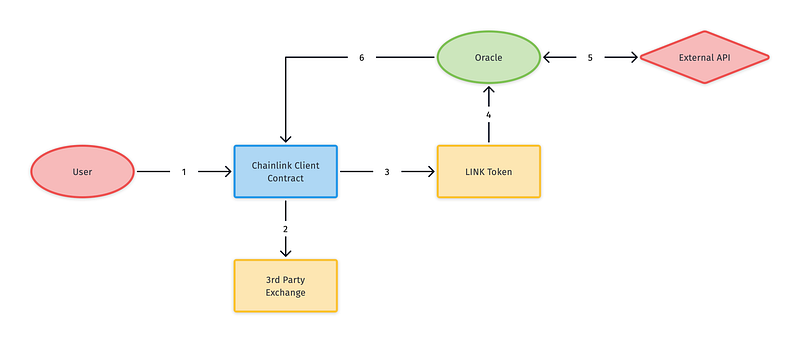
The new entities here are:
- User: This could be any Ethereum address (another contract, or a user’s wallet).
- 3rd Party Exchange: A decentralized exchange offering exchange between ETH and ERC20 tokens.
The two extra steps which were added here are as follows:
- The User makes a call to the Client Contract to go and fetch the external data. Instead of the Client Contract needing LINK tokens to pay, the User sends the equivalent value needed in ETH to submit the request.
- The Client Contract uses the 3rd Party Exchange to convert the ETH sent by the User into LINK, which can be used to start the Request & Receive cycle.
- Steps 3,4,5 and 6 follow the same steps as 1,2,3,4 in figure 1.
Further Reading
If you’re interested in blockchain development, I write tutorials, walkthroughs, hints, and tips on how to get started and build a portfolio. Check out some of these resources: