
The power of Godot C# export hints (Godot 4/C#)
Let’s see how to improve our C# script Inspectors in Godot 4!

If you’re a somewhat seasoned game dev, you probably that devs are only as good as their tools — which is why it’s important to always ensure you create as clear and robust systems as possible.
This is of course essential for game systems, but it also applies to the editor tooling, and the way you expose those systems to your fellow creators in the team.
And, in particular, it’s important to understand how to improve your script Inspectors so that they are easy-to-use…
So in this tutorial, we’ll see a few tricks for better organising, specifying and constraining the different properties that appear in the Inspector of a C# script in our Godot projects, to make these variables easier to edit and assign :)
As usual, since we’ll be coding our logic in C#, make sure that you have a version of Godot with .NET enabled.

And of course, don’t forget that you can get the demo scene and all the assets from this demo on my Github 🚀 with all my other Godot tutorials.
The tutorial is also available as a video — text version is below:
But now, with all that said, let’s dive in and discover some tips to improve your Godot script Inspectors!
The [Export] attribute
Obviously, the first and most essential tool we need to discuss here is the [Export] attribute. This is what you need to add to your C# variables in order to have them show in the Inspector, and to therefore be able to assign them directly in the editor:
[Export] private int _age;
Note: By the way, the reason variables with this attribute are shown in the Inspector is because they’re actually saved as a resource inside your scene file — and so Godot can remember this connection, and show it to you in the editor :)
So, whenever you add this [Export] attribute to either a C# field or property in your code, it will appear in the Inspector:
[Export] private int _age;              // field
[Export] private int Age { get; set; }  // property
However, don’t forget that, contrary to GDScript, C# project need to be re-compiled for code changes to take effect. That’s why, after adding this attribute to a variable in your script, you should go to the MSBuild tab, and use the Build Project option to manually recompile the project. And then, the variable will show in the Inspector:

It’s important to note that the [Export] attribute is the only reason the variable gets saved and exposed; for example, if you’re coming from the world of Unity game dev, you’ll notice that making your variable public doesn’t auto-expose it here.
I personally think it’s a good idea, because the public, protected and private keywords are related to data encapsulation, and to making sure the objects in your code are only readable and writable to the classes that absolutely need to. This is key in having a robust and maintainable codebase and I believe that, to some extent, mixing this concept with the fact of showing variables in the Inspector can sometimes be confusing. With Godot, there’s no connection: a variable can be public or private, and exposed or not exposed:
// not exposed:
private string _name;
public string name;

// exposed:
[Export] private string _name;
[Export] public string name;
Also, like any other variables, exported elements can be assigned a default value (which, of course, needs to match their type), or else they’ll default to the default value for their type.
And yes, the cool thing is that even more complex types like Resources or Nodes can be exported, so you’re not limited to just basic C# types ;)
[Export] private Node _node;
[Export] private Resource _res;
And don’t forget that, for a Resource for example, using the exact type of Resource you want here will reduce the list of possibilities and help creators pick the right kind of object!
[Export] private StandardMaterial3D _myMat;
So, all in all, exporting your C# variables is the fastest and most robust way of ensuring the creators in your team can adapt the references and tweak the project without always having to come back to the code!
Boosting your exports?
But did you know that adding the [Export] attribute is just the first step? :)
In fact, Godot allows us to pass options to this attribute and, thanks to those additional settings, you can really improve your Inspector and make it more secure.
The idea is to use the PropertyHint object to specify some extra “specialisation” of the field, and have Godot use an even-more appropriate (and usually more constrained) input in the Inspector. This way, you’re sure that the value defined in the editor is valid for your code!
For example, by adding the PropertyHint.File option to the [Export] attribute on a string variable, you’re telling Godot that this input shouldn’t just contain any string, but it should contain a path to a file:
[Export(PropertyHint.File)]
private string _aFilePath;
Note: By default, those paths can’t be global — they’ll only be relative to your Godot project root directory. You can only have global paths when you’re in tool mode.
If you’d rather reference a path to a directory, you can use the PropertyHint.Dir option; and if you want to apply a filter on your search, you can use a wildcard pattern along with the PropertyHint.File option to specify to Godot what files are valid for this input:
[Export(PropertyHint.Dir)]
private string _aFolderPath;

[Export(PropertyHint.File, "*.xml,")]
private string _aXmlFilePath;
(Typically, that’s useful to constrain the inputs to just a given extension, meaning only accept a given type of file.)
Similarly, if you’re working with ints, it can sometimes be interesting to restrict the value to a certain range; which you can do with the aptly named PropertyHint.Range option:
[Export(PropertyHint.Range, "0,20,")]
private int _anIntRange;
The trick is just to give it the minimum and maximum value in this format (so inside quotes, separated by commas), and you’ll see that the Inspector input instantly blocks you if you try to get out of this range:
You can also add a third parameter to the range description to tell Godot what step to use, and better control the granularity of the values:
[Export(PropertyHint.Range, "0,20,1")]
private int _anIntRange;
Note: Also, if you feel like users should be able to get out of this range when they really need it, you can use “or_greater” and/or “or_less” to just block the slider itself but allow them to enter whatever value they want, even if it’s outside the range:
[Export(PropertyHint.Range, "0,20,1,or_greater,or_less")]
private int _anIntRange;
Another really cool example is when using enums; cause if you just need to have a specific list of options for one of your variables, you can actually use the PropertyHint.Enum option and pass in the different possible values in here — no need to pre-create the enum anymore!
[Export(PropertyHint.Enum, "Fire,Water,Earth,Air")]
public string spellType;
Of course, there are a few other particularities, settings, or PropertyHint options that can be useful, so I highly recommend you have a look at this page from the official docs ;)
Here, I want to focus on a specific point that is a new feature of Godot 4.0, and that’s the fact that we can now export Nodes directly…
Exporting Nodes directly!
If you’re new to Godot, or if you have a background in another game engine like Unity or Unreal Engine, you’ll probably think that this is just basic news. But if you were here during the Godot 3 age, then you probably know that’s a really cool and welcomed addition ;)
Basically, before Godot 4, you couldn’t directly reference and expose a node in a script. Rather, you had to use an intermediary NodePath variable, to get the position of the node in the hierarchy:
[Export] private NodePath _myNodePath;And then use this reference as an input to the famous GetNode() built-in function to get back the real node you were looking for:
[Export] private NodePath _myNodePath;

public override void _Ready() {
    Node n = GetNode(_myNodePath);
}
Though it was a cool step-up from manually traversing your hierarchy and building the string path by hand, it was still one additional somewhat annoying step.
Now, actually, in my previous tutorials from this series, even the more recent ones that use Godot 4, I did rely on NodePath, because I didn’t want to dive into the details of this change. (And the Godot team was kind enough to keep this old technique, too, to avoid having too many breaking changes!)
But, in truth, it’s of course way easier and quicker to just export the node directly, or even the type of component you want to get on it, like this :)
[Export] private Node _myNode;    // direct node ref
[Export] private Timer _myTimer;  // direct component ref
A little bonus: grouping exports
To wrap up this tutorial, let’s just see one last little tool that can help organise your script Inspectors: the [ExportGroup] attribute.
It’s really simple to use: you just add this attribute above some variables in your code and then, until you re-use it with another group name or with an empty string to break out, all the variables Godot encounters that have the [Export] attribute will be put under this group in the Inspector.
[ExportGroup("My Group")]
[Export] private int _age;
[Export] private string _name;
(Note that even if you skip a few blank lines before declaring your next variables, they will still be part of the same group!)
You can even nest subgroups inside, using the [ExportSubgroup] attribute, to get an even finer organisation:
[ExportGroup("My Group")]
[Export] private int _age;
[Export] private string _name;

[ExportSubgroup("Extra")]
[Export] private string _login;
And then, if you really want to isolate some variables in the Inspector, it’s also possible to change their category, with the [ExportCategory] attribute:
[ExportGroup("My Group")]
[Export] private int _age;
[Export] private string _name;

[ExportCategory("Extra")]
[Export] private string _login;
If you do this, you’ll get a new separate block in the Inspector, instead of having all your C# script variables be packed together:
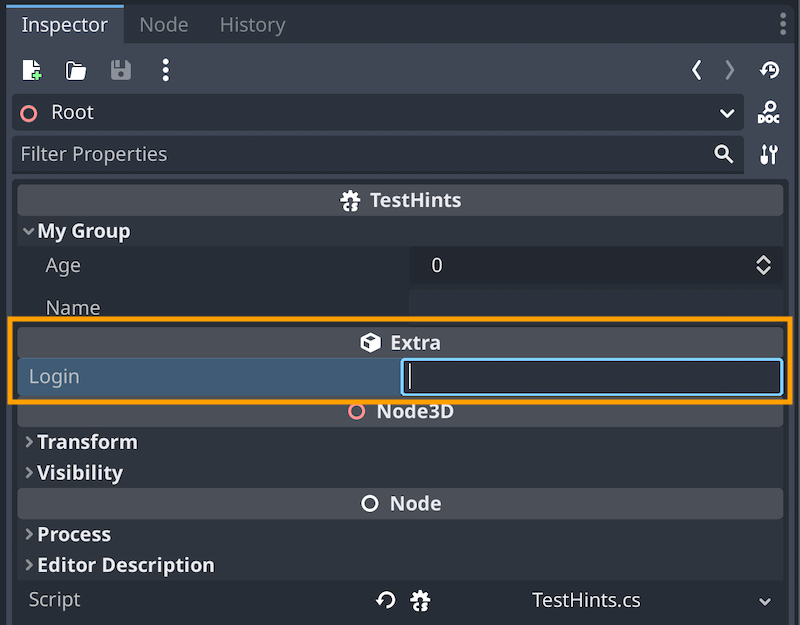
But Godot does warn us that this can result in pretty unexpected Inspector layout since these categories also depend on class inheritance — so you should use this last tool carefully :)
Conclusion
But anyway, here you go: you know how a few tricks to creating more organised and more robust Godot Inspectors for your C# scripts! I hope you liked this tutorial and that it helped you understand the basics of C# exports and hints.
If you enjoyed the tutorial, feel free to clap for the article and follow me to not miss the next ones — and of course, don’t hesitate to drop a comment with ideas of Godot tricks that you’d like to learn!
As always, thanks a lot for reading, and take care :)
To read more of my content, and articles from many other great writers from Medium, consider becoming a member! Your membership fee directly supports the writers you read.


