
The Most Useful Bash/Zshell Aliases I use Daily

I never truly realized the power of aliases until I was forced to work from a terminal exclusively (i.e., working on a remote server via ssh). I held out for as long as I could; I would devise work-arounds that (ironically) took even longer to implement than if I just used an alias. I constantly pored over man page entries, searching for the specific flags I needed (which, of course, I used all the time, but had not committed to memory). I found I had two different situations with executing commands: (1) commands that were hard to remember because I didn’t use them frequently enough (but are indispensable to system administration), and (2) long commands that I eventually remembered by rote memorization. I was in a spot that you were once in or are potentially in now.
As I have come to understand over my time using *nix systems, developers have created innumerable tools, the purpose of which are to make our lives easier. The whole idea of a computer is to make things simpler for humans. And even with these great simplifications, there are greater simplifications further—shortcuts we can use to economize and simplify the process of computing. One of these many “shortcuts” is the alias, which can be used to great effect to make working with the terminal a better experience.
What is an alias?
In plain English, an alias is just a placeholder (with a simple, short name) for some specific (usually long and/or complex). Just like an alias is another name for a person, an alias is just another name for a command. The benefits of aliases are that they:
- allow longer commands to be shortened to a reasonable level to type (and remember, especially with tab completion), and
- make memorizing commonly used commands with various flags unnecessary.
In total, they make using the terminal a more pleasant experience by simplifying everyday tasks, which in turn make us more efficient users.
The aliases I list below are compatible between bash and zsh, and, unless specifically noted, are valid for both macOS and Linux.
Never accidentally delete a file again
We have all made the mistake of using rm -rf on the wrong directory—we all know that feeling of absolute existential dread when we realize that those files are never coming back—it is a mistake you can’t forget. I had this happen a few times. The straw that broke the camel’s back was when I erased a week’s worth of work.
Fortunately, though, we can create an alias that will add a layer of safety to this (very) permanent process, accomplished without having to type out the flag every time we run the command. When using rm in “interactive” mode (passing the i flag), you’ll be prompted before you can remove the file. In my .zshrc (ZShell read commands) file, I have my rm command aliased to:
alias rm='rm -i'The only caveat here is that you must be mindful if you are working on a remote server or another machine where you haven’t set this alias. Upon logging in, it’s a good idea to either set this alias for your current session or if you’re going to be using the machine often, just add it to your bash or zsh profile.
List (ls) commands
Make ls look nice
The monochromatic look of the standard ls is enough to drive oneself mad. Without colorized output, you have to scan through each of the files/directories. To get color-coded output where directories, symbolic links, executable files, devices (drives), etc., all have their own specific color, you need to use the G flag on OSX. We can assign this as the default alias of ls:
alias ls='ls -G'
On Linux distributions you need to set --color=auto:
alias ls='ls --color=auto'The long list (ll) command
This one might not be applicable for everyone, but for those of who move between macOS and Linux know how annoying it is to type ll and be given the command not found: ll response. To fix this, we create the alias
alias ll='ls -l'(which on Linux distributions is a built-in alias; you can check this by executing $ type ll). To make it a little nicer (the way I like it, at least), we add the a flag (to also list hidden files), the T flag to display the complete time (month, day, year, hours, minutes, and seconds), the t flag to sort by time, the r flag to reverse this output such that the most recently created file, directory, etc. is displayed near the bottom, and lastly, the G flag (or for Linux, --color=auto), to colorize the output:
alias ll='ls -altrTG'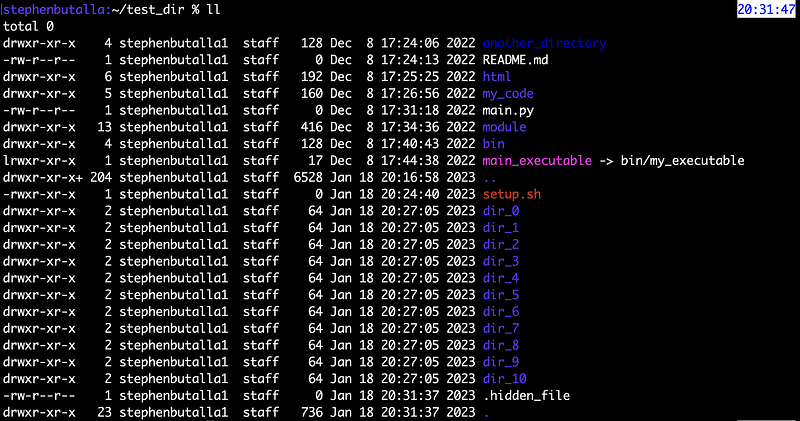
List items by size
Frequently I need to list directory contents by size, in ascending order, such that the largest file is nearest the bottom of the output. We use the usual “long list” command but add the size flag S, with reversed output (r flag), and to make the file sizes human readable (i.e., using prefixes with Bytes like kB, MB, GB, etc., instead of writing out incredibly long numbers), we use the h flag:
alias lsz='ls -lrSh'List only directories inside of a parent directory
This is one that I use many times a day. For this alias, we have to specify that we want to list the directories (d), where we use the asterisk (referred to as a wildcard in the parlance of computing) and a forward slash (*/) to say list directories in the current directory only:
alias lsdir='ls -ldTh */' Or, if you want to recursively list all subdirectories, simply add an extra wildcard before the forward slash:
alias lsrdir='ls -ldTh **/'List the size of the contents of a directory
I often find myself needing the aggregate size of the contents of a directory (and not the individual sizes of every subdirectory), so I made an alias for this specific:
alias dudir='du -sh'where the s flag is for displaying only the total size of the directory in question (this treats the directory as if it were one single file), and h is to transform the output size to a human-readable output (e.g., kB, MB, GB, etc.).
Safely move and copy data
My standard move function (mv) alias
It is good to know when you are overwriting a file when copying or moving data (or using mv to rename a file)—you can’t undo it, so you better be completely sure of the operation. that if there are files in the target directory that share the name of the files you’re moving/copying, you want to overwrite them. This risk can be mitigated by using the interactive mode (i) flag. So if this scenario does occur, we can be prompted to proceed with the moving/copying or skip the current file. For a little more information (and to keep track of the progress), I also like to use the verbose (v) setting. Simple, but extremely effective:
alias mv='mv -iv'
My standard copy function (cp) alias
The story is the same for the cp function:
alias cp='cp -iv'Colorize grep
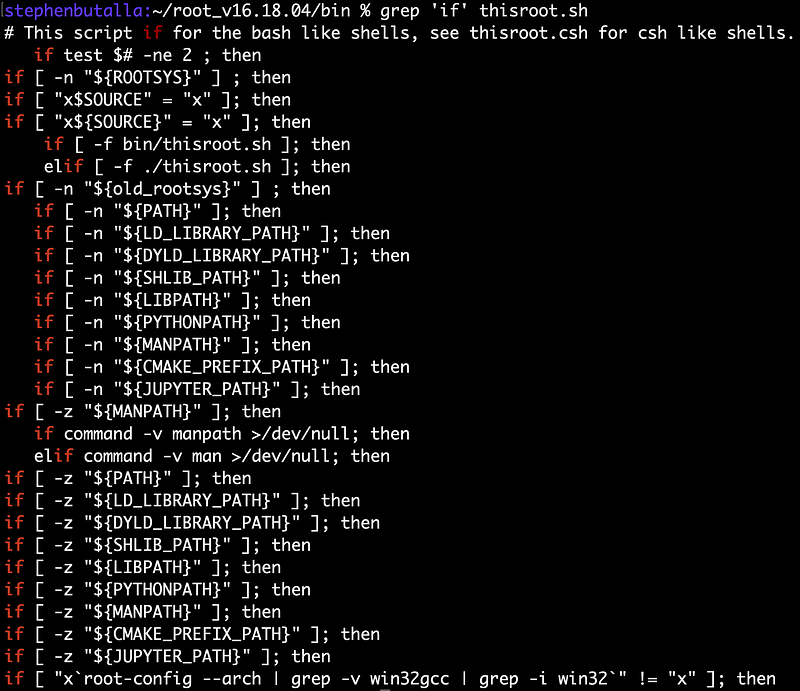
Colorizing makes things much easier to read, so I alias the default grep command so that it prints the pattern in color:
alias grep='grep --color'As an example, I’ll search for if statements in a shell script:
Shutting down and rebooting made faster
Going through the GUI to shutdown your machine takes an extra 20 seconds that I just don’t have. And typing out the shutdown and reboot commands in full is just too exacting. So, I made aliases for both:
alias off='sudo shutdown -h now'
alias reboot='sudo shutdown -r now'
Finding all specific processes
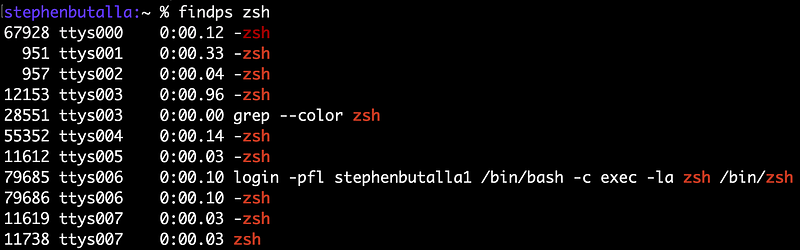
When I need to get the specific PID of a process, I pipe the results of the process status (ps) command and filter the results using grep. This is annoying to type out every time, so I made an alias devoted to this purpose:
alias findps='ps -ax | grep'Perhaps you want to find all s processes running a particular shell (zsh in this case). Just type $ findps zsh, and the colorized, grep-filtered output from ps appears:
macOS-centric commands
All of these have a direct Linux analog, but since for some reason, the commands for macOS are generally more complicated than their Linux counterparts. So, instead of typing out the long commands to, say, list or mount and unmount drives, I made some aliases to make life a little easier.
List all connected drives
This one is a real time saver, as I rotate between several external hard drives:
alias dl='diskutil list'The Linux equivalent here is the lsblk command (list block devices).
Mount/unmount connected drives
I use a few external drives often so I frequently find myself mounting or unmounting the drives. The disk utility command for macOS is great, but it is long to type out and you can’t use tab completion for the second part of the command. So, to save some time, I aliased the mount and unmount diskutil commands:
alias mnt='diskutil mount'
alias unmnt='diskutil unmount'
alias eject='diskutil eject'
The Linux commands here are mount, umount, and eject. It is interesting to note that the first two of these commands are available with the macOS version of BSD Unix. However, if you read the man page on umount(8) (from the BSD System Manager’s Manual, 4th Berkely Distribution) there is a cryptic message that reads “Due to the complex and interwoven nature of Mac OS X, umount may fail often. It is recommended that diskutil(1) (as in, ``diskutil unmount /mnt’’) be used instead.”. It is for this reason that commands for block devices are performed through macOS’s diskutil.
GitHub Commands
Staging files for a commit, committing, and pushing
Since you can’t use tab completion after the executable is typed, e.g., after typing git, you can’t type a and then <tab> to autocomplete the command to git add, I like to alias my most frequently used Git commands to speed things up:
alias gita='git add'
alias gitc='git commit -m'
alias gitp='git push'
Sundry
Starting and naming a tmux session succinctly
If you read my article on my top seven command line tools that boost productivity, you know I’m a big fan of tmux (terminal multiplexer). This is an amazing tool that allows you to use more than one shell “session” when logged in to a remote server (where, by design, you only have one shell to use). You can create more windows which you can scroll through, or, you can split a window into panes, allowing you to view several “shells” on the same screen. (I use “shells” in quotations because it isn’t actually a separate shell, but a subprocess of the shell tmux was launched in.) It sounds trivial, but to have the flexibility of moving between different shells when logged in remotely (e.g., one shell has vim open, one is used to execute commands, another is used for making changes to files in a completely separate location on the machine, etc.), your productivity skyrockets. If you haven’t read the article I recommend checking it out:
Instead of writing out the command in full, we’ll create an alias that automatically takes care of creating the tmux session and adds the s flag to specify the name:
alias tmuxn='tmux new-session -s'Attaching to a tmux session
Here we make an alias to attach to a previously created session. We use the the t flag to specify the target session:
alias tmuxa='tmux attach -t'A new default for tree
Another command line tool in my article The Top 7 Must-Have Command Line Tools to Boost Productivity is tree . It’s great on its own, but for more utility and improved readability, I have the original tree command aliased to print out the file/directory structure in color (the C flag), and also print the size of the file(s) in human readable format (the h flag):
alias tree='tree -Ch'
A shorcut to start Jupyter Notebook/Lab
For my research I make a lot of plots, and the datasets I use come packaged in a spectrum of forms. Consequentially, I have to write parsers every now and again. Jupyter notebook/lab is the ideal tool for quickly developing these parsers and making plots. However, it is annoying to type the command all the way out (even when using tab completion for the first command). I know, I’m extremely lazy. To ameliorate this terrible inconvenience, I have two aliases, two characters in length, for launching Jupyter Notebook and Jupyter Lab from the command line:
alias jn='jupyter notebook'
alias jl='jupyter lab'
Quickly printing the weather forecast in different ways
The honorable mention from my article The Top 7 Must-Have Command Line Tools to Boost Productivity was wttr.in, a weather forecast command that only requires curl. There are innumerable ways to display the weather forecast using this command, and depending on what time of day it is or how far into the future I want to know the forecast for, I want more or less information accordingly. It is also a pretty long command to type out (let alone remember perfectly). So, I made some aliases to streamline this process, the first of which prints the current conditions plus the complete three day forecast:
alias weather3="curl -s 'wttr.in/london?F'"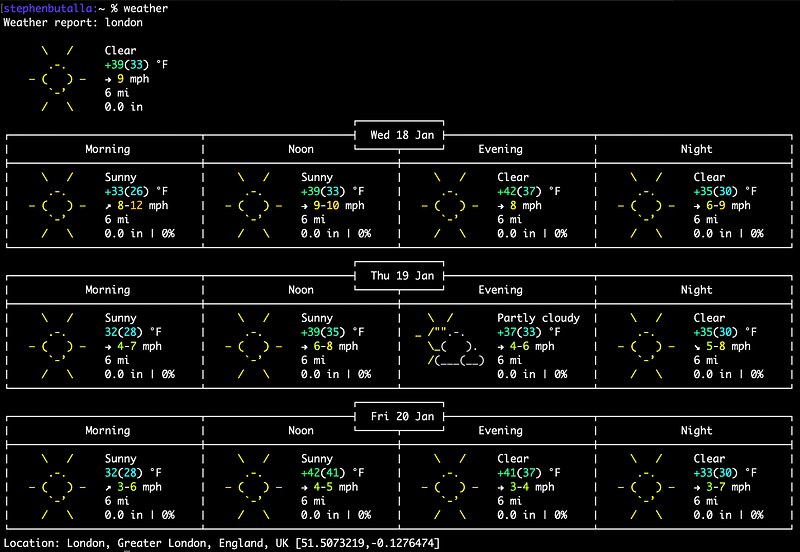
Of course, you would substitute your location appropriately, or if you supply no location it returns the weather based on the location of your IP address. If you are not in one of the large, uniquely named cities in the world (as most of us are), you’ll need to, for example, replace the single city of ‘london’ in the command above with city+state if you’re in America or city+country if you're anywhere else.
For the current conditions and a one day forecast, I use the alias
alias weather=”curl -s ‘wttr.in/meyrin+switzerland?1F’”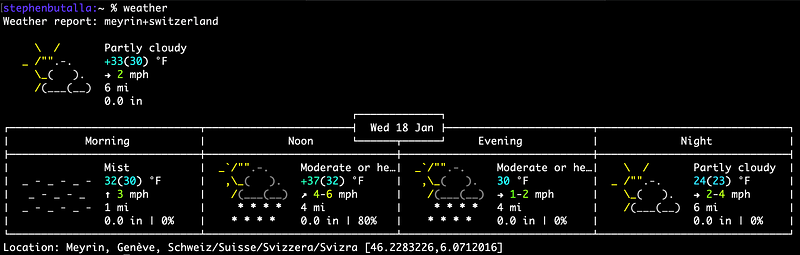
And for a detailed report, including the three-day forecast, a color-coded, time series line plot of the temperature, the wind speed and direction, the conditions (snowing, cloudy, sunny, etc.), barometric pressure, dawn, dusk, sunrise, and sunset times, and the moon phases, I alias a command using the v2 format:
alias fancy_weather=”curl ‘wttr.in/nashville?format=v2’”
Make these changes permanent
If we set these aliases from the command line they will only be valid in the shell session where they were set. Once we exit from that session any commands we aliased will be forever lost. To make these changes permanent, we carve out a section of our shell’s “read commands” or rc file (e.g., .bashrc, .zshrc, etc.) and add them. Here we assign our aliases:
## EXAMPLE ENVIRONMENT VARIABLES
export PATH=/usr/local/bin:/path/to/my/executables:$PATH

## ALIASES
alias rm='rm -i'                                    # prompt to delete
alias ls='ls -G'                                    # alias ls='ls --color=auto' for linux
alias ll='ls -altrTG'                               # list by time, oldest to newest, with colorized output
alias lsz='ls -lrSh'                                # list by size, descending order
alias lsdir='ls -ldTh */'                           # list only directories
alias lsrdir='ls -ldTh **/'                         # recursively list only directories
alias mv='mv -iv'                                   # prompt to overwrite, verbose
alias cp='cp -iv'                                   # prompt to overwrite, verbose
alias grep='grep --color'                           # colorize output
alias off='sudo shutdown -h now'                    # power off now
alias reboot='sudo shutdown -r now'                 # reboot now
alias findps='ps -ax | grep'                        # find processes matching input to grep
alias dl='diskutil list'                            # macOS only; list all block devices
alias mnt='diskutil mount'                          # macOS only; mount drive
alias unmnt='diskutil unmount'                      # macOS only; unmount drive
alias eject='diskutil eject'                        # macOS only; mount eject
alias gita='git add'                                # add file(s) for commit
alias gitc='git commit -m'                          # stage files with a message
alias gitp='git push'                               # push
alias tmuxn='tmux new-session -s'                   # start a new tmux session and name it
alias tmuxa='tmux attach -t'                        # attach to a named tmux session
alias tree='tree -Ch'                               # add color and human-readable file sizes
alias weather3="curl -s 'wttr.in/city?F'"           # print current conditions and 3-day forecast
alias weather="curl -s 'wttr.in/city?1F'"           # print current conditions and daily forecast
alias fancy_weather="curl 'wttr.in/city?format=v2'" # print out all weather info available
For these changes to take effect we need to “source” the file, which is accomplished by the source command (or, equivalently, the dot command, ., with the caveat that the full path must be included when using .). E.g.,
$ source .zshrcor
$ . ~/.bashrcAt this point, the scrupulous reader might be wondering what the difference between source and . are. We normally execute shell scripts with the ./ command, and source (or .) for the bash/zsh rc files or profiles. I answered that question in the short article linked below:
If we want to go the extra mile (or just be more organized), we can define a separate file containing our aliases and then “import” it when we source our rc file. We’ll make this a hidden file in our home directory (~/) named .aliases. To import these aliases when we source our rc file we add the statement below, which first checks if the file exists using the -f logical operator. If it does, it will source the file, if not, it continues to execute the rest of the rc file. This if statement will ensure that the rest of the rc file will be sourced if, for some reason, the .aliases file was accidentally moved or deleted.
## LOAD ALIASES
if [ -f ~/.aliases ]; then
    . ~/.aliases
fi
Conclusion
And that’s it! Those are my essential aliases that I use on a daily basis. If you aren’t already using aliases you should be—they make working with the terminal a much more efficient and simpler experience. In any case, be sure to leave a comment and let me know what your favorite aliases are!


