avatarCleison Ferreira Melo

Free AI web copilot to create summaries, insights and extended knowledge, download it at here

1850

Abstract

href="https://www.rabbitmq.com/">https://www.rabbitmq.com<i></i></a><i>. If microservice A wants a data from microservice B, the microservice A(client) will send the request to a queue, on the RabbitMQ server, and once this request has been processed by microservice B(server), RabbitMQ will reply an answer for the microservice A(client). Below the RCP(Remote Procedure Call) strategy, picture.</i></p><figure id="1125"><img src="https://cdn-images-1.readmedium.com/v2/resize:fit:800/1*ryQ5ELEeuWdBZFt8MBVNfw.png"><figcaption></figcaption></figure><p id="2c1a">The first step is to create a new service inside “<b>docker-compose.yml</b>”, as you can see below, you should add the service “<b>rabbitmq-server</b>”.</p><figure id="32eb"><img src="https://cdn-images-1.readmedium.com/v2/resize:fit:800/1*8siawI9yQcbCOQQ_XDb0cA.png"><figcaption></figcaption></figure><p id="8ed5">The next step is to run “<b>docker-compose up — build -d</b>”, remember to running it inside the microservice product root folder.</p><figure id="963a"><img src="https://cdn-images-1.readmedium.com/v2/resize:fit:800/1*EAdDrs9fy1bkdSVvd8DsjA.png"><figcaption></figcaption></figure><p id="5aa4">To check if the service is up, open “<a href="http://localhost:15672/">http://localhost:15672/</a>”. Username “user”, password “1”.</p><figure id="01c8"><img src="https://cdn-images-1.readmedium.com/v2/resize:fit:800/1*63Vxa0uWHpheivG9IO6VRQ.png"><figcaption></figcaption></figure><p id="e695">The next step is to open the “<b>package.json</b>” to install the new dependencies. Pay attention in highlighted items below. Run “<b>npm install</b>” to install the dependencies.</p><figure id="a838"><img src="https://cdn-images-1.readmedium.com/v2/resize:fit:800/1*Ep4GViO7Zizv7CNS6qMbag.png"><figcaption></figcaption></figure><p id="7061">The last step is to create a new file “<b>ra

Options

bbitmq-conn.js</b>” inside connection folder, inside this file we will create one connection with the RabbitMQ server, and I added the <b>parameters to keep the connection always opened case we get some network issues</b>.</p><figure id="d195"><img src="https://cdn-images-1.readmedium.com/v2/resize:fit:800/1*qa6TdydT9CIResV-ex_saQ.png"><figcaption></figcaption></figure><p id="3be1">The next screenshot is a “<b>tip</b>” for you. To avoid every time us, developers, define the system variables, I added a new dependency “<b>dotenv</b>” inside “<b>devDependencies</b>” to read the system variables from “.env” file inside of the project root folder. This file isn’t committed to GitHub; you should create a new one as an example below to use this resource.</p><figure id="d5b3"><img src="https://cdn-images-1.readmedium.com/v2/resize:fit:800/1*fNH3vzZBddFrcTpts2oXpw.png"><figcaption></figcaption></figure><p id="b90d">Here I finish this article; I hope you enjoyed it. In the next article, we will create the broker server to read messages sent for a queue. See you soon.</p><p id="0ed8">Link GitHub:</p><div id="6d95" class="link-block"> <a href="https://github.com/cleisommais/journey_full_microservices"> <div> <div> <h2>cleisommais/journey_full_microservices</h2> <div><h3>Contribute to cleisommais/journey_full_microservices development by creating an account on GitHub.</h3></div> <div><p>github.com</p></div> </div> <div> <div style="background-image: url(https://miro.readmedium.com/v2/resize:fit:320/0*cKYafY4diij7KdsS)"></div> </div> </div> </a> </div><p id="2f7e"><b>Cleison Ferreira de Melo</b></p><p id="cd9c"><i>Instructor Estía Training</i></p></article></body>

The journey to building a full microservice app. RabbitMQ container and connection.

Hi guys, today I’m publishing the 14th article of this track. I hope that the journey is instigating you to learn more about microservices and the several technologies that we should learn to create a real microservice app. Today we will add a new Docker Compose service, the RabbitMQ, and create the connection between the microservice and RabbitMQ. Suppose you don’t know what RabbitMQ is and why we should use it, read the introduction topic below. Let’s start.

Before we start, look at the last article of the track.

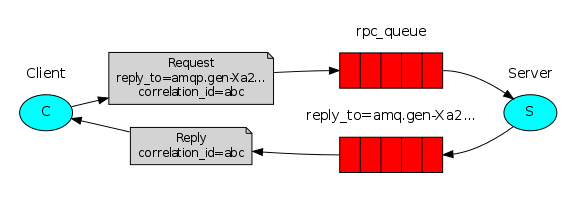
When we define a microservice architecture, we must keep in mind, the isolation of all services, avoiding any kind of dependency. For this, we use a message-broker like is RabbitMQ https://www.rabbitmq.com. If microservice A wants a data from microservice B, the microservice A(client) will send the request to a queue, on the RabbitMQ server, and once this request has been processed by microservice B(server), RabbitMQ will reply an answer for the microservice A(client). Below the RCP(Remote Procedure Call) strategy, picture.

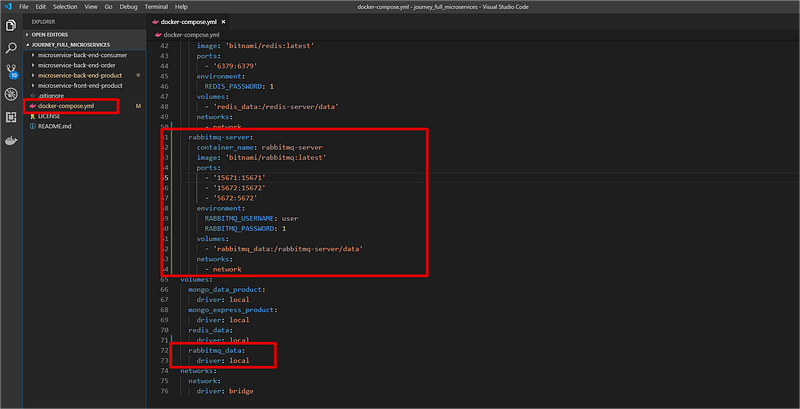
The first step is to create a new service inside “docker-compose.yml”, as you can see below, you should add the service “rabbitmq-server”.

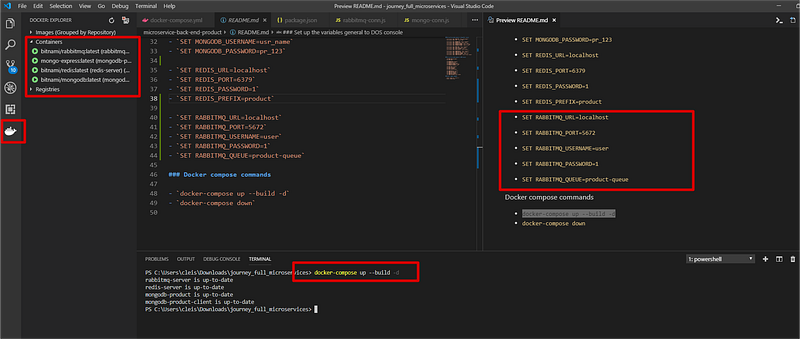
The next step is to run “docker-compose up — build -d”, remember to running it inside the microservice product root folder.

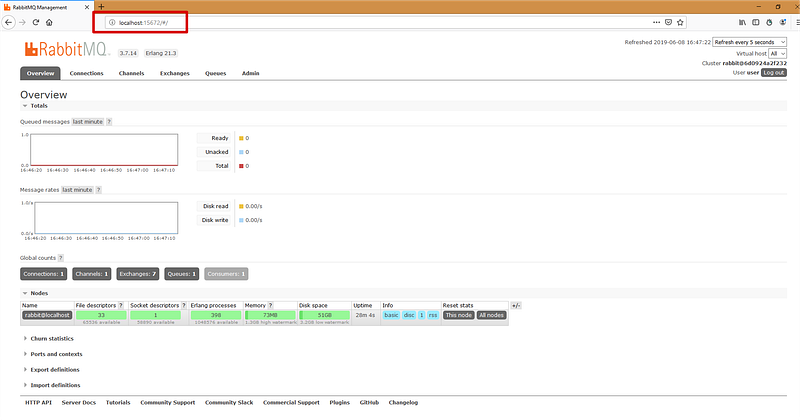
To check if the service is up, open “http://localhost:15672/”. Username “user”, password “1”.

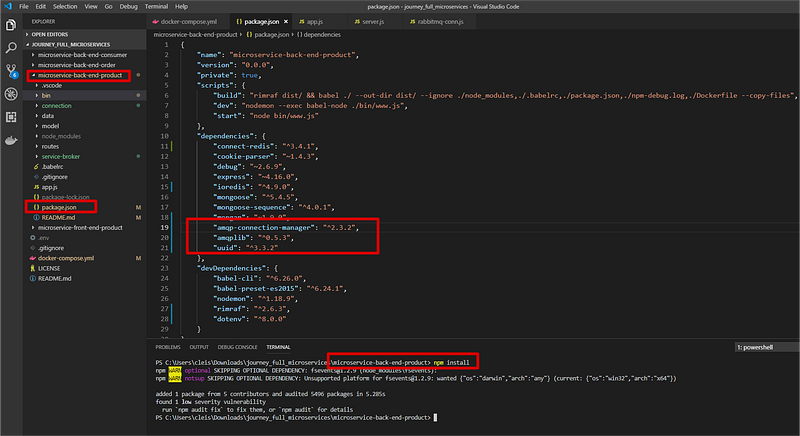
The next step is to open the “package.json” to install the new dependencies. Pay attention in highlighted items below. Run “npm install” to install the dependencies.

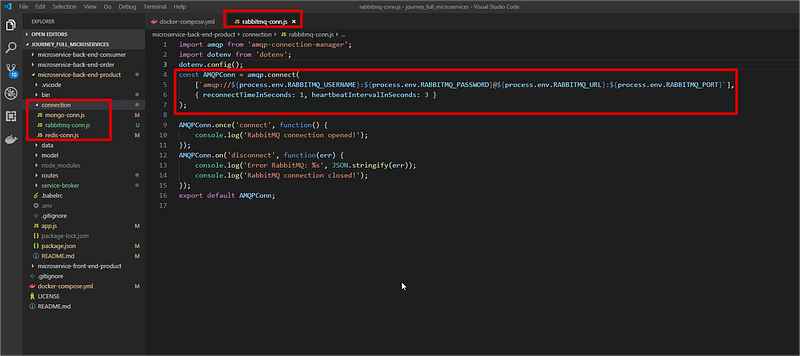
The last step is to create a new file “rabbitmq-conn.js” inside connection folder, inside this file we will create one connection with the RabbitMQ server, and I added the parameters to keep the connection always opened case we get some network issues.

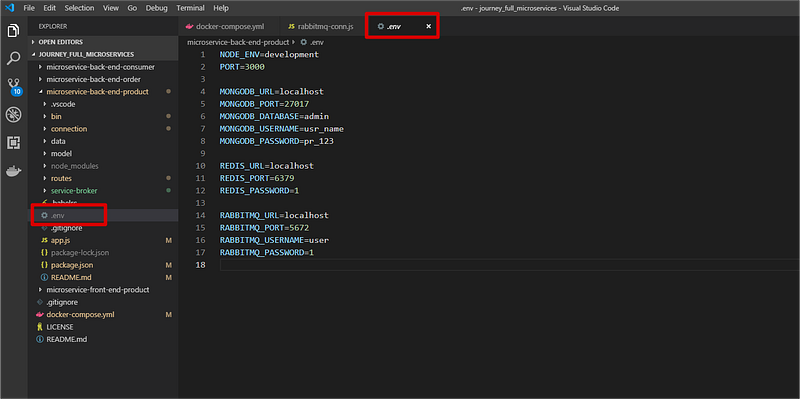
The next screenshot is a “tip” for you. To avoid every time us, developers, define the system variables, I added a new dependency “dotenv” inside “devDependencies” to read the system variables from “.env” file inside of the project root folder. This file isn’t committed to GitHub; you should create a new one as an example below to use this resource.

Here I finish this article; I hope you enjoyed it. In the next article, we will create the broker server to read messages sent for a queue. See you soon.

Link GitHub:

Cleison Ferreira de Melo

Instructor Estía Training

Docker
Software Development
Redis
Rabbitmq
JavaScript
Recommended from ReadMedium