
The Easiest Way to Deal with Forms in React
Use React Hook Form to improve performance in your application

Forms are an essential part of any website or application. You will see them used everywhere from login/signup screens to adding and updating data.
When using React, typically we would want to create a controlled component when dealing with inputs.
For example, we will need to create a state variable and set this as the value of the input. Then we will need to add an onChange event listener to the input. Now, whenever the input is updated, we have a controlled state within our application.
As you can see from above, there is a few extra lines of code needed to pull this off. Imagine if we have a form with multiple inputs? We will need to create a separate state for each input and add the value and onChange listener for each one. Also, every time we change the value of the input, it will cause a rerender of the component.
To make things a lot simpler, welcome the React Hook Form library. It is described as,
“Performant, flexible and extensible forms with easy-to-use validation.”
Sounds good, doesn’t it? In this article, we will take a look at the React Hook Form library. We will start off with learning how to implement it in our app, then take a look at how to handle validation.
Getting Started
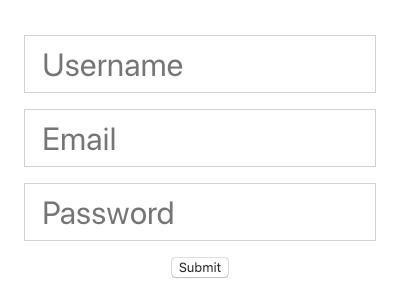
To show off this library, we will build a simple form. First off, let’s create a form in our React project like below. It is a simple form with three input fields and a submit button.
const App = () => {
  return (
    <form className="App">
      <input type="text" placeholder="Username" name="username" />
      <input type="email" placeholder="Email" name="email" />
      <input type="password" placeholder="Password" name="password" />
      <input type="submit" />
    </form>
  );
};
I added a few basic stylings too, just to make it look a little nicer. Now if we open up our application it will look something like this.
Using React Hook Form
To use the React Hook Form library, let’s first install it into our project. You can find the npm package here.
We will import the useForm hook from the library.
import { useForm } from 'react-hook-form';Then, call it inside of a function component. This hook will give us three variables when we call it, register handleSubmit and errors.
const { register, handleSubmit, errors } = useForm();To track the changes to our inputs, we will pass register as a ref to each input that we want to track. Now each input will look like this.
<input
  type="text"
  placeholder="Username"
  name="username"
  ref={register}
/>
Next, let’s take care of the handle submit functionality of the form. We will create a onSubmit function, which will accept data. For now, we will just output it to the console.
const onSubmit = (data) => {
  console.log(data);
};
On the form, add the handleSubmit function as a prop and pass onSubmit as a callback function.
<form className="App" onSubmit={handleSubmit(onSubmit)}>Now, when we add data to the form and submit it, we will see the output in our console. We now have a nice object with all of our form data.
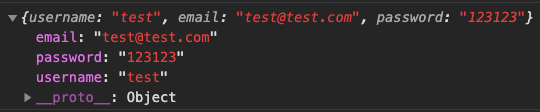
Don’t forget to add a name prop to the inputs. The name we pass to the inputs will be used as the key in our data object.
Adding Validation
To add validation rules to the form, we can pass an optional object as an argument to register.
For example, if we want to make an input required, we can simply add the following to any input.
<input
  type="text"
  placeholder="Username"
  name="username"
  ref={register({ required: true })}
/>
Now, if we try to submit the form without a username, it will not work.
We can display an error message by using the errors value from before. Any errors that occur will become a prop on the errors object and we can use this to display errors.
For example, if a user does not write in a username (which we made required), we can display an error like so.
{errors.username && <p>Username required</p>}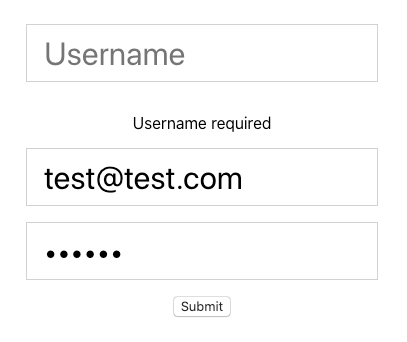
The list of supported validation rules are:
- required
- min
- max
- minLength
- maxLength
- pattern
- validate
If you were following along with the code, we should now have a form with the validation set up like below.
Wrapping Up
Thanks for reading! I hope this article was helpful for you to get started working with the React Hook Form library.
It is easy to use, good for performance, and requires a lot less code. Give it a shot in your next application where a form is needed.
If you want to check out the full source code for the example we created, check out the GitHub repository here.
To learn about another useful React library, check out the article below where we look at the React Icons library.


