
The Complete Guide to Uploading a Marketable Book on Amazon KDP
For self-published authors, diligent formatting is key
This is the ultimate guide for you to get started in self-publishing your book on Amazon. Because the processes are different for doing a paperback book and an eBook, I will cover them separately. (If you want to see the final result, check out my Author Page.)
If you are having trouble viewing this content here’s how to fix that.
Preparing the Manuscript — Paperback
First, you’ll need to get your manuscript ready. You will do this in Word, Scrivener, or Google Docs initially, but you’ll need two separate types of documents, one for paperback and one for eBook.
I used Word to create my manuscript, and so my directions will be tailored to the Word program.
While in Word, you need to set your document size to be 6 by 9 if that is the size of book you would like to create.
To do this, go to layout> size> more paper sizes> and then plug in the size of the document that you want. I wanted my poetry book to be 6 by 9, and so that’s what I put in. Also, if you go to View>print layout, your document will look like this.
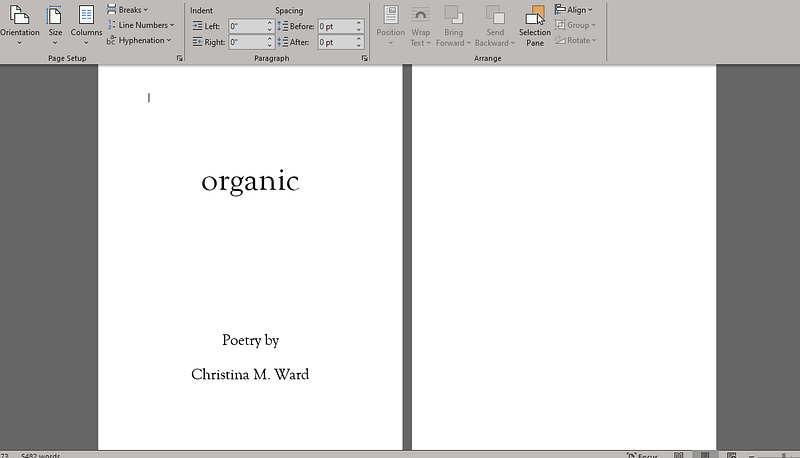
Note that the Title page is on the left on this screen. What is on the left will appear on the RIGHT in the book when you upload it to KDP. This piece of information will save you a lot of time. When my book uploaded I had it reversed and all my chapter headings and section pages were on the wrong side. Look at the odd/even numbers on the uploaded book to see if you need to change this in your original document. (This will make more sense later.)
Read your manuscript multiple times to check for spelling and grammatical errors.
When your manuscript is as ready as you can make it, you’ll want to save it as a PDF file. This is very important.
Now, when you get to KDP you’ll want to either use their Cover Creator or have a cover ready. I used Canva to create my cover photo:

Checklist — here is what you need to have ready for a paperback book when you go to Kindle Direct Publishing (KDP)
- Your complete manuscript saved as a PDF file.
- The cover photo you want to use if you don’t want to use the standard KDP cover photos (there is a template you can use and put your photo into).
- Any “blurbs” you’ve prepared from other sources singing the praises of your book or any other “back matter” you’ve prepared for the back of your book. You’ll put that into the Cover Creator, but you don’t want to put it in your manuscript file.
- Your manuscript file should look exactly how you want the INSIDE ONLY of your book to look. Don’t forget to put in blank pages where you want them.
- The description for your book that you would like to go live on the Amazon page for your book.
Now, you’ll want to go to the KDP publishing website and start an account there.
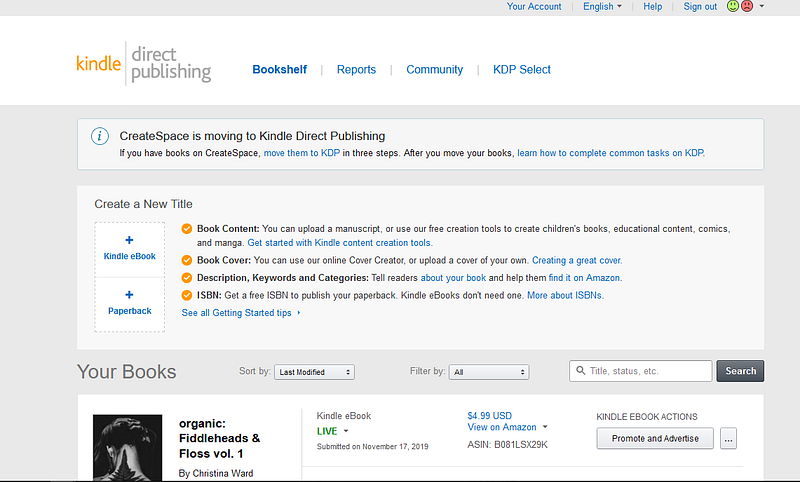
Here you see the webpage with Bookshelf (where you’ll create and edit your books), Reports (where you’ll view sales data), Community (where you’ll see the community threads), and KDP Select (which is a special promotional program that KDP offers.)
Since we’re going to do a paperback book, you want to go down to where it says “create a new title” and click on the word “paperback” with the little plus sign above it.
You may be required to sign in again with Amazon. This happens at multiple junctions of the process to make sure the process is as secure as possible.
Across the top of the page, you’ll see paperback details, paperback content, and paperback rights and pricing. This is the three-step process that you will complete to submit your book.
Under the first tab, paperback details, select the language of your book and put in your book title as it appears on your book cover. You also have the option to add a subtitle or whether or not your book is part of a series. If this is a second or third edition, you can put that under addition number. I didn’t put anything there as this is my first book.
Next, fill in the author as you would like your name printed in your book. You can also add any other contributors, such as other authors, illustrators, or editors.
Next, add in the description that you’ve pre-prepared for your book. This is the description that will be on the Amazon page, and so you want to make sure that it’s a good sales pitch for your book.
After the description, you’ll choose publishing rights. Select that you’re the owner and hold the rights to publish your work or if it’s a public domain work. You’ll also select keywords and categories to help people find your book when they’re browsing on Amazon. You can also select whether or not your book contains adult content.
When you’ve completed this first page, select “save and continue.” You’ll be taken to a page for paperback content.
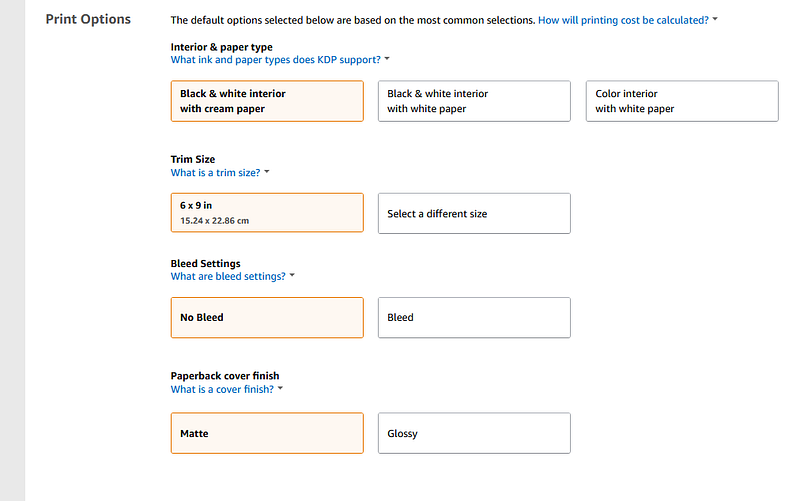
Select whether or not you want Amazon to provide you with a free ISBN or provide your own, and then select the publication date if you want it to launch on a certain date. Then, select some options for how you want your book to look regarding paper type and color, trim size, bleed settings, and whether or not you want your cover to be matte or glossy.
Here are the print options you’ll have:
Now, aside from the preparation of your manuscript, this next portion will take up the bulk of your time and the length of your nerves. Grab a cup of coffee or a six-pack because it’s going to take some time. If you know this going in it may save you a lot of hair-pulling.
For the record, I began mine at about 9 p.m. and hit publish at 4 a.m. Of course, I was going in completely blind. I hope to save you some of the issues that I had.
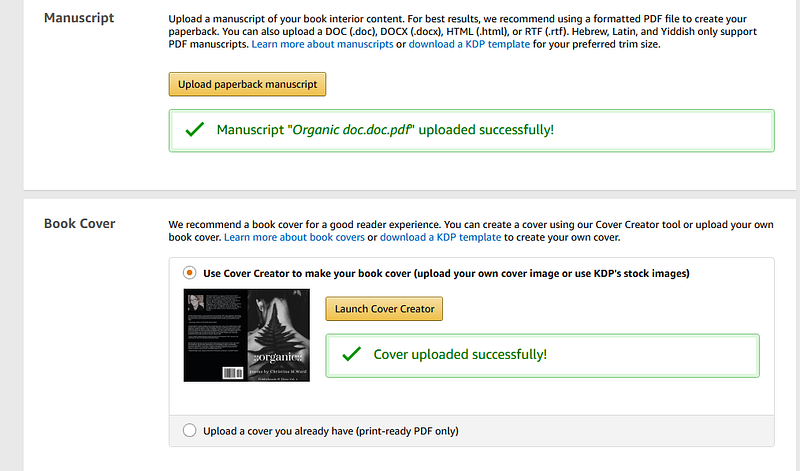
The first thing you’ll do is upload your manuscript, which is your PDF file that you have saved and ready to go.
Next, launch Cover Creator and choose your options.
You’ll have the option to choose a template, and you can upload a photo of your own from your computer if you like for the cover.
Don’t panic when you see this:
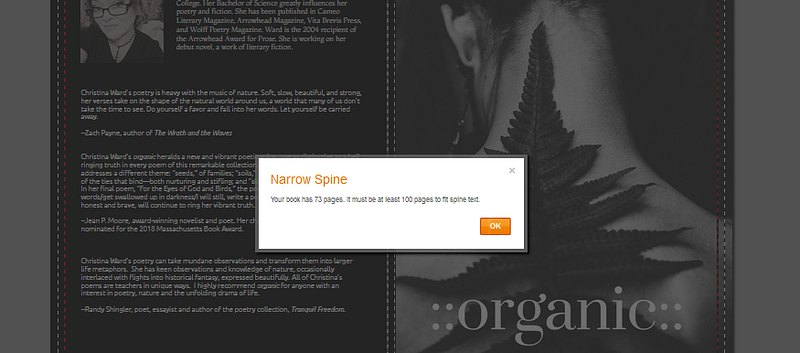
As you can see, my cover is already finished, but that little blurb about narrow spine simply means that your book is too narrow for you to include spine information, like your name or the title of your book. Click OK.
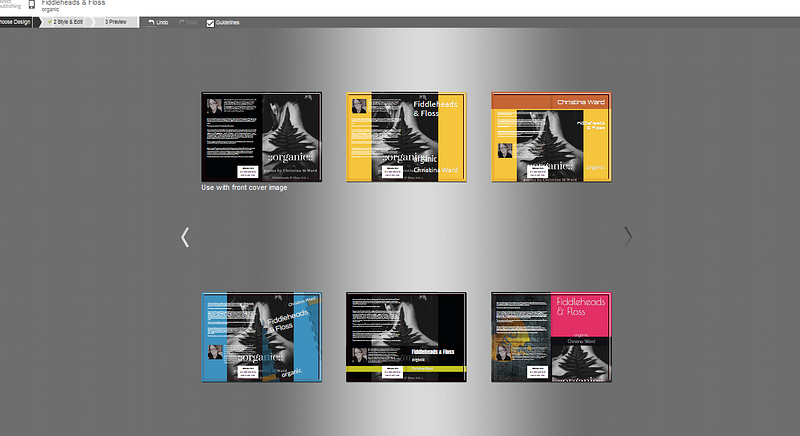
As you can see, there are multiple templates for you to choose from. I chose my template and had uploaded my photo, which you can see in the various templates to get an idea of the layout of your cover.
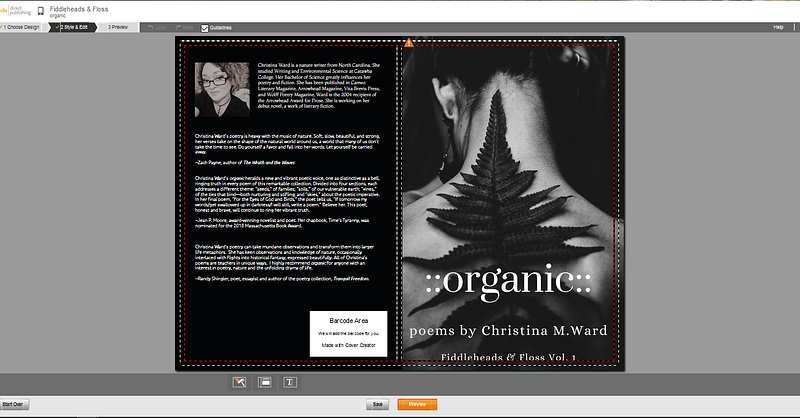
From this point, you’ll adjust the cover photo if you need to, plug in your bio and photo, and plug in any back matter that you have prepared. The information will automatically fill in and adjust to the size of your cover.
A barcode space will be there as well, but you don’t need to do anything with this.
When you’re done editing and creating your cover, click on the preview screen to see what it will actually look like. You may have to go through the process of editing and saving multiple times before you get the cover exactly as you want it.
Save and continue. Back on the manuscript and book cover screen, scroll down to where it says “book preview” and launch the previewer.
Get a cup of coffee again or open another beer because this part takes a while. It may take up to 10 or 15 minutes to finish preparing the preview. While on the preview screen, you have the option to scroll all the way through your book and proofread. You may see all kinds of jacked up things that you don’t like. That means that you have to go back to your original Word document, edit what you want to correct, save again as a PDF file, and then re-upload your manuscript to KDP.
For me, this process took hours. Sometimes I had to go through the process all over again to move two spaces on something. Each time you do it is time-consuming and you have to wait all over again for the book previewer to prepare your book to be viewed.
Be patient and try not to pull your hair out.
Note: For novels, you want your formatting to be fairly consistent, but with poetry, you may want to move things so that a stanza isn’t broken in the middle before the poem carries over to the next page. Use your discretion on how you do this as it needs to look pleasing to you.
When you’re done and you’re satisfied with the final look of your book (or you are too intoxicated to continue — at which point, get some sleep and pick up HERE when you come back — PROOFREAD the previewer again and then continue →) save, continue, and complete the paperback rights and pricing page. Select the territories for which you hold distribution rights, set your pricing, and then publish your paperback book.
It may take up to 72 hours for your book to be reviewed, approved, and appear on Amazon.
Some of my material had been previously published online and therefore my book was initially rejected. I had to go back into KDP and publish it again, which shows that I’m claiming that I do have the rights to publish this material. In all, it took about 24 hours for my book to go live on Amazon.
If you haven’t lost your mind at this point and you would like to continue to preparing your eBook, proceed. (I waited until the next day to do my eBook…at this point in my book-launching efforts, it was 4 a.m. and I thought I might lose my mind completely.)
Preparing Your Manuscript for an eBook
The process is very different for preparing your manuscript as an eBook on KDP. First of all, you won’t be using a PDF file. You’ll also be preparing the Word document very differently. I didn’t know how to do this and did some research online to figure it out. The following video explained it well enough that I was able to do it. Do yourself a favor and watch the whole thing!
Checklist — here is what you need to have ready for an eBook when you go to Kindle Direct Publishing (KDP)
- Your complete manuscript saved as a docx file.
- The cover photo you want to use if you don’t want to use the standard KDP cover photos (there is a template you can use and put your photo into).
- Any “blurbs” you’ve prepared from other sources singing the praises of your book or any other “back matter” you’ve prepared for the back of your book. You will want it in your manuscript file on whatever page you would like. I put mine at the beginning of the book, after the title page.
- The description for your book that you would like to go live on the Amazon page for your book.
When you go on KDP, select eBook (with the little plus sign over top of it) to create an eBook. Then, you’ll go through the same process, only you’ll upload your new document manuscript.
The KDP program offers a list of different file types that you can use, and not knowing which was the best, I was shooting in the dark.
I tried multiple files. I saved as HTML. I saved as RTF. And then finally I saved as docx. This is very important because when I was working in the book previewer I was continually going back and having to correct my original document, save it again, and upload it again.
The same problems were showing up over and over when I was using an HTML document. I’d view my Book Preview and ALL of my titles were changed either in the size of the font, in the color of the font, or both, but not equally throughout the document. Even changing them in the original, re-uploading, and relaunching Book Previewer — there they were, messed up all over again in different ways.
So, I tried it as an RTF and that was an ultimate fail.
I eventually settled on saving it as a docx. This was the winning solution. Save yourself hours of time and start with the docx.
When you launch the cover creator, you’ll go through the same process, only it will be much simpler as an eBook has only the front page.
When you have the cover and the manuscript loaded, go to your book previewer and flip through every single page to make sure it looks exactly the way you want it to look.
If it doesn’t look right, go back and edit your original document. Then, save it in the correct file type, re-upload your manuscript to KDP, and launch the book previewer all over again.
Yes, TEDIOUS and TIME-CONSUMING. This is your baby — get it right.
Once you’re satisfied, hit “save and continue” and go on to the pricing section. When you are finished with that page, you’ll publish your book, and it will go through the same review process as your paperback.
KDP Select
You’ll have the option with the paperback and your eBook to enroll your book in KDP Select. It’s pretty much clear as mud if you read through the information, but essentially, KDP Select is a program that helps to promote your book on more platforms, but you’re limited somewhat in being able to list your book for sale in other places.
I encourage you to read through some information about this program and make this decision for yourself. Please note that for an eBook if you choose to be a part of the KDP Select program you may only sell your eBook on Amazon.
I wish you all the best in your self-publishing goals and hope that this tutorial has been somewhat helpful, at least to prepare you for the process. I am, by no means, an expert. But slogging through the mud alone is a difficult way to do anything. After hearing questions and having requests from several other writers, I decided to make this tutorial.
Thanks
THANK YOU to Michelle Monet for taking the time to call me last month and encourage me to self-publish through KDP.
Tagging some who have had questions: Jun Wu, Jenny Justice, Zarina Dara.


