
Text Generation with Bi-LSTM in PyTorch
A step-by-step guide to build a text generation model by using PyTorch’s LSTMCells to create a Bi-LSTM model from scratch

“There is no rule on how to write. Sometimes it comes easily and perfectly: sometimes it’s like drilling rock and then blasting it out with charges” — Ernest Hemingway
The aim of this blog is to explain the building of an end-to-end model for text generation by implementing a powerful architecture based on LSTMs.
The blog is divided into the following sections:
- Introduction
- Text preprocessing
- Sequence generation
- Model architecture
- Training phase
- Text generation
You can find the complete code at: https://github.com/FernandoLpz/Text-Generation-BiLSTM-PyTorch
Introduction
Over the years, various proposals have been launched to model natural language, but how is this? what does the idea of “modeling natural language” refer to? We could think that “modeling natural language” refers to the reasoning given to the semantics and syntax that make up the language, in essence, it is, but it goes further.
Nowadays, the field of Natural Language Processing (NLP) deals with different tasks that refer to reasoning, understanding and modeling of language through different methods and techniques. The field of NLP (Natural Language processing) has been growing extremely fast in this past decade. It has been proposed in plenty of models to solve different NLP tasks from different perspectives. Likewise, the common denominator among the most popular proposals is the implementation of Deep Learning based models.
As already mentioned, NLP field addresses a huge number of problems, specifically in this blog we will address the problem of text generation by making use of deep learning based models, such as the recurrent neural networks LSTM and Bi-LSTM. Likewise, we will use one of the most sophisticated frameworks today to develop deep learning models, specifically we will use the LSTMCell class from PyTorch to develop the proposed architecture.
If you want to dig into the mechanics of the LSTM, as well as how it is implemented in PyTorch, take a look at this amazing explanation: From a LSTM Cell to a Multilayer LSTM Network with PyTorch
Problem statement
Given a text, a neural network will be fed through character sequences in order to learn the semantics and syntactics of the given text. Subsequently, a sequence of characters will be randomly taken and the next character will be predicted.
So, let’s get started!
Text preprocessing
First, we are going to need a text which we are going to work with. There are different resources where you can find different texts in plain text, I recommend you take a look at the Gutenberg Project.
In this case, I will use the book called Jack Among the Indians by George Bird Grinnell, the one you can find here: link to the book. So, the first lines of chapter 1 look like:
The train rushed down the hill, with a long shrieking whistle, and then began to go more and more slowly. Thomas had brushed Jack off and thanked him for the coin that he put in his hand, and with the bag in one hand and the stool in the other now went out onto the platform and down the steps, Jack closely following.As you can see, the text contains uppercase, lowercase, line breaks, punctuation marks, etc. What is suggested to do is to try to adapt the text to a form which allows us to handle it in a better way and which mainly reduces the complexity of the model that we are going to develop. So we are going to transform each character to its lowercase form. Also, it is advisable to handle the text as a list of characters, that is, instead of having a “big string of characters”, we will have a list of characters. The purpose of having the text as a sequence of characters is for better handling when generating the sequences which the model will be fed with (we will see this in the next section in detail).
So let’s do it!
As we can see, in line 2 we are defining the characters to be used, all other symbols will be discarded, we only keep the “white space” symbol. In lines 6 and 10 we are reading the raw file and transforming it into its lowercase form. In the loops of lines 14 and 19 we are creating and string which represents the entire book and generating a list of characters. In line 23 we are filtering the text list by only keeping the letters defined in line 2.
So, once the text is loaded and preprocessed, we will go from having a text like this:
text = "The train rushed down the hill."to have a list of characters like this:
text = ['t','h','e',' ','t','r','a','i','n',' ','r','u','s','h','e','d',' ','d','o','w','n',
' ','t','h','e',' ','h','i','l','l']
Well, we already have the full text as a list of characters. As it’s well known, we cannot introduce raw characters directly to a neural network, we require a numerical representation, therefore, we need to transform each character to a numerical representation. For this, we are going to create a dictionary which will help us to save the equivalence “character-index” and “index-character”.
So, let’s do it!
As we can notice, in lines 11 and 12 the “char-index” and “index-char” dictionaries are created.
So far we have already shown how to load the text and save it in the form of a list of characters, we have also created a couple of dictionaries that will help us to encode-decode each character. Now, it is time to see how we will generate the sequences that will be introduced to the model. So, let’s go to the next section!
Sequence generation
The way in which the sequences are generated depends entirely on the type of model that we are going to implement. As already mentioned, we will use recurrent neural networks of the LSTM type, which receive data sequentially (time steps).
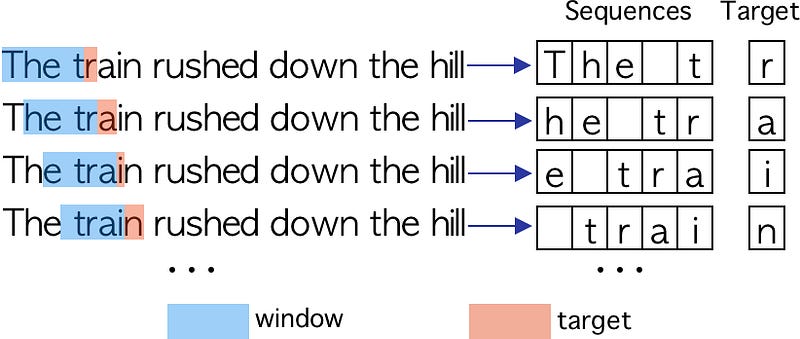
For our model, we need to form sequences of a given length which we will call “window”, where the character to predict (the target) will be the character next to the window. Each sequence will be made up of the characters included in the window. To form a sequence, the window is sliced one character to the right at a time. The character to predict will always be the character following the window. We can clearly see this process in Figure 1.
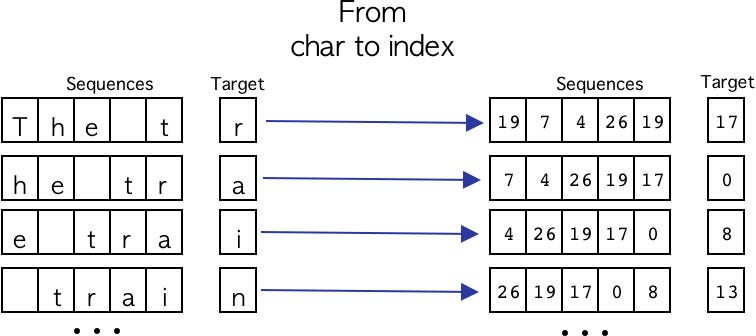
Well, so far we have seen how to generate the character sequences in a simple way. Now we need to transform each character to its respective numerical format, for this we will use the dictionary generated in the preprocessing phase. This process can be visualized in Figure 2.
Great, now we know how to generate the character sequences using a window that slides one character at a time and how we transform the characters into a numeric format, the following code snippet shows the process described.
Fantastic, now we know how to preprocess raw text, how to transform it into a list of characters and how to generate sequences in a numeric format. Now we go to the most interesting part, the model architecture.
Model architecture
As you already read in the title of this blog, we are going to make use of Bi-LSTM recurrent neural networks and standard LSTMs. Essentially, we make use of this type of neural network due to its great potential when working with sequential data, such as the case of text-type data. Likewise, there are a large number of articles that refer to the use of architectures based on recurrent neural networks (e.g. RNN, LSTM, GRU, Bi-LSTM, etc.) for text modeling, specifically for text generation [1, 2].
The architecture of the proposed neural network consists of an embedding layer followed by a Bi-LSTM as well as a LSTM layer. Right after, the latter LSTM is connected to a linear layer.
Methodology
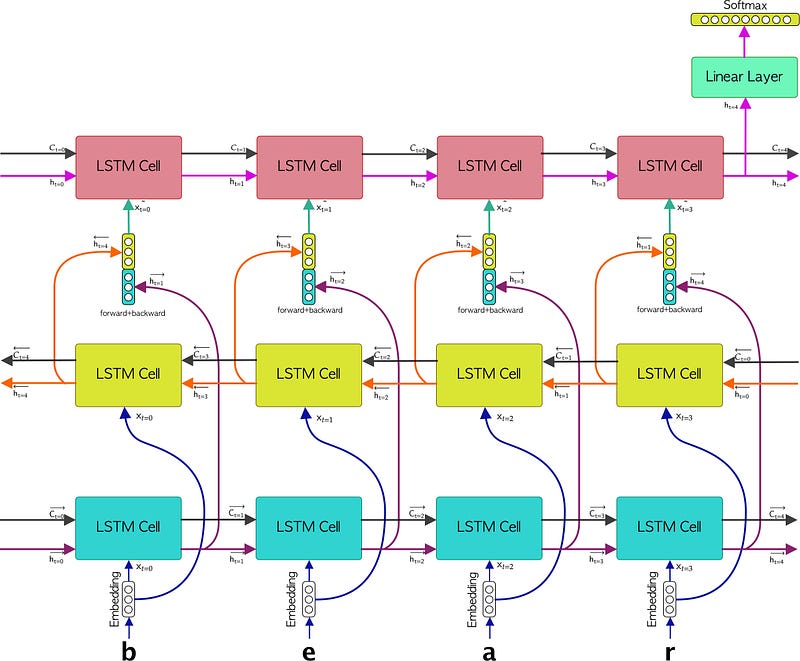
The methodology consists of passing each sequence of characters to the embedding layer, this to generate a representation in the form of a vector for each element that makes up the sequence, therefore we would be forming a sequence of embedded characters. Subsequently, each element of the sequence of embedded characters will be passed to the Bi-LSTM layer. Subsequently, a concatenation of each output of the LSTMs that make up the Bi-LSTM (the forward LSTM and the backward LSTM) will be generated. Right after, each forward + backward concatenated vector will be passed to the LSTM layer from which the last hidden state will be taken to feed the linear layer. This last linear layer will have as activation function a Softmax function in order to represent the probability of each character. Figure 3 show the described methodology.
Fantastic, so far we have already explained the architecture of the model for text generation as well as the implemented methodology. Now we need to know how to do all this with the PyTorch framework, but first, I would like to briefly explain how the Bi-LSTM and the LSTM work together to later see how we would do it in code, so let’s see how a Bi-LSTM network works.
Bi-LSTM & LSTM
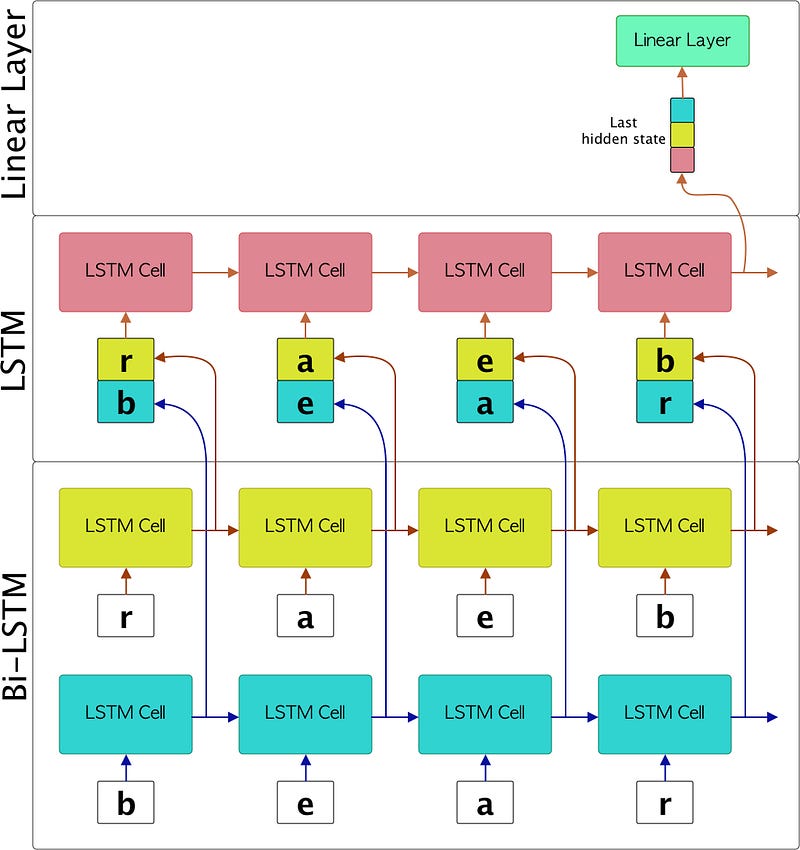
The key difference between a standard LSTM and a Bi-LSTM is that the Bi-LSTM is made up of 2 LSTMs, better known as “forward LSTM” and “backward LSTM”. Basically, the forward LSTM receives the sequence in the original order, while the backward LSTM receives the sequence in reverse. Subsequently and depending on what is intended to be done, each hidden state for each time step of both LSTMs can be joined or only the last states of both LSTMs will be operated. In the proposed model, we suggest joining both hidden states for each time step.
Perfect, now we understand the key difference between a Bi-LSTM and an LSTM. Going back to the example we are developing, Figure 4 represents the evolution of each sequence of characters when they are passed through the model.
Great, once everything about the interaction between Bi-LSTM and LSTM is clear, let’s see how we do this in code using only LSTMCells from the great PyTorch framework.
So, first let’s understand how we make the constructor of the TextGenerator class, let’s take a look at the following code snippet:
As we can see, from lines 6 to 10 we define the parameters that we will use to initialize each layer of the neural network. It is important to mention that input_size is equal to the size of the vocabulary (that is, the number of elements that our dictionary generated in the preprocessing contains). Likewise, the number of classes to be predicted is also the same size as the vocabulary and sequence_length refers to the size of the window.
On the other hand, in lines 20 and 21 we are defining the two LSTMCells that make up the Bi-LSTM (forward and backward). In line 24 we define the LSTMCell that will be fed with the output of the Bi-LSTM. It is important to mention that the hidden state size is double compared to the Bi-LSTM, this is because the output of the Bi-LSTM is concatenated. Later on line 27 we define the linear layer, which will be filtered later by the softmax function.
Once the constructor is defined, we need to create the tensors that will contain the cell state (cs) and hidden state (hs) for each LSTM. So, we proceed to do it as follows:
Fantastic, once the tensors that will contain the hidden state and cell state have been defined, it is time to show how the assembly of the entire architecture is done, let’s go for it!
First, let’s take a look at the following code snippet:
For a better understanding, we are going to explain the assembly with some defined values, in such a way that we can understand how each tensor is passed from one layer to another. So say we have:
batch_size = 64
hidden_size = 128
sequence_len = 100
num_classes = 27
so the x input tensor will have a shape:
# torch.Size([batch_size, sequence_len])
x : torch.Size([64, 100])
then, in line 2 is passed the x tensor through the embedding layer, so the output would have a size:
# torch.Size([batch_size, sequence_len, hidden_size])
x_embedded : torch.Size([64, 100, 128])
It is important to notice that in line 5 we are reshaping the x_embedded tensor. This is because we need to have the sequence length as the first dimension, essentially because in the Bi-LSTM we will iterate over each sequence, so the reshaped tensor will have a shape:
# torch.Size([sequence_len, batch_size, hidden_size])
x_embedded_reshaped : torch.Size([100, 64, 128])
Right after, in lines 7 and 8 the forward and backward lists are defined. There we will store the hidden states of the Bi-LSTM.
So it’s time to feed the Bi-LSTM. First, in line 12 we are iterating over forward LSTM, we are also saving the hidden states of each time step (hs_forward). In line 19 we are iterating over the backward LSTM, at the same time we are saving the hidden states of each time step (hs_backward). You can notice that the loop is done in the same sequence, the difference is that it’s read in reversed form. Each hidden state will have the following shape:
# hs_forward : torch.Size([batch_size, hidden_size])
hs_forward : torch.Size([64, 128])
# hs_backward : torch.Size([batch_size, hidden_size])
hs_backward: torch.Size([64, 128])Great, now let’s see how to feed the latest LSTM layer. For this, we make use of the forward and backward lists. In line 26 we are iterating through each hidden state corresponding to forward and backward which are concatenated in line 27. It is important to note that by concatenating both hidden states, the dimension of the tensor will increase 2X, that is, the tensor will have the following shape:
# input_tesor : torch.Size([bathc_size, hidden_size * 2])
input_tensor : torch.Size([64, 256])
Finally, the LSTM will return a hidden state of size:
# last_hidden_state: torch.Size([batch_size, num_classes])
last_hidden_state: torch.Size([64, 27])
At the very end, the last hidden state of the LSTM will be passed through a linear layer, as shown on line 31. So, the complete forward function is shown in the following code snippet:
Congratulations! Up to this point we already know how to assemble the neural networks using LSTMCell in PyTorch. Now it’s time to see how we do the training phase, so let’s move on to the next section.
Training phase
Great, we’ve come to training. To perform the training we need to initialize the model and the optimizer, later we need to iterate for each epoch and for each mini-batch, so let’s do it!
Once the model is trained, we will need to save the weights of the neural network to later use them to generate text. For this we have two options, the first is to define a fixed number of epochs and then save the weights, the second is to determine a stop function to obtain the best version of the model. In this particular case, we are going to opt for the first option. After training the model under a certain number of epochs, we save the weights as follows:
Perfect, up to this point we have already seen how to train the text generator and how to save the weights, now we are going to the top part of this blog, the text generation! So let’s go to the next section.
Text generation
Fantastic, we have reached the final part of the blog, the text generation. For this, we need to do two things: the first is to load the trained weights and the second is to take a random sample from the set of sequences as the pattern to start generating the next character. So let’s take a look at the following code snippet:
So, by training the model under the following characteristics:
window : 100
epochs : 50
hidden_dim : 128
batch_size : 128
learning_rate : 0.001
we can generate the following:
Seed:
one of the prairie swellswhich gave a little wider view than most of them jack saw quite close to the
Prediction:
one of the prairie swellswhich gave a little wider view than most of them jack saw quite close to the wnd banngessejang boffff we outheaedd we band r hes tller a reacarof t t alethe ngothered uhe th wengaco ack fof ace ca e s alee bin cacotee tharss th band fofoutod we we ins sange trre anca y w farer we sewigalfetwher d e we n s shed pack wngaingh tthe we the we javes t supun f the har man bllle s ng ou y anghe ond we nd ba a she t t anthendwe wn me anom ly tceaig t i isesw arawns t d ks wao thalac tharr jad d anongive where the awe w we he is ma mie cack seat sesant sns t imes hethof riges we he d ooushe he hang out f t thu inong bll llveco we see s the he haa is s igg merin ishe d t san wack owhe o or th we sbe se we we inange t ts wan br seyomanthe harntho thengn th me ny we ke in acor offff of wan s arghe we t angorro the wand be thing a sth t tha alelllll willllsse of s wed w brstougof bage orore he anthesww were ofawe ce qur the he sbaing tthe bytondece nd t llllifsffo acke o t in ir me hedlff scewant pi t bri pi owasem the awh thorathas th we hed ofainginictoplid we meAs we can see, the generated text may not make any sense, however there are some words and phrases that seem to form an idea, for example:
we, band, pack, the, man, where, he, hang, out, be, thing, me, wereCongratulations, we have reached the end of the blog!
Conclusion
Throughout this blog we have shown how to make an end-to-end model for text generation using PyTorch’s LSTMCell and implementing an architecture based on recurring neural networks LSTM and Bi-LSTM.
It is important to comment that the suggested model for text generation can be improved in different ways. Some suggested ideas would be to increase the size of the text corpus to be trained, increase the number of epochs as well as the memory size for each LSTM. On the other hand, we could think of an interesting architecture based on Convolutional-LSTM (maybe a topic for another blog).
References
[1] LSTM vs. GRU vs. Bidirectional RNN for script generation


