
TailwindCSS and Angular: It’s a Match! 💙
Or “Why I left Angular Material”

If you are looking for an article on how to set up TailwindCSS with Angular, take a look at here, it’s the complete guide:
I would rather here focus on the reasons that led me to leave Angular Material and choose a low-level UI framework like TailwindCSS.
We are not going to compare a Component Library (Angular Material) and a styling only library (Tailwind), but HOW they manage CSS and the impact of this management for our project.
This article does not want to discredit Angular Material. This UI Framework has its reason for being and I will explain why at the end of the article, for the decision making of your future UI Framework.
How it started ?
In the early days of my career as a web developer consultant, I often looked at Bootstrap. I really liked the concept of utility-class first.
However, I didn’t have much experience in design, UI, UX, … All of these were pretty obscure to me.
One day, a web designer called me up during my work and said: “Do you use Bootstrap? This utility-class first trend is really nonsense, and it is ugly! Believe me, we must follow the new recommendations, such as Material Design!”
Being a Junior at the time, I found it normal to listen to the advice of this colleague who had many years of experience behind him ...
Discovering Angular Material
So I started to use the components created by the Angular team. And the least we can say is that the development was faster.
If you’ve seen my previous posts, you’ll see that I’ve gone far enough into this UI framework to find out what’s behind it. Management of themes, customization of the different elements such as the MatTable, …
Despite the many benefits of Material that you are familiar with, we are gradually facing customization problems, and the difficulties to obtain a design close to us are piling up …
The start of the nightmare 😰
Why is it becoming difficult to customize the components with Material ?
In general, it’s not that big a problem. Angular Material provides a superb theming system that you can use throughout your application. It is quite easy to change the colors of your components.
But things get tough when you have to change small details in a component.
the devil is in the details
Two ways are available to us:
- Place your CSS in the root styles of your application
- in the component’s CSS. However, this approach can become problematic if that same component has dynamic elements that come later … forcing you to use tricks like
::ng-deep.
The bundle size 📦
Let’s take a look at the bundle size!
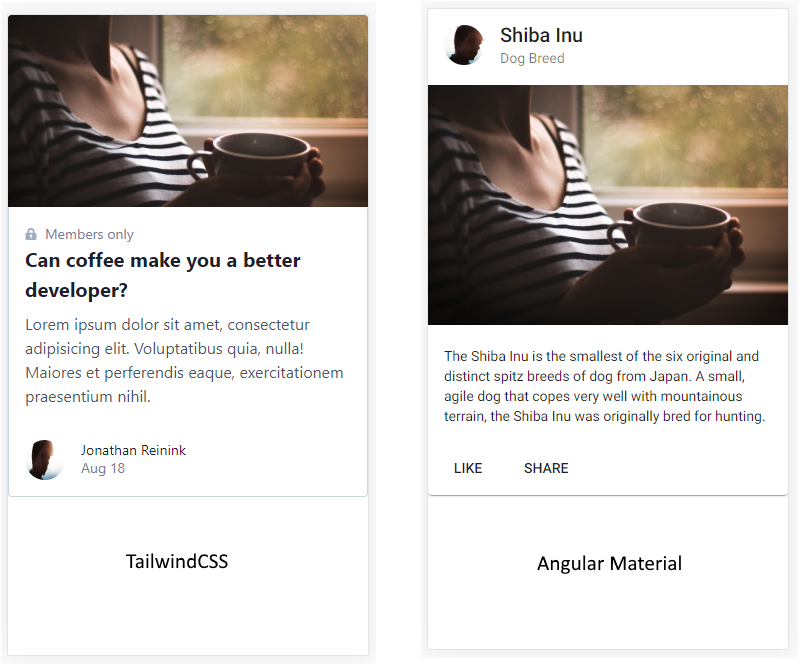
The Material and Tailwind approaches are completely different! One will style the components according to a guideline, and the other allows you to use a set of utility classes to create your own components.
Let’s start by creating a new, blank project, and test each UI framework to compare them.

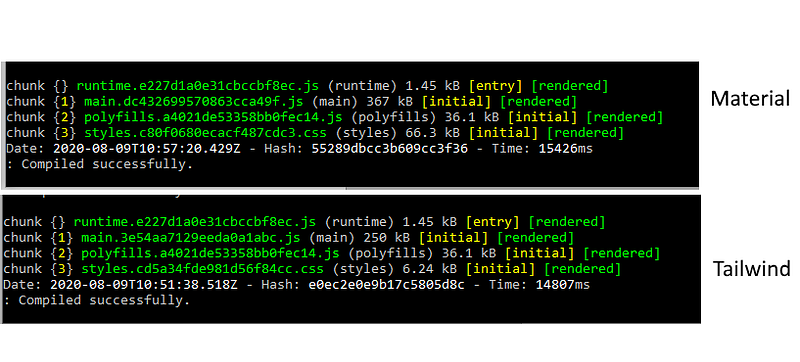
As you can see, the difference is simply huge. For the development part, Material has a very light size compared to TailwindCSS. And the reason is quite simple: styling each component independently, the size is quite small. in theory.
However, if TailwindCSS can seem very heavy, it is only because it is very rich. And fortunately for us, we are not going to exploit all this wealth! We take what we need, sometimes based on customer demand.
And TailwindCSS’s approach to production is a clear winner. It is difficult to exceed 10kb as explained by the creators of TailwindCSS. Different optimization techniques are even explained. A small bundle size results in a faster web page loading.
You win a point, Tailwind! 👍
Critical Rendering Path ?
Never heard about the CRP ? Still, this kind of concept should be known to us frontend developers. (Don’t worry, I only found out by chance … two years ago?)
Usually, we call the critical rendering path the computation time of the DOM rendering. Whenever there is a CSS modification for a DOM element, the step of calculating the CSSOM (yes, it exists) will repeat itself until the element is rendered. And it does this for every element of your DOM … Each new calculation of this CSSOM will lead to what is called a Render-blocking CSS. Using Lighthouse, you have surely already seen this point appear in red, which is not a good sign …
Optimizing this path will increase the speed of the first render of your web page!
As in our code, we are going to use a utility class set, it will be easier for us to see the elements that we are rewriting without realizing it. A quick glance in the Chrome Inspector (or whatever browser you use every day) will allow you to quickly find where the CSS has been rewritten, and therefore optimize the rendering calculation of the CSSOM.
For the case of Angular Material, you will already have a set of classes with well-defined names for each component. You will want to rewrite a part to make it conform to your design idea. This rewriting leads to recompute the CSSOM.
Useful links at the end of this article.
An example with Lighthouse 🔬
To give Tailwind and Material the same chances, I took the same assets. These two examples are taken from their respective official website. Still following everyone’s documentation, I prepared a setup for production. When I serve the files with the production config, this is what the console gives me as output:
And… The final results!
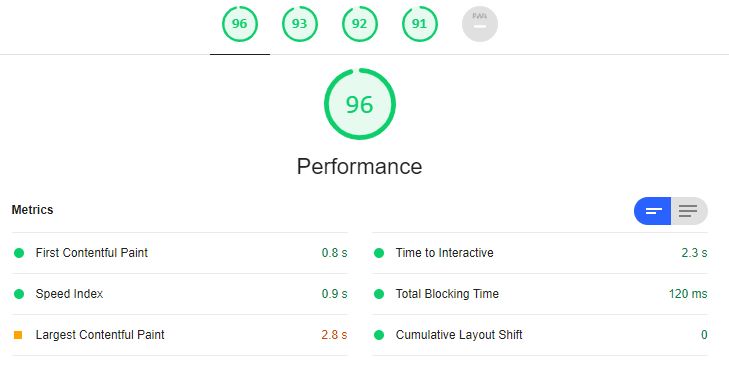
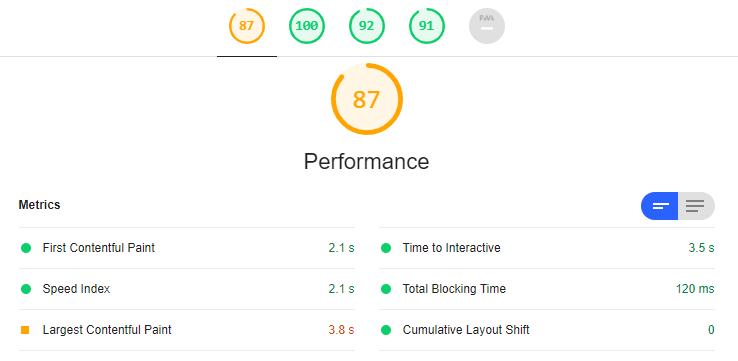
As we can see, with a small example, Tailwind gives better results for performance! We can see that Tailwind is able to give a performance twice as superior to Material! 🚀
Atomic CSS or a predefined guideline ? 🤔
Here is the true question of this article: Should you prefer to use the concepts of Atomic CSS (Utility-Classes) or follow the guidelines of Material?
It depends on what you want to accomplish.
If your client likes the way Material Design works, then take it and use Angular Material with eyes closed.
If, on the contrary, the design deviates from this guideline, and you need an application with a very specific look and feel, give TailwindCSS a chance. Also, if you like Angular Material components, you can very well use the @angular/cdk
End note ✏️
Take a look at all the articles about Atomic CSS. This approach to CSS can bring many benefits, and will definitely change the way you code. Kind of like when you get to Angular and learn RxJS.
In a future article, I will explain how to properly configure your Angular application in order to take advantage of this enormous potential that is Tailwind. Stay tuned!
EDIT: The article for the setup is live
Useful Links for TailwindCSS 🔗
- The complete guide to configure Tailwind in an Angular Application: https://readmedium.com/angular-configure-tailwindcss-6816f7cc6f8e
- Interesting resources: https://tailwindcss.com/resources
- List of articles concerning the Atomic CSS Approach: https://johnpolacek.github.io/the-case-for-atomic-css/
- For more info about Critical Path Rendering, I invite you to watch this free course on Udacity. https://classroom.udacity.com/courses/ud884
- Interesting discussion about Angular and Render-blocking CSS: https://github.com/angular/angular-cli/issues/17764
- ⭐️ TailwindCSS Awesome: https://github.com/aniftyco/awesome-tailwindcss


