
SwiftUI — You got this! Learn to build your first app — Part 1 of 3
SwiftUI is Apple’s new framework for making user interfaces. If you have ever built a web application using a declarative framework like React or Vue.js, you will feel right at home using SwiftUI. If not, you’re welcome too. This is part 1 of a 3 part series to teach you the basics of building an app to target iPhones and iPads. Read and follow along for some of the tips I’ve learned adopting SwiftUI for making apps.
In part 1, we will go over the basics to get your environment set up to build your first app. We will build our UI using SwiftUI for a music app. You need an Apple Developer account to create apps on the Apple ecosystem. Apple explains how to set up an account better than I can; go to the Apple Developer Program for details on how to get an account. Once you have an account, continue with this tutorial.
Apple released SwiftUI during WWDC19, and there are some really good videos from the conference that you can watch to get Apple’s viewpoint on how to use their newest framework. For my series here, you benefit from my interpretations on how to build with SwiftUI. I have included all of the source files in a github repo that you can can clone and use to follow along. There will be 2 folders for each part of the series: 1) for the base project to code along with me and 2) the completed project for the tutorial step which you can refer to if you get lost along the way. I hope you will code each step because that is really the best way to learn this stuff. You can find the repo here; the beginning project is in the step1-create_ui/ directory.
Part 1 — Building the UI for the app
We are going to build a music app to display our top music albums along with providing details about the album and artist. Our music app will have two main views. One lists Albums and the second will be a detail view on a selected album. In UI terms, we are creating a master-detail relationship.
Here are the goals for this step in the series:
- Create a project that uses SwiftUI
- Create two views using SwiftUI to match the design provided to us by our designer (i.e. me)
- Add Interaction between the views
That’s it. We will center our learning around accomplishing these two tasks. Along the way, I will teach you some concepts and tips that will help make building your next app easier on your own. Let’s get started!
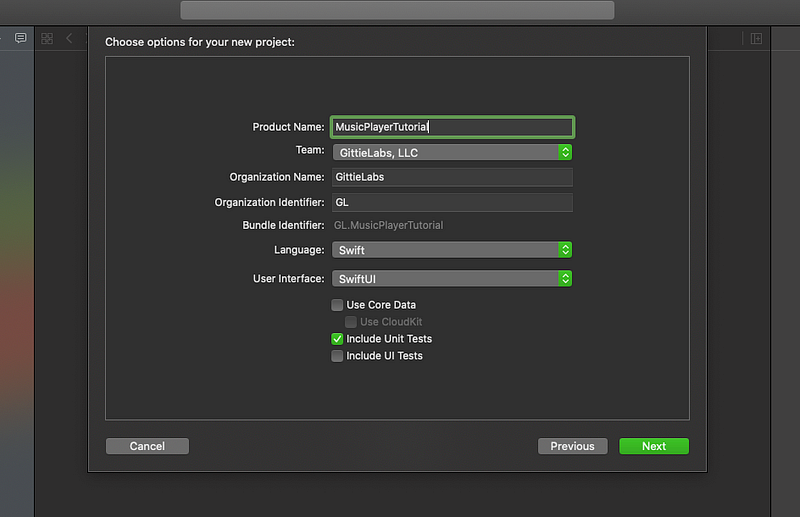
Fire up Xcode and create a New Project. Select the Single View App.

Give the project a name and select SwiftUI as the user interface option. Click Next and select a place to save your project. Finally, click Create and your project scaffold will be created.
Here is a quick breakdown of the files we have so far when you look at the project navigator, which is located on the far left side of Xcode’s interface.
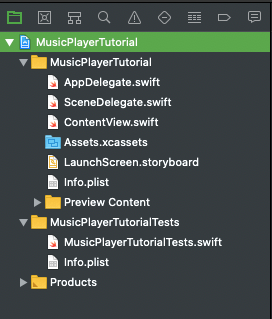
AppDelegate.swift — This is the entry point into our application. This file manages the application’s shared behavior including some of its interactions with the system. For now, you can ignore this file since we won’t use it in part 1 of our tutorial.
ContentView.swift — This is our initial SwiftUI view file. It’s where we declaratively describe what our view should look like. To begin with, we have two structs defined for us. ContentView conforms to the View protocol and defines our view. ContentView_Previews conforms to the PreviewProvider protocol and controls our preview of ContentView above. We will spend our time in this file defining our interface.
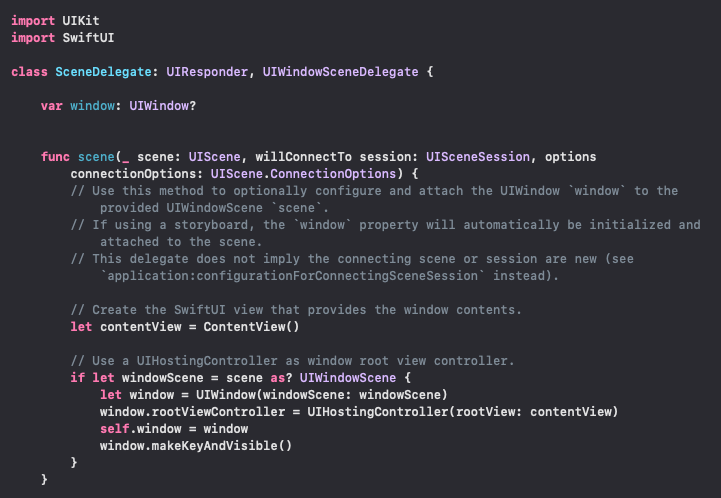
SceneDelegate.swift — At this point, you might be curious how we actually get our view to display on our app. Well, the SceneDelegate.swift handles that for us. When the function in our screenshot is called by the system, it responds with a UIHostingController that hosts the ContentView on screen. We can also ignore this file for part 1 of our tutorial.
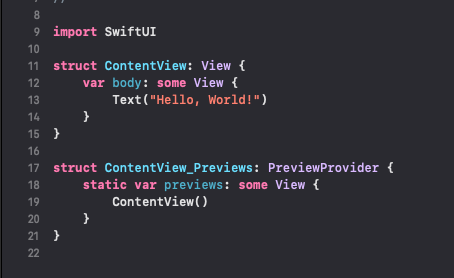
Now with the introductory things out of the way, let’s build the app and see what we have. Switch to the ContentView.swift file to make it active. Then press the Resume button in the canvas to build and display a preview. If you don’t see the canvas, display it by selecting Editor > Editor and Canvas. Wow, we have a very simple declaration that adds, “Hello, World!” to our view!

In order to keep the length of this tutorial manageable, please refer to Apple’s excellent documentation on the very basic elements of SwiftUI. The rest of this tutorial is geared toward creating more complicated UI using SwiftUI. What is mind blowing is that to create our proposed UI for this tutortial prior to SwiftUI, you would have used Storyboards and Viewcontrollers and the whole process would have taken hours to get right. Thankfully, with SwiftUI all of that is now in our past!
Building the Album List View
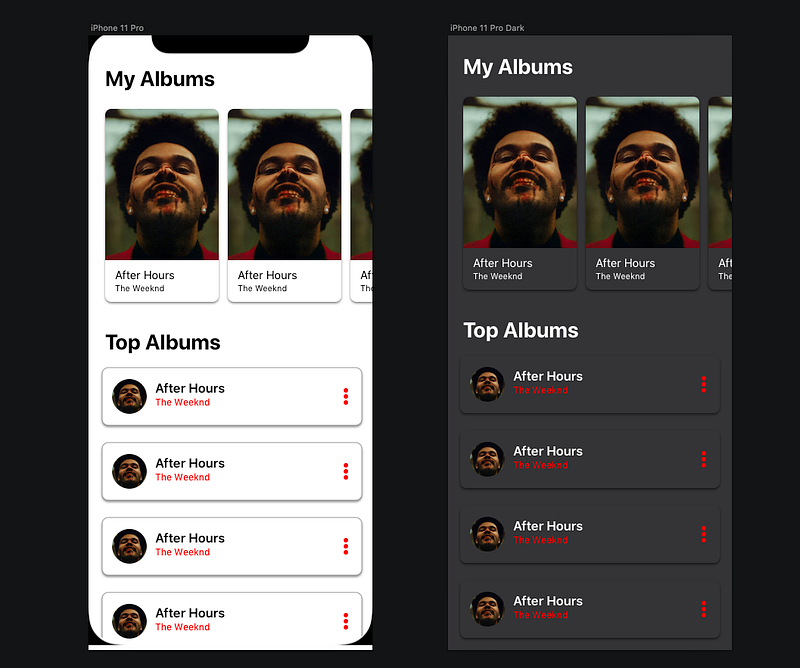
I created a mockup of the UI using Sketch. See below for our Album List view.
Ready? Let’s start to see how we can create our first view. First, let’s change the name of ContentView.swift file to AlbumListView.swift. We can use the Rename action under the Refactor context menu. This action will change all of the references in our project including the file name.

Let’s now change the Text view from, “Hello, World!” to say, “My Albums.” The change should display automatically in the canvas. If yours didn’t change, check to see if the resume button is displayed. You need to rebuild the display by pressing that button. In most cases, you won’t have to do it and the changes will automatically display in the canvas preview. Amazing, Right?
With SwiftUI, it’s best to take a bottom up approach. What I mean by that is that we want to create our smallest element and layer siblings and then wrappers around those elements moving outward. Let’s start with creating the AlbumCard view, which will be the cards that we display in a horizontal ScrollView. Create a New SwiftUI View file and name it AlbumCard.swift. Copy the code below into this file, replacing the existing content.
We are going to back this view with data from an Album. Let’s create the Album class that will hold data on an album. Create a new Swift file and name it Album.swift. Replace the contents of this file with the code below. Our Album struct conforms to several protocols to allow it to be used in lists, which need to be able to uniquely identify each element.
Switch back to our AlbumCard, and let’s talk about what’s happening so far. At this point, we have a preview of the card to use in the “My Album” list.
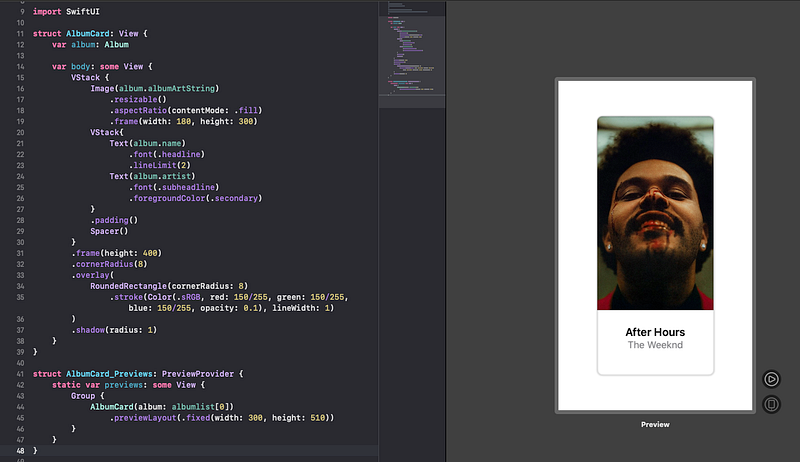
If you are familar with Flexbox for the web, this syntax will feel familar. We can create a vertical stack (think column) of elements using VStack and a horizontal stack (think row) of elements using HStack. Using these two container view types, we can compose simple and complex views. Our code above uses a VStack container view to create a vertical list composed of an Image view and another VStack container view. Inside the inner VStack, we have placed two Text objects. The rest of the code controls placement and appearance using attributes on each object. The key take away is that each of these objects is View which allows us to group or composite them in views that contain other views, building up a hierarchy that we can ultimately display.
The Image view that we create uses a string name to locate the image to display. This works because we have added our images to the Assets.xcassets bundle. If you are following along in code, you can find the images in an images folder along with the project. Drag the images from the folder over to the assets sidebar. After doing that, the images will display correctly.
Shifting focus now, look at the code that controls the preview of the AlbumCard. Our AlbumCard_Previews struct conforms to the PreviewProvider protocol, which allows us to create views we can display on our canvas. The default implementation displays our code inside of an iPhone. However, we want to display our view with a defined frame. Use the previewLayout function and pass it a fixed frame to specify the width and height of the displayed view. Finally, we wrap up our AlbumCard view with a Group container view to add multiple variations of the AlbumCard for preview. Our canvas can display as many variations as you choose to give it. That can be extremely handy for display a view in various states.
Switch back to the AlbumListView.swift file. Now we’ll use our AlbumCard to create a horizontal list of Albums. Replace the current code with the code below.
Our AlbumListView is composed of a ScrollView that holds an HStack container view with our AlbumCard views. We use ForEach to iterate over a list of Albums that we add to the HStack container. For now, we just use our test data array of Albums we defined in our Album.swift file. SwiftUI has a live view feature that lets us testdrive our view. Press the playbutton located at the bottom right side of our view in the canvas.
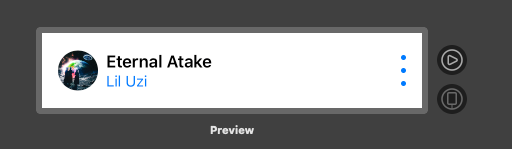
Now we need to create the title text and a VStack container to Albums vertically. Create a new SwiftUI View file and name it TopAlbumCard.swift. Replace the contents with the code below.
Our view uses an HStack container to lay out contents horizontally. Next, place and Image view and VStack container into the HStack container. I have added attributes to the image to read the image location from the Album instance along with making a clipping view using a circle as the mask. As for the album title and artist, use a VStack to stack them vertically and change their font properties to match the mockup. We also create a view to hold a more view (3 vertical dots) we will use as a button.
Switch back to the AlbumListView.swift file. We’ll now create the vertical list using our newly defined TopAlbumCard view. Replace the contents of the AlbumListView with the code below.
If you preview our view now, you see that we have a working scrollable view! We added a Text view with the title “Top Albums” and a VStack that holds a list of TopAlbumCard views. It’s amazing how little code our view needs to accomplish this.
Building the AlbumDetailView
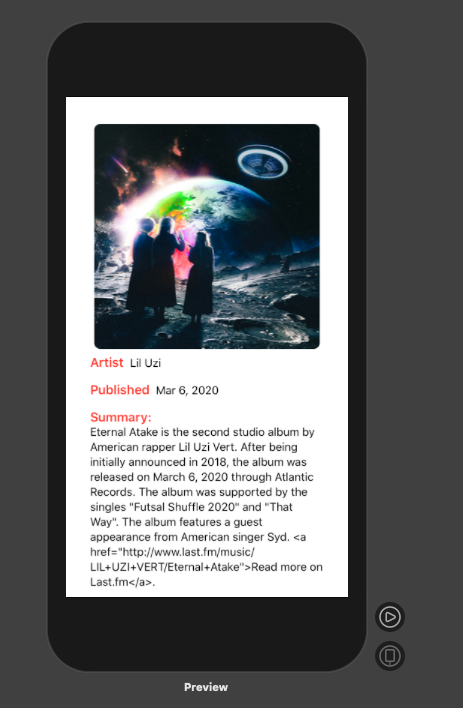
Hopefully you’re getting the hang of how to create views. Next let’s create a detail view to display info on each album and artist. Create a new SwiftUI View file and name it AlbumDetailView.swift. Replace the code with the code shown below.
There is nothing new here in terms of techniques. We are simply composing views using VStack and HStack container views. One element I should mention is the Spacer() view. This element consumes all of the available space in a view not occupied by other views. Try experimenting with its placement to see how it affects the space around the views in its container view.
Adding Navigation between our views
We are almost done with this Part 1 of our tutorial. We need to add navigation to our views so that we can see our detail view. Switch over to the AlbumViewList.swift file. We’ll wrap our existing view heirarchy inside of a NavigationView, which will allow us to add a navigation title and navigate between views. We need to add a navigationBarTitle with the text, “My Albums” to the child view of the NavigationView element. We also need to remove our Text (“My Albums”) element as we no longer need it.
Switch over to the AlbumCard.swift file. We are going to add a Read More link to navigate to our detail view. Add the following code under the Text(album.artist) view:
The NavigationLink view takes a destination view along with a closure for a view to serve as the owner of the link. Switch over to the TopAlbumCard.swift view so that we can add a link there as well. We are going to add our link to the MoreButtonView.
Switch back over to the AlbumListView.swift file to preview our work! You should have a complete UI now that allows for navigation between master and detail views.
Summary
In this part of our tutorial, we learned the basics of how to lay out views using SwiftUI. We dabbled a bit with adding data to back our views. Last, we added navigation to navigate between views. This was a fairly long tutorial, and we already covered a lot! In part 2, we will create bindings to our view and consume a webservice to add dynamic content. Thanks for reading! If this article was helpful to you please leave me a comment and share it with someone who might also find it interesting.


