
SwiftUI: Create a Sound Visualizer.
Using the built-in microphone, sample the sound level in dB to visualize it in SwiftUI.
This is what we are going to accomplish in this tutorial:
Getting Started
Create a new SwiftUI Project in Xcode. Make sure you’re running macOS Catalina and have Xcode 11 installed. (Allows you to use SwiftUI)
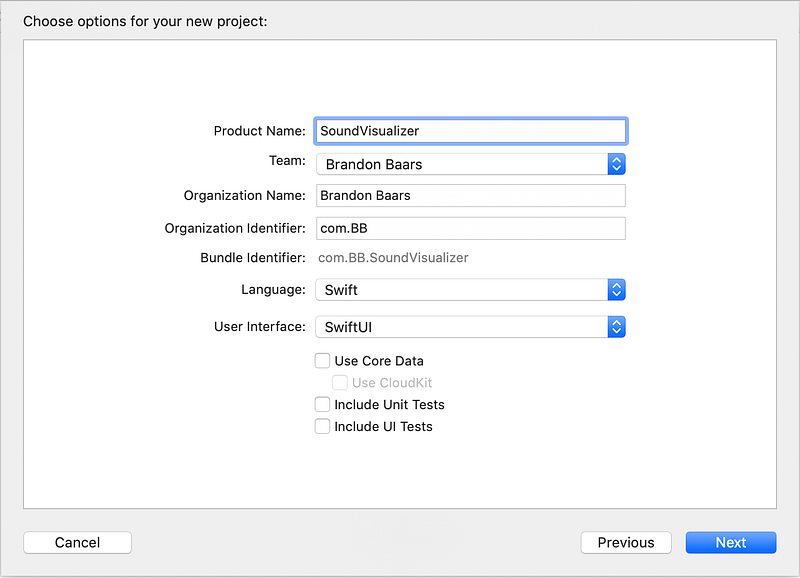
Open Xcode → File → New → Project → iOS → Single View App
Then hit next.
I called mine SoundVisualizer, but feel free to name it whatever you’d like.
Make sure you have User Interface set to SwiftUI.
How are we going to accomplish this?
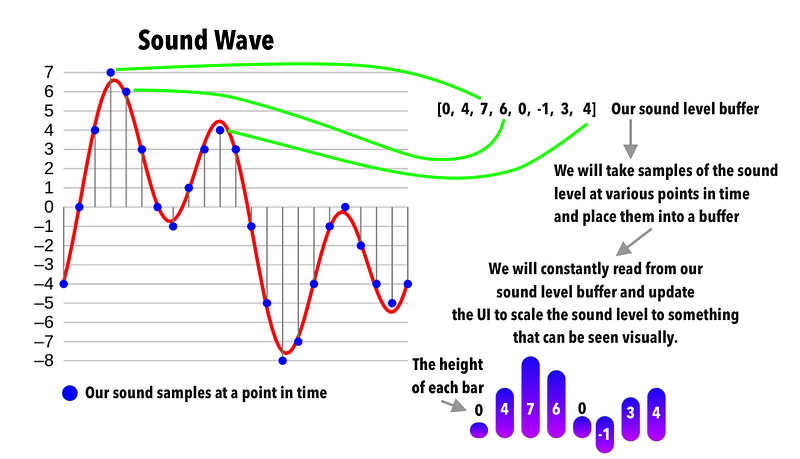
Imagine the red line above is our analog sound wave. Using Swift, we can capture the level of the sound at any given time. We then take various samples of our sound and store them in an array (buffer). Using this array, we can map it to our SwiftUI bar chart where the height is directly correlated to the sound received from the microphone!
Implementation
Let’s create a new Swift file. This swift file will hold the logic needed to capture the audio from our phone.
Create a new Swift file and name it MicrophoneMonitor.swift .
In this file, we’ll deal with the setup associated with ‘recording’ the audio from the user's phone as well as publishing when our sound level buffer changes.
We will set up our AVAudioSession and configure it to capture the sound levels every 0.01 seconds. (You can always change this value and play around with some to see how it affects the outcome of our project)
Add the following code to your MicrophoneMonitor.swift file:
- We set up our audio recorder and an optional timer. The timer will be configured later on and not within our init() so we make it optional. We also could have declared it as
private var timer: Timer!but it’s NOT guaranteed in this case that it will be instantiated. - We can mark our
soundSamplesan@Publishedso every time it changes it will publish that information and we can use it to update our UI. Since we’re using@Published, we must inherit fromObservableObjectlike we’re doing. - We set up our audio session and check to see if the privacy permission has been granted. If it hasn’t been granted, we request permission from the user. If they decline, we throw a
fatalError()since it’s required for this demonstration. It’s not good practice to throwfatalErrorsin production, but for this example, it’s meant to make sure you’re following the necessary steps. - Create our
urlfor where our audio recording will be ‘stored’. In this case, it’s more of a temp directory since we won’t actually be saving the audio recordings. We also needed to set up the necessary settings to record our microphone audio. - We create our
audioRecorderwith oururland our recorder settings. I won’t dive into detail in how this works necessarily, but this will allow us to play and record audio from the user's phone (Obvious, right?) - We start monitoring as soon as this object is initialized. We must make sure we call
audioRecorder.isMeteringEnabled = truebecause:
By default, audio level metering is off for an audio recorder. Because metering uses computing resources, turn it on only if you intend to use it.
In our case, we intend to use it. Why? Because we need audio-level metering to obtain the sound level.
7. By calling updateMeters() we are refreshing the average and peak power values for all channels of an audio recorder. This allows us to get the average power for our sound channel.
We also need to update our soundSamples to be whatever the audioPower() give us at that point in time.
Relating back to our image above, this is us putting our ‘blue dot’ samples into our buffer.
We then increment our current sample to the next value, and if we go over our current numberOfSamples, we loop back to 0.
8. Make sure we clean up our resources when this object is de-initialized.
Onward to SwiftUI
Now that we have our audio being able to be captured and publish its results, we can create a simple bar that we will replicate. This ‘bar’ will take in a value and that value will be directly related to its height!
Add this code to the bottom of ContentView.swift
- The value will a translated sound level to something our UI will recognize. For example, our ‘loudest’ sound would be equal to its maximum height.
- We will use a
RoundedRectanglewith a fill of aLinearGradient(for visuals of course) - We set our frame equal to the
width of our device — number of samples * 4. The 4 is our padding. So we’re essentially making the width equal to, however, many samples we want to show horizontally and account for the padding between them. Also, setting our height equal to our value.
Now let’s implement it to our ContentView.swift :
- We create our observedObject of our microphone monitor passing in 10 samples. (We want 10 bars to show horizontally on our device)
- Here we create a helper function that will take in our raw sound level (the level given to use from our microphone monitor). it’s worth noting that the sound we get back is between -160db and 0db. Where -160db is the quietest, and 0 is the loudest possible sound. We will convert it to a value between 0.1 and 25 (for the most part). We then want our
BarViewheight to be 300px so we then further translate it to go up to 300! - We create an
HStack()of ourBarView(Hence why we didCGFloat(numberOfSamples) * 4above). For each sound sample from ourMicrophoneMonitor, we create aBarViewwith ournormalizedSoundLevel.
Build and run
Did your app crash? It’s because we didn’t add the required privacy setting to our Info.plist.
Open Info.plist and add the following:

Now when you build and run make sure you allow microphone access and watch as the Bars change to the sound from the microphone.
Here is what the output should be:
Check out the full project on GitHub.


