
Swagger in Go: Why It’s the Genius Move You Haven’t Made Yet
Swagger in Go is often overlooked, but its simplicity in API documentation and design are truly transformative for our team.

We’re going to delve into the practical aspects of implementing Swagger in Go.
I’m proceeding with the assumption that you have some familiarity with Swagger, or at the very least, a basic grasp of its concepts. For those who are encountering Swagger for the first time, let me give you a quick overview:
“Swagger is a tool that helps people understand and use our server by creating clear documentation for them. It shows all the ways an API can be used, making it easier for developers to build and connect software”.
1. Bootstrapping
To kick things off, we need to set up Swagger.
I’ll be using the Echo framework as a primary example. Still, the steps are quite similar if you’re working with other frameworks like Gin, Buffalo, net/http, Gorilla/mux, Fiber, etc.
Step 1: Installing the Swag tool
Our first step involves installing the Swag tool, which is essential for generating Swagger documentation.
Execute this command in your terminal:
go install github.com/swaggo/swag/cmd/swag@latest
Step 2: Integrating the middleware
Now, let’s focus on integrating the Swagger middleware and for those using Echo, you’ll need the echo-swagger middleware. Here’s how to install it:
$ go get -u github.com/swaggo/echo-swaggerimport (
"github.com/labstack/echo/v4"
echoSwagger "github.com/swaggo/echo-swagger"
)
func main() {
e := echo.New()
e.GET("/swagger/*", echoSwagger.WrapHandler)
e.Logger.Fatal(e.Start(":1323"))
}If you’re working with the Gin framework, the approach is quite similar, but you’ll use the gin-swagger middleware instead:
$ go get -u github.com/swaggo/gin-swagger
import (
    "github.com/gin-gonic/gin"
    ginSwagger "github.com/swaggo/gin-swagger"
    "github.com/swaggo/gin-swagger/swaggerFiles"
)

func main() {
    r := gin.New()
    r.GET("/swagger/*any", ginSwagger.WrapHandler(swaggerFiles.Handler))
    r.Run()
}
Step 3: Add comments to your code
Next, we’ll focus on annotating main.go to facilitate Swagger documentation. It’s most practical to place these annotations above of the main() function.
// Swagger
//
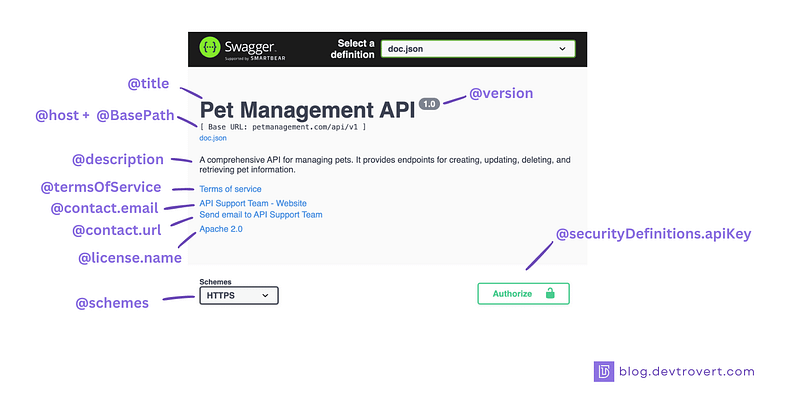
// @title Pet Management API
// @version 1.0
// @description A comprehensive API for managing pets, offering endpoints for creation, update, deletion, and retrieval of pet data.
// @termsOfService http://petmanagement.com/terms
// @contact.name API Support Team
// @contact.url http://petmanagement.com/support
// @contact.email [email protected]
// @license.name Apache 2.0
// @license.url http://www.apache.org/licenses/LICENSE-2.0.html
// @host petmanagement.com
// @BasePath /api/v1
// @schemes http https
// @securityDefinitions.apiKey JWT
// @in header
// @name Authorization
// @description JWT security accessToken. Please add it in the format "Bearer {AccessToken}" to authorize your requests.I prefer to start with “// Swagger” and use “//” right below it to indicate breaks between title and custom annotations like Swagger.
“Why?”
The gofmt tool is designed to automatically format your code, including comments, according to a set standard. This is particularly true for “doc comments”, which are comments placed above functions, types, and similar constructs.
When it comes to Swagger annotations, gofmt can sometimes reformat them in a way that detracts from their clarity and readability:
// @title   Pet Management API
// @version  1.0
// @description A comprehensive API for managing pets. It provides endpoints for creating, updating, deleting, and retrieving pet information.
// @termsOfService http://petmanagement.com/terms
// @contact.name API Support Team
// @contact.url http://petmanagement.com/support
The annotations might get reformatted by gofmt, leading to a layout that’s harder to follow.
Step 4: Generate swagger docs
Ok, let’s generate the Swagger documentation:
$ swag init
$ swag fmt # format the comments
The swag init command is the workhorse here, creating the documentation, while swag fmt helps in organizing our comments neatly.
Post-execution, you’ll notice a new ./docs folder in your project, containing docs.go, swagger.json, and swagger.yaml. Typically, docs.go is the only file you'll need, if you prefer to skip generating JSON and YAML files, use --outputType go.
Then, include the docs.go file in your main.go for proper initialization:
import _ "yourproject/docs"Note: In Go, the _ import signifies that the package is being imported solely for its initialization side effects.
Launch your server, and your Swagger documentation should be accessible at http://localhost:1323/swagger/index.html (or your custom host/ port).
Although this might seem like a lot to absorb for a straightforward guide, it’s crucial to be aware of the various options Swagger offers. For those new to Swagger, here’s a brief explanation of each annotation:
@title: Names your API, in this case, "Pet Management API."@version: Indicates the current version of your API.@description: Provides a summary of what your API does, such as managing pet information.@termsOfService,@contact.name,@contact.url,@contact.email: These are for contact details and terms of service links.@license.name,@license.url: Information about the API's license.@host: The main web address of your API, here "petmanagement.com."@BasePath: The root path for accessing your API, like "/api/v1."@schemes: The protocols your API uses, for example, "https" and "http."@securityDefinitions.apiKey,@in,@name,@description: These annotations provide details on API security and usage instructions.
2. Define the API
Crafting the API specification is a process that builds upon the foundational API annotations we’ve already covered.
Consider a simple example: an API that fetches all pets in our database.
type Pet struct {
ID int `json:"id"`
Name string `json:"name"`
Species string `json:"species"`
}
// getPetByID godoc
//
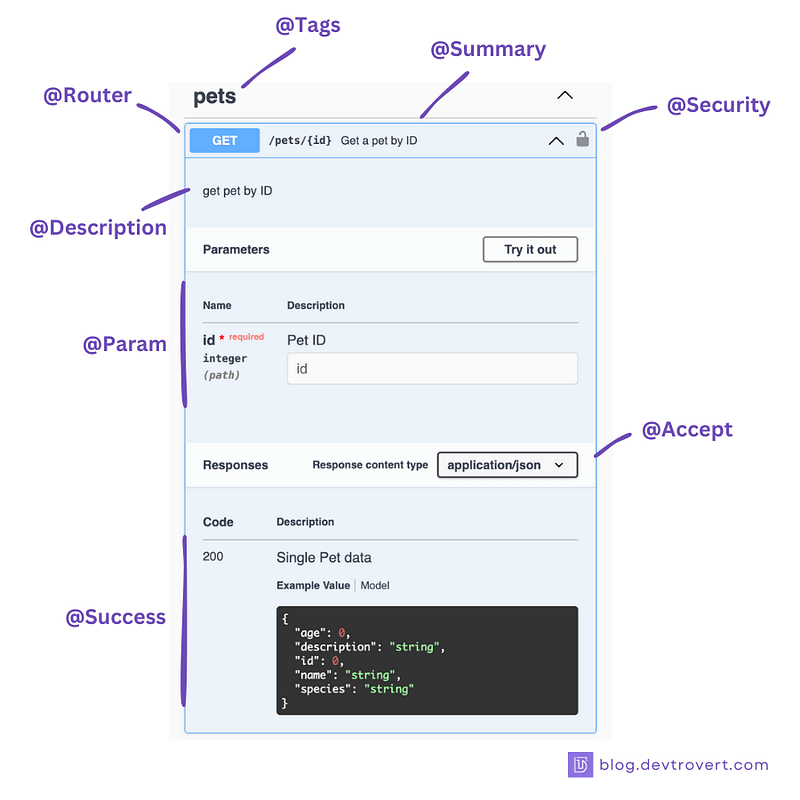
// @Summary Get a pet by ID
// @Description Retrieve pet details using its ID
// @Tags pets
// @Accept json
// @Produce json
// @Security JWT
// @Param id path int true "Pet ID"
// @Success 200 {object} Pet "Details of the pet"
// @Router /pets/{id} [get]
func getPetByID(c echo.Context) error {
// Implement logic to return a pet by ID
return c.JSON(http.StatusOK, Pet{})
}
func main() {
e := echo.New()
e.GET("/pets/:id", getPetByID)
e.GET("/swagger/*", echoSwagger.WrapHandler)
e.Logger.Fatal(e.Start(":8081"))
}After implementing this, regenerate the documentation with $ swag init and restart your server to reflect the changes.
Let’s decode each annotation:
@Summary: Provides a concise description of the API's functionality, like "Get a pet by ID."@Description: Offers a more detailed explanation of the function's purpose.@Tags: Helps in categorizing API endpoints. Here, "pets" associates this endpoint with other pet-related operations.@Accept: Specifies the acceptable content types, such as JSON.@Produce: Indicates the content type that the API returns. Here, it's set to respond with JSON.@Security: Details the security mechanism for the endpoint. "JWT" signifies that access requires a valid JSON Web Token.@Param: Describes the expected parameters. For instance, "id" is a required integer parameter in the URL path, representing the pet's ID.@Success: Outlines the API's successful response. "200" is the HTTP status code for success, {object} Pet describes the response structure, and "Details of the pet" briefly explains what the response contains.@Router: Defines the API's route (URL path) and method. Here, /pets/{id} is the route, and [get] is the method.
Swagger not only interprets these annotations but also uses the Pet struct to construct a corresponding model. We’ll explore how to further refine and enhance these model details later.

3. Customizing Swagger for different environments
Swagger annotations are typically static and compiled beforehand.
It’s still possible to tweak certain elements like the host, basePath, schemes, and security configurations dynamically, adapting them to various environments such as development or production.
In the docs.go file, created by $ swag init, you'll find the SwaggerInfo struct, it's crucial for these runtime adjustments.
// SwaggerInfo holds configurations generated by Swag CLI.
var SwaggerInfo = &swag.Spec{
    Version:          "1.0",
    Host:             "petmanagement.com",
    BasePath:         "/api/v1",
    Schemes:          []string{"http", "https"},
    Title:            "Pet Management API",
    Description:      "A comprehensive API for managing pets, including endpoints for creation, update, deletion, and retrieval of pet data.",
    InfoInstanceName: "swagger",
    SwaggerTemplate:  docTemplate,
    LeftDelim:        "{{",
    RightDelim:       "}}",
}
Imagine you need to modify the host and schemes based on the environment, say local or production, you’d update the SwaggerInfo struct like this:
// Custom modification
if isLocal {
    docs.SwaggerInfo.Host = "localhost:8081"
    docs.SwaggerInfo.Schemes = []string{"http"}
}
Beyond these runtime tweaks, the Swagger UI offers a range of configuration options to improve your API documentation’s functionality.
e.GET(
	"/swagger/*",
	echoswagger.EchoWrapHandler(
		echoswagger.PersistAuthorization(true),
	),
)
Here are some noteworthy options:
URL: Specifies the location of your API definition. If your API definition is hosted elsewhere, you can point to it here. By default, it's ["doc.json", "doc.yaml"], but this doesn't relate to the swagger.json and swagger.yaml in the docs folder.DocExpansion(default: "list"): Manages how the API routes and tags are displayed in the Swagger UI. The default "list" setting expands only the tags. Other settings include "full" (expands tags and operations) and "none" (doesn't expand anything).DeepLinking(default: true): Enables creating direct links to specific sections of your Swagger documentation, handy for direct references or sharing.DefaultModelsExpandDepth(default: 1): Determines how deeply the model schemas are expanded by default in the documentation. Setting it to -1 hides the models entirely from the UI.InstanceName(default: "Swagger"): Particularly useful when you have multiple Swagger documents on the same router. It prevents conflicts by giving each Swagger instance a distinct name.PersistAuthorization(default: false): Retains authorization data (like API keys or OAuth tokens) in the browser session, sparing you from re-entering it upon every page reload.Oauth2DefaultClientID(default: ""): If your API uses OAuth2 for authorization, this option pre-fills the client_id field in the OAuth2 authorization dialog, streamlining testing or demonstrations.
4. Model
The Swagger UI automatically crafts models, examples, and detailed field information, including validations. Let’s delve into refining our models using Swagger-specific annotations and tags.
a. Description
Initially, we’ll augment our model with descriptive annotations. Consider this refined version of the Pet model, now annotated with comments:
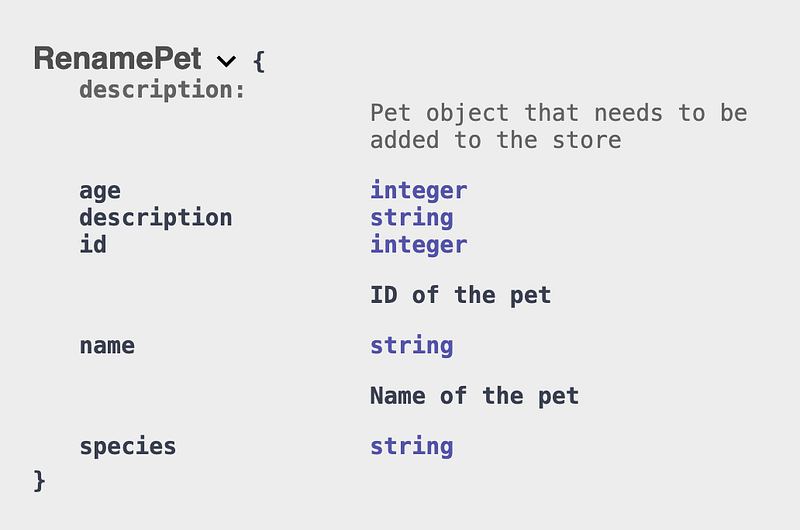
// Pet model info
//
//  @description    Pet object that needs
//  @description    to be added to the store
type Pet struct {
    // ID of the pet
    ID          int    `json:"id"`
    Name        string `json:"name"` // Name of the pet
    Species     string `json:"species"`
    Age         int    `json:"age"`
    Description string `json:"description"`
} //  @name   RenamePet
In this instance, we’ve made a few enhancements:
- Introduced a description for the model using @description.
- Altered the model’s display name with @name.
- Appended descriptions for individual fields.
Note that you can position the field’s description either directly above the field or immediately after it, both approaches are fine.
b. Struct tags
Swaggo allows the integration of straightforward validations (like length and required fields) and examples directly into each field, all through struct tags.
Below is the Pet struct, now enriched with various Swagger-specific struct tags. Descriptions are omitted for simplicity:
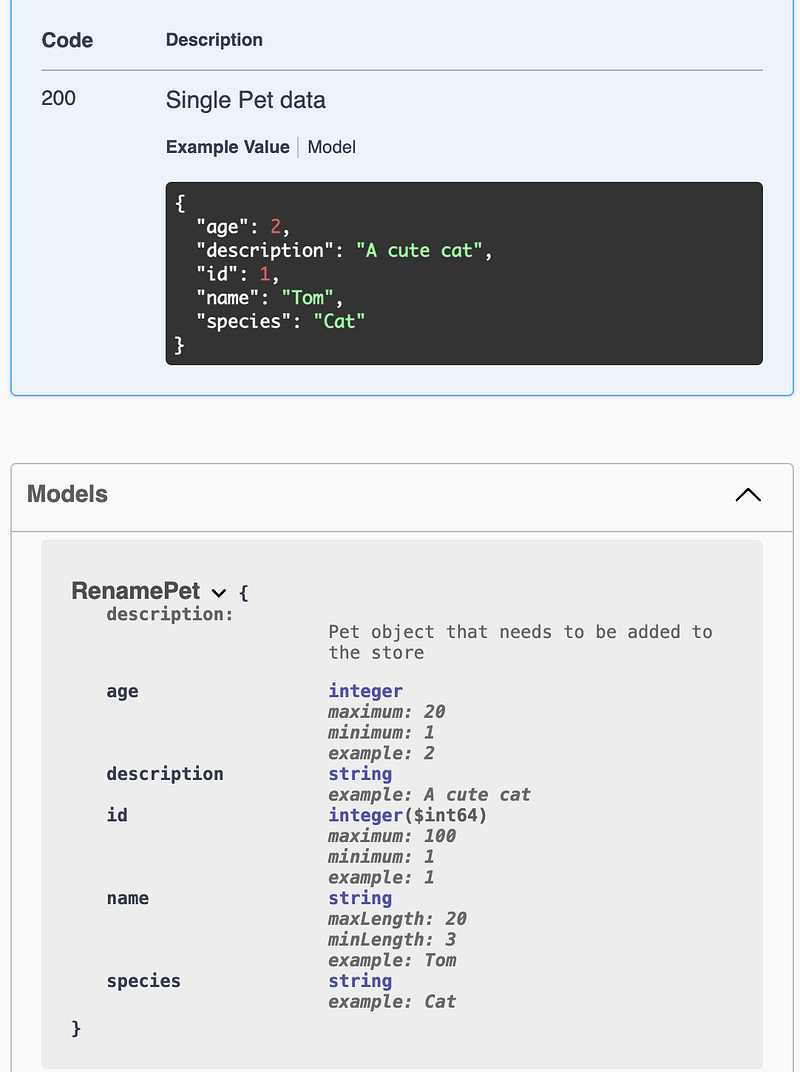
type Pet struct {
	ID          int    `json:"id" example:"1" format:"int64" minimum:"1" maximum:"100"`
	Name        string `json:"name" example:"Tom" minLength:"3" maxLength:"20"`
	Species     string `json:"species" example:"Cat"`
	Age         int    `json:"age" example:"2" minimum:"1" maximum:"20"`
	Description string `json:"description" example:"A cute cat"`
}
The example tag’s effect is instantly noticeable in the API section. Moreover, if this struct is part of a request, the field validations become active and enforceable within the Swagger UI.
Here’s a breakdown of the struct tag options:
default: Sets a default value for a field when none is provided by the client.example: Displays an example value in the swagger documentation.validate(string): Can be "required" or "optional".maximum, minimum (number): Sets the upper and lower bounds for numeric fields.maxLength, minLength (integer): Specifies the maximum and minimum lengths for string fields.multipleOf(number): Requires a numeric value to be a multiple of a specified number.enums(*): Enumerates all possible values for a field or an array element.format(string): Defines the field's format, like "date-time" for date fields.collectionFormat(array): Describes the array's format, options include csv (comma-separated), ssv (space-separated), tsv (tab-separated), pipes (pipe-separated), multi (multiple values in a single parameter), or default (the standard array format).swaggerignore(bool): If true, excludes the field from Swagger documentation.swaggertype(string): Specifies how a field should appear in Swagger docs. For instance, a time.Time field can be represented as a string using swaggertype:"string". This is also useful for types with custom UnmarshalJSON and MarshalJSON.extensions: Provides additional information or behaviors not covered by the standard OpenAPI Specification.
For predefined enums in your code, there’s no need to manually list possible values using the enums tag since Swaggo will automatically detect and generate these values.
type Species string

const (
  Cat Species = "Cat"
  Dog Species = "Dog"
)

type Pet struct {
  ID      int     `json:"id" example:"1" format:"int64" minimum:"1" maximum:"100"`
  Name    string  `json:"name" example:"Tom" minLength:"3" maxLength:"20"`
  Species Species `json:"species"`
}
Swaggo also selects the first detected enum value as an example and generates an additional model for it.

With this, we’ve covered the essential aspects and basics of Swaggo. For more detailed customization and advanced features, I recommend exploring the official documentation, available here.


