
Supplying Assets to the Compound Protocol
Quick Start Guide
The Compound Protocol is a series of interest rate markets running on the Ethereum blockchain. When users and applications supply an asset to the Compound Protocol, they begin earning a variable interest rate instantly. Interest accrues every Ethereum block (currently ~13 seconds), and users can withdraw their principal plus interest anytime.
Under the hood, users are contributing their assets to a large pool of liquidity (a “market”) that is available for other users to borrow, and they share in the interest that borrowers pay back to the pool.
When users supply assets, they receive cTokens from Compound in exchange. cTokens are ERC20 tokens that can be redeemed for their underlying assets at any time. As interest accrues to the assets supplied, cTokens are redeemable at an exchange rate (relative to the underlying asset) that constantly increases over time, based on the rate of interest earned by the underlying asset.
Non-technical users can interact with the Compound Protocol using an interface like Argent, Coinbase Wallet, or app.compound.finance; developers can create their own applications that interact with Compound’s smart contracts.
In this guide, we’re going to walk through supplying assets via Web3.js JSON RPC and via proxy smart contracts that live on the blockchain. These are two methods in which developers can write software to utilize the Compound Protocol.
There are examples in JavaScript and also Solidity.
Table of Contents for This Guide
- Compound Markets
- Connecting to the Ethereum Network
- Supplying on a Localhost Network
- Supplying on a Public Network
- How to Supply ETH to the protocol via Web3.js
- How to Supply a Supported ERC20 Token to the protocol via Solidity
If you are new to Ethereum, we suggest that you start by Setting up your Development Environment for Ethereum.
All of the code referenced in this guide can be found in this GitHub Repository: Quick Start: Supplying Assets to the Compound Protocol.
To copy the repository to your computer, run this on the command line after you’ve installed git:
git clone git@github.com:compound-developers/compound-supply-examples.gitCompound Markets
The Compound Protocol enables developers to build innovative products on DeFi. So far, we’ve seen crypto wallets equipped with savings APRs, a no-loss lottery system, an interest-earning system for donation income, and more.
The smart contracts that power the protocol are deployed to the Ethereum blockchain. This means that at the time of this guide’s writing, the only types of assets that Compound can support are Ether and ERC-20 tokens.
The currently supported assets are listed here https://compound.finance/markets. Based on the different implementation of Ether (ETH) and ERC-20 tokens, we have to utilize two similar processes:
- The ETH supply method
- The ERC20 token supply method
Like mentioned earlier, when someone supplies an asset to the protocol, they are given cTokens in exchange. The method for getting cETH is different from the method for getting cDAI, cUNI, or any other cToken for an ERC-20 asset. We’ll run through code examples and explanations for the two different asset supply methods.
When supplying Ether to the Compound protocol, an application can send ETH directly to the payable mint function in the cEther contract. Following that mint, cEther is minted for the wallet or contract that invoked the mint function. Remember that if you are calling this function from another smart contract, that contract needs a payable function in order to receive ETH when you redeem the cTokens later.
The operation is slightly different for cERC20 tokens. In order to mint cERC20 tokens, the invoking wallet or contract needs to first call the approve function on the underlying token’s contract. All ERC20 token contracts have an approve function.
The approval needs to indicate that the corresponding cToken contract is permitted to take up to the specified amount from the sender address. Subsequently, when the mint function is invoked, the cToken contract retrieves the indicated amount of underlying tokens from the sender address, based on the prior approve call.
Example code for each method (JS and Solidity) is available, open source, in the GitHub Repository linked above.
Connecting to the Ethereum Network
You will need to use the contract address for the particular network that you’re developing on; start by identifying the contract address for each network in the Docs. In this guide, we’ll create a fork of Mainnet, which will run on our localhost; copy the Mainnet addresses.
If you want to use a public test net (like Ropsten, Göerli, Kovan, or Rinkeby), make an Infura account at https://infura.io/ to get your API key. If you are using your own localhost test net, or the production mainnet, we will also use Infura.
If you are not hosting your own Ethereum node to access the blockchain, make an Infura account before continuing.
For more on connecting to a public Ethereum network, see the instructions in Setting up your Development Environment for Ethereum.
Supplying to the Compound Protocol on a Localhost Network
To run an Ethereum local test net on your machine, we will fork the Main network (a.k.a Homestead or Mainnet). This means that you can interact with the production smart contracts in a test environment. No real ETH will be used and no modifications to the production blockchain will occur. If you haven’t already, install Node.js. Click here to install the LTS of Node.js and NPM.
Let’s install all of the dependencies required by the project.
cd compound-supply-examples/
npm install
npm install -g npx## or for yarn fans:
## yarn install
## yarn add global npxThis will install all of the dependencies listed in the package.json file, as well as a CLI tool called npx.
Run this command in a second command line window before you start running the code referenced later in this guide. The command spins up a test Ethereum blockchain on your localhost. It also seeds your localhost account with ERC20 tokens referenced at the top of the script file. Be sure to add your Infura project ID and Ethereum mnemonic as environment variables beforehand.
## Set environment variables for the script to useexport MAINNET_PROVIDER_URL="https://mainnet.infura.io/v3/<YOUR INFURA PROJECT ID HERE>"export DEV_ETH_MNEMONIC="clutch captain shoe salt awake harvest setup primary inmate ugly among become"## Runs the Hardhat node locally
## Also seeds your first mnemonic account with test Ether and ERC20snode ./scripts/run-localhost-fork.jsThe script that we are running uses Hardhat to run an Ethereum node locally which has a fork of the history of Ethereum Mainnet. We have test Ether and test ERC-20 tokens that are seeded in the first account of the development mnemonic. Wait for the script logs to appear before continuing.
Running a hardhat localhost fork of mainnet at http://localhost:8545Impersonating address on localhost... 0x5d3a536E4D6DbD6114cc1Ead35777bAB948E3643
Impersonating address on localhost... 0x35a18000230da775cac24873d00ff85bccded550
Impersonating address on localhost... 0x39AA39c021dfbaE8faC545936693aC917d5E7563
Local test account successfully seeded with DAI
Local test account successfully seeded with UNI
Local test account successfully seeded with USDC
DAI amount in first localhost account wallet: 100
UNI amount in first localhost account wallet: 10
USDC amount in first localhost account wallet: 100Ready to test locally! To exit, hold Ctrl+C.To change the types of ERC-20 assets provided to the account, uncomment the lines in the amounts object near the top of the run-localhost-fork.js script.
Supplying to Compound on a Public Network
If you are supplying to the protocol on the Mainnet, Ropsten, Göerli, Kovan, or Rinkeby, you should have already located and copied the Compound contract address for that network (see how above). You’ll need it for later.
You also should have collected some ETH for that network by purchasing/mining (Main), or a test net’s faucet (all the others). This is not necessary when using a localhost fork.
For example, here is Ropsten’s faucet https://faucet.ropsten.be/. You can send yourself 1 ETH every 24 hours from a single IP address. This is test ETH that is only applicable to the Ropsten test network.
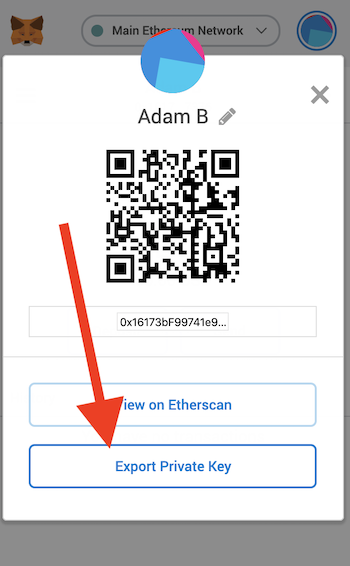
Next, copy and safely store your wallet’s private key. Don’t do this if you are only testing on your localhost. The private key is used to sign transactions that are sent on the Ethereum network. The purpose of this is to certify that the transaction was created and submitted by a unique wallet.
If you are using MetaMask for your Ethereum wallet, open the menu, click the 3 dots on the right, Account Details, Export Private Key, and input your MetaMask password. This will reveal your private key. Keep it safe! Copy this value and save it for later.
It is a best practice to store a test key like this as an environment variable on your local machine. When a key is stored as an environment variable, it can be referenced in code files by a variable name, instead of explicitly with a string. This promotes code cleanliness, and reduces the risk of exposing your secret.
Again, if you are only testing smart contracts on your localhost Hardhat node today, don’t get your MetaMask private key. We’ll rely on a private key that comes from your environment variable mnemonic (see instructions above).
How to Supply ETH to Compound via Web3.js
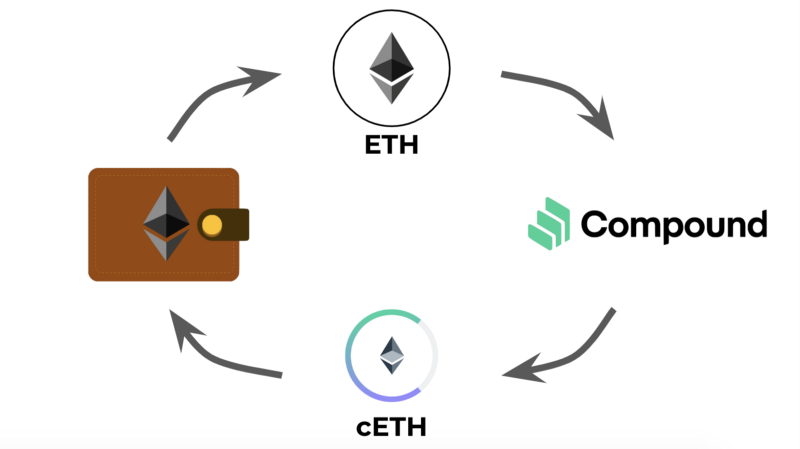
Supplying Ether (ETH) to the Compound Protocol is as easy as calling the “mint” function in the Compound cEther smart contract. The “mint” function transfers ETH to the Compound contract address, and mints cETH tokens. The cETH tokens are transferred to the wallet of the supplier.
Remember that the amount of ETH that can be exchanged for cETH increases every Ethereum block, which is about every 13 seconds. There is no minimum or maximum amount of time that suppliers need to keep their asset in the protocol. See the varying exchange rate for each cToken by clicking on one at https://compound.finance/markets.
For more information on cToken concepts see the cToken documentation.
In order to call the mint function, you need to first:
- Have ETH in your Ethereum wallet.
- Find your Ethereum wallet’s private key.
- Connect to the network via Infura API key (see above section Connecting to the Ethereum Network)
There are several programming languages that have Ethereum Web3 libraries, but the most popular at the time of this guide’s writing is JavaScript.
We’ll be using Node.js JavaScript to call the mint function. The following code snippets are from this Node.js file in the supplying assets guide GitHub Repository. Web browser JavaScript is nearly identical to these code examples.
Let’s import Web3.js, and initialize the Web3 object. It’s pointing to our localhost’s Hardhat node, which has 10000 test ETH in each of the test wallets. We get the same test wallet addresses every time we run a Hardhat node with the mnemonic environment variable (from the Connecting to the Ethereum Network section).
If you are using a public network (Ropsten, Kovan, etc.), make sure your wallet has ETH, and that you have your wallet private key stored as an environment variable. Also, have your Infura API key ready if you are deploying to a public test net.
Replace the HTTP provider URL in the Web3 declaration line with the appropriate network’s provider if you are not using the Hardhat test environment.
Next, we’ll add our wallet’s private key as a variable. It’s a best practice to access this as an environment variable.
If you are writing web browser JavaScript instead of Node.js, you can add the user’s private key to the Web3 object by using the ethereum.enable() command. Here is the alternative code snippet.
Next we’ll make some variables for the contract address and the contract ABI. The contract addresses are posted on this page: https://compound.finance/docs#networks. Remember to use the mainnet address if you are testing with Hardhat locally. The ABI is the same regardless of the Ethereum network that we are using.
The next section of code is where the magic happens. The first call in the main function supplies our ETH to the protocol by calling the mint function, which mints cETH. The cETH is transferred to our wallet address.
The three subsequent function calls are not necessary, but they are here for illustration. The first method calls a getter function in the Compound contract that shows how much underlying ETH our cToken balance entitles us to. The second function shows our wallet’s cToken balance. The third function gets the current exchange rate of cETH to ETH.
Our code sends 1 ETH to the contract, and gives our wallet cETH. The ratio of cETH to ETH should be in the ballpark of 50 to 1. Remember that the exchange rate of underlying to cToken increases over time.
Lastly, after the supply operation is complete, we’ll redeem our cTokens. This is what a user or application will do when they want to withdraw their crypto asset from the Compound protocol.
The first method, redeem, redeems based on the cToken amount passed to the function call.
The second method, redeemUnderlying, which is commented out, redeems ETH based on the amount passed to the function call.
Finally, we execute the main function and declare an error handler.
Here is the command for running the script from the root directory of the project:
node ./examples-js/web3-js/supply-eth.jsScript example output:
How to Supply a Supported ERC20 Token to Compound via Solidity
The following will run through an example of adding an ERC20 token to the Compound protocol using Solidity smart contracts. The full Solidity file can be found in the project GitHub repository.
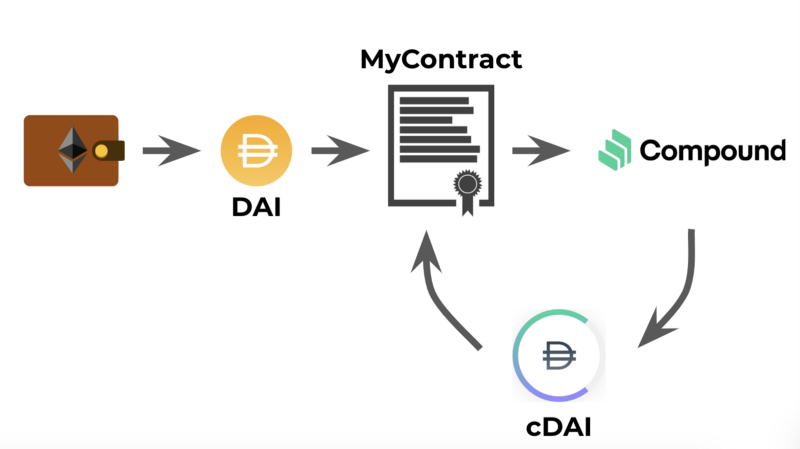
Here’s an overview of supplying a token to the Compound Protocol with Solidity:
Prerequisites
- Get some ETH into your own Ethereum wallet by purchasing/mining (or faucets on test nets). This will be used for gas costs. If you’re using Hardhat on localhost, you’re ready.
- Get some ERC20 token, in this case Dai. If you are working in the production environment, purchase some Dai for your Ethereum wallet. If you are working with a Hardhat test blockchain locally, your test wallet will receive some Dai when you run the run-localhost-fork.js script.
- Get the address of the ERC20 contract.
- Get the address of the Compound cToken contract. See Dai on this page: https://compound.finance/docs#networks.
Order of Operations
- You transfer Dai from your wallet to your custom contract. This is not done in Solidity, but instead with Web3.js and JSON RPC.
- You call your custom contract’s function for supplying to the Compound Protocol.
- Your custom contract’s function calls the approve function from the original ERC20 token contract. This allows an amount of the token to be withdrawn by cToken from your custom contract’s token balance.
- Your custom contract’s function calls the mint function in the Compound cToken contract.
- Finally, we call your custom contract’s function for redeeming, to get the ERC20 token back.
Let’s get started. First we’ll walk through the code in our Solidity file, MyContracts.sol.
We added contract interfaces. The first is for our ERC20 token contract, and the second is for Compound’s corresponding cToken contract.
We’ll be able to call the production versions of the 3rd party contracts using these definitions. We need to initialize them with the production address of the deployed contracts, which we pass to each of the functions in MyContract.
The first function in MyContract allows the caller to supply an ERC20 token to the Compound Protocol. We will need to pass the underlying contract address, the cToken contract address, and the number of tokens we want to supply.
The function first creates references to the production instances of Dai and cDAI contracts using our interface definitions.
Then the function logs the exchange rate and the supply rate. These calls are not necessary for supplying. They are there for illustration. You can see the amounts in the “events” output later in JavaScript.
Next, our function approves the transfer of ERC20 token from our contract’s address to Compound’s cToken contract using the approve method.
Finally, our contract calls the cToken contract mint function. This supplies some Dai to the protocol, and gives our custom contract a balance of cDAI.
After we have supplied some Dai, we can redeem it at any time. The following function shows how we can accomplish that in Solidity.
The redeemCErc20Tokens function allows the caller to redeem based on the amount of underlying or the amount of cTokens. This is indicated by calling the function with a boolean for redeem type; True for cToken, and false for underlying amount.
If there is an error with redeeming, the error code is logged using MyLog. Error codes for cToken contracts are described in the documentation.
Now that we have our code written, let’s run it!
Compiling
Hardhat has compilation as a simple command in the development environment. The compiler settings are configured in the hardhat.config.js file in the root directory of the project. Run the following command to compile the Solidity smart contracts in the contracts folder.
npx hardhat compileDeploying
Once you have deployed your contract, the script will log the new MyContract address.
npx hardhat run ./scripts/deploy.js --network localhostDeploying contracts with the account: 0xa0df350d2637096571F7A701CBc1C5fdE30dF76A
Account balance: 10000000000000000000000
MyContract address: 0x0Bb909b7c3817F8fB7188e8fbaA2763028956E30Copy this and save it for later. We’ll need it to call the smart contract’s function to supply Dai to Compound.
Executing
The Web3.js code that will invoke our custom smart contract can be found in the examples-solidity/ folder. Let’s run through the Web3.js supply-erc20.js script.
First, the script makes a Web3 object and points it to the blockchain network that we want to use to supply to Compound.
Next, we make a reference to our Ethereum wallet private key. This should be a wallet that has some ETH (for gas) and also Dai (to supply to Compound). Our script’s main function first transfers Dai from our wallet to MyContract.
Next, we make some references to MyContract, the Dai contract, and also the Compound cDAI contract.
Remember, the cToken contract addresses and ABIs can be found here: https://compound.finance/docs#networks, and MyContract’s address was logged when we deployed the contract.
Finally, we call our main function, which first transfers Dai from our wallet to MyContract.
Next we call the supplyErc20ToCompound function in MyContract, which sends 10 Dai to Compound in exchange for cDAI.
The next 2 function calls are not necessary for supplying. They illustrate how to get the balance of underlying ERC20 asset in the protocol and the amount of cTokens that MyContract now holds.
Lastly we call the redeemCErc20Tokens function in MyContract to redeem the cDAI for Dai. The example utilizes the redeem method by passing a cToken amount. Under that, there is a redeem underlying amount example, which is commented out.
Now we’re ready to run!
If you are running this on a public network, you’ll need to acquire Dai for that network.
To execute the script, navigate to the project root directory and run:
node ./examples-solidity/web3-js/supply-erc20.jsIf successful, the output of the script will show something like this:
Remember that this code will work with any of the ERC20 tokens that Compound supports. You will need to swap in the corresponding ERC20 token contract address and ABI into the JavaScript.
Thanks for reading! You are now able to supply assets to the Compound protocol using Solidity or JavaScript. We walked through supplying Ether, and also the supported ERC20 token assets. We can also redeem cTokens for those underlying assets later on. There are several code examples available in the Supply Examples GitHub repository.
The next key concept of developing a DApp with the Compound protocol is borrowing assets. Be sure to check out the next developer quick start guide: Borrowing Assets from the Compound Protocol.
Be sure to subscribe to the Compound Newsletter. Feel free to comment on this post, or get in touch in the #development room on our very active Discord server.


